Hosho

| Research price11000 exp |
| Purchase price1,000,000 |
| Hit Points31,000 |
| 140 mm/50 3rd Year Type on a single mount4 х 1 pcs. |
| Firing Range3.5 km. |
| Rate of Fire7.5 shots/min. |
| Reload Time8 sec. |
| HE Shell140 mm HE Type0 |
| Maximum HE Shell Damage2,400 |
| Initial HE Shell Velocity850 m./s. |
| Chance of Fire on Target Caused by HE Shell10 % |
| 13 mm/76 Type 93 on a twin mount6 х 2 pcs. |
| . . . Average Damage per Second12 |
| . . . Firing Range1.2 km. |
| Maximum Speed25 knot |
| Turning Circle Radius740 m. |
| Rudder Shift Time11.1 sec. |
| Surface Detectability Range8.56 km. |
| Air Detectability Range6.46 km. |

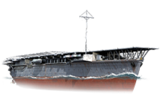
Hōshō — Japanese Tier IV aircraft сarrier.
Japan started its first experiments with aircraft carriers with a continuous flight deck right after World War I. They decided to convert a navy tanker that had been laid down in 1919 into an aircraft carrier. Hōshō entered service in December 1922. She was initially used to test the capabilities of carrier-based aircraft, but she then took part in the Shanghai incident and also played a role in the Sino-Japanese War in 1937. Later, she was transferred to the Combined Fleet and carried out reconnaissance and anti-submarine defense missions for the fleet's main forces.
Modules
 |
Hit Points (HP) | Armor (mm) | Armor (mm) | Main Turrets (pcs.) | Secondary Gun Turrets (pcs.) | AA Mounts (pcs.) | Torpedo Tubes (pcs.) | Hangar Capacity (pcs.) |
Research price (exp) |
Purchase price ( | |
|---|---|---|---|---|---|---|---|---|---|---|---|
| Hōshō (A) | 31,000 | 6 | 20 | 4 | 6 | 0 | 100,000 | ||||
| Hōshō (B) | 31,800 | 6 | 20 | 4 | 6 | 3,000 | 250,000 |
 |
Speed (knot) | IDS_SHIP_PARAM_SQUADRON_MED_DAMAGE (HP/min) | IDS_SHIP_PARAM_SQUADRON_AMMO_AMOUNT | Hit Points (HP) |
Research price (exp) |
Purchase price ( | |
|---|---|---|---|---|---|---|---|
| A4N | 108 | 1,150 | 0 | 50,000 |
 |
Maximum Torpedo Damage (HP) | Speed (knot) | Hit Points (HP) |
Research price (exp) |
Purchase price ( | |
|---|---|---|---|---|---|---|
| B4Y Jean | 5,800 | 97 | 1,380 | 0 | 50,000 |
 |
Maximum Bomb Damage (HP) | Speed (knot) | Hit Points (HP) |
Research price (exp) |
Purchase price ( | |
|---|---|---|---|---|---|---|
| D1A Susie | 98 | 1,360 | 0 | 50,000 |
 |
Maximum Speed (knot) |
Research price (exp) |
Purchase price ( | |
|---|---|---|---|---|
| Propulsion: 30,000 hp | 25 | 0 | 40,000 |
Compatible Upgrades
| Slot 1 |
|||
|---|---|---|---|
| Slot 2 |
Player Opinion
Performance
Pros:
- Has 16 torpedo bombers total, making it forgiving to lose some bombers during a run
- Powerful propulsion, allowing it to keep up with the team
Cons:
- Has only 8 fighters, which makes it difficult to fight against Langley's potential 10 fighters
Research
Optimal Configuration
Upgrades
As a Tier IV carrier with only the first two upgrade slots (slots 1 and 4), the following upgrades are recommended on Hosho:
Slot 1
- Air Groups Modification 1, in order to improve the fighters' damage capabilities and increase their chances of winning dogfights.
Slot 4
- Damage Control System Modification 1, in order to reduce fire and flooding chance on the ship (as carriers rarely have their engine or rudder incapacitated due to being far from the surface ship fights).
Commander Skills
As Hosho is a Tier IV carrier with only one 4-man squadron of fighters and the only carrier no dive bombers, it's best to choose the following recommended skills. Players can opt to sacrifice Emergency Takeoff and Dogfighting Expert skills for Concealment Expert (which would reduce her detection to 7.1km when coupled with camouflage), but Hosho already has sufficient stealth and speed to avoid detection by enemy ships. Therefore, Concealment Expert is not a highly recommended skill. Priority Target and Incoming Fire Alert are not really necessary because when a carrier is detected, the ship often becomes a priority target for many players.
ATTENTION
- As of Update 0.6.3, this carrier can no longer use manual / Alt function attack.
| Recommended Commander Skills | ||||||||
|---|---|---|---|---|---|---|---|---|
| Cost (points) |
Endurance | Attack | Support | Versatility | ||||
| 1 |
|
|
|
★★★ |
|
|
|
|
| 2 |
★★ |
|
|
★★★ |
|
|
★★ |
|
| 3 |
|
|
★★★ |
|
★ |
|
|
|
| 4 |
|
|
|
|
★ |
|
|
★★ |
| Key: ★★★ - Extremely Useful ★★ - Frequently Useful ★ - Occasionally Useful No stars - Meh Χ - Not recommended | ||||||||
Consumables
As a carrier at Tier IV, Hosho has access to only Damage Control Party.
Camouflage
Type 1, 2, or 5 camouflage can be equipped for credits; Types 1 or 5 are recommended at a minimum to reduce chances of being detected by the enemy.
Signals
As a carrier, Hosho can only mount at most four signals at a time and has no risk of detonating. Players should mount Equal Speed Charlie London (for faster XP grinding / increased XP gain per battle), Zulu Hotel (when coupled with Equal Speed Charlie London greatly helps increase commander (re)training), and Juliet Whiskey Unaone (to have a better chance at causing flooding and dealing damage via flooding). However, Juliet Whiskey Unaone is not highly recommended if the player wishes to conserve the signal for later tiers.
Recommended Signal Flags 
| |||||
|---|---|---|---|---|---|
| Combat | |||||

|

|

|

|

|

|
 ★★ |

|

|
 ★ |

|

|

|

| ||||
Note: Use of the Juliet Charlie signal makes detonation impossible.
Gallery
Historical Info
Historical Gallery


.jpg)
| Japan | IV Hōshō • VI Ryūjō • VIII Shōkaku • VIII Kaga |
| U.K. | IV Hermes • VI Furious • VI Ark Royal |
| France | VI Béarn |
| U.S.S.R. | IV Komsomolets • VI Serov • VIII Pobeda • VIII Chkalov |
| U.S.A. | IV Langley • VI Independence • VI Ranger • VIII Yorktown • VIII Lexington • VIII Enterprise |
| Germany | IV Rhein • VI Weser • VI Erich Loewenhardt |
| Pan-Asia | VIII Sanzang |
| Spain | |
| Europe | |
| Netherlands | |
| Italy | VIII Aquila |
| Commonwealth | |
| Pan-America |