Jervis
| Revision as of 03:55, 20 September 2018 | Revision as of 21:22, 14 April 2020 | |||
11 intermediate revisions by 10 users not shown | ||||
| Line 10: | Line 10: | |||
| |Performance=<!-- write text about performance in battles below --> | |Performance=<!-- write text about performance in battles below --> | |||
| ? | + | Players will find ''{{#var:ship_name}}'' a pleasant upgrade from ''[[Icarus]]'', being an upgrade across the board. As a warship, she prefers to find herself on the front lines, taking advantage of her powerful gun battery and stealth. This also helps players use her torpedo battery to its fullest, compensating for the relative inferiority in quality compared to many of her contemporaries. | ||
| ? | + | |||
| ? | + | |||
| ? | + | |||
| ? | + | |||
| ? | + | |||
| ? | Players will find '' | + | ||
| ? | Perhaps one of '' | + | Perhaps one of ''{{#var:ship_name}}''’ best assets is the power of her gunnery at medium to close range, especially when she's aggressively charging enemy ships. It is trivially easy for the player to bring all six guns to bear, even when rapidly switching from side to side, and combined with her high rate of fire, this allows her to quickly pummel enemy destroyers, gaining an early advantage in a fight even against enemy destroyers able to bring to bear their full armament. Her massive quantity of torpedoes also allows her to put a staggering amount of torpedoes into the water at once. Her ability to utilize {{Hydroacoustic Search}} allows her to be safer when charging enemy smokescreens (or utilizing her own) with the earlier detection of torpedoes — although her Hydro is inferior to those of German destroyers, so it should not be relied upon to spot enemy ships. | |
| ? | For all her benefits at mid to close-range combat, players will find that '' | + | For all her benefits at mid to close-range combat, players will find that ''{{#var:ship_name}}''’ abilities drop off sharply at longer ranges - in fact, about 7 kilometers is where this happens. Not only is this the maximum range of her torpedoes, but it's also the edge of her effective maximum gunnery range due to the ballistics of her guns. The ballistics of this guns are actually inferior to that of the 5"/38 found on most American destroyers, which means only the slowest targets are viable choices at longer ranges. This puts a hard cap on the engagement range of ''{{#var:ship_name}}'', and the player should generally seek to avoid exposing themselves in such engagements - the better ballistics of weapons such as the Soviet 130mm, or the 152mm guns found on light cruisers, will give them a major advantage over the player at ranges over 7 kilometers. | |
| ? | The smoke of '' | + | The smoke of ''{{#var:ship_name}}'' bears unique attributes that will effect how she plays. Due to its rapid reload time, it can be used frequently, but players should be aware of its short generation time and the short period of time that is lasts for. Because of this, it is extremely inadvisable to use in order to sit and HE-spam enemy targets. Instead, it is advised players use it as a supplement to their concealment, using it to break contact with enemy ships more rapidly, creating a barrier that will last just long enough for you to put adequate distance between the player and the enemy. | |
| ? | Like most destroyers, '' | + | Like most destroyers, ''{{#var:ship_name}}'' is a warship who's lethality increases as the battle wears on. The fewer ships that can challenge its concealment and close-range lethality, the easier it will be for the player to close in on and ambush enemy ships. Destroyers the player can get close to will melt under ''{{#var:ship_name}}''’ gunnery, and larger ships will find it difficult to avoid her spreads of ten torpedoes, especially when they can be single-launched for precision accuracy. | |
| |Pros=<!-- write list of positive points below. use * as in ordinary wiki-list. --> | |Pros=<!-- write list of positive points below. use * as in ordinary wiki-list. --> | |||
| ? | * Good guns - fast firing with decent range | + | * Good guns - fast firing with decent range. | |
| ? | * Large number of torpedoes | + | * Large number of torpedoes. | |
| ? | * Excellent firing arcs forward - the aft turret can fire | + | * Excellent firing arcs forward - the aft turret can fire 26 degrees off the bow, and rotates 360 degrees. | |
| ? | * Great concealment | + | * Great concealment. | |
| ? | * Decent maneuverability - decent top speed, great turning radius and decent rudder shift | + | * Decent maneuverability - decent top speed, great turning radius and decent rudder shift. | |
| ? | * Smoke consumable has a rapid reload, and ''Jervis'' also carries the {{Hydroacoustic Search}} consumable | + | * Smoke consumable has a rapid reload, and ''Jervis'' also carries the {{Hydroacoustic Search}} consumable. | |
| |Cons=<!-- write list of negative points below. use * as in ordinary wiki-list. --> | |Cons=<!-- write list of negative points below. use * as in ordinary wiki-list. --> | |||
| ? | * Torpedoes individually aren't very good | + | * Torpedoes individually aren't very good. | |
| ? | * Smoke duration is short in all respects | + | * Smoke duration is short in all respects. | |
| ? | * Her | + | * Her anti-aircraft armament is negligible (typical for a destroyer). | |
| ? | * Her main battery shells are slow in flight and lack penetration | + | * Her main battery shells are slow in flight and lack penetration. | |
| ? | * Like all RN DDs, she lacks the {{Engine Boost}} consumable | + | * Like all RN DDs (save for the Premiums ''[[Gallant]]'' and ''[[Cossack]]''), she lacks the {{Engine Boost}} consumable. | |
| |Research=<!-- write text about priority sequence of research below --> | |Research=<!-- write text about priority sequence of research below --> | |||
| ? | ||||
| The research path on this destroyer is very straightforward. The player should prioritize the (B) Hull upgrade to increase their hit points by over 20%, as well as improving rudder shift time and Anti-Aircraft armament. Then, take the Gun Fire Control System upgrade to improve main battery range, as the only remanding researchable module. | The research path on this destroyer is very straightforward. The player should prioritize the (B) Hull upgrade to increase their hit points by over 20%, as well as improving rudder shift time and Anti-Aircraft armament. Then, take the Gun Fire Control System upgrade to improve main battery range, as the only remanding researchable module. | |||
| Line 60: | Line 53: | |||
| Key skills for ''{{#var:ship_name}}'' commanders can vary drastically depending on how they choose to set up their ship, in particular among the third tier of skills. The first tiers are almost invariably "Priority Target" and "Last Stand". However, on the third tier many options are viable - "Torpedo Armament Expertise" to increase your already considerable volume of torpedoes, "Basic Firing Training" to further increase your excellent rate of fire, "Superintendent" for extra charges of Smoke or Hydro, or "Demolition Expert" to increase fire chance (especially if the player chooses to take IFHE). Even "Vigilance" is useful, to increase detection via the Hydro. At the fourth tier, "Concealment Expert" should absolutely be the player's priority. | Key skills for ''{{#var:ship_name}}'' commanders can vary drastically depending on how they choose to set up their ship, in particular among the third tier of skills. The first tiers are almost invariably "Priority Target" and "Last Stand". However, on the third tier many options are viable - "Torpedo Armament Expertise" to increase your already considerable volume of torpedoes, "Basic Firing Training" to further increase your excellent rate of fire, "Superintendent" for extra charges of Smoke or Hydro, or "Demolition Expert" to increase fire chance (especially if the player chooses to take IFHE). Even "Vigilance" is useful, to increase detection via the Hydro. At the fourth tier, "Concealment Expert" should absolutely be the player's priority. | |||
| ? | {{Commander Skills | + | {{Commander Skills 2 | |
| ? | | | + | <!-- This version enables a '0' rating. Use it for skills that have no effect (e.g. Improved Engines on a non-CV) or are detrimental to the ship. They should mirror what appears in the game client. --> | |
| ? | | | + | | rating11 = 3 <!-- Priority Target --> | |
| ? | | Expert Loader | + | | rating12 = 1 <!-- Preventive Maint --> | |
| ? | | | + | | rating13 = <!-- Expert Loader --> | |
| ? | | Direction Center for | + | | rating14 = 0 <!-- Air Supremacy --> | |
| ? | | | + | | rating15 = 0 <!-- Direction Center for Fighters --> | |
| ? | | Incoming Fire Alert | + | | rating16 = 0 <!-- Improved Engine Boost --> | |
| ? | | | + | | rating17 = <!-- Incoming Fire Alert --> | |
| + | | rating18 = 0 <!-- Last Gasp --> | |||
| ? | | High Alert = 1 | + | | rating21 = 1 <!-- High Alert --> | |
| ? | + | | rating22 = 1 <!-- Jack of All Trades --> | ||
| ? | | Expert Marksman | + | | rating23 = 1 <!-- Expert Marksman --> | |
| ? | | Torpedo Acceleration | + | | rating24 = <!-- Torpedo Acceleration --> | |
| ? | | Smoke Screen Expert | + | | rating25 = 1 <!-- Smoke Screen Expert --> | |
| ? | | | + | | rating26 = 0 <!-- Improved Engines --> | |
| ? | | | + | | rating27 = 2 <!-- Adrenaline Rush --> | |
| ? | | | + | | rating28 = 3 <!-- Last Stand --> | |
| ? | | Basics of Survivability | + | | rating31 = <!-- Basics of Survivability --> | |
| ? | | | + | | rating32 = 2 <!-- Survivability Expert--> | |
| ? | | Torpedo Armament Expertise | + | | rating33 = 1 <!-- Torpedo Armament Expertise--> | |
| ? | | | + | | rating34 = 0 <!-- Aircraft Armor --> | |
| ? | | Basic Firing Training | + | | rating35 = 2 <!-- Basic Firing Training --> | |
| ? | | | + | | rating36 = 2 <!-- Superintendent --> | |
| ? | | | + | | rating37 = 2 <!-- Demolition Expert --> | |
| ? | | | + | | rating38 = 1 <!-- Vigilance --> | |
| ? | | Manual Fire Control for Secondary Armament | + | | rating41 = <!-- Manual Fire Control for Secondary Armament --> | |
| ? | | Fire Prevention | + | | rating42 = <!-- Fire Prevention --> | |
| ? | | Inertia Fuse for HE Shells | + | | rating43 = 3 <!-- Inertia Fuse for HE Shells --> | |
| ? | | | + | | rating44 = 0 <!-- Sight Stabilization --> | |
| ? | | Advanced Firing Training | + | | rating45 = 1 <!-- Advanced Firing Training --> | |
| ? | | | + | | rating46 = <!-- Massive AA Fire --> | |
| ? | | Radio Position Finding | + | | rating47 = 1 <!-- Radio Position Finding --> | |
| ? | | Concealment Expert | + | | rating48 = 3 <!-- Concealment Expert --> | |
| }} | }} | |||
| Line 103: | Line 97: | |||
| * '''Slot 2:''' {{Smoke Generator}} | * '''Slot 2:''' {{Smoke Generator}} | |||
| * '''Slot 3:''' {{Hydroacoustic Search}} | * '''Slot 3:''' {{Hydroacoustic Search}} | |||
| ? | ||||
| |Camouflage=<!-- write text about useful camouflage below --> | |Camouflage=<!-- write text about useful camouflage below --> | |||
| Line 110: | Line 103: | |||
| Players who wish to spend doubloons can equip ''{{#var:ship_name}}'' with [[Ship:Camouflage#Permanent_Camouflage|Type XX camouflage]] that lowers her detection radius, reduces the accuracy of incoming shells, reduces her repair costs, and increases the amount of experience she earns. | Players who wish to spend doubloons can equip ''{{#var:ship_name}}'' with [[Ship:Camouflage#Permanent_Camouflage|Type XX camouflage]] that lowers her detection radius, reduces the accuracy of incoming shells, reduces her repair costs, and increases the amount of experience she earns. | |||
| ? | ||||
| ? | ||||
| |Signals=<!-- write text about best set of signals below --> | |Signals=<!-- write text about best set of signals below --> | |||
| ? | + | {{Signal Flags | ||
| | November Echo Setteseven = | | November Echo Setteseven = | |||
| | Mike Yankee Soxisix = | | Mike Yankee Soxisix = | |||
| Line 156: | Line 147: | |||
| <div class="thumb tright"> | <div class="thumb tright"> | |||
| {{AnnoWiki|content= | {{AnnoWiki|content= | |||
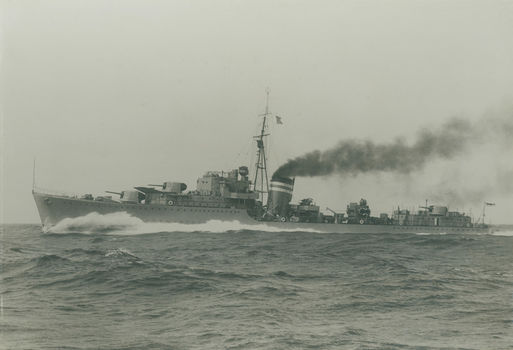
| ? | <h2>''{{#var:ship_name}}'', | + | <h2>''{{#var:ship_name}}'', 1944</h2> | |
| ===Construction=== | ===Construction=== | |||
| ? | :Builder: | + | :Builder: Hawthorn Leslie & Company, Hebburn-on-Tyne, United Kingdom | |
| ? | :Laid down: | + | :Laid down: 26 August 1937 | |
| ? | :Launched: | + | :Launched: 9 September 1938 | |
| ? | :Commissioned: | + | :Commissioned: 8 May 1939 | |
| ---- | ---- | |||
| ===Specifications=== | ===Specifications=== | |||
| ? | : | + | :1760 tons displacement, standard | |
| ? | : | + | :2384 tons displacement, deep load | |
| ? | : | + | :108.7m length | |
| ? | : | + | :10.9m beam | |
| + | :4.16-4.22m draft | |||
| ---- | ---- | |||
| ====Machinery==== | ====Machinery==== | |||
| ? | : | + | :2 Admiralty 3-drum boilers | |
| + | :2 Parsons geared steam turbines | |||
| + | :464 tons oil | |||
| ---- | ---- | |||
| ====Performance==== | ====Performance==== | |||
| ? | : | + | :36 knots at 40,000 shaft horsepower | |
| ? | : | + | :5500 nm at 15 knots | |
| ? | + | |||
| ? | + | |||
| ? | + | |||
| ? | + | |||
| ? | + | |||
| ? | + | |||
| ? | + | |||
| ? | + | |||
| ? | + | |||
| ---- | ---- | |||
| ====Armament==== | ====Armament==== | |||
| =====Main===== | =====Main===== | |||
| ? | : | + | :Six (3x2) 4.7"/45 (120mm) QF Mk.XII | |
| ? | + | |||
| ? | + | |||
| =====Anti-aircraft===== | =====Anti-aircraft===== | |||
| ? | : | + | :Four (1x4) Vickers 2-pdr (40mm) QF Mk.VIII | |
| + | :Eight (2x4) 0.5"/62 (12.7mm) Mk.III | |||
| =====Torpedoes===== | =====Torpedoes===== | |||
| ? | : | + | :Ten (2x5) 533mm torpedo tubes | |
| + | ---- | |||
| + | ====Complement==== | |||
| + | 218 officers and sailors | |||
| ---- | ---- | |||
| ? | ||||
| ? | ||||
| ? | ||||
| ? | ||||
| ? | ||||
| ? | ||||
| ? | ||||
| }}</div> | }}</div> | |||
| ? | [[File: | + | [[File:HMSJervisSeaTrials.jpeg|none|frame|x350px|link=|HMS Jervis on sea trials 1939]] | |
| ===History=== | ===History=== | |||
| Line 212: | Line 192: | |||
| ====Service==== | ====Service==== | |||
| + | ===Historical Inaccuracies=== | |||
| + | * Permanent camouflage is actually the historical camouflage of HMS ''Kandahar'' (F28), a K-class destroyer. | |||
| + | * ''Jervis''' Admiralty Standard camouflage is missing. | |||
| |HistoricalGallery=<!-- write below list of files with description (if necessary) separated with | --><gallery> | |HistoricalGallery=<!-- write below list of files with description (if necessary) separated with | --><gallery> | |||
| Line 220: | Line 203: | |||
| |Ref= <!-- write below --> | |Ref= <!-- write below --> | |||
| + | # [https://en.wikipedia.org/wiki/HMS_Jervis HMS ''Jervis'' - Wikipedia] | |||
| + | # [https://en.wikipedia.org/wiki/J-,_K-_and_N-class_destroyer J-, K- and N-class destroyer - Wikipedia] | |||
| }}<!-- DO NOT DELETE THIS LINE. DO NOT INSERT ANYTHING BELOW THIS LINE --> | }}<!-- DO NOT DELETE THIS LINE. DO NOT INSERT ANYTHING BELOW THIS LINE --> | |||
Revision as of 21:22, 14 April 2020

| Research price65000 exp |
| Purchase price5,150,000 |
| Hit Points11,800 |
| 120 mm/45 Mk.IX on a CPXIX mount3 х 2 pcs. |
| Rate of Fire12 shots/min. |
| Reload Time5 sec. |
| Rotation Speed10 deg./sec. |
| 180 Degree Turn Time18 sec. |
| Firing Range10.98 km. |
| Maximum Dispersion97 m. |
| HE Shell120 mm HE |
| Maximum HE Shell Damage1,700 |
| Chance of Fire on Target Caused by HE Shell8 % |
| Initial HE Shell Velocity808 m./s. |
| HE Shell Weight22.68 kg. |
| AP Shell120 mm AP |
| Maximum AP Shell Damage2,100 |
| Initial AP Shell Velocity808 m./s. |
| AP Shell Weight22.68 kg. |
| 533 mm PR Mk II2 х 5 pcs. |
| Rate of Fire0.5 shots/min. |
| Reload Time120 sec. |
| Rotation Speed25 deg./sec. |
| 180 Degree Turn Time7.2 sec. |
| Torpedo533 mm Mk VII |
| Maximum Damage15,733 |
| Torpedo Speed59 knot |
| Torpedo Range7.02 km. |
| 12.7 mm Mk.III4 х 4 pcs. |
| . . . Average Damage per Second8.4 |
| . . . Firing Range1.2 km. |
| 40 mm/39 Vickers QF Mk.II on a Mk.II HA mount2 х 1 pcs. |
| . . . Average Damage per Second11.4 |
| . . . Firing Range2.49 km. |
| 40 mm/39 Vickers QF Mk.VIII on a Mk.VII mount1 х 4 pcs. |
| . . . Average Damage per Second12.9 |
| . . . Firing Range2.49 km. |
| Maximum Speed36 knot |
| Turning Circle Radius590 m. |
| Rudder Shift Time4.9 sec. |
| Surface Detectability Range7.08 km. |
| Air Detectability Range2.98 km. |

Jervis — British Tier VII destroyer.
The J-class ships became the pioneers of the the new generation of British destroyers. Their increased size enabled them to carry powerful artillery in new twin mounts.
Modules
 |
Rate of Fire (shots/min) | 180° Turn Time (sec) | Maximum Dispersion (m) | Maximum HE Shell Damage (HP) | Chance of Fire on Target Caused by HE Shell (%) | Maximum AP Shell Damage (HP) |
Research price (exp) |
Purchase price ( | |
|---|---|---|---|---|---|---|---|---|---|
| 120 mm/45 Mk.IX on a CPXIX mount | 12 | 18 | 97 | 1,700 | 8 | 2,100 | 0 | 420,000 |
 |
Hit Points (HP) | Armor (mm) | Armor (mm) | Main Turrets (pcs.) | Secondary Gun Turrets (pcs.) | AA Mounts (pcs.) | Torpedo Tubes (pcs.) | Hangar Capacity (pcs.) |
Research price (exp) |
Purchase price ( | |
|---|---|---|---|---|---|---|---|---|---|---|---|
| Jervis (A) | 11,800 | 6 | 16 | 3 | 4/2/1 | 2 | 0 | 600,000 | |||
| Jervis (B) | 14,300 | 6 | 16 | 3 | 4/2/1 | 2 | 23,500 | 1,500,000 |
 |
Rate of Fire (shots/min) | Torpedo Tubes Reload Time (sec) | 180° Turn Time (sec) | Maximum Damage (HP) | Torpedo Speed (knot) | Torpedo Range (km) |
Research price (exp) |
Purchase price ( | |
|---|---|---|---|---|---|---|---|---|---|
| 533 mm Mk VII | 0.5 | 120 | 7.2 | 15,733 | 59 | 7 | 0 | 430,000 |
 |
IDS_SHIP_PARAM_SUO_INCREASE_DIST (%) | Maximum Firing Range (km) |
Research price (exp) |
Purchase price ( | |
|---|---|---|---|---|---|
| Mk VII mod. 1 | 0 | 0 | 350,000 | ||
| Mk VII mod. 2 | 0 | 17,000 | 1,100,000 |
 |
Maximum Speed (knot) |
Research price (exp) |
Purchase price ( | |
|---|---|---|---|---|
| Propulsion: 44,000 hp | 36 | 0 | 405,000 |
Compatible Upgrades
| Slot 1 |
|||||
|---|---|---|---|---|---|
| Slot 2 |
|||||
| Slot 3 |
|||||
| Slot 4 |
Player Opinion
Performance
Players will find Jervis a pleasant upgrade from Icarus, being an upgrade across the board. As a warship, she prefers to find herself on the front lines, taking advantage of her powerful gun battery and stealth. This also helps players use her torpedo battery to its fullest, compensating for the relative inferiority in quality compared to many of her contemporaries.
Perhaps one of Jervis’ best assets is the power of her gunnery at medium to close range, especially when she's aggressively charging enemy ships. It is trivially easy for the player to bring all six guns to bear, even when rapidly switching from side to side, and combined with her high rate of fire, this allows her to quickly pummel enemy destroyers, gaining an early advantage in a fight even against enemy destroyers able to bring to bear their full armament. Her massive quantity of torpedoes also allows her to put a staggering amount of torpedoes into the water at once. Her ability to utilize Hydroacoustic Search ![]() allows her to be safer when charging enemy smokescreens (or utilizing her own) with the earlier detection of torpedoes — although her Hydro is inferior to those of German destroyers, so it should not be relied upon to spot enemy ships.
allows her to be safer when charging enemy smokescreens (or utilizing her own) with the earlier detection of torpedoes — although her Hydro is inferior to those of German destroyers, so it should not be relied upon to spot enemy ships.
For all her benefits at mid to close-range combat, players will find that Jervis’ abilities drop off sharply at longer ranges - in fact, about 7 kilometers is where this happens. Not only is this the maximum range of her torpedoes, but it's also the edge of her effective maximum gunnery range due to the ballistics of her guns. The ballistics of this guns are actually inferior to that of the 5"/38 found on most American destroyers, which means only the slowest targets are viable choices at longer ranges. This puts a hard cap on the engagement range of Jervis, and the player should generally seek to avoid exposing themselves in such engagements - the better ballistics of weapons such as the Soviet 130mm, or the 152mm guns found on light cruisers, will give them a major advantage over the player at ranges over 7 kilometers.
The smoke of Jervis bears unique attributes that will effect how she plays. Due to its rapid reload time, it can be used frequently, but players should be aware of its short generation time and the short period of time that is lasts for. Because of this, it is extremely inadvisable to use in order to sit and HE-spam enemy targets. Instead, it is advised players use it as a supplement to their concealment, using it to break contact with enemy ships more rapidly, creating a barrier that will last just long enough for you to put adequate distance between the player and the enemy.
Like most destroyers, Jervis is a warship who's lethality increases as the battle wears on. The fewer ships that can challenge its concealment and close-range lethality, the easier it will be for the player to close in on and ambush enemy ships. Destroyers the player can get close to will melt under Jervis’ gunnery, and larger ships will find it difficult to avoid her spreads of ten torpedoes, especially when they can be single-launched for precision accuracy.Pros:
- Good guns - fast firing with decent range.
- Large number of torpedoes.
- Excellent firing arcs forward - the aft turret can fire 26 degrees off the bow, and rotates 360 degrees.
- Great concealment.
- Decent maneuverability - decent top speed, great turning radius and decent rudder shift.
- Smoke consumable has a rapid reload, and Jervis also carries the Hydroacoustic Search
 consumable.
Cons:
- Torpedoes individually aren't very good.
- Smoke duration is short in all respects.
- Her anti-aircraft armament is negligible (typical for a destroyer).
- Her main battery shells are slow in flight and lack penetration.
- Like all RN DDs (save for the Premiums Gallant and Cossack), she lacks the Engine Boost
 consumable.
Research
Optimal Configuration
Upgrades
The recommended upgrades for Jervis are as follows:
- Slot 1: Main Armaments Modification 1

- Slot 2: Propulsion Modification 1

- Slot 3: Aiming Systems Modification 1

- Slot 4: Steering Gears Modification 2

Main Armaments Modification 1 ![]() is recommended for Slot 1, although is advisable to take Magazine Modification 1
is recommended for Slot 1, although is advisable to take Magazine Modification 1 ![]() may also be used if players have no Juliet Charlie (
may also be used if players have no Juliet Charlie (![]() ) signal flags to spare. Propulsion Modification 1
) signal flags to spare. Propulsion Modification 1 ![]() is the best option for Slot 2. but if players have access to the Hydroacoustic Search Modification 1
is the best option for Slot 2. but if players have access to the Hydroacoustic Search Modification 1 ![]() module, they may wish to use that instead in order to maximize the power of their hydro.
module, they may wish to use that instead in order to maximize the power of their hydro.
Commander Skills
Key skills for Jervis commanders can vary drastically depending on how they choose to set up their ship, in particular among the third tier of skills. The first tiers are almost invariably "Priority Target" and "Last Stand". However, on the third tier many options are viable - "Torpedo Armament Expertise" to increase your already considerable volume of torpedoes, "Basic Firing Training" to further increase your excellent rate of fire, "Superintendent" for extra charges of Smoke or Hydro, or "Demolition Expert" to increase fire chance (especially if the player chooses to take IFHE). Even "Vigilance" is useful, to increase detection via the Hydro. At the fourth tier, "Concealment Expert" should absolutely be the player's priority.
| Recommended Commander Skills | ||||||||
|---|---|---|---|---|---|---|---|---|
| Cost (points) |
Endurance | Attack | Support | Versatility | ||||
| 1 |
★★★ |
★ |
|
Χ |
Χ |
Χ |
|
Χ |
| 2 |
★ |
★ |
★ |
|
★ |
Χ |
★★ |
★★★ |
| 3 |
|
★★ |
★ |
Χ |
★★ |
★★ |
★★ |
★ |
| 4 |
|
|
★★★ |
Χ |
★ |
|
★ |
★★★ |
| Key: ★★★ - Extremely Useful ★★ - Frequently Useful ★ - Occasionally Useful No stars - Meh Χ - Not recommended | ||||||||
Consumables
Jervis can equip the following consumables:
- Slot 1: Damage Control Party

- Slot 2: Smoke Generator

- Slot 3: Hydroacoustic Search
Camouflage
Type 1, 2, or 5 camouflage can be equipped for credits; Types 1 or 5 are recommended at a minimum to reduce detectibility range.
Players who wish to spend doubloons can equip Jervis with Type XX camouflage that lowers her detection radius, reduces the accuracy of incoming shells, reduces her repair costs, and increases the amount of experience she earns.
Signals
Recommended Signal Flags 
| |||||
|---|---|---|---|---|---|
| Combat | |||||
 ★★★ |

|

|

|
 ★★★ |
 ★★ |
 ★★ |

|

|
 ★★★ |
 ★★ |

|

|

| ||||
Note: Use of the Juliet Charlie signal makes detonation impossible.


.jpg)