Kongo
| Revision as of 15:37, 22 May 2016 Transferring content from the previous article on Kongo (https://wiki.wargaming.net/en/Ship:PJSB007_Kongo_1942) | Revision as of 19:23, 23 March 2019 | |||
36 intermediate revisions by 16 users not shown | ||||
| Line 3: | Line 3: | |||
| |Anno=<!-- you can write below short description for the ship. it will replace default once. --> | |Anno=<!-- you can write below short description for the ship. it will replace default once. --> | |||
| + | When she was commissioned, ''Kongo'' was the most advanced battlecruiser in the world. She was the first among battlecruisers and battleships to be equipped with 356 mm main battery guns. Unlike previous Japanese dreadnoughts, ''Kongo'' received a thinner armor belt while her deck armor and torpedo protection were reinforced.<br><br>{{Model3DViewer|7cd9cf21d00e4be5af298bb9af93c6de}} | |||
| |Performance=<!-- write text about performance in battles below --> | |Performance=<!-- write text about performance in battles below --> | |||
| ? | + | ''Kongo'' is considered to be one of the most enjoyable battleships in the game, especially towards the lower tiers. ''Kongo'' has by far the highest top speed of the battleships of Tier V, a strong, solid main armament of eight 14-inch guns in four twin turrets, far greater range than her contemporaries, good secondaries, and the most health of her tier. However, she's not the strongest in all suites - she's got the worst armor of her tier, with only 203mm of belt armour compared to ''[[New York]]''’s, ''[[Texas]]''’ and ''[[König]]''’s 356mm belt armor, and she has the least guns of her tier. These shortcomings, however, don't stop ''Kongo'' from being one of the most competitive battleships in the game tier-for-tier. ''Kongo'' must always be careful with how she positions herself; showing too much broadside to an enemy battleship can be a fatal mistake. ''Kongo'' excels at both ranged combat and can use her maneuverability to outdo enemy battleships at closer ranges. ''Kongo'' is the second of three battlecruisers/fast battleships in the Japanese battleship line, coming after ''[[Myogi]]'' and eventually leading to ''[[Amagi]]'' at Tier VIII. | ||
| ? | + | |||
| ? | + | |||
| ? | + | |||
| ? | + | |||
| |Pros=<!-- write list of positive points below. use * as in ordinary wiki-list. --> | |Pros=<!-- write list of positive points below. use * as in ordinary wiki-list. --> | |||
| ? | * Great gun range | + | * Great gun range: Reaching out to 21+ kilometers, she has the second highest range in the mid tiers after ''[[Fuso]]''. | |
| ? | * | + | * Impressive speed: ''Kongo'' can reach 30 knots, allowing her to keep up with cruisers and relocate if needed. | |
| ? | * Decent agility | + | * Decent agility: She is surprisingly maneuverable and can cover her turning circle quite quickly. | |
| ? | * | + | * Good gun characteristics: her guns are accurate, powerful, and have decent penetration. | |
| ? | + | * Feels like a modern battleship in a world of outdated WWI era ships. | ||
| ? | * Feels like a modern battleship in a world of outdated | + | * Good firing angles. | |
| |Cons=<!-- write list of negative points below. use * as in ordinary wiki-list. --> | |Cons=<!-- write list of negative points below. use * as in ordinary wiki-list. --> | |||
| ? | * | + | * Low AA suite potency: Her AA suite will not do much against higher tier aircraft. | |
| ? | * | + | * High detection range: She is easily seen at 16km, but not much of a problem, as she can fire out to 21 km. | |
| ? | * Battlecruiser armor, | + | * Battlecruiser armor: Her weak armor is easily penetrated by battleship shells, though it can be partially overcome with angling. | |
| ? | * Sluggish rudder shift time compared to | + | * Sluggish rudder shift time: It takes a long time for her to start turning compared to American battleships. | |
| + | * Being a mid-tier battleship, her dispersion is still somewhat high at longer range. This can be mitigated my installing Aiming System Modification 1. | |||
| + | * Turret traverse is rather sluggish. | |||
| |Research=<!-- write text about priority sequence of research below --> | |Research=<!-- write text about priority sequence of research below --> | |||
| ? | + | ''Kongo'' is — effectively — a battlecruiser and needs to be able to dictate the terms of the engagement as she does not have a lot of armor. Upgrading her Propulsion module is first priority. After this, pick up Hull (B) for the upgraded main battery shells and a little bit faster turret traverse. The Fire Control System module upgrade can be saved for last. | ||
| + | ||||
| + | |OptimalConfiguration=<!-- write some general text about selection of optimal configuration below (optional)--> | |||
| + | ||||
| + | |Upgrades=<!-- write text about best upgrades below --> | |||
| + | The recommended upgrades for ''{{#var:ship_name}}'' are as follows: | |||
| + | * '''Slot 1''': {{Main Armaments Modification 1}}<nowiki>*</nowiki> | |||
| + | * '''Slot 2''': {{Damage Control System Modification 1}} | |||
| + | * '''Slot 3''': {{Aiming Systems Modification 1}}<nowiki>*</nowiki> | |||
| + | ||||
| + | '''Slot 1''' provides players with the first option in choosing a desired role. Typically, {{Main Armaments Modification 1}} is recommended to provide additional survivability to the main battery, but players who desire to specialize in the secondary or anti-aircraft armament should choose {{Auxiliary Armaments Modification 1}}. | |||
| + | ||||
| + | '''Slot 3''' allows for further specialization. Generally, {{Aiming Systems Modification 1}} is recommended because it reduces shell dispersion of the main and secondary armaments. To increase the effectiveness of the anti-aircraft armament, mount {{AA Guns Modification 1}}. Players wishing to specialize for secondaries should mount {{Secondary Battery Modification 2}}. | |||
| + | ||||
| + | ||||
| + | |CommanderSkills=<!-- write text about best set of Commander Skills below --> | |||
| + | ||||
| + | {{Commander Skills | |||
| + | | Priority Target = 1 | |||
| + | | Preventative Maintenance = 2 | |||
| + | | Expert Loader = | |||
| + | | Aircraft Servicing Expert = | |||
| + | | Direction Center for Catapult Aircraft = 1 | |||
| + | | Dogfighting Expert = | |||
| + | | Incoming Fire Alert = 1 | |||
| + | | Evasive Maneuver = | |||
| + | ||||
| + | | High Alert = 2 | |||
| + | | Jack of All Trades = 2 | |||
| + | | Expert Marksman = 3 | |||
| + | | Torpedo Acceleration = | |||
| + | | Smoke Screen Expert = | |||
| + | | Expert Rear Gunner = | |||
| + | | Adrenaline Rush = 1 | |||
| + | | Last Stand = | |||
| + | ||||
| + | | Survivability Expert = | |||
| + | | Basics of Survivability = 2 | |||
| + | | Torpedo Armament Expertise = | |||
| + | | Emergency Takeoff = | |||
| + | | Basic Firing Training = 2 | |||
| + | | Superintendent = 3 | |||
| + | | Demolition Expert = | |||
| + | | Vigilance = 2 | |||
| + | ||||
| + | | Manual Fire Control for Secondary Armament = 1 | |||
| + | | Fire Prevention = 3 | |||
| + | | Inertia Fuse for HE Shells = 1 | |||
| + | | Air Supremacy = | |||
| + | | Advanced Firing Training = 2 | |||
| + | | Manual Fire Control for AA Armament = 1 | |||
| + | | Radio Position Finding = 1 | |||
| + | | Concealment Expert = | |||
| + | }} | |||
| + | ||||
| + | |Consumables=<!-- write text about selection of Consumables below --> | |||
| + | ''{{#var:ship_name}}'' can equip the following consumables: | |||
| + | * '''Slot 1:''' {{Damage Control Party}} | |||
| + | * '''Slot 2:''' {{Repair Party}} | |||
| + | * '''Slot 3:''' {{Spotting Aircraft}} | |||
| + | ||||
| + | Spending credits or doubloons on {{Damage Control Party II}} and {{Repair Party II}} are recommended to maximize survivability. | |||
| + | ||||
| + | |Camouflage=<!-- write text about useful camouflage below --> | |||
| + | [[Ship:Camouflage#Standard Camouflage|Type 1, 2, or 5 camouflage]] can be equipped for credits; Types 2 or 5 are recommended at a minimum to reduce the accuracy of incoming shells. | |||
| + | ||||
| + | |Signals=<!-- write text about best set of signals below --> | |||
| + | As with all battleships, ''Kongo'' comes with 8 [[Ship:Flags#Signals|signal flag]] slots. The three most important flags are India Delta ({{India Delta|Size=18px}}), Juliet Yankee Bissotwo ({{Juliet Yankee Bissotwo|Size=18px}}) and India Yankee ({{India Yankee|Size=18px}}), all of which will improve your survivability. Captains wishing to improve the performance of their secondary battery should consider the addition of Mike Yankee Soxisix ({{Mike Yankee Soxisix|Size=18px}}). | |||
| + | ||||
| + | {{Signal Flags | |||
| + | | Hotel Yankee = 1 | |||
| + | | Juliet Charlie = | |||
| + | | November Foxtrot = 1 | |||
| + | | Zulu = 1 | |||
| + | | Juliet Yankee Bissotwo = 3 | |||
| + | | India Delta = 3 | |||
| + | ||||
| + | | India Yankee = 3 | |||
| + | | November Echo Setteseven = 2 | |||
| + | | Zulu Hotel = 2 | |||
| + | | India Bravo Terrathree = | |||
| + | | Sierra Mike = 2 | |||
| + | | Victor Lima = | |||
| + | ||||
| + | | Mike Yankee Soxisix = 2 | |||
| + | | Papa Papa = 1 | |||
| + | | India X-Ray = | |||
| + | | Equal Speed Charlie London = 2 | |||
| + | | Juliet Whiskey Unaone = | |||
| + | | Dragon Flag = 2 | |||
| + | }} | |||
| + | ||||
| + | |Gallery=<!-- write below list of files without tags. description (if necessary) for each should be separated with | --><gallery> | |||
| + | Kongo shot (1).jpg | |||
| + | Kongo shot (2).jpg | |||
| + | Kongo shot (3).jpg | |||
| + | Kongo shot (4).jpg | |||
| + | Kongo shot (5).jpg | |||
| + | Kongo shot (6).jpg | |||
| + | Kongo 03 WorldOfWarships Screens New.jpg | |||
| + | </gallery> | |||
| + | ||||
| + | |History=<!-- write text below --> | |||
| + | <div class="thumb tright"> | |||
| + | {{AnnoWiki|content= | |||
| + | <h2>''{{#var:ship_name}}'', 1929</h2> | |||
| + | ===Construction=== | |||
| + | :Vickers Shipbuilding Company; Barrow, England | |||
| + | :Laid down: 17 January 1911 | |||
| + | :Launched: 18 May 1912 | |||
| + | :Commissioned: 16 August 1913 | |||
| + | ---- | |||
| + | ====Specifications==== | |||
| + | :26,230 tons displacement, standard | |||
| + | :214.58m length | |||
| + | :28.04m beam | |||
| + | :8.38m draft | |||
| + | ---- | |||
| + | ====Machinery==== | |||
| + | :36 boilers, 4 turbines | |||
| + | ---- | |||
| + | ====Performance==== | |||
| + | :27.5 knots at 64,000 shaft horsepower | |||
| + | :8,000nm at 14 knots | |||
| + | ---- | |||
| + | ====Armor==== | |||
| + | :Main belt: 203mm mid, 76mm forward, 76mm aft | |||
| + | :Decks: 41-50mm | |||
| + | :Bulkheads: 203mm | |||
| + | :Barbettes and Turrets: 254mm barbette, 228mm turrets | |||
| + | :Conning tower: 254mm | |||
| + | ---- | |||
| + | ====Armament==== | |||
| + | =====Main===== | |||
| + | :Eight (4x2) 356mm guns | |||
| + | =====Secondary===== | |||
| + | :Sixteen (16x1) 152mm guns | |||
| + | =====Anti-aircraft===== | |||
| + | :Eight (8x1) 76mm guns | |||
| + | =====Torpedoes===== | |||
| + | :Eight (8x1) 533mm submerged torpedo tubes | |||
| + | }} | |||
| + | </div> | |||
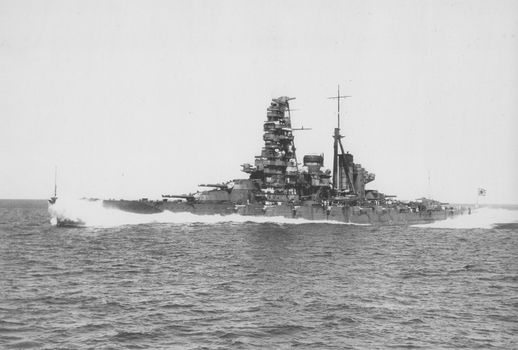
| + | [[File:Haruna 1934.jpg|none|frame|x350px|link=|''Haruna'' underway in 1934.]] | |||
| + | ===History=== | |||
| + | ||||
| + | ====Design==== | |||
| + | The ''Kongō''-class battlecruiser (金剛型巡洋戦艦 Kongō-gata jun'yōsenkan) was a class of four battlecruisers built for the Imperial Japanese Navy (IJN) immediately before World War I. Designed by British naval architect George Thurston, the lead ship of the class, constructed in the UK by Vickers, was the last Japanese capital ship constructed outside Japan. | |||
| + | ||||
| + | During the late 1920s, all but ''Hiei'' were reconstructed and reclassified as battleships. After the signing of the London Naval Treaty in 1930, ''Hiei'' was reconfigured as a training ship to avoid being scrapped. Following Japan's withdrawal from the London Naval Treaty, all four underwent a massive second reconstruction in the late 1930s. Following the completion of these modifications, which increased top speeds to over 30 knots (56 km/h; 35 mph), all four were reclassified as fast battleships. | |||
| + | ||||
| + | The ''Kongō''-class battleships were the most active capital ships of the Japanese Navy during World War II, participating in most major engagements of the war. | |||
| ? | + | ====Service==== | ||
| + | ''Kongō'' (金剛, "Indestructible", named for Mount Kongō) was a warship of the Imperial Japanese Navy during World War I and World War II. She was the first battlecruiser of the ''Kongō'' class, among the most heavily armed ships in any navy when built, and the last capital ship to be built outside Japan. Her designer was the British naval engineer George Thurston, and she was laid down in 1911 at Barrow-in-Furness in Britain by Vickers Shipbuilding Company. ''Kongō'' was the last Japanese capital ship constructed outside Japan. She was formally commissioned in 1913, and patrolled off the Chinese coast during World War I. | |||
| + | <br/> | |||
| ? | + | ''Kongō'' underwent two major reconstructions. Beginning in 1929, the Imperial Japanese Navy rebuilt her as a battleship, strengthening her armor and improving her speed and power capabilities. In 1935, her superstructure was completely rebuilt, her speed was increased, and she was equipped with launch catapults for floatplanes. Now fast enough to accompany Japan's growing carrier fleet, ''Kongō'' was reclassified as a fast battleship. During the Second Sino-Japanese War, ''Kongō'' operated off the coast of mainland China before being redeployed to the Third Battleship Division in 1941. In 1942, she sailed as part of the Southern Force in preparation for the Battle of Singapore. | ||
| + | <br/> | |||
| ? | + | ''Kongō'' fought in a large number of major naval actions of the Pacific War during World War II. She covered the Japanese Army's amphibious landings in British Malaya (part of present-day Malaysia) and the Dutch East Indies (now Indonesia) in 1942, before engaging American forces at the Battle of Midway and during the Guadalcanal Campaign. Throughout 1943, ''Kongō'' primarily remained at Truk Lagoon in the Caroline Islands, Kure Naval Base (near Hiroshima), Sasebo Naval Base (near Nagasaki), and Lingga Roads, and deployed several times in response to American aircraft carrier air raids on Japanese island bases scattered across the Pacific. The Kongō participated in the Battle of the Philippine Sea and the Battle of Leyte Gulf in 1944 (October 22–23), engaging and sinking American vessels in the latter. ''Kongō'' was torpedoed and sunk by the submarine USS ''Sealion'' while transiting the Formosa Strait on 21 November 1944. She was the only Japanese battleship sunk by submarine in the Second World War, and the last battleship sunk by submarine in history. | ||
| ? | Kongō | + | ||
| ? | + | ==== Miscellaneous ==== | ||
| + | The ship modeled in the game is actually based off ''Hiei'', the second ship of the ''Kongō'' class with a history that differed significantly from the her other three sisters. Unlike her other sisters, she did not undergo the first modernization that strengthened their armor and underwater protection, and was disarmed in 1930 to comply with the terms of the First London Naval Treaty. When Japan withdrew from the terms of the Second London Naval Treaty, along with the second modernizations of her sisters, ''Hiei'' underwent extensive modernizations to bring her up to their specifications. Fitted onto her was a pagoda style mast that differed from the other ''Kongō'' sisters, serving as the prototype of the superstructure that was later fitted onto the ''[[Yamato]]'' class. This is the superstructure that is featured by the in-game model. | |||
| ? | The | + | ===Historical Inaccuracies=== | |
| + | * The in-game model is actually based on ''Hiei''. | |||
| + | * ''Kongo'' had six twin 127 mm dual-purpose guns fitted to her midsection; the in-game model has only four. | |||
| + | * By July 1944, ''Kongo'' had 18 triple and six twin 25 mm/60 Type96 anti-aircraft guns, augmented by several more 25 mm guns in single mounts (see Historical Gallery). | |||
| + | * ''Kongo''’s original battlecruiser configuration is missing. It was removed in a previous update. | |||
| ? | |HistoricalGallery=<!-- write below list of files without tags. description (if necessary) for each should be separated with | + | |HistoricalGallery=<!-- write below list of files without tags. description (if necessary) for each should be separated with | --> | |
| ? | + | <gallery> | ||
| ? | + | Haruna at Yokosuka 1916.jpg|''Haruna'' at Yokosuka, 11 September 1916. | ||
| ? | + | Установка ордий главного калибра.jpg|A 14-inch gun being installed aboard ''Haruna'', October 1914. | ||
| ? | + | Kongo after reconstruction.jpg|''Kongō'' following her first reconstruction. | ||
| ? | + | Japanese training ship Hiei.jpg|''Hiei'' in 1933, as a training ship. | ||
| ? | + | Киришима.jpeg|''Kirishima'' off Amoy, China, in 1938. | ||
| ? | + | Haruna 1934.jpg|''Haruna'' in 1934, following her second reconstruction. | ||
| + | Japanese battleships Yamashiro, Fuso and Haruna.jpg|''Yamashiro'', ''[[Fuso]]'' and the fast battleship ''Haruna'' in the late 1930s. | |||
| + | Hiei1942.png|A diagram of ''Hiei'' as she appeared in 1942, showing her superstructure which differs significantly from her sisters. | |||
| + | Kongo1944.png|A diagram of ''Kongo'' as she appeared in 1944, showing her late-war enhanced AA protection and reduced casemate guns. | |||
| + | </gallery> | |||
| ? | + | |Video=<!-- put below video clips with using template VideoYT. You can use html-tags for formatting. --> | ||
| |Ref= <!-- write below --> | |Ref= <!-- write below --> | |||
| }}<!-- DO NOT DELETE THIS LINE. DO NOT INSERT ANYTHING BELOW THIS LINE --> | }}<!-- DO NOT DELETE THIS LINE. DO NOT INSERT ANYTHING BELOW THIS LINE --> | |||
Revision as of 19:23, 23 March 2019

| Research price12000 exp |
| Purchase price1,420,000 |
| Hit Points49,500 |
| 356 mm/45 41st Year Type in a twin turret4 х 2 pcs. |
| Rate of Fire1.94 shots/min. |
| Reload Time31 sec. |
| Rotation Speed3 deg./sec. |
| 180 Degree Turn Time60 sec. |
| Firing Range19.27 km. |
| Maximum Dispersion236 m. |
| HE Shell356 mm HE Type0 |
| Maximum HE Shell Damage5,700 |
| Chance of Fire on Target Caused by HE Shell25 % |
| Initial HE Shell Velocity805 m./s. |
| HE Shell Weight625 kg. |
| AP Shell356 mm AP Type5 |
| Maximum AP Shell Damage10,000 |
| Initial AP Shell Velocity790 m./s. |
| AP Shell Weight635.5 kg. |
| 127 mm/40 Type 89 on a Model A1 mount4 х 2 pcs. |
| Firing Range4.3 km. |
| Rate of Fire12 shots/min. |
| Reload Time5 sec. |
| HE Shell127 mm HE Type0 |
| Maximum HE Shell Damage2,100 |
| Initial HE Shell Velocity725 m./s. |
| Chance of Fire on Target Caused by HE Shell8 % |
| 152 mm/50 41st Year Type on a casemate mount14 х 1 pcs. |
| Firing Range4.3 km. |
| Rate of Fire6 shots/min. |
| Reload Time10 sec. |
| HE Shell152 mm HE Type4 |
| Maximum HE Shell Damage2,500 |
| Initial HE Shell Velocity825 m./s. |
| Chance of Fire on Target Caused by HE Shell9 % |
| 127 mm/40 Type 89 on a Model A1 mount4 х 2 pcs. |
| . . . Average Damage per Second40.4 |
| . . . Firing Range5.01 km. |
| 13 mm/76 Type 93 on a twin mount12 х 2 pcs. |
| . . . Average Damage per Second24 |
| . . . Firing Range1.2 km. |
| Maximum Speed24.9 knot |
| Turning Circle Radius770 m. |
| Rudder Shift Time17.2 sec. |
| Surface Detectability Range15.71 km. |
| Air Detectability Range9.36 km. |

Kongō — Japanese Tier V battleship.
When she was commissioned, Kongo was the most advanced battlecruiser in the world. She was the first among battlecruisers and battleships to be equipped with 356 mm main battery guns. Unlike previous Japanese dreadnoughts, Kongo received a thinner armor belt while her deck armor and torpedo protection were reinforced.
Modules
 |
Rate of Fire (shots/min) | 180° Turn Time (sec) | Maximum Dispersion (m) | Maximum HE Shell Damage (HP) | Chance of Fire on Target Caused by HE Shell (%) | Maximum AP Shell Damage (HP) |
Research price (exp) |
Purchase price ( | |
|---|---|---|---|---|---|---|---|---|---|
| 356 mm/45 41st Year Type in a twin turret | 1.9 | 60 | 236 | 5,700 | 25 | 10,000 | 0 | 190,000 |
 |
Hit Points (HP) | Armor (mm) | Armor (mm) | Main Turrets (pcs.) | Secondary Gun Turrets (pcs.) | AA Mounts (pcs.) | Torpedo Tubes (pcs.) | Hangar Capacity (pcs.) |
Research price (exp) |
Purchase price ( | |
|---|---|---|---|---|---|---|---|---|---|---|---|
| Kongō (A) | 49,500 | 13 | 254 | 4 | 4/14 | 12/4 | 0 | 230,000 | |||
| Kongō (B) | 54,100 | 13 | 254 | 4 | 4/14 | 4/2/6/4 | 6,500 | 480,000 |
 |
IDS_SHIP_PARAM_SUO_INCREASE_DIST (%) | Maximum Firing Range (km) |
Research price (exp) |
Purchase price ( | |
|---|---|---|---|---|---|
| Type5 mod. 1 | 0 | 0 | 76,000 | ||
| Type5 mod. 2 | 0 | 3,600 | 240,000 |
 |
Maximum Speed (knot) |
Research price (exp) |
Purchase price ( | |
|---|---|---|---|---|
| Propulsion: 75,000 hp | 24.9 | 0 | 110,000 | |
| Propulsion: 136,000 hp | 30 | 2,000 | 240,000 |
Compatible Upgrades
| Slot 1 |
|||||
|---|---|---|---|---|---|
| Slot 2 |
|||||
| Slot 3 |
Player Opinion
Performance
Pros:
- Great gun range: Reaching out to 21+ kilometers, she has the second highest range in the mid tiers after Fuso.
- Impressive speed: Kongo can reach 30 knots, allowing her to keep up with cruisers and relocate if needed.
- Decent agility: She is surprisingly maneuverable and can cover her turning circle quite quickly.
- Good gun characteristics: her guns are accurate, powerful, and have decent penetration.
- Feels like a modern battleship in a world of outdated WWI era ships.
- Good firing angles.
Cons:
- Low AA suite potency: Her AA suite will not do much against higher tier aircraft.
- High detection range: She is easily seen at 16km, but not much of a problem, as she can fire out to 21 km.
- Battlecruiser armor: Her weak armor is easily penetrated by battleship shells, though it can be partially overcome with angling.
- Sluggish rudder shift time: It takes a long time for her to start turning compared to American battleships.
- Being a mid-tier battleship, her dispersion is still somewhat high at longer range. This can be mitigated my installing Aiming System Modification 1.
- Turret traverse is rather sluggish.
Research
Optimal Configuration
Upgrades
The recommended upgrades for Kongō are as follows:
- Slot 1: Main Armaments Modification 1
 *
*
- Slot 2: Damage Control System Modification 1

- Slot 3: Aiming Systems Modification 1
 *
*
Slot 1 provides players with the first option in choosing a desired role. Typically, Main Armaments Modification 1 ![]() is recommended to provide additional survivability to the main battery, but players who desire to specialize in the secondary or anti-aircraft armament should choose Auxiliary Armaments Modification 1
is recommended to provide additional survivability to the main battery, but players who desire to specialize in the secondary or anti-aircraft armament should choose Auxiliary Armaments Modification 1 ![]() .
.
Slot 3 allows for further specialization. Generally, Aiming Systems Modification 1 ![]() is recommended because it reduces shell dispersion of the main and secondary armaments. To increase the effectiveness of the anti-aircraft armament, mount AA Guns Modification 1
is recommended because it reduces shell dispersion of the main and secondary armaments. To increase the effectiveness of the anti-aircraft armament, mount AA Guns Modification 1 ![]() . Players wishing to specialize for secondaries should mount Secondary Battery Modification 1 (
. Players wishing to specialize for secondaries should mount Secondary Battery Modification 1 (![]() ).
).
Commander Skills
| Recommended Commander Skills | ||||||||
|---|---|---|---|---|---|---|---|---|
| Cost (points) |
Endurance | Attack | Support | Versatility | ||||
| 1 |
★ |
★★ |
|
|
|
|
★ |
|
| 2 |
★★ |
★★ |
★★★ |
|
|
|
★ |
|
| 3 |
★★ |
|
|
|
★★ |
★★★ |
|
★★ |
| 4 |
★ |
★★★ |
★ |
|
★★ |
|
★ |
|
| Key: ★★★ - Extremely Useful ★★ - Frequently Useful ★ - Occasionally Useful No stars - Meh Χ - Not recommended | ||||||||
Consumables
Kongō can equip the following consumables:
- Slot 1: Damage Control Party

- Slot 2: Repair Party

- Slot 3: Spotting Aircraft

Spending credits or doubloons on Damage Control Party II (![]() ) and Repair Party II (
) and Repair Party II (![]() ) are recommended to maximize survivability.
) are recommended to maximize survivability.
Camouflage
Type 1, 2, or 5 camouflage can be equipped for credits; Types 2 or 5 are recommended at a minimum to reduce the accuracy of incoming shells.
Signals
As with all battleships, Kongo comes with 8 signal flag slots. The three most important flags are India Delta (![]() ), Juliet Yankee Bissotwo (
), Juliet Yankee Bissotwo (![]() ) and India Yankee (
) and India Yankee (![]() ), all of which will improve your survivability. Captains wishing to improve the performance of their secondary battery should consider the addition of Mike Yankee Soxisix (
), all of which will improve your survivability. Captains wishing to improve the performance of their secondary battery should consider the addition of Mike Yankee Soxisix (![]() ).
).
Recommended Signal Flags 
| |||||
|---|---|---|---|---|---|
| Combat | |||||

|
 ★★★ |
 ★★★ |
 ★ |

|

|

|
 ★★ |
 ★★ |
 ★★ |
 ★ |
 ★★★ |

|

| ||||
Note: Use of the Juliet Charlie signal makes detonation impossible.
Gallery
.jpg)
.jpg)
.jpg)
.jpg)
.jpg)
.jpg)

Historical Info
Historical Gallery


