Kuma
| Revision as of 21:09, 24 September 2019 Massive AA Fire | Revision as of 21:47, 7 October 2019 Commander Skills 2 | |||
| Line 44: | Line 44: | |||
| |CommanderSkills=<!-- write text about best set of Commander Skills below --> | |CommanderSkills=<!-- write text about best set of Commander Skills below --> | |||
| Key skills for ''{{#var:ship_name}}'' commanders include Last Stand at Level 2, Torpedo Armament Expertise at Level 3, and Concealment Expert at Level 4. Demolition Expert can be taken to increase the main battery's fire chance per shell. Basics of Survivability is also recommended to reduce the time needed to repair module damage and extinguish fires. | Key skills for ''{{#var:ship_name}}'' commanders include Last Stand at Level 2, Torpedo Armament Expertise at Level 3, and Concealment Expert at Level 4. Demolition Expert can be taken to increase the main battery's fire chance per shell. Basics of Survivability is also recommended to reduce the time needed to repair module damage and extinguish fires. | |||
| ? | ||||
| ? | ||||
| ? | ||||
| ? | ||||
| ? | ||||
| ? | ||||
| ? | ||||
| ? | ||||
| ? | ||||
| ? | | | + | {{Commander Skills 2 | |
| ? | | | + | <!-- This version enables a '0' rating. Use it for skills that have no effect (e.g. Improved Engines on a non-CV) or are detrimental to the ship. They should mirror what appears in the game client. --> | |
| ? | | | + | | rating11 = 2 <!-- Priority Target --> | |
| ? | | | + | | rating12 = 2 <!-- Preventive Maint --> | |
| ? | | | + | | rating13 = <!-- Expert Loader --> | |
| ? | | | + | | rating14 = 0 <!-- Air Supremacy --> | |
| ? | | | + | | rating15 = 1 <!-- Direction Center for Fighters --> | |
| ? | | | + | | rating16 = 0 <!-- Improved Engine Boost --> | |
| + | | rating17 = 1 <!-- Incoming Fire Alert --> | |||
| + | | rating18 = 0 <!-- Last Gasp --> | |||
| ? | | | + | | rating21 = 1 <!-- High Alert --> | |
| ? | | | + | | rating22 = 2 <!-- Jack of All Trades --> | |
| ? | | Torpedo | + | | rating23 = 2 <!-- Expert Marksman --> | |
| ? | | | + | | rating24 = 1 <!-- Torpedo Acceleration --> | |
| ? | | | + | | rating25 = 0 <!-- Smoke Screen Expert --> | |
| ? | | | + | | rating26 = 0 <!-- Improved Engines --> | |
| ? | | | + | | rating27 = 2 <!-- Adrenaline Rush --> | |
| ? | + | | rating28 = 3 <!-- Last Stand --> | ||
| ? | | Manual Fire Control for Secondary Armament | + | | rating31 = 2 <!-- Basics of Survivability --> | |
| ? | | Fire Prevention | + | | rating32 = 1 <!-- Survivability Expert--> | |
| ? | | Inertia Fuse for HE Shells | + | | rating33 = 3 <!-- Torpedo Armament Expertise--> | |
| ? | | | + | | rating34 = 0 <!-- Aircraft Armor --> | |
| ? | | Advanced Firing Training | + | | rating35 = 1 <!-- Basic Firing Training --> | |
| ? | | Massive AA Fire | + | | rating36 = 2 <!-- Superintendent --> | |
| ? | | Radio Position Finding | + | | rating37 = 3 <!-- Demolition Expert --> | |
| ? | | | + | | rating38 = 1 <!-- Vigilance --> | |
| + | ||||
| + | | rating41 = <!-- Manual Fire Control for Secondary Armament --> | |||
| + | | rating42 = <!-- Fire Prevention --> | |||
| + | | rating43 = 2 <!-- Inertia Fuse for HE Shells --> | |||
| + | | rating44 = 0 <!-- Sight Stabilization --> | |||
| + | | rating45 = 1 <!-- Advanced Firing Training --> | |||
| + | | rating46 = <!-- Massive AA Fire --> | |||
| + | | rating47 = 2 <!-- Radio Position Finding --> | |||
| + | | rating48 = 2 <!-- Concealment Expert --> | |||
| }} | }} | |||
| Line 86: | Line 88: | |||
| * '''Slot 1:''' {{Damage Control Party}} | * '''Slot 1:''' {{Damage Control Party}} | |||
| * '''Slot 2:''' {{Hydroacoustic Search}} | * '''Slot 2:''' {{Hydroacoustic Search}} | |||
| ? | * '''Slot 3:''' {{Catapult Fighter}} '''[Hull B only]''' | + | * '''Slot 3:''' {{Catapult Fighter}} '''[Hull B only]''' | |
| Premium versions of these consumables are recommended to decrease their cooldown timers. | Premium versions of these consumables are recommended to decrease their cooldown timers. | |||
Revision as of 21:47, 7 October 2019

| Research price5600 exp |
| Purchase price684,000 |
| Hit Points23,000 |
| 140 mm/50 3rd Year Type on a single mount7 х 1 pcs. |
| Rate of Fire10 shots/min. |
| Reload Time6 sec. |
| Rotation Speed8.5 deg./sec. |
| 180 Degree Turn Time21.18 sec. |
| Firing Range11.67 km. |
| Maximum Dispersion113 m. |
| HE Shell140 mm HE Type0 |
| Maximum HE Shell Damage2,400 |
| Chance of Fire on Target Caused by HE Shell10 % |
| Initial HE Shell Velocity850 m./s. |
| HE Shell Weight38 kg. |
| AP Shell140 mm Capped Common Shell |
| Maximum AP Shell Damage2,700 |
| Initial AP Shell Velocity850 m./s. |
| AP Shell Weight38 kg. |
| 533 mm Twin4 х 2 pcs. |
| Rate of Fire1.43 shots/min. |
| Reload Time42 sec. |
| Rotation Speed25 deg./sec. |
| 180 Degree Turn Time7.2 sec. |
| Torpedo533 mm Type6 |
| Maximum Damage10,833 |
| Torpedo Speed57 knot |
| Torpedo Range6.99 km. |
| 6.5 mm/115 3rd Year Type on a single mount2 х 1 pcs. |
| . . . Average Damage per Second2.4 |
| . . . Firing Range0.99 km. |
| 76 mm /40 3rd Year Type on a single mount2 х 1 pcs. |
| . . . Average Damage per Second3.2 |
| . . . Firing Range3 km. |
| Maximum Speed34.5 knot |
| Turning Circle Radius640 m. |
| Rudder Shift Time6.9 sec. |
| Surface Detectability Range11 km. |
| Air Detectability Range5.23 km. |

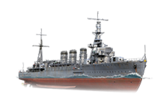
Kuma — Japanese Tier IV cruiser.
A multipurpose light cruiser that could serve as a scout and a destroyer leader. Compared with the preceding class, Kuma had a greater displacement, reinforced weaponry and increased speed. She retained a weak AA defense that was typical of earlier-period Japanese cruisers.
Modules
 |
Rate of Fire (shots/min) | 180° Turn Time (sec) | Maximum Dispersion (m) | Maximum HE Shell Damage (HP) | Chance of Fire on Target Caused by HE Shell (%) | Maximum AP Shell Damage (HP) |
Research price (exp) |
Purchase price ( | |
|---|---|---|---|---|---|---|---|---|---|
| 140 mm/50 3rd Year Type on a single mount | 10 | 21.2 | 113 | 2,400 | 10 | 2,700 | 0 | 44,000 |
 |
Hit Points (HP) | Armor (mm) | Armor (mm) | Main Turrets (pcs.) | Secondary Gun Turrets (pcs.) | AA Mounts (pcs.) | Torpedo Tubes (pcs.) | Hangar Capacity (pcs.) |
Research price (exp) |
Purchase price ( | |
|---|---|---|---|---|---|---|---|---|---|---|---|
| Kuma (A) | 23,000 | 10 | 65 | 7 | 2/2 | 4 | 0 | 80,000 | |||
| Kuma (B) | 24,200 | 10 | 65 | 7 | 6 | 4 | 2,000 | 300,000 |
 |
Rate of Fire (shots/min) | Torpedo Tubes Reload Time (sec) | 180° Turn Time (sec) | Maximum Damage (HP) | Torpedo Speed (knot) | Torpedo Range (km) |
Research price (exp) |
Purchase price ( | |
|---|---|---|---|---|---|---|---|---|---|
| Type 6 | 1.4 | 42 | 7.2 | 10,833 | 57 | 7 | 0 | 200,000 |
 |
IDS_SHIP_PARAM_SUO_INCREASE_DIST (%) | Maximum Firing Range (km) |
Research price (exp) |
Purchase price ( | |
|---|---|---|---|---|---|
| Type4 mod. 1 | 0 | 0 | 60,000 | ||
| Type4 mod. 2 | 0 | 900 | 140,000 |
 |
Maximum Speed (knot) |
Research price (exp) |
Purchase price ( | |
|---|---|---|---|---|
| Propulsion: 90,000 hp | 34.5 | 0 | 40,000 |
Compatible Upgrades
| Slot 1 |
||||
|---|---|---|---|---|
| Slot 2 |
Player Opinion
Performance
The Kuma is an improvement of the previous Tenryu. The Kuma inherits the same rapid fire 140 mm guns of its predecessor in greater number. With more guns the Kuma is able to deliver a greater volume of fire making the ship better at surface combat. A pair of double torpedo launchers on each side allows the Kuma to deliver 4 torpedoes per broadside. These torpedoes have an excellent range of 7 km and solid damage.
However, the Kuma suffers from several weaknesses. First of all the citadel of the ship sits high above the water line and is easily penetrated by the AP shells of most of her opponents. Moreover, the engine and steering modules are easy to disable. Finally the Kuma has extremely weak AA defence and will have trouble effectively shooting down planes. The addition of the catapult fighter with the B hull upgrade provides a minor improvement.
The Kuma is a fun ship to play. The high rate of fire and strong torpedo armament provides the player the tools to inflict substantial damage to ships of any type. Players should be wary about protecting the sides of the ship from enemy fire to avoid citadel penetrations. This is especially true when facing battleships as the AP rounds from any battleship that the Kuma will face have a high probability of hitting the citadel, and although giving them a broadside may make them overpenetrate, doing that would expose you to cruiser AP rounds. The torpedo tubes are also poorly protected and may be disabled by enemy fire.Pros:
- Great guns with a long range and fast reload.
- Powerful torpedoes with 7 km range.
- She is very maneuverable for her size.
- Low slung profile makes her hard to hit.
- She is equipped with a catapult fighter.
- Very deadly to enemy destroyers.
Cons:
- Loses torpedo firing systems easily.
- Rudder is made of paper.
- Armor that can absorb practically nothing.
- Catches fire with ease and shares the large citadel of Tenryu.
- AA is all bark and no bite.
- No secondaries.
- Has to show quite a lot of her broadside to get her rear guns into action.
Research
Availability of researchable upgrades for Kuma is as follows:
- Hull: Upgrade to Hull (B) for an improved rudder shift time, additional hit points, additional anti-aircraft guns, and access to the Hydroacoustic Search
 and Catapult Fighter
  consumables. Research of this module unlocks progression to Furutaka.
- Gun Fire Control System: Upgrade to Type 4 Mod. 2 for an extra 10% range on the main battery.
Optimal Configuration
Upgrades
- Slot 1: Main Armaments Modification 1
 keeps the guns and torpedo tubes active and firing.
- Slot 1: Damage Control System Modification 1
 makes the ship more resistant to fires and flooding.
Commander Skills
Key skills for Kuma commanders include Last Stand at Level 2, Torpedo Armament Expertise at Level 3, and Concealment Expert at Level 4. Demolition Expert can be taken to increase the main battery's fire chance per shell. Basics of Survivability is also recommended to reduce the time needed to repair module damage and extinguish fires.
| Recommended Commander Skills | ||||||||
|---|---|---|---|---|---|---|---|---|
| Cost (points) |
Endurance | Attack | Support | Versatility | ||||
| 1 |
★★ |
★★ |
|
Χ |
★ |
Χ |
★ |
Χ |
| 2 |
★ |
★★ |
★★ |
★ |
Χ |
Χ |
★★ |
★★★ |
| 3 |
★★ |
★ |
★★★ |
Χ |
★ |
★★ |
★★★ |
★ |
| 4 |
|
|
★★ |
Χ |
★ |
|
★★ |
★★ |
| Key: ★★★ - Extremely Useful ★★ - Frequently Useful ★ - Occasionally Useful No stars - Meh Χ - Not recommended | ||||||||
Consumables
Kuma can equip the following consumables:
- Slot 1: Damage Control Party

- Slot 2: Hydroacoustic Search
- Slot 3: Catapult Fighter [Hull B only]
Premium versions of these consumables are recommended to decrease their cooldown timers.
Camouflage
Type 1, 2, or 5 camouflage can be equipped for credits; Types 1 or 5 are recommended at a minimum to reduce detectibility range.
Signals
Kuma captains should mount the standard flags to improve the ship's performance in battle. To improve upon the ship's armaments, India X-Ray (![]() ), Victor Lima (
), Victor Lima (![]() ), and Juliet Whiskey Unaone (
), and Juliet Whiskey Unaone (![]() ) flags are recommended to increase the fire chance and flooding chances respectively. To improve the ship’s survivability, captains should mount November Foxtrot (
) flags are recommended to increase the fire chance and flooding chances respectively. To improve the ship’s survivability, captains should mount November Foxtrot (![]() ) and India Yankee (
) and India Yankee (![]() ) flags. Sierra Mike (
) flags. Sierra Mike (![]() ) flags are recommended to increase the ship’s already high top speed. Lastly, economic and special signal flags can be mounted to improve the ship’s economic gains per battle.
) flags are recommended to increase the ship’s already high top speed. Lastly, economic and special signal flags can be mounted to improve the ship’s economic gains per battle.
Recommended Signal Flags 
| |||||
|---|---|---|---|---|---|
| Combat | |||||
 ★★ |

|
 ★★ |
 ★ |
 ★★★ |
 ★★ |
 ★ |

|
 ★★ |
 ★★★ |
 ★★★ |

|

|

| ||||
Note: Use of the Juliet Charlie signal makes detonation impossible.
Gallery
Historical Info
Historical Gallery

