Medea
| Revision as of 19:10, 19 September 2018 Added Historical Specs, Design History, and Service History | Revision as of 19:14, 19 September 2018 Added Signals | |||
| Line 121: | Line 121: | |||
| |Signals=<!-- write text about best set of signals below --> | |Signals=<!-- write text about best set of signals below --> | |||
| + | Combat signal flags will be the ones most frequently mounted; it is recommended to focus on buffing her speed and main battery. Some economy flags to increase commander experience gain may also be useful. Full list of appropriate signals for ''Medea'' is shown below: | |||
| ? | + | {{Signal Flags | ||
| | November Echo Setteseven = | | November Echo Setteseven = | |||
| | Mike Yankee Soxisix = | | Mike Yankee Soxisix = | |||
| ? | | India X-Ray = | + | | India X-Ray = 3 | |
| ? | | Juliet Whiskey Unaone = | + | | Juliet Whiskey Unaone = 1 | |
| ? | | Victor Lima = | + | | Victor Lima = 3 | |
| | Hotel Yankee = | | Hotel Yankee = | |||
| ? | | November Foxtrot = | + | | November Foxtrot = 2 | |
| ? | | Sierra Mike = | + | | Sierra Mike = 3 | |
| | India Delta = | | India Delta = | |||
| | Juliet Yankee Bissotwo = | | Juliet Yankee Bissotwo = | |||
| ? | | India Yankee = | + | | India Yankee = 1 | |
| ? | | Juliet Charlie = | + | | Juliet Charlie = 1 | |
| | Zulu = | | Zulu = | |||
| | India Bravo Terrathree = | | India Bravo Terrathree = | |||
| ? | | Equal Speed Charlie London = | + | | Equal Speed Charlie London = 2 | |
| ? | | Zulu Hotel = | + | | Zulu Hotel = 2 | |
| | Papa Papa = | | Papa Papa = | |||
| | Wyvern = | | Wyvern = | |||
| ? | | Red Dragon = | + | | Red Dragon = 1 | |
| ? | | Dragon Flag = | + | | Dragon Flag = 1 | |
| | Ouroboros = | | Ouroboros = | |||
| | Hydra = | | Hydra = | |||
| ? | }} | + | }} | |
| + | ||||
| |Gallery=<!-- write below list of files with description (if necessary) separated with | --><gallery> | |Gallery=<!-- write below list of files with description (if necessary) separated with | --><gallery> | |||
| Line 161: | Line 163: | |||
| <div class="thumb tright"> | <div class="thumb tright"> | |||
| {{AnnoWiki|content= | {{AnnoWiki|content= | |||
| ? | <h2>HMS Medea, 1914</h2> | + | <h2>HMS ''Medea'', 1914</h2> | |
| ====Construction==== | ====Construction==== | |||
| :Builder: John Brown & Company,<br> Clydebank, United Kingdom | :Builder: John Brown & Company,<br> Clydebank, United Kingdom | |||
| Line 217: | Line 219: | |||
| '''HMS ''Medusa'''''<br /> | '''HMS ''Medusa'''''<br /> | |||
| ? | She was completed in July 1915 and was part of the Harwich Force. She was tragically lost in 1916 when destroyer HMS Laverock rammed her during a counter-raid against a German airship. | + | She was completed in July 1915 and was part of the Harwich Force. She was tragically lost in 1916 when destroyer HMS ''Laverock'' rammed her during a counter-raid against a German airship. | |
| '''HMS ''Melampus'''''<br /> | '''HMS ''Melampus'''''<br /> | |||
| ? | She was completed in June of 1915 and joined the Harwich Force as a tender for the 8th Submarine Flotilla. In April 1917 she accidentally rammed the C-class submarine C-16, which was lost with all hands on board. She survived the war and was scrapped in 1921. | + | She was completed in June of 1915 and joined the Harwich Force as a tender for the 8th Submarine Flotilla. In April 1917 she accidentally rammed the ''C''-class submarine ''C-16'', which was lost with all hands on board. She survived the war and was scrapped in 1921. | |
| '''HMS ''Melpomene'''''<br />She was completed in August of 1915 was part of the Harwich Force as a destroyer commissioned into the 10th Destroyer Flotilla. She survived the war and was scrapped in 1921. | '''HMS ''Melpomene'''''<br />She was completed in August of 1915 was part of the Harwich Force as a destroyer commissioned into the 10th Destroyer Flotilla. She survived the war and was scrapped in 1921. | |||
Revision as of 19:14, 19 September 2018
Medea

Tech Tree Position
stock
top
General
| Research price650 exp |
| Purchase price65,000 |
| Hit Points8,000 |
Main Battery
| 102 mm/40 QF Mk.IV on a PIX mount3 х 1 pcs. |
| Rate of Fire12 shots/min. |
| Reload Time5 sec. |
| Rotation Speed8 deg./sec. |
| 180 Degree Turn Time22.5 sec. |
| Firing Range8.03 km. |
| Maximum Dispersion81 m. |
| HE Shell102 mm HE 31 lb |
| Maximum HE Shell Damage1,500 |
| Chance of Fire on Target Caused by HE Shell6 % |
| Initial HE Shell Velocity664 m./s. |
| HE Shell Weight14.1 kg. |
| AP Shell102 mm SAP 31 lb |
| Maximum AP Shell Damage1,500 |
| Initial AP Shell Velocity664 m./s. |
| AP Shell Weight14.1 kg. |
Torpedo Tubes
| 533 mm Mk I2 х 2 pcs. |
| Rate of Fire1.13 shots/min. |
| Reload Time53 sec. |
| Rotation Speed25 deg./sec. |
| 180 Degree Turn Time7.2 sec. |
| Torpedo533 mm Mk II |
| Maximum Damage10,000 |
| Torpedo Speed53 knot |
| Torpedo Range6 km. |
Maneuverability
| Maximum Speed32 knot |
| Turning Circle Radius460 m. |
| Rudder Shift Time3.2 sec. |
Concealment
| Surface Detectability Range5.24 km. |
| Air Detectability Range1.94 km. |
Battle Levels
12345678910

II
65,000
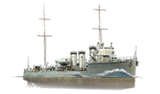
Medea — British Tier II destroyer.
Initially intended for the Greek Navy, but with the outbreak of World War I, she was assigned to the Royal Navy. Medea's main advantage over her same-type foreign contemporaries was her large-caliber—533 mm—torpedoes.
Modules
 |
Rate of Fire (shots/min) | 180° Turn Time (sec) | Maximum Dispersion (m) | Maximum HE Shell Damage (HP) | Chance of Fire on Target Caused by HE Shell (%) | Maximum AP Shell Damage (HP) |
Research price (exp) |
Purchase price ( | |
|---|---|---|---|---|---|---|---|---|---|
| 102 mm/40 QF Mk.IV on a PIX mount 102 mm/45 QF Mk.V on an LA CP Mk.II mount | 12 | 18 | 81 | 1,500 | 6 | 1,800 | 0 | 7,500 |
 |
Hit Points (HP) | Armor (mm) | Armor (mm) | Main Turrets (pcs.) | Secondary Gun Turrets (pcs.) | AA Mounts (pcs.) | Torpedo Tubes (pcs.) | Hangar Capacity (pcs.) |
Research price (exp) |
Purchase price ( | |
|---|---|---|---|---|---|---|---|---|---|---|---|
| Medea (A) | 8,000 | 6 | 6 | 3 | 2 | 0 | 10,000 | ||||
| Medea (B) | 8,700 | 6 | 6 | 3 | 2 | 2 | 300 | 28,000 |
 |
Rate of Fire (shots/min) | Torpedo Tubes Reload Time (sec) | 180° Turn Time (sec) | Maximum Damage (HP) | Torpedo Speed (knot) | Torpedo Range (km) |
Research price (exp) |
Purchase price ( | |
|---|---|---|---|---|---|---|---|---|---|
| 533 mm Mk II | 1.1 | 53 | 7.2 | 10,000 | 53 | 6 | 0 | 9,500 |
 |
IDS_SHIP_PARAM_SUO_INCREASE_DIST (%) | Maximum Firing Range (km) |
Research price (exp) |
Purchase price ( | |
|---|---|---|---|---|---|
| Mk II mod. 1 | 0 | 0 | 4,500 | ||
| Mk II mod. 2 | 0 | 250 | 16,000 |
 |
Maximum Speed (knot) |
Research price (exp) |
Purchase price ( | |
|---|---|---|---|---|
| Propulsion: 23,000 hp | 32 | 0 | 5,000 |
Compatible Upgrades
| Slot 1 |
|---|
Player Opinion
Pros:
Cons:
Optimal Configuration
Signals
Combat signal flags will be the ones most frequently mounted; it is recommended to focus on buffing her speed and main battery. Some economy flags to increase commander experience gain may also be useful. Full list of appropriate signals for Medea is shown below:
Recommended Signal Flags 
| |||||
|---|---|---|---|---|---|
| Combat | |||||
 ★ |

|
 ★ |

|
 ★★★ |
 ★★★ |
 ★ |

|

|
 ★★★ |
 ★★ |

|

|

| ||||
Note: Use of the Juliet Charlie signal makes detonation impossible.
Gallery


Historical Info
Historical Gallery
Ships of U.K.
Destroyers
Categories: