Medea
| Revision as of 08:29, 31 July 2018 Added 3D model | Revision as of 16:37, 20 September 2018 Protected "Ship:Medea" ([Edit=Allow only administrators] (expires 16:37, 20 October 2018 (UTC)) [Move=Allow only administrators] (indefinite)) | |||
10 intermediate revisions by 2 users not shown | ||||
| Line 9: | Line 9: | |||
| <br><br>{{Model3DViewer|d714387fd8f6434885c1b8e3948c7219}} | <br><br>{{Model3DViewer|d714387fd8f6434885c1b8e3948c7219}} | |||
| |Performance=<!-- write text about performance in battles below --> | |Performance=<!-- write text about performance in battles below --> | |||
| ? | + | HMS ''Medea'' introduces players to the British Destroyer tech tree. As such, ''Medea'' will be most effectively played as a defensive destroyer. | ||
| ? | + | |||
| ? | + | ''Medea'' will be most comfortably played as a destroyer that is supporting an allied screen of destroyers or cruisers, or within contention of a cap circle. While she does not have the gun angles to pursue foes, she can keep all her guns pointed forward, which allows quick response to oncoming threats, as well as allowing her to manoeuvre whilst keeping pressure on the enemy. Given her good health pool, she has the stamina to survive drawn out gunfights given proper situational awareness and decision-making. | ||
| ? | + | |||
| ? | + | Furthermore, single-fire torpedoes provide ''Medea'' captains a degree of flexibility not seen in the tier. In a defensive situation, captains can manually decrease the spread between torpedoes to ensure a heavy punch into a vulnerable broadside of an unaware foe, or can use individual torpedoes to misdirect an enemy into a heavier spread of incoming fish; catching them off-guard. Once ''Medea'' closes the distance, she is a difficult adversary to shake off. | ||
| ? | + | |||
| + | A special note on the {{Smoke Generator}} given to royal navy destroyers; due to their incredibly short duration, it encourages captains to continue to reposition their vessel in order to keep pace with the flow of battle. . As a destroyer ''Medea'' is most effective supporting an assault or ambush, ergo the smoke provides an ability to set up a temporary cover from enemies. An individual charge seems like less of a waste if used incorrectly and a following charge should be available soon. | |||
| |Pros=<!-- write list of positive points below. use * as in ordinary wiki-list. --> | |Pros=<!-- write list of positive points below. use * as in ordinary wiki-list. --> | |||
| ? | * | + | * Good hit point pool. | |
| ? | * | + | * 2nd best artillery range. | |
| ? | * | + | * X-turret rotates 180˚ | |
| ? | * | + | * Torpedoes can fire individually. | |
| + | * Each individual torpedo inflicts a lot of damage. | |||
| + | * Torpedoes are fast with good range. | |||
| + | * Good surface concealment. | |||
| + | * Smokescreen reload is fastest of all Destroyers in-class. | |||
| + | * Accelerates faster than other destroyers in-class. | |||
| |Cons=<!-- write list of negative points below. use * as in ordinary wiki-list. --> | |Cons=<!-- write list of negative points below. use * as in ordinary wiki-list. --> | |||
| ? | * | + | * Low shell velocity for 102mm guns. | |
| ? | * | + | * Average number of guns and torpedo launchers. | |
| ? | * | + | * Wide gun angles. | |
| ? | * | + | * Slowest torpedo reload of all Tier 2 Destroyers. | |
| + | * Average top speed and turning radius. | |||
| + | * Smokescreen duration is lowest of all Destroyers in-class | |||
| + | * Does not get access to Engine Boost consumable. | |||
| |Research=<!-- write text about priority sequence of research below --> | |Research=<!-- write text about priority sequence of research below --> | |||
| ? | + | Availability of researchable upgrades for ''{{#var:ship_name}}'' is as follows: | ||
| ? | * ''' | + | *'''Hull''': Upgrade to Hull B for increase in hit-points, increase in artillery performance, and improvement in AA suite. Research of this module unlocks progression to ''[[Valkyrie]]''. | |
| ? | + | *'''Gun Fire Control System''': Upgrade to Mk II mod. 2 for increase in range. | ||
| ? | + | <br /> | ||
| ? | * '''Gun Fire Control System | + | It is recommended to solely focus on Hull upgrades for captains who wish to progress further up the tech tree. Furthermore, the B Hull configuration installs new artillery, which is more competitive in-tier. For captains who wish to continue playing Medea, Mk II mod. 2 is an inexpensive upgrade to research and mount. | |
| ? | + | |||
| ? | + | |||
| ? | + | |||
| ? | + | |||
| ? | + | |||
| |OptimalConfiguration=<!-- write some general text about selection of optimal configuration below (optional)--> | |OptimalConfiguration=<!-- write some general text about selection of optimal configuration below (optional)--> | |||
| |Upgrades=<!-- write text about best upgrades below, add * after upgrade link to designate that another upgrade may be viable --> | |Upgrades=<!-- write text about best upgrades below, add * after upgrade link to designate that another upgrade may be viable --> | |||
| ? | + | The recommended upgrades for ''{{#var:ship_name}}'' are as follows: | ||
| ? | + | * '''Slot 1''': {{Main Armaments Modification 1}}<nowiki>*</nowiki> | ||
| ? | * '''Slot 1''': | + | <br /> | |
| ? | * | + | '''Upgrade Slot 1''': Alternatively, captains may choose to mount {{Magazine Modification 1}} in order to mitigate the chance of magazine [[Ship:Detonation|detonation]] during combat. | |
| ? | + | |||
| ? | + | |||
| ? | + | |||
| ? | + | |||
| ? | + | |||
| |CommanderSkills=<!-- write text about best set of Commander Skills below --> | |CommanderSkills=<!-- write text about best set of Commander Skills below --> | |||
| ? | + | Recommended skills for ''Medea'' commanders should be focused on enhancing her ability to engage other destroyers in artillery duels. This equates to a preference for skills focused on survivability and gun performance. A full breakdown of recommended skills are shown below: | ||
| {{Commander Skills | {{Commander Skills | |||
| ? | | Priority Target = | + | | Priority Target = 3 | |
| ? | | Preventative Maintenance = | + | | Preventative Maintenance = 3 | |
| | Expert Loader = | | Expert Loader = | |||
| | Aircraft Servicing Expert = | | Aircraft Servicing Expert = | |||
| | Direction Center for Catapult Aircraft = | | Direction Center for Catapult Aircraft = | |||
| | Dogfighting Expert = | | Dogfighting Expert = | |||
| ? | | Incoming Fire Alert = | + | | Incoming Fire Alert = 1 | |
| | Evasive Maneuver = | | Evasive Maneuver = | |||
| ? | | High Alert = | + | | High Alert = 1 | |
| | Jack of All Trades = | | Jack of All Trades = | |||
| ? | | Expert Marksman = | + | | Expert Marksman = 2 | |
| | Torpedo Acceleration = | | Torpedo Acceleration = | |||
| | Smoke Screen Expert = | | Smoke Screen Expert = | |||
| | Expert Rear Gunner = | | Expert Rear Gunner = | |||
| ? | | Adrenaline Rush = | + | | Adrenaline Rush = 3 | |
| ? | | Last Stand = | + | | Last Stand = 3 | |
| ? | | Basics of Survivability = | + | | Basics of Survivability = 1 | |
| ? | | Survivability Expert = | + | | Survivability Expert = 2 | |
| ? | | Torpedo Armament Expertise = | + | | Torpedo Armament Expertise = | |
| | Emergency Takeoff = | | Emergency Takeoff = | |||
| ? | | Basic Firing Training = | + | | Basic Firing Training = 3 | |
| ? | | Superintendent = | + | | Superintendent = 3 | |
| ? | | Demolition Expert = | + | | Demolition Expert = 2 | |
| ? | | Vigilance = | + | | Vigilance = 1 | |
| | Manual Fire Control for Secondary Armament = | | Manual Fire Control for Secondary Armament = | |||
| ? | | Fire Prevention = | + | | Fire Prevention = 1 | |
| | Inertia Fuse for HE Shells = | | Inertia Fuse for HE Shells = | |||
| | Air Supremacy = | | Air Supremacy = | |||
| ? | | Advanced Firing Training = | + | | Advanced Firing Training = 1 | |
| | Manual Fire Control for AA Armament = | | Manual Fire Control for AA Armament = | |||
| | Radio Position Finding = | | Radio Position Finding = | |||
| ? | | Concealment Expert = | + | | Concealment Expert = 3 | |
| ? | }} | + | }} | |
| |Consumables=<!-- write text about selection of Consumables below --> | |Consumables=<!-- write text about selection of Consumables below --> | |||
| ? | + | ''{{#var:ship_name}}'' can equip the following consumables: | ||
| ? | * '''Slot 1:''' {{Damage Control Party}} | + | * '''Slot 1:''' {{Damage Control Party}} | |
| ? | * {{ | + | * '''Slot 2:''' {{Smoke Generator}} | |
| ? | + | <br /> | ||
| ? | + | Note on {{Smoke Generator}}: Royal Navy destroyers come equipped with a unique smoke screen generator. Once activated, they will only disperse for a maximum of '''40''' seconds, but in turn the consumable will recharge in '''80''' seconds ('''60''' seconds for the premium consumable). Furthermore, a total of '''5''' charges ('''6''' charges for premium) will be in supply. | ||
| ? | + | |||
| ? | + | At the minimum, captains are encouraged to equip the premium {{Damage Control Party II}} in order to have more opportunities to repair damaged modules. | ||
| ? | + | |||
| ? | + | |||
| |Camouflage=<!-- write text about useful camouflage below --> | |Camouflage=<!-- write text about useful camouflage below --> | |||
| ? | + | [[Ship:Camouflage#Standard Camouflage|Type 1, 2, or 5 camouflage]] can be equipped for credits; It is recommended to use Type 1 or Type 5 camouflage in order to decrease detectability range. | ||
| ? | [[Ship:Camouflage#Standard Camouflage|Type 1, 2, or 5 camouflage]] can be equipped for credits; | + | ||
| ? | + | |||
| ? | + | |||
| ? | + | |||
| ? | + | |||
| ? | + | |||
| ? | + | |||
| ? | + | |||
| ? | + | |||
| ? | + | |||
| ? | + | |||
| ? | + | |||
| |Signals=<!-- write text about best set of signals below --> | |Signals=<!-- write text about best set of signals below --> | |||
| + | Combat signal flags will be the ones most frequently mounted; it is recommended to focus on buffing her speed and main battery. Some economy flags to increase commander experience gain may also be useful. Full list of appropriate signals for ''Medea'' is shown below: | |||
| ? | + | {{Signal Flags | ||
| | November Echo Setteseven = | | November Echo Setteseven = | |||
| | Mike Yankee Soxisix = | | Mike Yankee Soxisix = | |||
| ? | | India X-Ray = | + | | India X-Ray = 3 | |
| ? | | Juliet Whiskey Unaone = | + | | Juliet Whiskey Unaone = 1 | |
| ? | | Victor Lima = | + | | Victor Lima = 3 | |
| | Hotel Yankee = | | Hotel Yankee = | |||
| ? | | November Foxtrot = | + | | November Foxtrot = 2 | |
| ? | | Sierra Mike = | + | | Sierra Mike = 3 | |
| | India Delta = | | India Delta = | |||
| | Juliet Yankee Bissotwo = | | Juliet Yankee Bissotwo = | |||
| ? | | India Yankee = | + | | India Yankee = 1 | |
| ? | | Juliet Charlie = | + | | Juliet Charlie = 1 | |
| | Zulu = | | Zulu = | |||
| | India Bravo Terrathree = | | India Bravo Terrathree = | |||
| ? | | Equal Speed Charlie London = | + | | Equal Speed Charlie London = 2 | |
| ? | | Zulu Hotel = | + | | Zulu Hotel = 2 | |
| | Papa Papa = | | Papa Papa = | |||
| | Wyvern = | | Wyvern = | |||
| ? | | Red Dragon = | + | | Red Dragon = 1 | |
| ? | | Dragon Flag = | + | | Dragon Flag = 1 | |
| | Ouroboros = | | Ouroboros = | |||
| | Hydra = | | Hydra = | |||
| ? | }} | + | }} | |
| ? | ||||
| + | |Gallery=<!-- write below list of files with description (if necessary) separated with | --><gallery> | |||
| + | File:MedStart.jpg | |||
| + | File:MedBridge.jpg | |||
| + | File:MedHit.jpg | |||
| + | File:MedTorps.jpg | |||
| + | File:MedSurprise.jpg | |||
| </gallery> | </gallery> | |||
| Line 157: | Line 148: | |||
| <div class="thumb tright"> | <div class="thumb tright"> | |||
| {{AnnoWiki|content= | {{AnnoWiki|content= | |||
| ? | <h2>'' | + | <h2>HMS ''Medea'', 1914</h2> | |
| ? | ===Construction=== | + | ====Construction==== | |
| ? | :Builder: | + | :Builder: John Brown & Company,<br> Clydebank, United Kingdom | |
| ? | :Laid down: | + | :Laid down: 8 April 1914 | |
| ? | :Launched: | + | :Launched: 30 January 1915 | |
| ? | :Commissioned: | + | :Commissioned: 16 June 1915 | |
| ---- | ---- | |||
| ? | ===Specifications=== | + | ====Specifications==== | |
| ? | : | + | :Displacement: 1,040 tons, standard | |
| ? | : | + | :Length: 83.4m | |
| ? | : | + | :Beam: 8.1m | |
| ? | : | + | :Draft: 3.2m | |
| ---- | ---- | |||
| ====Machinery==== | ====Machinery==== | |||
| ? | : | + | : 3 Yarrow boilers, 3 Brown-Curtis turbines | |
| + | : 278 tons of fuel oil | |||
| ---- | ---- | |||
| ====Performance==== | ====Performance==== | |||
| ? | : | + | : 32 knots at 25,000 shaft horsepower | |
| ? | : | + | : 1,800 nautical miles at 15 knots | |
| ? | + | |||
| ? | + | |||
| ? | + | |||
| ? | + | |||
| ? | + | |||
| ? | + | |||
| ? | + | |||
| ? | + | |||
| ? | + | |||
| ---- | ---- | |||
| ====Armament==== | ====Armament==== | |||
| =====Main===== | =====Main===== | |||
| ? | : | + | :Three (3x1) 101.6mm/45 QF Mk VII gun | |
| ? | + | =====Anti-Aircraft===== | ||
| ? | + | :Two (2x1) 40mm/39 QF Mk II gun | ||
| ? | =====Anti- | + | ||
| ? | : | + | ||
| =====Torpedoes===== | =====Torpedoes===== | |||
| ? | : | + | :Four (2x2) 533 launchers | |
| ---- | ---- | |||
| ? | ==== | + | ====Complement==== | |
| ? | + | : 80 men | ||
| ? | + | }} | ||
| ? | + | </div> | ||
| ? | + | |||
| ? | + | |||
| ? | : | + | ||
| ? | }}</div> | + | ||
| ? | + | |||
| ? | + | |||
| ===History=== | ===History=== | |||
| ? | + | [[File:Medea1.jpg|none|frame|x300px|link=|Profile of HMS ''Medea'', date and location unknown.]] | ||
| ? | + | |||
| ====Design==== | ====Design==== | |||
| + | The ''Medea''-class destroyers were a product of the waning contention between Greece and the Ottoman Empire in the early 20th century. Especially after the First Balkan War, the Greek Navy placed an order for new warships from France and Britain. Specifically, they ordered a near identical version of the British ''M''-class destroyers coming into service at the time. | |||
| + | ||||
| + | The British Board of Admiralty conceived the ''M''-class destroyers in 1913. They were based off the preceding ''Laforey''-class destroyers, but with alterations made to the dimensions, and machinery. | |||
| + | ||||
| + | The biggest change was the incorporation of the newer boilers designed by Yarrow & Company. Furthermore, some of the ''M''-class destroyers added one more turbine than their predecessors, to three total. All of this meant that during speed trials, the class of destroyers added more than 6 knots to their total speed. | |||
| + | ||||
| + | The armament was identical to the ones pioneered on the ''Laforey''-class. Main armament consisted of three of the newer 4-inch/45 QF Mk VII guns, with two dual 533mm torpedo tube launchers; which was a quite heavy barrage for its time. The anti-aircraft suite was improved from 37mm guns to 40mm guns. | |||
| + | ||||
| + | There were some differences to the Greek destroyers, compared to their British counterparts. The Greek ships had a taller fore funnel where as the British equivalents had equal-sized funnels. The mainmast was taller than the foremast; a practice not common till later in the century. The main guns were placed uniquely on the ''Medea''-class; one on the forecastle, one abaft the fore funnel, and one of the quarterdecks. Both ships had the three boilers organized between two rooms; a large room housing two, and a smaller room housing one. The Greek ships had the large boiler room beside the single engine room, with the smaller boiler room front, whereas the British ships had the smaller room beside the engine room with the larger room front. | |||
| ====Service==== | ====Service==== | |||
| + | Two separate firms – John Brown & Company, and Fairfield Shipbuilding – built all four ships. All were ordered on April 1914, but with the First World War commencing just two months after, the Royal Navy purchased the entire class from the Greek Navy by August 1914. | |||
| + | All four ships were commissioned as part of the well-known Harwich Force. At the beginning of the War, the Admiralty was keenly aware of the threat posed by any German raids entering the Channel form either end with the goal of harassing civilian and merchant traffic. The Harwich Striking Force was a collection of cruisers and destroyers stationed from the eponymous town in order to guard the southern entrance to the Channel from enemy raiders and to provide escort for maritime trade approaching and departing the Thames. | |||
| ? | + | '''HMS ''Medea'''''<br /> | ||
| + | She was completed on June 1915 and was part of the 10th Destroyer Flotilla, as part of the Harwich Force. She survived the war and was scrapped in 1921. | |||
| + | '''HMS ''Medusa'''''<br /> | |||
| + | She was completed in July 1915 and was part of the Harwich Force. She was tragically lost in 1916 when destroyer HMS ''Laverock'' rammed her during a counter-raid against a German airship. | |||
| + | ||||
| + | '''HMS ''Melampus'''''<br /> | |||
| + | She was completed in June of 1915 and joined the Harwich Force as a tender for the 8th Submarine Flotilla. In April 1917 she accidentally rammed the ''C''-class submarine ''C-16'', which was lost with all hands on board. She survived the war and was scrapped in 1921. | |||
| + | ||||
| + | '''HMS ''Melpomene'''''<br />She was completed in August of 1915 was part of the Harwich Force as a destroyer commissioned into the 10th Destroyer Flotilla. She survived the war and was scrapped in 1921. | |||
| + | ||||
| + | |HistoricalGallery=<!-- write below list of files with description (if necessary) separated with | --><gallery> | |||
| + | File:Medea1.jpg | |||
| + | File:Medea2.jpg | |||
| </gallery> | </gallery> | |||
Revision as of 16:37, 20 September 2018

| Research price650 exp |
| Purchase price65,000 |
| Hit Points8,000 |
| 102 mm/40 QF Mk.IV on a PIX mount3 х 1 pcs. |
| Rate of Fire12 shots/min. |
| Reload Time5 sec. |
| Rotation Speed8 deg./sec. |
| 180 Degree Turn Time22.5 sec. |
| Firing Range8.03 km. |
| Maximum Dispersion81 m. |
| HE Shell102 mm HE 31 lb |
| Maximum HE Shell Damage1,500 |
| Chance of Fire on Target Caused by HE Shell6 % |
| Initial HE Shell Velocity664 m./s. |
| HE Shell Weight14.1 kg. |
| AP Shell102 mm SAP 31 lb |
| Maximum AP Shell Damage1,500 |
| Initial AP Shell Velocity664 m./s. |
| AP Shell Weight14.1 kg. |
| 533 mm Mk I2 х 2 pcs. |
| Rate of Fire1.13 shots/min. |
| Reload Time53 sec. |
| Rotation Speed25 deg./sec. |
| 180 Degree Turn Time7.2 sec. |
| Torpedo533 mm Mk II |
| Maximum Damage10,000 |
| Torpedo Speed53 knot |
| Torpedo Range6 km. |
| Maximum Speed32 knot |
| Turning Circle Radius460 m. |
| Rudder Shift Time3.2 sec. |
| Surface Detectability Range5.24 km. |
| Air Detectability Range1.94 km. |

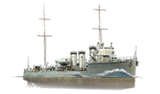
Medea — British Tier II destroyer.
Initially intended for the Greek Navy, but with the outbreak of World War I, she was assigned to the Royal Navy. Medea's main advantage over her same-type foreign contemporaries was her large-caliber—533 mm—torpedoes.
Modules
 |
Rate of Fire (shots/min) | 180° Turn Time (sec) | Maximum Dispersion (m) | Maximum HE Shell Damage (HP) | Chance of Fire on Target Caused by HE Shell (%) | Maximum AP Shell Damage (HP) |
Research price (exp) |
Purchase price ( | |
|---|---|---|---|---|---|---|---|---|---|
| 102 mm/40 QF Mk.IV on a PIX mount 102 mm/45 QF Mk.V on an LA CP Mk.II mount | 12 | 18 | 81 | 1,500 | 6 | 1,800 | 0 | 7,500 |
 |
Hit Points (HP) | Armor (mm) | Armor (mm) | Main Turrets (pcs.) | Secondary Gun Turrets (pcs.) | AA Mounts (pcs.) | Torpedo Tubes (pcs.) | Hangar Capacity (pcs.) |
Research price (exp) |
Purchase price ( | |
|---|---|---|---|---|---|---|---|---|---|---|---|
| Medea (A) | 8,000 | 6 | 6 | 3 | 2 | 0 | 10,000 | ||||
| Medea (B) | 8,700 | 6 | 6 | 3 | 2 | 2 | 300 | 28,000 |
 |
Rate of Fire (shots/min) | Torpedo Tubes Reload Time (sec) | 180° Turn Time (sec) | Maximum Damage (HP) | Torpedo Speed (knot) | Torpedo Range (km) |
Research price (exp) |
Purchase price ( | |
|---|---|---|---|---|---|---|---|---|---|
| 533 mm Mk II | 1.1 | 53 | 7.2 | 10,000 | 53 | 6 | 0 | 9,500 |
 |
IDS_SHIP_PARAM_SUO_INCREASE_DIST (%) | Maximum Firing Range (km) |
Research price (exp) |
Purchase price ( | |
|---|---|---|---|---|---|
| Mk II mod. 1 | 0 | 0 | 4,500 | ||
| Mk II mod. 2 | 0 | 250 | 16,000 |
 |
Maximum Speed (knot) |
Research price (exp) |
Purchase price ( | |
|---|---|---|---|---|
| Propulsion: 23,000 hp | 32 | 0 | 5,000 |
Compatible Upgrades
| Slot 1 |
|---|
Player Opinion
Performance
HMS Medea introduces players to the British Destroyer tech tree. As such, Medea will be most effectively played as a defensive destroyer.
Medea will be most comfortably played as a destroyer that is supporting an allied screen of destroyers or cruisers, or within contention of a cap circle. While she does not have the gun angles to pursue foes, she can keep all her guns pointed forward, which allows quick response to oncoming threats, as well as allowing her to manoeuvre whilst keeping pressure on the enemy. Given her good health pool, she has the stamina to survive drawn out gunfights given proper situational awareness and decision-making.
Furthermore, single-fire torpedoes provide Medea captains a degree of flexibility not seen in the tier. In a defensive situation, captains can manually decrease the spread between torpedoes to ensure a heavy punch into a vulnerable broadside of an unaware foe, or can use individual torpedoes to misdirect an enemy into a heavier spread of incoming fish; catching them off-guard. Once Medea closes the distance, she is a difficult adversary to shake off.
A special note on the Smoke GeneratorPros:
- Good hit point pool.
- 2nd best artillery range.
- X-turret rotates 180˚
- Torpedoes can fire individually.
- Each individual torpedo inflicts a lot of damage.
- Torpedoes are fast with good range.
- Good surface concealment.
- Smokescreen reload is fastest of all Destroyers in-class.
- Accelerates faster than other destroyers in-class.
Cons:
- Low shell velocity for 102mm guns.
- Average number of guns and torpedo launchers.
- Wide gun angles.
- Slowest torpedo reload of all Tier 2 Destroyers.
- Average top speed and turning radius.
- Smokescreen duration is lowest of all Destroyers in-class
- Does not get access to Engine Boost consumable.
Research
Availability of researchable upgrades for Medea is as follows:
- Hull: Upgrade to Hull B for increase in hit-points, increase in artillery performance, and improvement in AA suite. Research of this module unlocks progression to Valkyrie.
- Gun Fire Control System: Upgrade to Mk II mod. 2 for increase in range.
Optimal Configuration
Upgrades
The recommended upgrades for Medea are as follows:
- Slot 1: Main Armaments Modification 1
 *
*
Upgrade Slot 1: Alternatively, captains may choose to mount Magazine Modification 1 ![]() in order to mitigate the chance of magazine detonation during combat.
in order to mitigate the chance of magazine detonation during combat.
Commander Skills
Recommended skills for Medea commanders should be focused on enhancing her ability to engage other destroyers in artillery duels. This equates to a preference for skills focused on survivability and gun performance. A full breakdown of recommended skills are shown below:
| Recommended Commander Skills | ||||||||
|---|---|---|---|---|---|---|---|---|
| Cost (points) |
Endurance | Attack | Support | Versatility | ||||
| 1 |
★★★ |
★★★ |
|
|
|
|
★ |
|
| 2 |
★ |
|
★★ |
|
|
|
★★★ |
★★★ |
| 3 |
★ |
★★ |
|
|
★★★ |
★★★ |
★★ |
★ |
| 4 |
|
★ |
|
|
★ |
|
|
★★★ |
| Key: ★★★ - Extremely Useful ★★ - Frequently Useful ★ - Occasionally Useful No stars - Meh Χ - Not recommended | ||||||||
Consumables
Medea can equip the following consumables:
- Slot 1: Damage Control Party

- Slot 2: Smoke Generator

Note on Smoke Generator ![]() : Royal Navy destroyers come equipped with a unique smoke screen generator. Once activated, they will only disperse for a maximum of 40 seconds, but in turn the consumable will recharge in 80 seconds (60 seconds for the premium consumable). Furthermore, a total of 5 charges (6 charges for premium) will be in supply.
: Royal Navy destroyers come equipped with a unique smoke screen generator. Once activated, they will only disperse for a maximum of 40 seconds, but in turn the consumable will recharge in 80 seconds (60 seconds for the premium consumable). Furthermore, a total of 5 charges (6 charges for premium) will be in supply.
At the minimum, captains are encouraged to equip the premium Damage Control Party II (![]() ) in order to have more opportunities to repair damaged modules.
) in order to have more opportunities to repair damaged modules.
Camouflage
Type 1, 2, or 5 camouflage can be equipped for credits; It is recommended to use Type 1 or Type 5 camouflage in order to decrease detectability range.
Signals
Combat signal flags will be the ones most frequently mounted; it is recommended to focus on buffing her speed and main battery. Some economy flags to increase commander experience gain may also be useful. Full list of appropriate signals for Medea is shown below:
Recommended Signal Flags 
| |||||
|---|---|---|---|---|---|
| Combat | |||||
 ★ |

|
 ★ |

|
 ★★★ |
 ★★★ |
 ★ |

|

|
 ★★★ |
 ★★ |

|

|

| ||||
Note: Use of the Juliet Charlie signal makes detonation impossible.
Gallery


Historical Info
Historical Gallery

