Midway
| Revision as of 15:05, 7 July 2018 | Revision as of 03:36, 11 May 2019 corrected consumables for planes | |||
9 intermediate revisions by 5 users not shown | ||||
| Line 1: | Line 1: | |||
| ? | <!-- DO NOT EDIT OR DELETE LINES WITH COMMENTS (it | + | <!-- DO NOT EDIT OR DELETE LINES WITH COMMENTS (it looks like as this or next line) | |
| -->{{WoWs_Ship|Promo=<!-- in case of gift or promo ship write conditions to get it. --> | -->{{WoWs_Ship|Promo=<!-- in case of gift or promo ship write conditions to get it. --> | |||
| ? | |Anno=<!-- you can write below short description for the ship. it will replace default once. --> | + | |Anno=<!-- you can write below a short description for the ship. it will replace default once. --> | |
| The largest U.S. Navy warship laid down during World War II. The huge size of this aircraft carrier allowed her to carry the largest air group, compared to her contemporary counterparts. Excellent torpedo protection, well-armored flight deck and powerful AA defenses made ''Midway''-class ships virtually invulnerable to attacks from enemy aircraft.<br><br>The lead ship of the class, USS ''Midway'', is now preserved as a [https://www.midway.org/ military museum ship] in San Diego, California.<br><br>{{Model3DViewer|897dab115eaf4d79abf479539018fc3b}} | The largest U.S. Navy warship laid down during World War II. The huge size of this aircraft carrier allowed her to carry the largest air group, compared to her contemporary counterparts. Excellent torpedo protection, well-armored flight deck and powerful AA defenses made ''Midway''-class ships virtually invulnerable to attacks from enemy aircraft.<br><br>The lead ship of the class, USS ''Midway'', is now preserved as a [https://www.midway.org/ military museum ship] in San Diego, California.<br><br>{{Model3DViewer|897dab115eaf4d79abf479539018fc3b}} | |||
| ? | |Performance=<!-- write text about performance in battles below --> | + | |Performance=<!-- write a text about performance in battles below --> | |
| The pinnacle of the American aircraft carrier line, Midway is best suited for the flexible, fool-proof combat. Jack-of-all-Trades preset and parameters make her able to react to any threats quickly and counter them even if the original battle plan is falling apart. | The pinnacle of the American aircraft carrier line, Midway is best suited for the flexible, fool-proof combat. Jack-of-all-Trades preset and parameters make her able to react to any threats quickly and counter them even if the original battle plan is falling apart. | |||
| ? | + | While she has fewer planes on deck compared to her Japanese counterpart ''[[Ship:Hakuryu|Hakuryu]]'', Midway's plane squadrons are smaller in size and have higher health per plane. These squadrons can withstand more anti-aircraft power due to their increased tankiness and can even plow through the thickest of AA to launch attacks. | ||
| ? | Torpedo bombers are, after balance changes, | + | Torpedo bombers are, after balance changes, weaker than Tier VIII USN carrier torpedoes and remain the weakest of all Midway assets. The damage per torpedo is extremely low, only dealing a maximum of 4233 damage per torpedo hit as opposed to 6467 at Tier VIII. Midway's torpedoes also have very low flood chance, players may have to land over 10 torpedoes in order to get a flood. However, to compensate for these shortcomings the Midway drops six torpedoes per attack, two torps from each plane. | |
| ? | + | Midway's dive bombers are the stars of the show. Known for hitting targets hard regardless of class, the dive bombers can both do high amounts of alpha damage as well as set fires. They drop the same amount of bombs per attack as the ''[[Ship:Lexington|Lexington]]'', but get one more attack per squadron. Dropping near the end of an attack run can greatly increase the accuracy of the bomb drop, however, this technique is very high in difficulty. When mastered, the bomb runs can do five-digit damage per run even to destroyers. | ||
| ? | + | There are two different types of attack aircraft to use, similar to ''Lexington''. Players get the option between HVARs and Tiny Tims. HVARs have many rockets per run and have a horizontal aiming pattern. However, HVARs have low fire chance individually and have low penetration, so these rockets are best used on soft targets. Tiny Tims are the hard hitters, these rockets have high penetration and high fire chance. These rockets launch fewer rockets per attack with a vertical aiming pattern, so it is easier to miss small targets with these rockets. As the dive bombers can take care of small targets adequately, Tiny Tims are heavily advised over the HVARs. | ||
| ? | Huge spotting range is often named as a disadvantage, though it's offset by speed, armor and AA defenses, making Midway more viable in open combat should the need arise (she can tank battleship fire for quite some time). This all leads to a more forgiving gameplay compared to most other carriers, favoring brute force over stealth and allowing to follow allies for faster attacks. | + | Huge spotting range is often named as a disadvantage, though it's offset by speed, armor, torpedo protection, and AA defenses, making Midway more viable in open combat should the need arise (she can tank battleship fire for quite some time). This all leads to a more forgiving gameplay compared to most other carriers, favoring brute force over stealth and allowing to follow allies for faster attacks. | |
| ? | |Pros=<!-- write list of positive points below. use * as in ordinary wiki-list. --> | + | |Pros=<!-- write a list of positive points below. use * as in ordinary wiki-list. --> | |
| ? | * | + | * Planes have relatively high health compared to ''[[Ship:Hakuryu|Hakuryu]]''. | |
| ? | + | * High potential damage over time (via [[Ship:Fire|fires]] and [[Ship:Flooding|floods]]). | ||
| ? | * High potential damage over time (via [[Ship:Fire|fires]] and [[Ship:Flooding|floods]]) | + | ||
| * Strong anti-aircraft suite. | * Strong anti-aircraft suite. | |||
| ? | * Dive bombers | + | * Dive bombers are equipped with AN-M66 2000lb (907kg) High explosive bombs that inflict tremendous damage if they hit. | |
| ? | + | * Hull is relatively well armored and torpedo-proof, allowing to keep closer to action and therefore lower aircraft travel time. | ||
| ? | * Hull is relatively well armored, allowing to keep closer to action and therefore lower | + | * Tiny Tims have high penetration and high damage for rockets. | |
| ? | |Cons=<!-- write list of negative points below. use * as in ordinary wiki-list. --> | + | |Cons=<!-- write a list of negative points below. use * as in ordinary wiki-list. --> | |
| * With a base detection radius of over 18.0 km, ''Midway'' is among the most easily detectable ships in the game; this makes her a prime target for enemy surface ships when she is spotted. | * With a base detection radius of over 18.0 km, ''Midway'' is among the most easily detectable ships in the game; this makes her a prime target for enemy surface ships when she is spotted. | |||
| ? | * Armor is just thick enough to let incoming armor piercing shells from enemy battleships land as regular penetrations (or citadel hits) rather than over-penetrate. | + | * Armor is just thick enough to let incoming armor-piercing shells from enemy battleships land as regular penetrations (or citadel hits) rather than over-penetrate. | |
| ? | * | + | * HVAR rockets have low penetration and low fire chance for Tier X, while Tiny Tims are prone to missing small targets due to fewer rockets per payload. | |
| ? | + | * Torpedoes have poor aiming time as well as abysmal torpedo damage and flood chance. | ||
| ? | + | |||
| ? | + | |||
| ? | + | |||
| ? | * | + | ||
| ? | + | |||
| ? | |Research=<!-- write text about priority sequence of research below --> | + | |Research=<!-- write a text about priority sequence of research below --> | |
| ? | Unlike most | + | Unlike most Tier X ships, Midway has upgrades to research, with one variable choice. | |
| ? | + | |||
| ? | + | |||
| |OptimalConfiguration=<!-- write some general text about selection of optimal configuration below (optional)--> | |OptimalConfiguration=<!-- write some general text about selection of optimal configuration below (optional)--> | |||
| Line 48: | Line 40: | |||
| The recommended upgrades for ''{{#var:ship_name}}'' are as follows: | The recommended upgrades for ''{{#var:ship_name}}'' are as follows: | |||
| *'''Slot 1''': {{Air Groups Modification 1}} | *'''Slot 1''': {{Air Groups Modification 1}} | |||
| ? | *'''Slot 2''': {{ | + | *'''Slot 2''': {{Aircraft Engines Modification 1}} | |
| ? | *'''Slot 3''': {{ | + | *'''Slot 3''': {{Torpedo Bombers Modification 1}} | |
| ? | *'''Slot 4''': {{ | + | *'''Slot 4''': {{Torpedo Bombers Modification 2}} | |
| ? | *'''Slot 5''': {{Concealment System Modification 1}} | + | *'''Slot 5''': {{Concealment System Modification 1}} or {{Flight Control Modification 1}} | |
| ? | *'''Slot 6''': {{Air Groups Modification | + | *'''Slot 6''': {{Air Groups Modification 2}} or {{Flight Control Modification 2}} | |
| ? | '''Upgrade Slot | + | '''Upgrade Slot 5''' offers players '''Concealment System Modification 1''', which stacks with [[Ship:Commander#Concealment_Expert|Concealment Expert]] and Camouflage to bring ''{{#var:ship_name}}''’s surface detection down to a decent range of 13.5km. Players may also trade concealment for '''Flight Control Modification 1''', which adds two additional planes on deck per plane type as well as accelerating plane replenishment time by 5%. | |
| ? | '''Upgrade Slot | + | '''Upgrade Slot 6''' is the 2nd main choice of upgrades with ''{{#var:ship_name}}''. Due to the common presence of multiple battleships and cruisers with very high AA power, '''Air Groups Modification 2''' is highly recommended to make sure ''{{#var:ship_name}}''’s planes will survive their trip to and from their target. If survivability isn't the player's foremost preference, {{Flight Control Modification 2}} is viable, decreasing the speed gap between ''{{#var:ship_name}}''’s and ''[[Hakuryu]]''’s planes, allowing the slower and larger American squadrons to have a better chance of escaping from their Japanese counterparts. | |
| ? | '''Upgrade | + | <!-- '''Legendary Upgrade: {{Reinforced Armor Protection for Attack Air Groups}}''' belongs to '''Slot 6''' as well, and is, effectively, a better version of '''Air Groups Modification 3''': double the aircraft durability bonus (30% vs 15%) in exchange for 5% decrease in speed (offset by other modifications and by the higher chance to return a squadron intact). Considering that plane durability is a major necessity for Midway, the legendary upgrade is a solid choice, especially in prolonged battles.--> | |
| ? | '' | + | |CommanderSkills=<!-- write a text about best set of Commander Skills below --> | |
| + | As a Tier X carrier, ''{{#var:ship_name}}'' has incredibly strong anti-aircraft armament, rivaling those of specialized AA cruisers. Coupled with Basic Firing Training and Manual Fire Control for AA Armament, captains can significantly increase the ship's AA DPS to shoot down enemy planes effectively, sometimes completely wiping out the opponent's attack squadrons before they even manage to attack, or devastating careless enemy fighters. | |||
| ? | + | If the ''Midway'' has access to the Concealment System Modification, captains can opt to choose to utilize the Concealment Expert skill as an indirect form of further protection from enemy ships (with skill, camouflage, and upgrade, her surface detection range is 12.5km). | ||
| ? | + | |||
| ? | + | |||
| ? | If the ''Midway'' has access to the Concealment System Modification, captains can opt to choose to utilize the Concealment Expert skill as an indirect form of further protection from enemy ships (with skill, camouflage, and upgrade, her surface detection range is | + | ||
| ? | + | |||
| ? | + | |||
| ? | + | |||
| ? | + | |||
| {{Commander Skills | {{Commander Skills | |||
| ? | | Priority Target = | + | | Priority Target = | |
| ? | | Preventative Maintenance = | + | | Preventative Maintenance = | |
| | Expert Loader = | | Expert Loader = | |||
| ? | | | + | | Air Supremacy = 3 | |
| ? | | Direction Center for | + | | Direction Center for Fighters = 1 | |
| ? | | | + | | Improved Engine Boost = 3 | |
| ? | | Incoming Fire Alert = | + | | Incoming Fire Alert = | |
| ? | | | + | | Last Gasp = 3 | |
| | High Alert = | | High Alert = | |||
| | Jack of All Trades = | | Jack of All Trades = | |||
| | Expert Marksman = | | Expert Marksman = | |||
| ? | | Torpedo Acceleration = | + | | Torpedo Acceleration = 2 | |
| | Smoke Screen Expert = | | Smoke Screen Expert = | |||
| ? | | | + | | Improved Engines = 3 | |
| | Adrenaline Rush = 2 | | Adrenaline Rush = 2 | |||
| | Last Stand = | | Last Stand = | |||
| ? | | Survivability | + | | Basics of Survivability = | |
| ? | | | + | | Survivability Expert = 3 | |
| ? | | Torpedo Armament Expertise = | + | | Torpedo Armament Expertise = | |
| ? | | | + | | Aircraft Armor = 3 | |
| ? | | Basic Firing Training = | + | | Basic Firing Training = | |
| | Superintendent = | | Superintendent = | |||
| ? | | Demolition Expert = | + | | Demolition Expert = 2 | |
| ? | | Vigilance = | + | | Vigilance = | |
| | Manual Fire Control for Secondary Armament = | | Manual Fire Control for Secondary Armament = | |||
| | Fire Prevention = | | Fire Prevention = | |||
| | Inertia Fuse for HE Shells = | | Inertia Fuse for HE Shells = | |||
| ? | | | + | | Sight Stabilization = 3 | |
| ? | | Advanced Firing Training = | + | | Advanced Firing Training = | |
| ? | | Manual Fire Control for AA Armament = | + | | Manual Fire Control for AA Armament = | |
| | Radio Position Finding = | | Radio Position Finding = | |||
| ? | | Concealment Expert = | + | | Concealment Expert = 2 | |
| }} | }} | |||
| |Consumables=<!-- write text about selection of Consumables below --> | |Consumables=<!-- write text about selection of Consumables below --> | |||
| ''{{#var:ship_name}}'' can equip the following consumables: | ''{{#var:ship_name}}'' can equip the following consumables: | |||
| + | ||||
| + | '''Aircraft Carrier:''' | |||
| * '''Slot 1:''' {{Damage Control Party}} | * '''Slot 1:''' {{Damage Control Party}} | |||
| ? | * '''Slot 2:''' {{ | + | * '''Slot 2:''' {{Fighter I}} | |
| ? | + | All aircraft carrier consumables are automatically activated. | ||
| ? | |Camouflage=<!-- write text about useful camouflage below --> | + | '''Attack Aircraft:''' | |
| ? | [[Ship:Camouflage#Standard Camouflage|Type 1, 2, or 5 camouflage]] can be equipped for credits; Types 1 or 5 are recommended at a minimum to reduce | + | * '''Slot 1:''' {{Engine Cooling}} | |
| + | * '''Slot 2:''' {{Patrol Fighter}} | |||
| + | ||||
| + | '''Torpedo Bombers:''' | |||
| + | * '''Slot 1:''' {{Engine Cooling}} | |||
| + | * '''Slot 2:''' {{Patrol Fighter}} | |||
| + | * '''Slot 3:''' {{Repair I}} | |||
| + | ||||
| + | '''Bombers:''' | |||
| + | * '''Slot 1:''' {{Engine Cooling}} | |||
| + | * '''Slot 2:''' {{Patrol Fighter}} | |||
| + | ||||
| + | |Camouflage=<!-- write a text about useful camouflage below --> | |||
| + | [[Ship:Camouflage#Standard Camouflage|Type 1, 2, or 5 camouflage]] can be equipped for credits; Types 1 or 5 are recommended at a minimum to reduce detectability range. | |||
| Players who wish to spend doubloons can equip ''Midway'' with [[Ship:Camouflage#Permanent_Camouflage|Type 20 camouflage]] that lowers her detection radius, reduces the accuracy of incoming shells, reduces her repair costs, increases her credit earnings, and increases the amount of experience she earns. | Players who wish to spend doubloons can equip ''Midway'' with [[Ship:Camouflage#Permanent_Camouflage|Type 20 camouflage]] that lowers her detection radius, reduces the accuracy of incoming shells, reduces her repair costs, increases her credit earnings, and increases the amount of experience she earns. | |||
| |Signals=<!-- write text about best set of signals below --> | |Signals=<!-- write text about best set of signals below --> | |||
| ? | As | + | As with all other ships, ''Midway'' can mount eight signals at a time and has no risk of detonating. Players should mount Equal Speed Charlie London (for faster XP grinding / increased XP gain per battle), Zulu Hotel (when coupled with Equal Speed Charlie London greatly helps increase the speed of commander retraining), November Echo Setteseven (for better bomber self-defense against fighters and increased AA DPS), and Juliet Whiskey Unaone (to have a better chance at causing flooding and dealing damage via flooding). Players can also choose to equip the Dragon Flag for faster commander (re)training. | |
| {{Signal Flags | {{Signal Flags | |||
| + | | November Echo Setteseven = 2 | |||
| + | | Mike Yankee Soxisix = 1 | |||
| + | | India X-Ray = 3 | |||
| + | | Juliet Whiskey Unaone = 3 | |||
| + | | Victor Lima = 3 | |||
| | Hotel Yankee = | | Hotel Yankee = | |||
| ? | ||||
| ? | ||||
| ? | ||||
| ? | ||||
| ? | ||||
| + | | November Foxtrot = 3 | |||
| + | | Sierra Mike = 3 | |||
| + | | India Delta = | |||
| + | | Juliet Yankee Bissotwo = 1 | |||
| | India Yankee = | | India Yankee = | |||
| ? | | | + | | Juliet Charlie = | |
| + | ||||
| + | | Zulu = 1 | |||
| + | | India Bravo Terrathree = 1 | |||
| + | | Equal Speed Charlie London = 1 | |||
| | Zulu Hotel = 1 | | Zulu Hotel = 1 | |||
| ? | | | + | | Papa Papa = 1 | |
| ? | + | |||
| ? | + | |||
| ? | | | + | | Wyvern = 1 | |
| ? | | | + | | Red Dragon = 1 | |
| ? | + | |||
| ? | + | |||
| ? | + | |||
| | Dragon Flag = 1 | | Dragon Flag = 1 | |||
| + | | Ouroboros = 1 | |||
| + | | Hydra = 1 | |||
| + | | Basilisk = 1 | |||
| + | ||||
| + | | Leviathan = 1 | |||
| + | | Scylla = 1 | |||
| }} | }} | |||
| Line 205: | Line 215: | |||
| ===History=== | ===History=== | |||
| ====Service==== | ====Service==== | |||
| ? | The ''Midway''-class aircraft carrier was one of the longest-living carrier designs in history. First commissioned in late 1945, the lead ship of the class, USS ''Midway'', would serve her country for nearly 50 years. During her early years, ''Midway'' served the Navy as a test bench vehicle. She tested cold-weather operations (FROSTBITE), fired a captured V-2 rocket (SANDY), and test-launched long-range nuclear bombers. She participated in tests of the angled deck design in the early 1950s. The British concept proved successful, and ''Midway'' was refitted accordingly in 1957 along with other modifications to allow her to carry heavier and more modern aircraft. In 1963, two test pilots successfully landed their aircraft via automatic "hands off" approaches. | + | The ''Midway''-class aircraft carrier was one of the longest-living carrier designs in history. First commissioned in late 1945, the lead ship of the class, USS ''Midway'', would serve her country for nearly 50 years. During her early years, ''Midway'' served the Navy as a test bench vehicle. She tested cold-weather operations (FROSTBITE), fired a captured V-2 rocket (SANDY), and test-launched long-range nuclear bombers. She participated in tests of the angled deck design in the early 1950s. The British concept proved successful, and ''Midway'' was refitted accordingly in 1957 along with other modifications to allow her to carry heavier and more modern aircraft. In 1963, two test pilots successfully landed their aircraft via automatic "hands-off" approaches. | |
| ''Midway'' saw extensive action during the Vietnam War, launching 11,900 sorties over a nine month period. From 1966 to 1970, ''Midway'' was reborn as an even larger and more powerful aircraft carrier, with a larger flight deck and reworked infrastructure. She returned to Vietnam, assisting with combat operations, rescue operations, and removal of American assets. | ''Midway'' saw extensive action during the Vietnam War, launching 11,900 sorties over a nine month period. From 1966 to 1970, ''Midway'' was reborn as an even larger and more powerful aircraft carrier, with a larger flight deck and reworked infrastructure. She returned to Vietnam, assisting with combat operations, rescue operations, and removal of American assets. | |||
| Line 214: | Line 224: | |||
| * ''Midway'' can actually carry up to 137 aircraft. Her aircraft complement in 1945 consisted of 64 F4U-4s, 64 SB2C-5s, four F6F-5Ns and four F6F-5Ps. | * ''Midway'' can actually carry up to 137 aircraft. Her aircraft complement in 1945 consisted of 64 F4U-4s, 64 SB2C-5s, four F6F-5Ns and four F6F-5Ps. | |||
| * The Grumman TBM "Avenger", Curtiss SB2C "Helldiver" and Grumman F6F "Hellcat" are missing. | * The Grumman TBM "Avenger", Curtiss SB2C "Helldiver" and Grumman F6F "Hellcat" are missing. | |||
| ? | * The Kaiser XBTK-1 was a prototype aircraft of which only five were built. Production was | + | * The Kaiser XBTK-1 was a prototype aircraft of which only five were built. Production was canceled as the BTK's role was already filled by the Douglas AD Skyraider and Martin AM Mauler. | |
| * The Douglas XSB2D was a prototype aircraft of which only two were built. It preceded the BTD-1. | * The Douglas XSB2D was a prototype aircraft of which only two were built. It preceded the BTD-1. | |||
| * Only 26 BTD-1s were built and none saw combat. | * Only 26 BTD-1s were built and none saw combat. | |||
Revision as of 03:36, 11 May 2019

| Research price355000 exp |
| Purchase price28,000,000 |
| Hit Points67,600 |
| 127 mm/54 Mk.16 on a Mk.39 mount18 х 1 pcs. |
| Firing Range5 km. |
| Rate of Fire15 shots/min. |
| Reload Time4 sec. |
| HE Shell127 mm HE Mk41 |
| Maximum HE Shell Damage1,800 |
| Initial HE Shell Velocity808 m./s. |
| Chance of Fire on Target Caused by HE Shell9 % |
| 127 mm/54 Mk.16 on a Mk.39 mount18 х 1 pcs. |
| . . . Average Damage per Second199.8 |
| . . . Firing Range5.19 km. |
| 40 mm/56 Bofors on a Mk.2 mount10 х 4 pcs. |
| . . . Average Damage per Second159 |
| . . . Firing Range3.51 km. |
| 20 mm Oerlikon on a Mk.24 mount28 х 2 pcs. |
| . . . Average Damage per Second170.8 |
| . . . Firing Range2.01 km. |
| 40 mm/56 Bofors on a Mk.1 mount11 х 2 pcs. |
| . . . Average Damage per Second124.3 |
| . . . Firing Range3.51 km. |
| Maximum Speed33 knot |
| Turning Circle Radius1 230 m. |
| Rudder Shift Time18.2 sec. |
| Surface Detectability Range15.38 km. |
| Air Detectability Range12.46 km. |

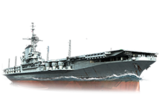
Midway — American Tier X aircraft сarrier.
The largest U.S. Navy warship laid down during World War II. The huge size of this aircraft carrier allowed her to carry the largest air group, compared to her contemporary counterparts. Excellent torpedo protection, well-armored flight deck and powerful AA defenses made Midway-class ships virtually invulnerable to attacks from enemy aircraft.
The lead ship of the class, USS Midway, is now preserved as a military museum ship in San Diego, California.
Modules
 |
Hit Points (HP) | Armor (mm) | Armor (mm) | Main Turrets (pcs.) | Secondary Gun Turrets (pcs.) | AA Mounts (pcs.) | Torpedo Tubes (pcs.) | Hangar Capacity (pcs.) |
Research price (exp) |
Purchase price ( | |
|---|---|---|---|---|---|---|---|---|---|---|---|
| Midway | 67,600 | 13 | 193 | 18 | 28/11/10/18 | 0 | 3,000,000 |
 |
Speed (knot) | IDS_SHIP_PARAM_SQUADRON_MED_DAMAGE (HP/min) | IDS_SHIP_PARAM_SQUADRON_AMMO_AMOUNT | Hit Points (HP) |
Research price (exp) |
Purchase price ( | |
|---|---|---|---|---|---|---|---|
| F4U Corsair | 173 | 1,530 | 0 | 1,000,000 | |||
| F8F Bearcat Tiny Tim | 176 | 1,660 | 38,000 | 2,500,000 | |||
| F8F Bearcat HVAR 127 mm | 176 | 1,590 | 38,000 | 2,500,000 |
 |
Maximum Torpedo Damage (HP) | Speed (knot) | Hit Points (HP) |
Research price (exp) |
Purchase price ( | |
|---|---|---|---|---|---|---|
| AD-1 Skyraider | 5,067 | 128 | 1,960 | 0 | 1,000,000 | |
| BTD Destroyer | 5,067 | 131 | 2,040 | 38,000 | 2,500,000 |
 |
Maximum Bomb Damage (HP) | Speed (knot) | Hit Points (HP) |
Research price (exp) |
Purchase price ( | |
|---|---|---|---|---|---|---|
| AD-1 Skyraider | 128 | 2,060 | 0 | 1,000,000 | ||
| BTD Destroyer | 131 | 2,150 | 38,000 | 2,500,000 |
 |
Maximum Speed (knot) |
Research price (exp) |
Purchase price ( | |
|---|---|---|---|---|
| Propulsion: 212,000 hp | 33 | 0 | 900,000 |
Compatible Upgrades
| Slot 1 |
|||||
|---|---|---|---|---|---|
| Slot 2 |
|||||
| Slot 3 |
|||||
| Slot 4 |
|||||
| Slot 5 |
|||||
| Slot 6 |
Player Opinion
Performance
The pinnacle of the American aircraft carrier line, Midway is best suited for the flexible, fool-proof combat. Jack-of-all-Trades preset and parameters make her able to react to any threats quickly and counter them even if the original battle plan is falling apart.
While she has fewer planes on deck compared to her Japanese counterpart Hakuryu, Midway's plane squadrons are smaller in size and have higher health per plane. These squadrons can withstand more anti-aircraft power due to their increased tankiness and can even plow through the thickest of AA to launch attacks.
Torpedo bombers are, after balance changes, weaker than Tier VIII USN carrier torpedoes and remain the weakest of all Midway assets. The damage per torpedo is extremely low, only dealing a maximum of 4233 damage per torpedo hit as opposed to 6467 at Tier VIII. Midway's torpedoes also have very low flood chance, players may have to land over 10 torpedoes in order to get a flood. However, to compensate for these shortcomings the Midway drops six torpedoes per attack, two torps from each plane.
Midway's dive bombers are the stars of the show. Known for hitting targets hard regardless of class, the dive bombers can both do high amounts of alpha damage as well as set fires. They drop the same amount of bombs per attack as the Lexington, but get one more attack per squadron. Dropping near the end of an attack run can greatly increase the accuracy of the bomb drop, however, this technique is very high in difficulty. When mastered, the bomb runs can do five-digit damage per run even to destroyers.
There are two different types of attack aircraft to use, similar to Lexington. Players get the option between HVARs and Tiny Tims. HVARs have many rockets per run and have a horizontal aiming pattern. However, HVARs have low fire chance individually and have low penetration, so these rockets are best used on soft targets. Tiny Tims are the hard hitters, these rockets have high penetration and high fire chance. These rockets launch fewer rockets per attack with a vertical aiming pattern, so it is easier to miss small targets with these rockets. As the dive bombers can take care of small targets adequately, Tiny Tims are heavily advised over the HVARs.
Huge spotting range is often named as a disadvantage, though it's offset by speed, armor, torpedo protection, and AA defenses, making Midway more viable in open combat should the need arise (she can tank battleship fire for quite some time). This all leads to a more forgiving gameplay compared to most other carriers, favoring brute force over stealth and allowing to follow allies for faster attacks.Pros:
- Planes have relatively high health compared to Hakuryu.
- High potential damage over time (via fires and floods).
- Strong anti-aircraft suite.
- Dive bombers are equipped with AN-M66 2000lb (907kg) High explosive bombs that inflict tremendous damage if they hit.
- Hull is relatively well armored and torpedo-proof, allowing to keep closer to action and therefore lower aircraft travel time.
- Tiny Tims have high penetration and high damage for rockets.
Cons:
- With a base detection radius of over 18.0 km, Midway is among the most easily detectable ships in the game; this makes her a prime target for enemy surface ships when she is spotted.
- Armor is just thick enough to let incoming armor-piercing shells from enemy battleships land as regular penetrations (or citadel hits) rather than over-penetrate.
- HVAR rockets have low penetration and low fire chance for Tier X, while Tiny Tims are prone to missing small targets due to fewer rockets per payload.
- Torpedoes have poor aiming time as well as abysmal torpedo damage and flood chance.
Research
Optimal Configuration
Upgrades
The recommended upgrades for Midway are as follows:
- Slot 1: Air Groups Modification 1

- Slot 2: Aircraft Engines Modification 1

- Slot 3: Torpedo Bombers Modification 1

- Slot 4: Torpedo Bombers Modification 2

- Slot 5: Concealment System Modification 1
 or Flight Control Modification 1
- Slot 6: Air Groups Modification 2
 or Flight Control Modification 2
Upgrade Slot 5 offers players Concealment System Modification 1, which stacks with Concealment Expert and Camouflage to bring Midway’s surface detection down to a decent range of 13.5km. Players may also trade concealment for Flight Control Modification 1, which adds two additional planes on deck per plane type as well as accelerating plane replenishment time by 5%.
Upgrade Slot 6 is the 2nd main choice of upgrades with Midway. Due to the common presence of multiple battleships and cruisers with very high AA power, Air Groups Modification 2 is highly recommended to make sure Midway’s planes will survive their trip to and from their target. If survivability isn't the player's foremost preference, Flight Control Modification 2 ![]() is viable, decreasing the speed gap between Midway’s and Hakuryu’s planes, allowing the slower and larger American squadrons to have a better chance of escaping from their Japanese counterparts.
is viable, decreasing the speed gap between Midway’s and Hakuryu’s planes, allowing the slower and larger American squadrons to have a better chance of escaping from their Japanese counterparts.
Commander Skills
As a Tier X carrier, Midway has incredibly strong anti-aircraft armament, rivaling those of specialized AA cruisers. Coupled with Basic Firing Training and Manual Fire Control for AA Armament, captains can significantly increase the ship's AA DPS to shoot down enemy planes effectively, sometimes completely wiping out the opponent's attack squadrons before they even manage to attack, or devastating careless enemy fighters.
If the Midway has access to the Concealment System Modification, captains can opt to choose to utilize the Concealment Expert skill as an indirect form of further protection from enemy ships (with skill, camouflage, and upgrade, her surface detection range is 12.5km).
| Recommended Commander Skills | ||||||||
|---|---|---|---|---|---|---|---|---|
| Cost (points) |
Endurance | Attack | Support | Versatility | ||||
| 1 |
|
|
|
★★★ |
★ |
★★★ |
|
★★★ |
| 2 |
|
|
|
★★ |
|
★★★ |
★★ |
|
| 3 |
|
★★★ |
|
★★★ |
|
|
★★ |
|
| 4 |
|
|
|
★★★ |
|
|
|
★★ |
| Key: ★★★ - Extremely Useful ★★ - Frequently Useful ★ - Occasionally Useful No stars - Meh Χ - Not recommended | ||||||||
Consumables
Midway can equip the following consumables:
Aircraft Carrier:
- Slot 1: Damage Control Party

- Slot 2: Template:Fighter I
All aircraft carrier consumables are automatically activated.
Attack Aircraft:
- Slot 1: Engine Cooling

- Slot 2: Patrol Fighter

Torpedo Bombers:
- Slot 1: Engine Cooling
- Slot 2: Patrol Fighter
- Slot 3: Template:Repair I
Bombers:
- Slot 1: Engine Cooling
- Slot 2: Patrol Fighter
Camouflage
Type 1, 2, or 5 camouflage can be equipped for credits; Types 1 or 5 are recommended at a minimum to reduce detectability range.
Players who wish to spend doubloons can equip Midway with Type 20 camouflage that lowers her detection radius, reduces the accuracy of incoming shells, reduces her repair costs, increases her credit earnings, and increases the amount of experience she earns.
Signals
As with all other ships, Midway can mount eight signals at a time and has no risk of detonating. Players should mount Equal Speed Charlie London (for faster XP grinding / increased XP gain per battle), Zulu Hotel (when coupled with Equal Speed Charlie London greatly helps increase the speed of commander retraining), November Echo Setteseven (for better bomber self-defense against fighters and increased AA DPS), and Juliet Whiskey Unaone (to have a better chance at causing flooding and dealing damage via flooding). Players can also choose to equip the Dragon Flag for faster commander (re)training.
Recommended Signal Flags 
| |||||
|---|---|---|---|---|---|
| Combat | |||||

|
 ★ |

|

|
 ★★★ |
 ★★★ |
 ★★★ |
 ★ |
 ★★ |
 ★★★ |
 ★★★ |

|

|

| ||||
Note: Use of the Juliet Charlie signal makes detonation impossible.
Gallery
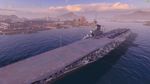
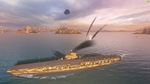
USS Midway is ready for her next assignment.
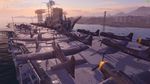
Midway’s powerful air wing is ready to deploy.
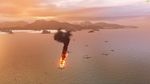
Kaiser XBTK-1 dive bombers from Midway assault an enemy Tirpitz.
A squadron of Grumman F8F "Bearcat" fighters intercept an enemy squadron of Douglas XSB2D "Destroyer" torpedo bombers.
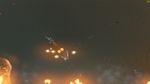
Midway defends herself from an enemy air strike while re-arming her aircraft.
Midway scrambles aircraft for a return strike.


Historical Info
Historical Gallery


.jpg)


_underway,_1987.jpg)
References
https://www.cv41.org/ // A nice site with good info.
https://www.midwaysailor.com/midway/history.html // First-hand accounts.
https://en.wikipedia.org/wiki/USS_Midway_(CV-41) // Wikipedia.
https://johneaves.wordpress.com/2010/12/10/the-evolutions-of-the-uss-midway-cv-41-and-the-uss-enterprise-ncc-1701-e // An interesting article.
| Japan | IV Hōshō • VI Ryūjō • VIII Shōkaku • VIII Kaga |
| U.K. | IV Hermes • VI Furious • VI Ark Royal |
| France | VI Béarn |
| U.S.S.R. | IV Komsomolets • VI Serov • VIII Pobeda • VIII Chkalov |
| U.S.A. | IV Langley • VI Independence • VI Ranger • VIII Yorktown • VIII Lexington • VIII Enterprise |
| Germany | IV Rhein • VI Weser • VI Erich Loewenhardt |
| Pan-Asia | VIII Sanzang |
| Spain | |
| Europe | |
| Netherlands | |
| Italy | VIII Aquila |
| Commonwealth | |
| Pan-America |