Mikasa
| Revision as of 19:50, 20 May 2016 Created page with "<!-- DO NOT EDIT OR DELETE LINES WITH COMMENTS (it's look like as this or next line) -->{{WoWs_Ship|Promo=<!-- in case of gift or promo ship write conditions to get it. -->..." | Revision as of 07:08, 29 May 2016 Transferring content and images, with some editing, from the previous article on Mikasa (https://wiki.wargaming.net/en/Ship:PJSB011_Mikasa_1905) | |||
| Line 5: | Line 5: | |||
| |Performance=<!-- write text about performance in battles below --> | |Performance=<!-- write text about performance in battles below --> | |||
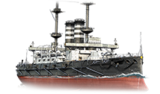
| + | The only pre-dreadnought battleship in existence, both in-game and in real life, the Mikasa has a unique place in the tier tree as the only tier 2 battleship in the game. An interesting point to note is that the in-game secondary guns are only part of the full armament that Mikasa actually carried (most likely for game balance); not only did she carry additional smaller calibre guns (two can be seen on either side of the upper deck and eight below the crow's nests), but she was also armed with 18-inch torpedoes, fired from two submerged torpedo tubes on each broadside. | |||
| ? | + | With her low speed, short main battery range, you will struggle to bring Mikasa's main guns to bear on anyone in the opening stages of the match. Even worse, you will be hard-pressed to focus both turrets on a single target due to their proximity to the superstructure - effectively meaning that most of the time, you will only be able to utilise 50% of your main battery firepower. Watch where your teammates are going, and once you have committed to a destination, don't deviate from it unless the situation changes or an emergency arises in another sector. Upon reaching the desired location, Mikasa makes for a great defensive screen; she has almost as much health as tier 3 battleships; her belt armour allows her to resist multiple torpedo hits; bristling with 32 secondary guns, she can decimate anyone that comes close. A viable (but risky and probably impractical) tactic is to simply charge at the enemy and let the secondary batteries pound them into the ocean while your main guns are reloading...but be wary of torpedoes, and you will be unable to catch up to anyone who has the presence of mind to keep their distance. That being said, the Mikasa's reasonable maneuverability and small size makes her fairly decent at dodging torpedoes and enemy fire. | ||
| |Pros=<!-- write list of positive points below. use * as in ordinary wiki-list. --> | |Pros=<!-- write list of positive points below. use * as in ordinary wiki-list. --> | |||
| + | * Incredibly good armour and health pool for a tier 2 | |||
| + | * Surprisingly reasonable speeds while turning (considering the era she was built) | |||
| + | * Powerful and numerous secondary batteries shred anyone that dares to venture within their 3km range | |||
| + | * Good turning radius with decent (for a battleship anyway) rudder shift time | |||
| + | * Relatively small size | |||
| |Cons=<!-- write list of negative points below. use * as in ordinary wiki-list. --> | |Cons=<!-- write list of negative points below. use * as in ordinary wiki-list. --> | |||
| + | * Short main battery range, with a slow rate of fire and only 4 barrels on 2 twin turrets | |||
| + | * Guns are inaccurate with limited ability to simultaneously train both on a target | |||
| + | * Decent players (or those unfortunate enough to have experienced the secondary batteries) will keep a respectful distance | |||
| + | * Low top speed | |||
| + | * Only has [[Equipment_(WoWS)|upgrade slot]] 1 | |||
| + | ||||
| + | |Research=<!-- write text about priority sequence of research below --> | |||
| + | As a premium, Mikasa has no upgradable modules. | |||
| |Gallery=<!-- write below list of files without tags. description (if necessary) for each should be separated with template {{!}} --><gallery> | |Gallery=<!-- write below list of files without tags. description (if necessary) for each should be separated with template {{!}} --><gallery> | |||
| </gallery>|History=<!-- write text below --> | </gallery>|History=<!-- write text below --> | |||
| + | Mikasa (三笠) is a pre-dreadnought battleship built for the Imperial Japanese Navy (IJN) in the late 1890s, and was the only ship of her class. Named after Mount Mikasa in Nara, Japan, the ship served as the flagship of Admiral Tōgō Heihachirō throughout the Russo-Japanese War of 1904–1905, including the Battle of Port Arthur on the second day of the war and the Battles of the Yellow Sea and Tsushima. Days after the end of the Russo-Japanese War, Mikasa's magazine accidentally exploded and sank the ship. She was salvaged and her repairs took over two years to complete. Afterwards, the ship served as coastal defense during World War I and supported Japanese forces during the Siberian Intervention in the Russian Civil War.<br /> | |||
| + | <br /> | |||
| + | ||||
| + | After 1922, Mikasa was decommissioned in accordance with the Washington Naval Treaty and preserved as a museum ship at Yokosuka. She was badly neglected during the post-World War II Occupation of Japan and required extensive refurbishing in the late 1950s. She is now fully restored as a museum ship and can be visited at Mikasa Park in Yokosuka.<br /> | |||
| + | <br /> | |||
| + | ||||
| + | Mikasa is the last remaining example of a pre-dreadnought battleship anywhere in the world. | |||
| |HistoricalGallery=<!-- write below list of files without tags. description (if necessary) for each should be separated with template {{!}} --><gallery> | |HistoricalGallery=<!-- write below list of files without tags. description (if necessary) for each should be separated with template {{!}} --><gallery> | |||
| + | File:Battleship Mikasa from JFS1906 Cropped.png|Plans showing Mikasa as originally built, from Jane's Fighting Ships 1906-07 | |||
| + | File:Mikasa 12 inch 40 cal gun turret right elevation.jpg|Turret layout for original 12-inch (305 mm) 40-calibre guns | |||
| + | File:MIKASAPAINTING.jpg|Admiral Tōgō on the bridge of Mikasa, before the Battle of Tsushima in 1905 | |||
| + | File:Japanese battleship Mikasa.jpg|Mikasa as she appeared in 1905 | |||
| + | File:MIKASAGUNS.jpg|The new 45-calibre 12-inch guns added during the reconstruction | |||
| </gallery>|Video=<!-- put below video clips with using template VideoYT. You can use html-tags for formatting. --> | </gallery>|Video=<!-- put below video clips with using template VideoYT. You can use html-tags for formatting. --> | |||
Revision as of 07:08, 29 May 2016

| Purchase priceSpecial |
| Hit Points31,200 |
| 305 mm/40 41st Year Type in a twin turret2 х 2 pcs. |
| Rate of Fire2 shots/min. |
| Reload Time30 sec. |
| Rotation Speed4.5 deg./sec. |
| 180 Degree Turn Time40 sec. |
| Firing Range11.82 km. |
| Maximum Dispersion160 m. |
| HE Shell305 mm HE 850 lb |
| Maximum HE Shell Damage5,100 |
| Chance of Fire on Target Caused by HE Shell29 % |
| Initial HE Shell Velocity732 m./s. |
| HE Shell Weight386 kg. |
| AP Shell305 mm AP 850 lb |
| Maximum AP Shell Damage7,700 |
| Initial AP Shell Velocity732 m./s. |
| AP Shell Weight386 kg. |
| IDS_PJGS137_152MM40_COLOR_BLACK10 х 1 pcs. |
| Firing Range3 km. |
| Rate of Fire6 shots/min. |
| Reload Time10 sec. |
| HE Shell152 mm HE Type0 |
| Maximum HE Shell Damage3,000 |
| Initial HE Shell Velocity701 m./s. |
| Chance of Fire on Target Caused by HE Shell10 % |
| IDS_PJGS138_76MM40_WITH_SHIELD_BLACK4 х 1 pcs. |
| Firing Range3 km. |
| Rate of Fire15 shots/min. |
| Reload Time4 sec. |
| HE Shell76 mm HE Mk2 |
| Maximum HE Shell Damage1,300 |
| Initial HE Shell Velocity680 m./s. |
| Chance of Fire on Target Caused by HE Shell5 % |
| 76 mm/40 41st Year Type on a single mount6 х 1 pcs. |
| Firing Range3 km. |
| Rate of Fire15 shots/min. |
| Reload Time4 sec. |
| HE Shell76 mm HE Mk2 |
| Maximum HE Shell Damage1,300 |
| Initial HE Shell Velocity680 m./s. |
| Chance of Fire on Target Caused by HE Shell5 % |
| 152 mm/50 41st Year Type on a casemate mount4 х 1 pcs. |
| Firing Range3 km. |
| Rate of Fire6 shots/min. |
| Reload Time10 sec. |
| HE Shell152 mm HE Type0 |
| Maximum HE Shell Damage3,000 |
| Initial HE Shell Velocity701 m./s. |
| Chance of Fire on Target Caused by HE Shell10 % |
| IDS_PJGS133_76MM40_WITH_SHIELD_WHITE8 х 1 pcs. |
| Firing Range3 km. |
| Rate of Fire15 shots/min. |
| Reload Time4 sec. |
| HE Shell76 mm HE Mk2 |
| Maximum HE Shell Damage1,300 |
| Initial HE Shell Velocity680 m./s. |
| Chance of Fire on Target Caused by HE Shell5 % |
| Maximum Speed18 knot |
| Turning Circle Radius450 m. |
| Rudder Shift Time10.2 sec. |
| Surface Detectability Range11.17 km. |
| Air Detectability Range5.64 km. |

Mikasa — Japanese special premium Tier II battleship.
Compared to other battleships ordered under the 1896 program, Mikasa had enhanced casemate armor for her secondary armament. The ship was Admiral Togo's flagship during the Russo-Japanese War; she also participated in the Battle of the Yellow Sea and Tsushima. By the beginning of World War I, Mikasa had become obsolete, but she was still listed as part of the fleet—first as a battleship, then as a coastal defense ship. Between 1926 and 1945, the ship served as a museum before being abandoned and partially scrapped. Later, she was restored and installed as a monument on the shore.
Modules
 |
Rate of Fire (shots/min) | 180° Turn Time (sec) | Maximum Dispersion (m) | Maximum HE Shell Damage (HP) | Chance of Fire on Target Caused by HE Shell (%) | Maximum AP Shell Damage (HP) |
Research price (exp) |
Purchase price ( | |
|---|---|---|---|---|---|---|---|---|---|
| 305 mm/40 41st Year Type in a twin turret | 2 | 40 | 160 | 5,100 | 28 | 7,700 | 0 | 0 |
 |
Hit Points (HP) | Armor (mm) | Armor (mm) | Main Turrets (pcs.) | Secondary Gun Turrets (pcs.) | AA Mounts (pcs.) | Torpedo Tubes (pcs.) | Hangar Capacity (pcs.) |
Research price (exp) |
Purchase price ( | |
|---|---|---|---|---|---|---|---|---|---|---|---|
| Mikasa | 31,200 | 10 | 356 | 2 | 18/14 | 0 | 0 |
 |
IDS_SHIP_PARAM_SUO_INCREASE_DIST (%) | Maximum Firing Range (km) |
Research price (exp) |
Purchase price ( | |
|---|---|---|---|---|---|
| Type2 mod. 1 | 0 | 0 | 0 |
 |
Maximum Speed (knot) |
Research price (exp) |
Purchase price ( | |
|---|---|---|---|---|
| Propulsion: 16,000 hp | 18 | 0 | 0 |
Compatible Upgrades
| Slot 1 |
|---|
Player Opinion
Performance
The only pre-dreadnought battleship in existence, both in-game and in real life, the Mikasa has a unique place in the tier tree as the only tier 2 battleship in the game. An interesting point to note is that the in-game secondary guns are only part of the full armament that Mikasa actually carried (most likely for game balance); not only did she carry additional smaller calibre guns (two can be seen on either side of the upper deck and eight below the crow's nests), but she was also armed with 18-inch torpedoes, fired from two submerged torpedo tubes on each broadside.
With her low speed, short main battery range, you will struggle to bring Mikasa's main guns to bear on anyone in the opening stages of the match. Even worse, you will be hard-pressed to focus both turrets on a single target due to their proximity to the superstructure - effectively meaning that most of the time, you will only be able to utilise 50% of your main battery firepower. Watch where your teammates are going, and once you have committed to a destination, don't deviate from it unless the situation changes or an emergency arises in another sector. Upon reaching the desired location, Mikasa makes for a great defensive screen; she has almost as much health as tier 3 battleships; her belt armour allows her to resist multiple torpedo hits; bristling with 32 secondary guns, she can decimate anyone that comes close. A viable (but risky and probably impractical) tactic is to simply charge at the enemy and let the secondary batteries pound them into the ocean while your main guns are reloading...but be wary of torpedoes, and you will be unable to catch up to anyone who has the presence of mind to keep their distance. That being said, the Mikasa's reasonable maneuverability and small size makes her fairly decent at dodging torpedoes and enemy fire.Pros:
- Incredibly good armour and health pool for a tier 2
- Surprisingly reasonable speeds while turning (considering the era she was built)
- Powerful and numerous secondary batteries shred anyone that dares to venture within their 3km range
- Good turning radius with decent (for a battleship anyway) rudder shift time
- Relatively small size
Cons:
- Short main battery range, with a slow rate of fire and only 4 barrels on 2 twin turrets
- Guns are inaccurate with limited ability to simultaneously train both on a target
- Decent players (or those unfortunate enough to have experienced the secondary batteries) will keep a respectful distance
- Low top speed
- Only has upgrade slot 1
Research
Gallery
Historical Info
Historical Gallery


