Montana
| Revision as of 01:20, 18 February 2017 | Revision as of 01:48, 18 February 2017 | |||
| Line 30: | Line 30: | |||
| |OptimalConfiguration=<!-- write some general text about selection of optimal configuration below (optional)--> | |OptimalConfiguration=<!-- write some general text about selection of optimal configuration below (optional)--> | |||
| + | ||||
| + | Building up for Concealment on the Montana is never a bad choice. With the captain skill, concealment modification, and camoflauge she drops down to 13.4 km range. While still long enough for Destroyers or Cruisers to spot you before you spot them, it will give the Montana more leeway for turning due to her high citadel. The Steering Gear modification 2 will reduce her rudder shift time down to 17.8 seconds. | |||
| + | ||||
| + | In the T9 slot you can either go with the Artillery Plotting Room 2 to give her guns more accuracy, or put in the Main Gun Modification 3 to improve her fire rate at the expense of her turret traverse. The APM2 will make it so that at ranges of ~12-13 kilometers she is very accurate, much more so than either of her contemporaries due to how dispersion works, but she can then be out DPMed by BBs who take MGM3. MGM3 will increase her DPM which is already the highest of the t10 battleships, and may surprise a Cruiser who still expects you to be reloading, but makes it so long range shots are more or less German in their spread while making her tuurets take longer to turn. | |||
| + | ||||
| + | In the 2nd slot you have several choices. Artillery Plotting Room 1 will increase her already impressive range, and give her secondaries a slight boost in rage and accuracy. AA Modification 2 will give her a huge aura for her AA guns to work with, and with captain skills they can reach out to 7.2 km. Secondary Modification 2 will boost the range and accuracy of her secondaries instead, and with captain skills and flags those can reach out to 9.1km. | |||
| + | ||||
| + | For the 1st and 4th slot both should just have Main Gun Modification 1 for better health on your big guns, and Damage Control System Modification 1 to reduce the chance of fires and torpedo damage slightly. | |||
| |CommanderSkills=<!-- write text about best set of Commander Skills below --> | |CommanderSkills=<!-- write text about best set of Commander Skills below --> | |||
| Line 61: | Line 69: | |||
| | Vigilance = 1 | | Vigilance = 1 | |||
| ? | | Manual Fire Control for Secondary Armament = | + | | Manual Fire Control for Secondary Armament = 2 | |
| | Fire Prevention = 2 | | Fire Prevention = 2 | |||
| | Inertia Fuse for HE Shells = | | Inertia Fuse for HE Shells = | |||
Revision as of 01:48, 18 February 2017

| Research price247000 exp |
| Purchase price20,800,000 |
| Hit Points96,300 |
| 406 mm/50 Mk.7 in a turret4 х 3 pcs. |
| Rate of Fire2 shots/min. |
| Reload Time30 sec. |
| Rotation Speed4 deg./sec. |
| 180 Degree Turn Time45 sec. |
| Firing Range23.65 km. |
| Maximum Dispersion296 m. |
| HE Shell406 mm HE/HC Mk13 |
| Maximum HE Shell Damage5,700 |
| Chance of Fire on Target Caused by HE Shell36 % |
| Initial HE Shell Velocity820 m./s. |
| HE Shell Weight862 kg. |
| AP Shell406 mm AP Mk8 |
| Maximum AP Shell Damage13,500 |
| Initial AP Shell Velocity762 m./s. |
| AP Shell Weight1225 kg. |
| 127 mm/54 Mk.16 on a Mk.41 mount10 х 2 pcs. |
| Firing Range7.3 km. |
| Rate of Fire15 shots/min. |
| Reload Time4 sec. |
| HE Shell127 mm HE Mk41 |
| Maximum HE Shell Damage1,800 |
| Initial HE Shell Velocity808 m./s. |
| Chance of Fire on Target Caused by HE Shell9 % |
| 127 mm/54 Mk.16 on a Mk.41 mount10 х 2 pcs. |
| . . . Average Damage per Second157 |
| . . . Firing Range5.19 km. |
| 40 mm/56 Bofors on a Mk.2 mount20 х 4 pcs. |
| . . . Average Damage per Second318 |
| . . . Firing Range3.51 km. |
| 20 mm Oerlikon on a Mk.24 mount20 х 2 pcs. |
| . . . Average Damage per Second122 |
| . . . Firing Range2.01 km. |
| 20 mm Oerlikon on a Mk.4 mount20 х 1 pcs. |
| . . . Average Damage per Second72 |
| . . . Firing Range2.01 km. |
| Maximum Speed30 knot |
| Turning Circle Radius950 m. |
| Rudder Shift Time22.2 sec. |
| Surface Detectability Range17.29 km. |
| Air Detectability Range12.91 km. |

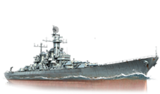
Montana — American Tier X battleship.
The Montana class was intended as a successor to the Iowa-class battleships: They were larger, better armored, and more heavily armed. Their armament was supposed to consist of twelve 406 mm guns housed in four triple-gun turrets. Preliminary design work began before the U.S. entered World War II. The attack on Pearl Harbor delayed the construction of battleships, and the success of aircraft carriers in the Battle of the Coral Sea and Battle of Midway led the U.S. Navy to abandon the Montana class in favor of aircraft carriers, assault ships, and anti-submarine ships.
Modules
 |
Rate of Fire (shots/min) | 180° Turn Time (sec) | Maximum Dispersion (m) | Maximum HE Shell Damage (HP) | Chance of Fire on Target Caused by HE Shell (%) | Maximum AP Shell Damage (HP) |
Research price (exp) |
Purchase price ( | |
|---|---|---|---|---|---|---|---|---|---|
| 406 mm/50 Mk.7 in a turret | 2 | 45 | 296 | 5,700 | 36 | 13,500 | 0 | 2,200,000 |
 |
Hit Points (HP) | Armor (mm) | Armor (mm) | Main Turrets (pcs.) | Secondary Gun Turrets (pcs.) | AA Mounts (pcs.) | Torpedo Tubes (pcs.) | Hangar Capacity (pcs.) |
Research price (exp) |
Purchase price ( | |
|---|---|---|---|---|---|---|---|---|---|---|---|
| Montana | 96,300 | 6 | 457 | 4 | 10 | 20/20/20/10 | 0 | 3,400,000 |
 |
IDS_SHIP_PARAM_SUO_INCREASE_DIST (%) | Maximum Firing Range (km) |
Research price (exp) |
Purchase price ( | |
|---|---|---|---|---|---|
| Mk10 mod. 1 | 0 | 0 | 2,100,000 |
 |
Maximum Speed (knot) |
Research price (exp) |
Purchase price ( | |
|---|---|---|---|---|
| Propulsion: 172,000 hp | 30 | 0 | 550,000 |
Compatible Upgrades
| Slot 1 |
|||||
|---|---|---|---|---|---|
| Slot 2 |
|||||
| Slot 3 |
|||||
| Slot 4 |
|||||
| Slot 5 |
|||||
| Slot 6 |
Player Opinion
Performance
Often being called as the "Yamato killer" for the US Navy, the Montana at first glance is basically a supersized Iowa with an additional triple mount turret and having thicker belt and deck armor. Her offense capability relies on her heavy broadside to smash enemy battleships or destroy anything smaller should the rounds connect. She also has an extremely powerful AA suite, able to protect herself from lower tiered CVs, but is not strong enough to defend against tier X carriers. However, while she can sail at 30 kts, her large size and slow rudder shift time make her vulnerable to torpedo attack, and with only 16 in guns, they do not get the ability to overmatch 32mm thick armor like Yamato's 46cm guns can, meaning you may have to sling HE at well angled battleships.
The dispersion of her main guns were recently buffed, making her more precise and less of a "shotgun", but her dispersion is still higher than Yamato even after the Artillery Plotting Room Modification 2 is installed. However they are more accurate than Kurfurst at range, while having a slower turret traverse (45 sec vs Kurfurst' 40 sec on both guns). Her secondaries are not as numerous as her counterparts, but they are better armored than both. This means that cruisers firing HE are unable to destroyer her secondaries unlike with Yamato or Kurfurst. They have better range than on Iowa and have the best rate of fire and the highest fire chance of all Tier 10 battleships.
The Montana is a ship that does not excel at any one thing for a battleship (AA doesn't count). IN a close range fight she will outpace Yamato's turret traverse but not Kurfurst, while at range she will be more accurate than Kurfurst but not as accurate as Yamato. Flexibility is her strength, but it is also her weakness.Pros:
- 12 guns generally means that something will hit even if your aim is slightly off and can seriously damage destroyers without swapping ammunition
- Phenomenal broadside killing power exceeds even Yamato and can one-salvo anything that floats; losing or masking a turret still leaves you with Iowa broadside firepower
- Best AA suite in the game
- Secondaries have the best fire chance (9%) and rate of fire (4/sec) of T10 BBs
- Quick turret traverse speed
- Two turrets still deliver 6 shells, allowing Montana to fire effective salvos at two targets simultaneously
- Faster than Yamato (30 kts compared to 27)
Cons:
- Uses same guns as the Iowa, no real upgrade for a tier up
- Bad dispersion without artillery plotting room 2
- Large citadel that sits high above the waterline
- Bow is overmatched by Yamato 460mm shells (like every other ship). Belt armor angling can still work but is open to RNG letting shells through
- Smallest gun caliber of all tier X battleships
- In the game's current state, has difficulty of beating other tier X battleships in a 1v1 duel.
Research
Optimal Configuration
Building up for Concealment on the Montana is never a bad choice. With the captain skill, concealment modification, and camoflauge she drops down to 13.4 km range. While still long enough for Destroyers or Cruisers to spot you before you spot them, it will give the Montana more leeway for turning due to her high citadel. The Steering Gear modification 2 will reduce her rudder shift time down to 17.8 seconds.
In the T9 slot you can either go with the Artillery Plotting Room 2 to give her guns more accuracy, or put in the Main Gun Modification 3 to improve her fire rate at the expense of her turret traverse. The APM2 will make it so that at ranges of ~12-13 kilometers she is very accurate, much more so than either of her contemporaries due to how dispersion works, but she can then be out DPMed by BBs who take MGM3. MGM3 will increase her DPM which is already the highest of the t10 battleships, and may surprise a Cruiser who still expects you to be reloading, but makes it so long range shots are more or less German in their spread while making her tuurets take longer to turn.
In the 2nd slot you have several choices. Artillery Plotting Room 1 will increase her already impressive range, and give her secondaries a slight boost in rage and accuracy. AA Modification 2 will give her a huge aura for her AA guns to work with, and with captain skills they can reach out to 7.2 km. Secondary Modification 2 will boost the range and accuracy of her secondaries instead, and with captain skills and flags those can reach out to 9.1km.
For the 1st and 4th slot both should just have Main Gun Modification 1 for better health on your big guns, and Damage Control System Modification 1 to reduce the chance of fires and torpedo damage slightly.
Commander Skills
| Recommended Commander Skills | ||||||||
|---|---|---|---|---|---|---|---|---|
| Cost (points) |
Endurance | Attack | Support | Versatility | ||||
| 1 |
★★ |
★ |
★ |
|
|
|
★ |
|
| 2 |
★★ |
★ |
★★★ |
|
|
|
★★ |
|
| 3 |
★★ |
|
|
|
★★ |
★★★ |
★ |
★ |
| 4 |
★★ |
★★ |
|
|
★★★ |
|
|
★★★ |
| Key: ★★★ - Extremely Useful ★★ - Frequently Useful ★ - Occasionally Useful No stars - Meh Χ - Not recommended | ||||||||
Gallery

Historical Info
Historical Gallery


_Oerlikon_20mm_AA_gun_mount.jpg)

_Stern.jpg)