Montana
| Revision as of 08:38, 25 July 2021 changes to commander skills and updated | Revision as of 02:13, 31 August 2021 Screenshot | |||
| Line 122: | Line 122: | |||
| |Gallery=<!-- write below list of files with description (if necessary) separated with | --><gallery> | |Gallery=<!-- write below list of files with description (if necessary) separated with | --><gallery> | |||
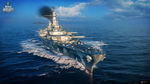
| File:Montana Screenshot.jpeg | File:Montana Screenshot.jpeg | |||
| + | File:DancingAroundMontana.jpg | A sinking Montana provides a meat shield for both his friendly Riga and the enemy Des Moines during a Succession League brawl. | |||
| </gallery> | </gallery> | |||
Revision as of 02:13, 31 August 2021

| Research price247000 exp |
| Purchase price20,800,000 |
| Hit Points96,300 |
| 406 mm/50 Mk.7 in a turret4 х 3 pcs. |
| Rate of Fire2 shots/min. |
| Reload Time30 sec. |
| Rotation Speed4 deg./sec. |
| 180 Degree Turn Time45 sec. |
| Firing Range23.65 km. |
| Maximum Dispersion296 m. |
| HE Shell406 mm HE/HC Mk13 |
| Maximum HE Shell Damage5,700 |
| Chance of Fire on Target Caused by HE Shell36 % |
| Initial HE Shell Velocity820 m./s. |
| HE Shell Weight862 kg. |
| AP Shell406 mm AP Mk8 |
| Maximum AP Shell Damage13,500 |
| Initial AP Shell Velocity762 m./s. |
| AP Shell Weight1225 kg. |
| 127 mm/54 Mk.16 on a Mk.41 mount10 х 2 pcs. |
| Firing Range7.3 km. |
| Rate of Fire15 shots/min. |
| Reload Time4 sec. |
| HE Shell127 mm HE Mk41 |
| Maximum HE Shell Damage1,800 |
| Initial HE Shell Velocity808 m./s. |
| Chance of Fire on Target Caused by HE Shell9 % |
| 127 mm/54 Mk.16 on a Mk.41 mount10 х 2 pcs. |
| . . . Average Damage per Second157 |
| . . . Firing Range5.19 km. |
| 40 mm/56 Bofors on a Mk.2 mount20 х 4 pcs. |
| . . . Average Damage per Second318 |
| . . . Firing Range3.51 km. |
| 20 mm Oerlikon on a Mk.24 mount20 х 2 pcs. |
| . . . Average Damage per Second122 |
| . . . Firing Range2.01 km. |
| 20 mm Oerlikon on a Mk.4 mount20 х 1 pcs. |
| . . . Average Damage per Second72 |
| . . . Firing Range2.01 km. |
| Maximum Speed30 knot |
| Turning Circle Radius950 m. |
| Rudder Shift Time22.2 sec. |
| Surface Detectability Range17.29 km. |
| Air Detectability Range12.91 km. |

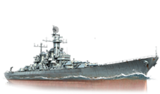
Montana — American Tier X battleship.
One of the largest battleships in the world. She is slightly inferior to Iowa-class ships in terms of speed but has more main guns and significantly stronger torpedo protection. Montana's armor is conventionally arranged and considerably reinforced.
Modules
 |
Rate of Fire (shots/min) | 180° Turn Time (sec) | Maximum Dispersion (m) | Maximum HE Shell Damage (HP) | Chance of Fire on Target Caused by HE Shell (%) | Maximum AP Shell Damage (HP) |
Research price (exp) |
Purchase price ( | |
|---|---|---|---|---|---|---|---|---|---|
| 406 mm/50 Mk.7 in a turret | 2 | 45 | 296 | 5,700 | 36 | 13,500 | 0 | 2,200,000 |
 |
Hit Points (HP) | Armor (mm) | Armor (mm) | Main Turrets (pcs.) | Secondary Gun Turrets (pcs.) | AA Mounts (pcs.) | Torpedo Tubes (pcs.) | Hangar Capacity (pcs.) |
Research price (exp) |
Purchase price ( | |
|---|---|---|---|---|---|---|---|---|---|---|---|
| Montana | 96,300 | 6 | 457 | 4 | 10 | 20/20/20/10 | 0 | 3,400,000 |
 |
IDS_SHIP_PARAM_SUO_INCREASE_DIST (%) | Maximum Firing Range (km) |
Research price (exp) |
Purchase price ( | |
|---|---|---|---|---|---|
| Mk10 mod. 1 | 0 | 0 | 2,100,000 |
 |
Maximum Speed (knot) |
Research price (exp) |
Purchase price ( | |
|---|---|---|---|---|
| Propulsion: 172,000 hp | 30 | 0 | 550,000 |
Compatible Upgrades
| Slot 1 |
|||||
|---|---|---|---|---|---|
| Slot 2 |
|||||
| Slot 3 |
|||||
| Slot 4 |
|||||
| Slot 5 |
|||||
| Slot 6 |
Player Opinion
Performance
Tier X's Montana is, at first glance, basically a supersized Iowa with an additional triple mount turret and thicker belt and deck armor. Her offensive capability relies on her heavy broadside to smash enemy battleships or destroy anything smaller should the rounds connect. She has the 3rd heaviest broadside and one of the best DPM of any battleship in the game. Although her guns are the second smallest of her fellow Tier X battleships her super-heavy shell (SHS) AP rounds do as much damage as the 420mm guns on Großer Kurfürst (while firing faster and more accurately) and exceed the AP damage of Conqueror. Her HE rounds are also decent, but characteristically weaker than Japanese and British HE but stronger than the high explosive found on German battleships. She also has an extremely powerful anti-aircraft suite and is more than capable of protecting herself from lower-tiered aircraft carriers, but will likely require the assistance of teammates to fend off a determined strike by a Tier X flattop.
While she can reach a top speed of 30 knots, her large size and slow rudder shift time make her vulnerable to torpedo attack. Further, her main battery of 16-inch guns are not able to overmatch the 32mm thick bow armor found on most Tier IX and X battleships like Yamato’s main battery can. This means that Montana captains may sometimes be forced into firing high explosive shells at well-angled enemy battleships.
The dispersion of her main guns has been improved since the game launched, but her dispersion is still worse than Yamato’s even after the Artillery Plotting Room Modification 2 ![]() upgrade is installed. They are, however, more accurate than Großer Kurfürst’s main battery at range while having a slower turret traverse (45 seconds versus Kurfürst’s 40 seconds). Her secondaries are not as numerous as those of her Tier X counterparts, but they are better armored. Cruisers firing high explosive rounds are far less likely to destroy her secondary battery turrets, something that Yamato and Kurfürst cannot claim. Additionally, they have have the best rate of fire and the highest fire chance of all Tier X battleship secondary guns.
upgrade is installed. They are, however, more accurate than Großer Kurfürst’s main battery at range while having a slower turret traverse (45 seconds versus Kurfürst’s 40 seconds). Her secondaries are not as numerous as those of her Tier X counterparts, but they are better armored. Cruisers firing high explosive rounds are far less likely to destroy her secondary battery turrets, something that Yamato and Kurfürst cannot claim. Additionally, they have have the best rate of fire and the highest fire chance of all Tier X battleship secondary guns.
Pros:
- Joint third heaviest AP broadside in the game
- Good main battery range
- Good main battery accuracy, aided by the Artillery Plotting Room Modification 2
 upgrade
- Good hitpoint pool, deck armor, and main belt armor
- Decent best anti-aircraft suite
- Improved Repair Party
 consumable heals 30% more damage per second than her peers (not counting ships with access to Specialized Repair Teams
  )
)
- Montana's unique upgrade provides a noticeable rudder shift improvement, as well as better resistance to fires and floods, at the expense of some concealment
Cons:
- Worst rudder shift among Tier 10 battleships
- While secondaries are good at starting fires, Montana is unsuited for brawling due to its sluggishness and vulnerable citadel
- A master of none, does not have anything unique going for it
Research
Optimal Configuration
Upgrades
- Slot 1: Main Armaments Modification 1
 keeps the guns active and firing.
- Slot 2: Damage Control System Modification 1
 reduces the chances of fire and flood.
- Slot 3: Main Battery Modification 2
 provides a boost to turret traverse. Artillery Plotting Room Modification 1
  improves the main and secondary battery firing range.
- Slot 4: Damage Control System Modification 2
 reduces the duration of fires and floods. Steering Gears Modification 1
  could be considered to improve the sluggish rudder shift.
- Slot 5: Concealment System Modification 1
 reduces her detection range. Alternatively, Template:Reinforced Emergency Response improves rudder shift and reduces fire/flood duration.
- Slot 6: Artillery Plotting Room Modification 2 improves her accuracy. Picking Main Battery Modification 3
 will improve the gun reload, increasing her DPM. Both are valid options and it is up to the player to choose the one they're most comfortable with.
Keep in mind that Montana can also be equipped with Spotting Aircraft Modification 1 ![]() in Slot 1 to increase the spotter plane flight time.
in Slot 1 to increase the spotter plane flight time.
Commander Skills
| Recommended Commander Skills | ||||||
|---|---|---|---|---|---|---|
| Cost (points) |
Attack | Defense | ||||
| 1 |
★★ |
|
|
★ |
|
★★ |
| 2 |
★★★ |
|
|
|
★★ |
|
| 3 |
|
|
★★★ |
★★★ |
|
★★ |
| 4 |
|
|
|
★★★ |
★★★ |
★★★ |
| Key: ★★★ - Extremely Useful ★★ - Frequently Useful ★ - Occasionally Useful No stars - Not Useful | ||||||
Consumables
Montana equips the following consumables
- Slot 1: Damage Control Party

- Slot 2: Repair Party
- Slot 3: Catapult Fighter
 or Spotting Aircraft
It is advisable to equip Spotting Aircraft ![]() rather than Catapult Fighter
rather than Catapult Fighter ![]() as it adds more range.
as it adds more range.
Camouflage
Type 1, 2, or 5 camouflage can be equipped for Credits![]() ; Types 1 or 5 are recommended at a minimum to reduce the detection range.
; Types 1 or 5 are recommended at a minimum to reduce the detection range.
Players who wish to spend Doubloons![]() can equip Montana with Type 20 camouflage for doubloons that lowers her detection radius, reduces the accuracy of incoming shells, halves her repair costs, increases her credit earnings, and increases the amount of experience she earns.
can equip Montana with Type 20 camouflage for doubloons that lowers her detection radius, reduces the accuracy of incoming shells, halves her repair costs, increases her credit earnings, and increases the amount of experience she earns.
Signals
Recommended Signal Flags 
| |||||
|---|---|---|---|---|---|
| Combat | |||||
 ★ |
 ★ |
 ★★★ |
 ★ |

|

|

|
 ★★ |
 ★★ |
 ★★★ |
 ★★ |
 ★★★ |

|

| ||||
Note: Use of the Juliet Charlie signal makes detonation impossible.
Gallery
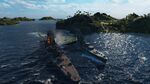
A sinking Montana provides a meat shield for both his friendly Riga and the enemy Des Moines during a Succession League brawl.


_Stern.jpg)