Mutsuki
| Revision as of 19:58, 20 May 2016 | Revision as of 17:08, 29 July 2016 | |||
| Line 5: | Line 5: | |||
| |Performance=<!-- write text about performance in battles below --> | |Performance=<!-- write text about performance in battles below --> | |||
| + | Much like the Minekaze, the Mutsuki is also heavily reliant on its torpedoes to perform well. However, it does suffer from quite a long reload time (over a minute). Players sometimes nickname the ship "Mutsucky" because when it comes to every category critical to the strengths of mid tier IJN DD's (torpedo reload, speed, concealment, launcher config, etc), its a downgrade from the Minekaze. While slower than the Minekaze, the Mutsuki still features the fantastic detection and torpedo ranges that make the mid tier IJN destroyers so devastating although you may have a hard time running away if you get detected. The Mutsuki features 2 triple-tube torpedo mounts, and can have fairly decent AA once fully upgraded. With a surface detection range of 5.9km and an air detection range of 3.1km, with a torpedo range of 10km (upgraded) the Mutsuki can remain undetected whilst unleashing torpedo hell on the enemy. This is highly recommended as its poor armor coupled with mediocre gun performance make this a ship you do not want to get into a close-range engagement in. Going for close-in engagements with guns is a one-way trip. Stay away from ships, at least 7 km away, and only use your guns in self-defense provided you are already detected. | |||
| |Research=<!-- write text about priority sequence of research below --> | |Research=<!-- write text about priority sequence of research below --> | |||
| + | As you do not want to get detected (due to gun stats and armor), it is recommended you get the torpedo upgrade ASAP as the stock torpedoes only give you a 100m leeway between detection and shooting. This will require getting the first hull upgrade aswell. | |||
| + | ||||
| + | After you have got the torpedo upgrade, you can get the final hull and then the gun upgrades if you desire, or can save exp after getting the final hull towards getting your Hatsuharu. Getting the gun upgrades is nice if you intend to keep the final hull equipped as the final hull removes 2 turrets, halving your DPM. The gun upgrade allows you to make up for that DPM loss by increasing your ROF to be higher than the original DPM, although as a IJN Destroyer it is still recommended not to shoot unless you have to. | |||
| |Pros=<!-- write list of positive points below. use * as in ordinary wiki-list. --> | |Pros=<!-- write list of positive points below. use * as in ordinary wiki-list. --> | |||
| + | * Low detection range | |||
| + | * Fantastic Torpedo range when upgraded | |||
| + | * Decent speed | |||
| + | * Ability to launch torpedoes undetected | |||
| + | * Decent reload time with the gun upgrade | |||
| + | * The most dangerous Tier VI destroyer in-game | |||
| |Cons=<!-- write list of negative points below. use * as in ordinary wiki-list. --> | |Cons=<!-- write list of negative points below. use * as in ordinary wiki-list. --> | |||
| + | * Reload time of stock guns is abysmal, can be fixed with the upgrade. | |||
| + | * Terrible gun traverse speed, even with the upgrade. | |||
| + | * Small gun range, less than its predecessor Minekaze. | |||
| + | * No armor, incapacitations are likely to happen when the ship takes hits. | |||
| + | * Slow torpedo speed makes them easier to dodge. | |||
| + | * Low Hitpoints | |||
| + | * Shorter stock torpedo range compared to previous destroyers. | |||
| |Gallery=<!-- write below list of files without tags. description (if necessary) for each should be separated with template {{!}} --><gallery> | |Gallery=<!-- write below list of files without tags. description (if necessary) for each should be separated with template {{!}} --><gallery> | |||
| </gallery>|History=<!-- write text below --> | </gallery>|History=<!-- write text below --> | |||
| + | The Mutsuki class (睦月) destroyers were based on the same hull design as the previous Kamikaze class, except with a double curvature configuration of the bow, a feature which became a standard in all later Japanese destroyers.<br /> | |||
| + | ||||
| + | ||||
| + | The Mutsuki class was the first to be fitted with the newly developed 24 inch torpedoes, with greater range and larger warhead than previous torpedoes in the Japanese inventory. Originally Type 8 torpedoes were carried, arranged in two triple mountings. These were later replaced with the famous Type 93 "Long Lance" oxygen-propelled torpedoes during World War II. | |||
| + | ||||
| + | In September 1935, many ships in the navy were severely damaged by a typhoon while on training exercises, in what was later termed the "Fourth Fleet Incident", including a number of the Mutsuki class destroyers, which had several plates buckled and bridges wrecked. During 1936-37 the Mutsuki class ships were retrofitted with a strengthened, more compact, bridge, with redesigned watertight shields on the torpedo mounts. With the new shields the torpedoes could be worked in all weather conditions thus extending the useful life of the class.[8] | |||
| + | ||||
| + | From 1941-1942 the Mutsuki class destroyers were refitted with the 120 mm/45 main guns reduced to two single mounts and ten Type 96 25 mm AT/AA Guns added. The minesweeping and minelaying equipment was removed and replaced with four depth charge launchers, with 36 depth charges. | |||
| + | ||||
| + | In June 1944, the surviving vessels were again refit, with the number of Type 96 25 mm antiaircraft guns increased to twenty, and an additional five Type 93 13 mm AA Guns also installed. | |||
| |HistoricalGallery=<!-- write below list of files without tags. description (if necessary) for each should be separated with template {{!}} --><gallery> | |HistoricalGallery=<!-- write below list of files without tags. description (if necessary) for each should be separated with template {{!}} --><gallery> | |||
| + | File:Japanese destroyer Mutsuki.jpg{{!}}Mutsuki 1930 | |||
| + | File:Mutsuki2.jpg{{!}}Office of Naval Intelligence recognition drawing of Mutsuki class | |||
| </gallery>|Video=<!-- put below video clips with using template VideoYT. You can use html-tags for formatting. --> | </gallery>|Video=<!-- put below video clips with using template VideoYT. You can use html-tags for formatting. --> | |||
| |Ref= <!-- write below --> | |Ref= <!-- write below --> | |||
| + | [https://en.wikipedia.org/wiki/Mutsuki-class_destroyer Mutsuki Class Destroyer] | |||
| }}<!-- DO NOT DELETE THIS LINE. DO NOT INSERT ANYTHING BELOW THIS LINE --> | }}<!-- DO NOT DELETE THIS LINE. DO NOT INSERT ANYTHING BELOW THIS LINE --> | |||
Revision as of 17:08, 29 July 2016

| Research price11000 exp |
| Purchase price1,380,000 |
| Hit Points9,500 |
| 120 mm/45 3rd Year Type on a Model G mount2 х 1 pcs. |
| Rate of Fire5 shots/min. |
| Reload Time12 sec. |
| Rotation Speed7 deg./sec. |
| 180 Degree Turn Time25.71 sec. |
| Firing Range8.11 km. |
| Maximum Dispersion81 m. |
| HE Shell120 mm HE Type1 |
| Maximum HE Shell Damage1,700 |
| Chance of Fire on Target Caused by HE Shell7 % |
| Initial HE Shell Velocity825 m./s. |
| HE Shell Weight20.3 kg. |
| AP Shell120 mm AP Type0 |
| Maximum AP Shell Damage2,000 |
| Initial AP Shell Velocity825 m./s. |
| AP Shell Weight20.3 kg. |
| 610 mm Triple2 х 3 pcs. |
| Rate of Fire0.92 shots/min. |
| Reload Time65 sec. |
| Rotation Speed25 deg./sec. |
| 180 Degree Turn Time7.2 sec. |
| TorpedoType8 mod. 3 |
| Maximum Damage14,600 |
| Torpedo Speed63 knot |
| Torpedo Range8.01 km. |
| IDS_PJGM015_120MM45_TYPE_HAGUN_102 х 1 pcs. |
| . . . Average Damage per Second6 |
| . . . Firing Range5.01 km. |
| 25 mm/60 Type 96 on a twin mount6 х 2 pcs. |
| . . . Average Damage per Second16.2 |
| . . . Firing Range2.49 km. |
| Maximum Speed37.5 knot |
| Turning Circle Radius550 m. |
| Rudder Shift Time3.2 sec. |
| Surface Detectability Range6.01 km. |
| Air Detectability Range2.5 km. |

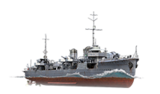
Mutsuki — Japanese Tier V destroyer.
The "enhanced Kamikaze"-class destroyers were the last Japanese destroyers to have a torpedo launcher positioned ahead of the bow superstructure. Twelve destroyers were built between 1924 and 1927, and all were lost during World War II. Mutsuki, which entered service in March 1926, participated in the Sino-Japanese War. During World War II, she participated in the Battle of Wake Island and the landings on the Solomon Islands and New Guinea. On August 24, 1942, the ship was sunk near the Solomon Islands after being hit by an aerial bomb.
Modules
 |
Rate of Fire (shots/min) | 180° Turn Time (sec) | Maximum Dispersion (m) | Maximum HE Shell Damage (HP) | Chance of Fire on Target Caused by HE Shell (%) | Maximum AP Shell Damage (HP) |
Research price (exp) |
Purchase price ( | |
|---|---|---|---|---|---|---|---|---|---|
| 120 mm/45 3rd Year Type on a Model G mount | 5 | 25.7 | 81 | 1,700 | 7 | 2,000 | 0 | 100,000 | |
| 120 mm/45 10th Year Type in a Model B turret | 10.9 | 18 | 81 | 1,700 | 7 | 2,000 | 3,800 | 320,000 |
 |
Hit Points (HP) | Armor (mm) | Armor (mm) | Main Turrets (pcs.) | Secondary Gun Turrets (pcs.) | AA Mounts (pcs.) | Torpedo Tubes (pcs.) | Hangar Capacity (pcs.) |
Research price (exp) |
Purchase price ( | |
|---|---|---|---|---|---|---|---|---|---|---|---|
| Mutsuki (A) | 9,500 | 6 | 19 | 2 | 2 | 2 | 0 | 115,000 | |||
| Mutsuki (B) | 11,300 | 6 | 19 | 2 | 4/6/2 | 2 | 4,400 | 420,000 |
 |
Rate of Fire (shots/min) | Torpedo Tubes Reload Time (sec) | 180° Turn Time (sec) | Maximum Damage (HP) | Torpedo Speed (knot) | Torpedo Range (km) |
Research price (exp) |
Purchase price ( | |
|---|---|---|---|---|---|---|---|---|---|
| Type8 mod. 3 | 0.9 | 65 | 7.2 | 14,600 | 63 | 8 | 0 | 210,000 |
 |
IDS_SHIP_PARAM_SUO_INCREASE_DIST (%) | Maximum Firing Range (km) |
Research price (exp) |
Purchase price ( | |
|---|---|---|---|---|---|
| Type5 mod. 1 | 0 | 0 | 70,000 | ||
| Type5 mod. 2 | 0 | 1,600 | 150,000 |
 |
Maximum Speed (knot) |
Research price (exp) |
Purchase price ( | |
|---|---|---|---|---|
| Propulsion: 38,500 hp | 37.5 | 0 | 105,000 |
Compatible Upgrades
| Slot 1 |
|||||
|---|---|---|---|---|---|
| Slot 2 |
|||||
| Slot 3 |
Player Opinion
Performance
Pros:
- Low detection range
- Fantastic Torpedo range when upgraded
- Decent speed
- Ability to launch torpedoes undetected
- Decent reload time with the gun upgrade
- The most dangerous Tier VI destroyer in-game
Cons:
- Reload time of stock guns is abysmal, can be fixed with the upgrade.
- Terrible gun traverse speed, even with the upgrade.
- Small gun range, less than its predecessor Minekaze.
- No armor, incapacitations are likely to happen when the ship takes hits.
- Slow torpedo speed makes them easier to dodge.
- Low Hitpoints
- Shorter stock torpedo range compared to previous destroyers.
Research
As you do not want to get detected (due to gun stats and armor), it is recommended you get the torpedo upgrade ASAP as the stock torpedoes only give you a 100m leeway between detection and shooting. This will require getting the first hull upgrade aswell.
After you have got the torpedo upgrade, you can get the final hull and then the gun upgrades if you desire, or can save exp after getting the final hull towards getting your Hatsuharu. Getting the gun upgrades is nice if you intend to keep the final hull equipped as the final hull removes 2 turrets, halving your DPM. The gun upgrade allows you to make up for that DPM loss by increasing your ROF to be higher than the original DPM, although as a IJN Destroyer it is still recommended not to shoot unless you have to.