Nagato
| Revision as of 22:37, 6 February 2017 | Revision as of 17:32, 4 July 2020 Update "inefficient" skills | |||
21 intermediate revisions by 15 users not shown | ||||
| Line 3: | Line 3: | |||
| |Anno=<!-- you can write below short description for the ship. it will replace default once. --> | |Anno=<!-- you can write below short description for the ship. it will replace default once. --> | |||
| ? | ''Nagato'' had long remained the most powerful warship in the Imperial Japanese Navy. She had good armor and carried | + | ''Nagato'' had long remained the most powerful warship in the Imperial Japanese Navy. She had good armor and carried 410mm main battery guns. In the 1930s, the ship was modernized to receive more powerful torpedo protection.<br><br>{{Model3DViewer|419b7589d65e420c98c0b86debbd84ba}} | |
| |Performance=<!-- write text about performance in battles below --> | |Performance=<!-- write text about performance in battles below --> | |||
| ? | ''Nagato'' is the end stage for all the dreadnoughts of the Japanese battleship line. Her guns change from the 14 inch guns of | + | ''Nagato'' is the end stage for all the dreadnoughts of the Japanese battleship line. Her guns change from the 14-inch guns of ''[[Kongo]]'' and ''[[Fuso]]'' into 16.1-inch (410mm) guns she carries in four dual mount turrets, and her handling is quite impressive for a dreadnought, enabling her to be a functional firing platform and ship of the line. | |
| ? | The | + | The number of guns she carries is a drastic reduction from the broadside of ''Fuso'', and their slower reload and narrower spread means that aiming properly is critical to success. However, these guns make her a serious threat to the heavily-armored American dreadnoughts that were tough nuts to crack with only 14-inch guns, and she can also easily maul higher tier battleships that are not too careful around her. She also has a very surprising quick-firing secondary battery with a respectable firing range; with a commander equipped with the Level 4 commander skill Manual Fire Control for Secondary Armament (which requires active targeting to use) that greatly reduces their dispersion, they can be lethal to destroyers that linger around her for too long. Her health pool is generous for a Tier VII battleship, and she can soak up a lot of punishment, though her torpedo protection is not that great. However her armor, while the strongest among mid-tier Japanese battleships, is still weaker than her Tier VII counterparts of other nations and her citadel is quite vulnerable; sailing into close-range duels, while they can be fun, is not advised. | |
| ? | ''Nagato'' can be a very rewarding battleship to have a three battleship | + | Though her stock hull's anti-aircraft suite is nothing to write home about, upgrading to Hull (B) gives her a respectable AA suite and slightly enhanced armor protection. Even upgraded, though, ''Nagato''’s AA is still weaker than many other battleships at her tier, meaning that enemy aircraft will likely focus their attentions on her. This, coupled with her sheer length (100 feet longer than ''[[Colorado]]'') and substandard torpedo protection, makes ''Nagato'' an especially tempting target for torpedo bombers. When in a game with a higher-tier CV, ''Nagato'' captains are advised to group up with other ships with strong AA. | |
| + | ||||
| + | The key to doing well in ''Nagato'' is to rely on her accuracy to make smart target selections and fire for maximum effect. Fire at targets of opportunity from afar, but especially nail incautious battleships with her powerful guns. Avoid getting into close-range fights with other battleships unless you hold a significant HP advantage; she can absorb damage for a limited time only. ''Nagato'' can be a very rewarding battleship to have a three battleship division, with as she can provide long ranged fire support for the divisioning battleships. | |||
| |Pros=<!-- write list of positive points below. use * as in ordinary wiki-list. --> | |Pros=<!-- write list of positive points below. use * as in ordinary wiki-list. --> | |||
| * Decent speed, impressive handling and good ergonomics for a dreadnought. | * Decent speed, impressive handling and good ergonomics for a dreadnought. | |||
| ? | * 410mm guns | + | * Powerful 410mm guns with fairly good accuracy, penetration and damage on both AP and HE shells. | |
| ? | * Superior main battery range to her | + | * Superior main battery range to her counterparts. | |
| * Fast-loading secondary batteries that have a high shell volume. | * Fast-loading secondary batteries that have a high shell volume. | |||
| ? | * Secondary batteries become dangerous when upgraded with the right [[Ship:Commander| | + | * Secondary batteries become dangerous when upgraded with the right [[Ship:Commander|commander skills]]. | |
| * Decent rudder shift time. | * Decent rudder shift time. | |||
| * Highest HP pool at her tier. | * Highest HP pool at her tier. | |||
| + | * Torpedo bulge extends to high above the waterline, providing slight protection from smaller shells at close range. | |||
| |Cons=<!-- write list of negative points below. use * as in ordinary wiki-list. --> | |Cons=<!-- write list of negative points below. use * as in ordinary wiki-list. --> | |||
| Line 25: | Line 28: | |||
| * Anti-aircraft suite is subpar, with most of her AA damage being concentrated at medium range. | * Anti-aircraft suite is subpar, with most of her AA damage being concentrated at medium range. | |||
| * Despite the guns being rather accurate, the dispersion itself is sometimes wonky at long range. | * Despite the guns being rather accurate, the dispersion itself is sometimes wonky at long range. | |||
| ? | * | + | * Eight main guns makes her reliant on getting good solid hits and citadel penetrations for damage. | |
| * Torpedo protection is not so effective. | * Torpedo protection is not so effective. | |||
| * Weak armor protecting her rudder. | * Weak armor protecting her rudder. | |||
| * Fairly high detection range. | * Fairly high detection range. | |||
| + | * Same dual-purpose secondaries as ''[[Kongo]]''. | |||
| |Research=<!-- write text about priority sequence of research below --> | |Research=<!-- write text about priority sequence of research below --> | |||
| ? | '' | + | The recommended upgrades for ''{{#var:ship_name}}'' are as follows: | |
| + | * '''Slot 1''': {{Main Armaments Modification 1}}<nowiki>*</nowiki> | |||
| + | * '''Slot 2''': {{Damage Control System Modification 1}} | |||
| + | * '''Slot 3''': {{Aiming Systems Modification 1}}<nowiki>*</nowiki> | |||
| + | * '''Slot 4''': {{Damage Control System Modification 2}} | |||
| ? | + | '''Slot 1''' provides players with the first option in choosing a desired role. Typically, {{Main Armaments Modification 1}} is recommended to provide additional survivability to the main battery, but players who desire to specialize in the secondary or anti-aircraft armament should choose {{Auxiliary Armaments Modification 1}}. | ||
| ? | + | '''Slot 3''' allows for further specialization. Generally, {{Aiming Systems Modification 1}} is recommended because it reduces shell dispersion of the main and secondary armaments. To increase the effectiveness of the anti-aircraft armament, mount {{AA Guns Modification 1}}. Players wishing to specialize for secondaries should mount {{Secondary Battery Modification 2}}. | ||
| ? | '' | + | ||
| ? | '' | + | |CommanderSkills=<!-- write text about best set of Commander Skills below --> | |
| + | Following the general battleship build, ''{{#var:ship_name}}'' can go for a number of viable Level 1 skills, since none of them have a decisive advantage over the others. The Direction Center for Fighters skill sends up an additional catapult fighter when the consumable is used, and can bolster the ship's subpar defenses against carrier strikes. The [[Ship:Consumables#Catapult Fighter|catapult fighters]] on battleships are only active for 60 seconds, though, which limits their utility. While battleships aren't in much danger of losing modules, Preventative Maintenance reduces the chance of losing a main turret, and allows captains to equip {{Auxiliary Armaments Modification 1}} to increase secondary and AA batteries' resilience. The Priority Target skill isn't as crucial as it is on cruisers, but can provide useful information as to when to push ahead or retreat. | |||
| ? | + | For Level 2 skills, Expert Marksman is top priority for this tier, and should be acquired on all battleships. Following that, Adrenaline Rush can provide a significant boost to damage output as health evaporates in a match, to the point that ''Nagato'' can shave more than 5 seconds off her reload time in the last quarter of her health pool. Jack of All Trades provides a cooldown benefit to all consumables and {{Damage Control Party}}. | ||
| ? | + | The Level 3 skill Superintendent is a very valuable skill on battleships because it provides an extra {{Repair Party}} consumable, and should be high on the list of skills to take. Otherwise, Basic Firing Training adds to the punch of ''Nagato''’s secondaries and AA and should be taken for a secondary build. Vigilance can provide crucial seconds with which to evade torpedoes, but it does not replace careful attention to the minimap and heads-up play. | ||
| ? | + | The last tier of skills offers a selection between Manual Control for Secondary Armament, Fire Prevention, Advanced Firing Training, and Concealment Expert. Manual Control for Secondary Armament and Advanced Firing Control are indispensable for secondary battery oriented builds, and provide the accuracy and range needed for them to work well. Fire Prevention increases ''Nagato''’s survivability, but keep in mind that the small reduction in fire chance may not be worth the amount of skill points it costs. Finally, Concealment Expert afforts ''Nagato'' a small tactical boost in allowing her to withdraw when it gets too hot, though the decrease in detection radius is not so large, and this skill generally is of little benefit unless the commander in question is to be moved to higher tier battleships. | ||
| ? | {{Commander Skills | + | {{Commander Skills 2 | |
| ? | | | + | <!-- This version enables a '0' rating. Use it for skills that have no effect (e.g. Improved Engines on a non-CV) or are detrimental to the ship. They should mirror what appears in the game client. --> | |
| ? | | | + | | rating11 = 2 <!-- Priority Target --> | |
| ? | | | + | | rating12 = 1 <!-- Preventive Maint --> | |
| ? | | | + | | rating13 = 1 <!-- Expert Loader --> | |
| ? | | Direction Center for | + | | rating14 = 0 <!-- Air Supremacy --> | |
| ? | | | + | | rating15 = 2 <!-- Direction Center for Fighters --> | |
| ? | | Incoming Fire Alert | + | | rating16 = 0 <!-- Improved Engine Boost --> | |
| ? | | | + | | rating17 = 1 <!-- Incoming Fire Alert --> | |
| + | | rating18 = 0 <!-- Last Gasp --> | |||
| ? | | | + | | rating21 = 2 <!-- High Alert --> | |
| ? | | Jack of All Trades | + | | rating22 = 2 <!-- Jack of All Trades --> | |
| ? | | | + | | rating23 = 3 <!-- Expert Marksman --> | |
| ? | | Torpedo Acceleration | + | | rating24 = 0 <!-- Torpedo Acceleration --> | |
| ? | | Smoke Screen Expert | + | | rating25 = 0 <!-- Smoke Screen Expert --> | |
| ? | | | + | | rating26 = 0 <!-- Improved Engines --> | |
| ? | | Adrenaline Rush | + | | rating27 = 2 <!-- Adrenaline Rush --> | |
| ? | | Last Stand | + | | rating28 = <!-- Last Stand --> | |
| ? | | | + | | rating31 = 2 <!-- Basics of Survivability --> | |
| ? | + | | rating32 = <!-- Survivability Expert--> | ||
| ? | | Torpedo Armament Expertise | + | | rating33 = 0 <!-- Torpedo Armament Expertise--> | |
| ? | | | + | | rating34 = 0 <!-- Aircraft Armor --> | |
| ? | | Basic Firing Training | + | | rating35 = 3 <!-- Basic Firing Training --> | |
| ? | | | + | | rating36 = 3 <!-- Superintendent --> | |
| ? | | Demolition Expert | + | | rating37 = <!-- Demolition Expert --> | |
| ? | | | + | | rating38 = 1 <!-- Vigilance --> | |
| ? | | Manual Fire Control for Secondary Armament | + | | rating41 = 3 <!-- Manual Fire Control for Secondary Armament --> | |
| ? | | Fire Prevention | + | | rating42 = 2 <!-- Fire Prevention --> | |
| ? | | Inertia Fuse for HE Shells | + | | rating43 = 0 <!-- Inertia Fuse for HE Shells --> | |
| ? | | | + | | rating44 = 0 <!-- Sight Stabilization --> | |
| ? | | Advanced Firing Training = | + | | rating45 = 3 <!-- Advanced Firing Training --> | |
| ? | | | + | | rating46 = 0 <!-- Massive AA Fire --> | |
| ? | + | | rating47 = 1 <!-- Radio Position Finding --> | ||
| ? | + | | rating48 = 1 <!-- Concealment Expert --> | ||
| }} | }} | |||
| |Consumables=<!-- write text about selection of Consumables below --> | |Consumables=<!-- write text about selection of Consumables below --> | |||
| ? | + | ''{{#var:ship_name}}'' can equip the following consumables: | ||
| + | * '''Slot 1:''' {{Damage Control Party}} | |||
| + | * '''Slot 2:''' {{Repair Party}} | |||
| + | * '''Slot 3:''' {{Spotting Aircraft}} '''or''' {{Catapult Fighter}} (the latter only with Hull B) | |||
| + | ||||
| + | ||||
| |Camouflage=<!-- write text about useful camouflage below --> | |Camouflage=<!-- write text about useful camouflage below --> | |||
| Line 93: | Line 107: | |||
| |Signals=<!-- write text about best set of signals below --> | |Signals=<!-- write text about best set of signals below --> | |||
| ? | + | ''Nagato'' comes with 21 [[Ship:Flags#Signals|signal flag]] slots. The three most important flags are India Delta ({{India Delta|Size=18px}}), Juliet Yankee Bissotwo ({{Juliet Yankee Bissotwo|Size=18px}}), and India Yankee ({{India Yankee|Size=18px}}); all of which will improve her survivability. For captains who prefer a '''Secondary Build''', the addition of Mike Yankee Soxisix ({{Mike Yankee Soxisix|Size=18px}}) will further improve the performance of ''Nagato''’s secondaries. | ||
| {{Signal Flags | {{Signal Flags | |||
| + | | November Echo Setteseven = 1 | |||
| + | | Mike Yankee Soxisix = 2 | |||
| + | | India X-Ray = | |||
| + | | Juliet Whiskey Unaone = | |||
| + | | Victor Lima = | |||
| | Hotel Yankee = 1 | | Hotel Yankee = 1 | |||
| ? | + | |||
| | November Foxtrot = 2 | | November Foxtrot = 2 | |||
| ? | | | + | | Sierra Mike = 1 | |
| ? | + | |||
| | India Delta = 3 | | India Delta = 3 | |||
| + | | Juliet Yankee Bissotwo = 1 | |||
| + | | India Yankee = 3 | |||
| + | | Juliet Charlie = 1 | |||
| ? | + | | Zulu = | ||
| ? | + | |||
| ? | | Zulu | + | ||
| | India Bravo Terrathree = | | India Bravo Terrathree = | |||
| ? | | | + | | Equal Speed Charlie London = 3 | |
| ? | | | + | | Zulu Hotel = 2 | |
| + | | Papa Papa = | |||
| ? | | | + | | Wyvern = | |
| ? | | | + | | Red Dragon = 2 | |
| ? | | | + | | Dragon Flag = 2 | |
| ? | | | + | | Ouroboros = | |
| ? | | | + | | Hydra = | |
| ? | + | |||
| }} | }} | |||
| Line 123: | Line 142: | |||
| |History=<!-- write text below --> | |History=<!-- write text below --> | |||
| ? | <div class="thumb tright">{{AnnoWiki|content=<h3>Construction</h3> | + | <div class="thumb tright"> | |
| ? | :Kure Naval Yard; Kure, Japan | + | {{AnnoWiki|content= | |
| + | <h2>''{{#var:ship_name}}'', 1921</h2> | |||
| + | <h3>Construction</h3> | |||
| + | :Builder: Kure Naval Yard; Kure, Japan | |||
| :Laid down: 28 August 1917 | :Laid down: 28 August 1917 | |||
| :Launched: 9 November 1919 | :Launched: 9 November 1919 | |||
| Line 160: | Line 182: | |||
| :Four (4x1) 533mm submerged torpedo tubes | :Four (4x1) 533mm submerged torpedo tubes | |||
| }}</div> | }}</div> | |||
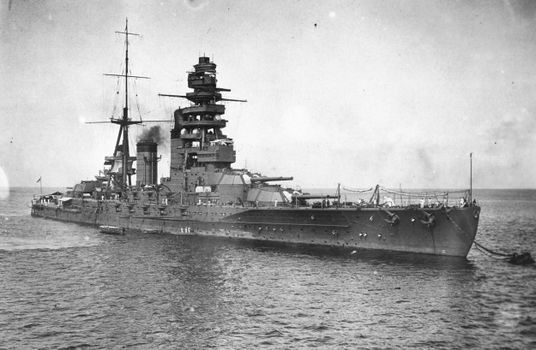
| ? | [[File:Nagato1924.jpg| | + | [[File:Nagato1924.jpg|none|frame|x350px|link=|''Nagato'' at anchor, circa 1924.]] | |
| ===History=== | ===History=== | |||
| The ''[[Nagato]]''-class battleships were the last pair of battleships build by the Japanese Navy before the global hiatus on capital ship construction due to the ratification of the Washington and London Naval Treaties. As such, the ''Nagato''-class is seen as the culmination of all the experience learned by the Japanese Navy in dreadnought design and construction up through the end of World War I. | The ''[[Nagato]]''-class battleships were the last pair of battleships build by the Japanese Navy before the global hiatus on capital ship construction due to the ratification of the Washington and London Naval Treaties. As such, the ''Nagato''-class is seen as the culmination of all the experience learned by the Japanese Navy in dreadnought design and construction up through the end of World War I. | |||
| Line 166: | Line 188: | |||
| Led by famed naval architect Yuzuru Hiraga, planning and design for the ''Nagato''-class began in 1916. By this time, Japan was a steadfast, growing naval power and wanted their designs to reflect such a status. As such, from the outset the ''Nagato''-class were set to be first-rate dreadnoughts, competitive with the offerings of the other navies of the world (chiefly the ''[[Colorado]]''-class battleships that were being built by the United States). Hiraga and his team were meticulous, delaying final completion of her plans until mid-1917 in order to incorporate the lessons learned from the Battle of Jutland the previous year. What ultimately emerged were the most advanced battleships afloat in the world. | Led by famed naval architect Yuzuru Hiraga, planning and design for the ''Nagato''-class began in 1916. By this time, Japan was a steadfast, growing naval power and wanted their designs to reflect such a status. As such, from the outset the ''Nagato''-class were set to be first-rate dreadnoughts, competitive with the offerings of the other navies of the world (chiefly the ''[[Colorado]]''-class battleships that were being built by the United States). Hiraga and his team were meticulous, delaying final completion of her plans until mid-1917 in order to incorporate the lessons learned from the Battle of Jutland the previous year. What ultimately emerged were the most advanced battleships afloat in the world. | |||
| ? | The Japanese determined that high-speed was an integral asset to making a battleship an effective weapon; as such, the ''Nagato''-class were designed to be the fastest battleships in the world. It was decided to fit no less than twenty-one (21) Kampon boilers into them: fifteen (15) oil-fired and six (6) mix-fired. These boilers then fed into four (4) geared turbines that each powered a single screw. Altogether, they generated 80,000 shaft horsepower and propelled the ships to speeds above 26 knots, significantly faster than their competition. This was not a fact the Japanese Navy boasted about, however, | + | The Japanese determined that high-speed was an integral asset to making a battleship an effective weapon; as such, the ''Nagato''-class were designed to be the fastest battleships in the world. It was decided to fit no less than twenty-one (21) Kampon boilers into them: fifteen (15) oil-fired and six (6) mix-fired. These boilers then fed into four (4) geared turbines that each powered a single screw. Altogether, they generated 80,000 shaft horsepower and propelled the ships to speeds above 26 knots, significantly faster than their competition. This was not a fact the Japanese Navy boasted about, however, instead electing to keep the true speed a closely guarded secret. In fact, the US Navy didn’t know the true speed of the class until well into the late 1930s. | |
| In electing to focus on propulsion and speed, weight had to be saved from the armoring. Ergo, the Japanese opted to implement the “all-or-nothing” armor principle that was championed by the US; maximal armor to the vital areas whist non-critical surfaces receives minimal armor. The main belt and the barbette rings received 12 inches of armor, whilst the conning tower and the turret faces received 14 inches and 18 inches of armor, respectively. While this was sufficient to rival other battleships of the period, British and US battleships all had heavier armor, with belt armors exceeding 13 inches for many classes. | In electing to focus on propulsion and speed, weight had to be saved from the armoring. Ergo, the Japanese opted to implement the “all-or-nothing” armor principle that was championed by the US; maximal armor to the vital areas whist non-critical surfaces receives minimal armor. The main belt and the barbette rings received 12 inches of armor, whilst the conning tower and the turret faces received 14 inches and 18 inches of armor, respectively. While this was sufficient to rival other battleships of the period, British and US battleships all had heavier armor, with belt armors exceeding 13 inches for many classes. | |||
| Line 174: | Line 196: | |||
| ''Nagato'' (長門, named for Nagato Province) was the lead ship of the class, built at the Naval Arsenal in Kure. She was laid down 28 August 1917, launched 9 November 1919 and completed 25 November 1920. Her sister ship, ''[[Mutsu]]'', was completed in the fall of 1921. | ''Nagato'' (長門, named for Nagato Province) was the lead ship of the class, built at the Naval Arsenal in Kure. She was laid down 28 August 1917, launched 9 November 1919 and completed 25 November 1920. Her sister ship, ''[[Mutsu]]'', was completed in the fall of 1921. | |||
| ? | The ''Nagato''-class underwent a modernization in the late 1920s and a reconstruction in the 1930s to keep the designs combat-capable. During the 1920s modernization, the first funnel was replaced with a serpentine funnel with a raked-top in order to attempt to fix the issue of the superstructure being occluded with smoke; the very funnel seen in-game. Furthermore, the torpedo tubes were traded-in for anti-aircraft artillery, in order to counter the growing threat of aircraft. The 1930s reconstruction proved to be a more extensive overhaul. The iconic 7-masted superstructure was replaced with a pagoda-mast style design, and the first funnel was removed altogether. The old boilers were replaced; the overall number was also reduced to just ten (10). Interestingly, the old turrets were replaced by the ones of the incomplete ''Tosa'' class battleships, allowing for greater gun elevation, ergo greater range. Furthermore, torpedo bulges were introduced. To mitigate the loss in ship speed due to the added weight, the length of the battleships | + | The ''Nagato''-class underwent a modernization in the late 1920s and a reconstruction in the 1930s to keep the designs combat-capable. During the 1920s modernization, the first funnel was replaced with a serpentine funnel with a raked-top in order to attempt to fix the issue of the superstructure being occluded with smoke; the very funnel seen in-game. Furthermore, the torpedo tubes were traded-in for anti-aircraft artillery, in order to counter the growing threat of aircraft. The 1930s reconstruction proved to be a more extensive overhaul. The iconic 7-masted superstructure was replaced with a pagoda-mast style design, and the first funnel was removed altogether. The old boilers were replaced; the overall number was also reduced to just ten (10). Interestingly, the old turrets were replaced by the ones of the incomplete ''Tosa'' class battleships, allowing for greater gun elevation, ergo greater range. Furthermore, torpedo bulges were introduced. To mitigate the loss in ship speed due to the added weight, the length of the battleships was increased. Finally, a catapult was added to launch scout planes off the deck. | |
| + | ||||
| + | ===Historical Inaccuracies=== | |||
| + | * ''Nagato''’s overall dark gray camouflage is missing. This was standard on all IJN warships beginning in 1903 until the end of WW2. | |||
| + | * Light and dark green camouflage was only applied to aircraft carriers. | |||
| + | * By July 1944, ''Nagato'' had ninety-eight (98) 25 mm AA guns; Hull (B) has only 90. Two triple mounts and one twin mount are missing. | |||
| + | * Not represented is ''Nagato''’s November 1944 refit, when four 140 mm secondary guns were removed for two twin 127 mm dual-purpose guns and nine triple 25 mm AA guns. | |||
| + | * Also missing is ''Nagato''’s final refit in June 1945; twelve (12) 140 mm secondary guns were removed for six twin 127 mm DP guns. By this time however, ''Nagato'' had been converted to a floating anti-aircraft battery. | |||
| ? | |HistoricalGallery=<!-- write below list of files without tags. description (if necessary) for each should be separated with | + | |HistoricalGallery=<!-- write below list of files without tags. description (if necessary) for each should be separated with | --><gallery> | |
| File:Mutsu02.jpg|''[[Mutsu]]'' under construction at Yokosuka Naval Shipyard, 24 September 1920. | File:Mutsu02.jpg|''[[Mutsu]]'' under construction at Yokosuka Naval Shipyard, 24 September 1920. | |||
| File:Nagato_1920_1.jpg|''Nagato'' undergoing sea trials at Sukumo, 30 September 1920. | File:Nagato_1920_1.jpg|''Nagato'' undergoing sea trials at Sukumo, 30 September 1920. | |||
| File:Mutsu1921.jpg|''Mutsu'' underway, 19 October 1921. | File:Mutsu1921.jpg|''Mutsu'' underway, 19 October 1921. | |||
| ? | ||||
| File:Mutsu03.jpg|''Mutsu'' anchored at Sasebo, 28 May 1925. | File:Mutsu03.jpg|''Mutsu'' anchored at Sasebo, 28 May 1925. | |||
| File:Nagato_1931_1.jpg|''Nagato'' at Saeki Bay, circa 1931. Note the serpentine funnel from her late 1920s modernization. | File:Nagato_1931_1.jpg|''Nagato'' at Saeki Bay, circa 1931. Note the serpentine funnel from her late 1920s modernization. | |||
| Line 197: | Line 225: | |||
| |Ref= <!-- write below --> | |Ref= <!-- write below --> | |||
| + | # [https://en.wikipedia.org/wiki/Japanese_battleship_Nagato Japanese battleship ''Nagato'' - Wikipedia] | |||
| + | # [https://en.wikipedia.org/wiki/Nagato-class_battleship ''Nagato''-class battleship - Wikipedia] | |||
| }}<!-- DO NOT DELETE THIS LINE. DO NOT INSERT ANYTHING BELOW THIS LINE --> | }}<!-- DO NOT DELETE THIS LINE. DO NOT INSERT ANYTHING BELOW THIS LINE --> | |||
Revision as of 17:32, 4 July 2020

| Research price78500 exp |
| Purchase price6,350,000 |
| Hit Points49,000 |
| 410 mm/45 3rd Year Type in a twin turret4 х 2 pcs. |
| Rate of Fire2.07 shots/min. |
| Reload Time29 sec. |
| Rotation Speed3.8 deg./sec. |
| 180 Degree Turn Time47.37 sec. |
| Firing Range20.46 km. |
| Maximum Dispersion231 m. |
| HE Shell410 mm HE Type0 |
| Maximum HE Shell Damage6,500 |
| Chance of Fire on Target Caused by HE Shell30 % |
| Initial HE Shell Velocity805 m./s. |
| HE Shell Weight938.5 kg. |
| AP Shell410 mm AP/APC Type91 |
| Maximum AP Shell Damage12,600 |
| Initial AP Shell Velocity806 m./s. |
| AP Shell Weight1020 kg. |
| 140 mm/50 3rd Year Type on a casemate mount18 х 1 pcs. |
| Firing Range5.6 km. |
| Rate of Fire7.5 shots/min. |
| Reload Time8 sec. |
| HE Shell140 mm HE Type0 |
| Maximum HE Shell Damage2,400 |
| Initial HE Shell Velocity850 m./s. |
| Chance of Fire on Target Caused by HE Shell10 % |
| 127 mm/40 Type 89 on a Model A1 mount4 х 2 pcs. |
| Firing Range5.6 km. |
| Rate of Fire12 shots/min. |
| Reload Time5 sec. |
| HE Shell127 mm HE Type0 |
| Maximum HE Shell Damage2,100 |
| Initial HE Shell Velocity725 m./s. |
| Chance of Fire on Target Caused by HE Shell8 % |
| 127 mm/40 Type 89 on a Model A1 mount4 х 2 pcs. |
| . . . Average Damage per Second40.4 |
| . . . Firing Range5.01 km. |
| 25 mm/60 Type 96 on a twin mount14 х 2 pcs. |
| . . . Average Damage per Second37.8 |
| . . . Firing Range2.49 km. |
| Maximum Speed22.25 knot |
| Turning Circle Radius770 m. |
| Rudder Shift Time15.2 sec. |
| Surface Detectability Range16.59 km. |
| Air Detectability Range10.63 km. |

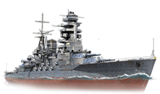
Nagato — Japanese Tier VII battleship.
Nagato had long remained the most powerful warship in the Imperial Japanese Navy. She had good armor and carried 410mm main battery guns. In the 1930s, the ship was modernized to receive more powerful torpedo protection.
Modules
 |
Rate of Fire (shots/min) | 180° Turn Time (sec) | Maximum Dispersion (m) | Maximum HE Shell Damage (HP) | Chance of Fire on Target Caused by HE Shell (%) | Maximum AP Shell Damage (HP) |
Research price (exp) |
Purchase price ( | |
|---|---|---|---|---|---|---|---|---|---|
| 410 mm/45 3rd Year Type in a twin turret | 2.1 | 47.4 | 231 | 6,500 | 30 | 12,600 | 0 | 560,000 |
 |
Hit Points (HP) | Armor (mm) | Armor (mm) | Main Turrets (pcs.) | Secondary Gun Turrets (pcs.) | AA Mounts (pcs.) | Torpedo Tubes (pcs.) | Hangar Capacity (pcs.) |
Research price (exp) |
Purchase price ( | |
|---|---|---|---|---|---|---|---|---|---|---|---|
| Nagato (A) | 49,000 | 16 | 457 | 4 | 4/18 | 14/4 | 0 | 690,000 | |||
| Nagato (B) | 65,000 | 16 | 457 | 4 | 4/18 | 24/12/14/4 | 22,000 | 1,800,000 |
 |
IDS_SHIP_PARAM_SUO_INCREASE_DIST (%) | Maximum Firing Range (km) |
Research price (exp) |
Purchase price ( | |
|---|---|---|---|---|---|
| Type7 mod. 1 | 0 | 0 | 310,000 |
 |
Maximum Speed (knot) |
Research price (exp) |
Purchase price ( | |
|---|---|---|---|---|
| Propulsion: 78,000 hp | 22.3 | 0 | 220,000 | |
| Propulsion: 84,000 hp | 25 | 7,500 | 550,000 |
Compatible Upgrades
| Slot 1 |
|||||
|---|---|---|---|---|---|
| Slot 2 |
|||||
| Slot 3 |
|||||
| Slot 4 |
Player Opinion
Performance
Nagato is the end stage for all the dreadnoughts of the Japanese battleship line. Her guns change from the 14-inch guns of Kongo and Fuso into 16.1-inch (410mm) guns she carries in four dual mount turrets, and her handling is quite impressive for a dreadnought, enabling her to be a functional firing platform and ship of the line.
The number of guns she carries is a drastic reduction from the broadside of Fuso, and their slower reload and narrower spread means that aiming properly is critical to success. However, these guns make her a serious threat to the heavily-armored American dreadnoughts that were tough nuts to crack with only 14-inch guns, and she can also easily maul higher tier battleships that are not too careful around her. She also has a very surprising quick-firing secondary battery with a respectable firing range; with a commander equipped with the Level 4 commander skill Manual Fire Control for Secondary Armament (which requires active targeting to use) that greatly reduces their dispersion, they can be lethal to destroyers that linger around her for too long. Her health pool is generous for a Tier VII battleship, and she can soak up a lot of punishment, though her torpedo protection is not that great. However her armor, while the strongest among mid-tier Japanese battleships, is still weaker than her Tier VII counterparts of other nations and her citadel is quite vulnerable; sailing into close-range duels, while they can be fun, is not advised.
Though her stock hull's anti-aircraft suite is nothing to write home about, upgrading to Hull (B) gives her a respectable AA suite and slightly enhanced armor protection. Even upgraded, though, Nagato’s AA is still weaker than many other battleships at her tier, meaning that enemy aircraft will likely focus their attentions on her. This, coupled with her sheer length (100 feet longer than Colorado) and substandard torpedo protection, makes Nagato an especially tempting target for torpedo bombers. When in a game with a higher-tier CV, Nagato captains are advised to group up with other ships with strong AA.
The key to doing well in Nagato is to rely on her accuracy to make smart target selections and fire for maximum effect. Fire at targets of opportunity from afar, but especially nail incautious battleships with her powerful guns. Avoid getting into close-range fights with other battleships unless you hold a significant HP advantage; she can absorb damage for a limited time only. Nagato can be a very rewarding battleship to have a three battleship division, with as she can provide long ranged fire support for the divisioning battleships.Pros:
- Decent speed, impressive handling and good ergonomics for a dreadnought.
- Powerful 410mm guns with fairly good accuracy, penetration and damage on both AP and HE shells.
- Superior main battery range to her counterparts.
- Fast-loading secondary batteries that have a high shell volume.
- Secondary batteries become dangerous when upgraded with the right commander skills.
- Decent rudder shift time.
- Highest HP pool at her tier.
- Torpedo bulge extends to high above the waterline, providing slight protection from smaller shells at close range.
Cons:
- Armor is quite weak and citadel is quite vulnerable, though this can be mitigated by angling and good positioning.
- Anti-aircraft suite is subpar, with most of her AA damage being concentrated at medium range.
- Despite the guns being rather accurate, the dispersion itself is sometimes wonky at long range.
- Eight main guns makes her reliant on getting good solid hits and citadel penetrations for damage.
- Torpedo protection is not so effective.
- Weak armor protecting her rudder.
- Fairly high detection range.
- Same dual-purpose secondaries as Kongo.
Research
The recommended upgrades for Nagato are as follows:
- Slot 1: Main Armaments Modification 1
 *
*
- Slot 2: Damage Control System Modification 1

- Slot 3: Aiming Systems Modification 1
 *
*
- Slot 4: Damage Control System Modification 2

Slot 1 provides players with the first option in choosing a desired role. Typically, Main Armaments Modification 1 ![]() is recommended to provide additional survivability to the main battery, but players who desire to specialize in the secondary or anti-aircraft armament should choose Auxiliary Armaments Modification 1
is recommended to provide additional survivability to the main battery, but players who desire to specialize in the secondary or anti-aircraft armament should choose Auxiliary Armaments Modification 1 ![]() .
.
Optimal Configuration
Commander Skills
Following the general battleship build, Nagato can go for a number of viable Level 1 skills, since none of them have a decisive advantage over the others. The Direction Center for Fighters skill sends up an additional catapult fighter when the consumable is used, and can bolster the ship's subpar defenses against carrier strikes. The catapult fighters on battleships are only active for 60 seconds, though, which limits their utility. While battleships aren't in much danger of losing modules, Preventative Maintenance reduces the chance of losing a main turret, and allows captains to equip Auxiliary Armaments Modification 1 ![]() to increase secondary and AA batteries' resilience. The Priority Target skill isn't as crucial as it is on cruisers, but can provide useful information as to when to push ahead or retreat.
to increase secondary and AA batteries' resilience. The Priority Target skill isn't as crucial as it is on cruisers, but can provide useful information as to when to push ahead or retreat.
For Level 2 skills, Expert Marksman is top priority for this tier, and should be acquired on all battleships. Following that, Adrenaline Rush can provide a significant boost to damage output as health evaporates in a match, to the point that Nagato can shave more than 5 seconds off her reload time in the last quarter of her health pool. Jack of All Trades provides a cooldown benefit to all consumables and Damage Control Party ![]() .
.
The Level 3 skill Superintendent is a very valuable skill on battleships because it provides an extra Repair Party ![]() consumable, and should be high on the list of skills to take. Otherwise, Basic Firing Training adds to the punch of Nagato’s secondaries and AA and should be taken for a secondary build. Vigilance can provide crucial seconds with which to evade torpedoes, but it does not replace careful attention to the minimap and heads-up play.
consumable, and should be high on the list of skills to take. Otherwise, Basic Firing Training adds to the punch of Nagato’s secondaries and AA and should be taken for a secondary build. Vigilance can provide crucial seconds with which to evade torpedoes, but it does not replace careful attention to the minimap and heads-up play.
The last tier of skills offers a selection between Manual Control for Secondary Armament, Fire Prevention, Advanced Firing Training, and Concealment Expert. Manual Control for Secondary Armament and Advanced Firing Control are indispensable for secondary battery oriented builds, and provide the accuracy and range needed for them to work well. Fire Prevention increases Nagato’s survivability, but keep in mind that the small reduction in fire chance may not be worth the amount of skill points it costs. Finally, Concealment Expert afforts Nagato a small tactical boost in allowing her to withdraw when it gets too hot, though the decrease in detection radius is not so large, and this skill generally is of little benefit unless the commander in question is to be moved to higher tier battleships.
| Recommended Commander Skills | ||||||||
|---|---|---|---|---|---|---|---|---|
| Cost (points) |
Endurance | Attack | Support | Versatility | ||||
| 1 |
★★ |
★ |
★ |
Χ |
★★ |
Χ |
★ |
Χ |
| 2 |
★★ |
★★ |
★★★ |
Χ |
Χ |
Χ |
★★ |
|
| 3 |
★★ |
|
Χ |
Χ |
★★★ |
★★★ |
|
★ |
| 4 |
★★★ |
★★ |
Χ |
Χ |
★★★ |
Χ |
★ |
★ |
| Key: ★★★ - Extremely Useful ★★ - Frequently Useful ★ - Occasionally Useful No stars - Meh Χ - Not recommended | ||||||||
Consumables
Nagato can equip the following consumables:
- Slot 1: Damage Control Party

- Slot 2: Repair Party

- Slot 3: Spotting Aircraft
 or Catapult Fighter
  (the latter only with Hull B)
Camouflage
Type 1, 2, or 5 camouflage can be equipped for credits; Types 2 or 5 are recommended at a minimum to reduce the accuracy of incoming shells.
Players who wish to spend doubloons can equip Nagato with Type 17 camouflage that lowers her detection radius, reduces the accuracy of incoming shells, reduces her repair costs, and increases the amount of experience she earns.
Signals
Nagato comes with 21 signal flag slots. The three most important flags are India Delta (![]() ), Juliet Yankee Bissotwo (
), Juliet Yankee Bissotwo (![]() ), and India Yankee (
), and India Yankee (![]() ); all of which will improve her survivability. For captains who prefer a Secondary Build, the addition of Mike Yankee Soxisix (
); all of which will improve her survivability. For captains who prefer a Secondary Build, the addition of Mike Yankee Soxisix (![]() ) will further improve the performance of Nagato’s secondaries.
) will further improve the performance of Nagato’s secondaries.
Recommended Signal Flags 
| |||||
|---|---|---|---|---|---|
| Combat | |||||
 ★ |
 ★ |
 ★★★ |
 ★ |

|

|

|
 ★★ |
 ★ |
 ★ |
 ★★ |
 ★★★ |

|

| ||||
Note: Use of the Juliet Charlie signal makes detonation impossible.