Nino Bixio
| Revision as of 21:59, 11 March 2020 | Revision as of 14:55, 14 March 2020 Added Performance section, de-memed pros & cons | |||
| Line 9: | Line 9: | |||
| |Performance=<!-- write text about performance in battles below --> | |Performance=<!-- write text about performance in battles below --> | |||
| + | ||||
| + | In gameplay, ''{{#var:ship_name}}'' reflects its design origins as a scout cruiser. Fast, with a fair armament, and poorly armored defines the first re searchable Italian cruiser. As a hull, the ship is the fastest cruiser at her tier by almost a full knot - though players should be cautious about this, as this can get them into trouble. As a product of her powerful machinery, ''{{#var:ship_name}}'' has a long citadel, and poorly armored at that - a 38mm sloped deck protects her vital spaces, which can easily be penetrated by most armor-piercing shells. She also lacks an armored belt, so she is very vulnerable to HE. To cut a long story short - her high speed should be used to keep her in a favorable position to participate, but also to quickly exit any action. She simply lacks the armor protection to mitigate much of the damage that comes at her, and this combined with one of the lowest health pools among tier II cruisers clearly indicates she cannot afford to trade blows directly. | |||
| + | ||||
| + | As with any other tier II cruiser, guns are the bread and butter of ''{{#var:ship_name}}''. Equipped with eight 120mm gun, up to five of these guns can be brought to bear against any given target. Given many of her tier mates are using 152mm guns, often in similar numbers, this doesn't bode well for ''{{#var:ship_name}}'', especially in combination with the slow rate of fire (5 rpm). Additionally, lacking HE, ''{{#var:ship_name}}'' cannot rely on the traditional source of damage for most cruisers - direct HE damage and setting fires. | |||
| + | ||||
| + | With all these cons to her firepower, ''{{#var:ship_name}}'' does have a few tricks up her sleeves. Her armor-piercing shells, which work the same as any others, have a relatively high ballistic performance, allowing them to have similar ballistic power (and thus flight times and penetration) to many of the 152mm guns used by other tier II cruisers, helping to offset the lower caliber (however, damage is still considerably less). ''{{#var:ship_name}}'' has an ace up its sleeve, however - Semi Armor-Piercing shells. These do considerably more damage than HE or AP (in fact, at 2,850 damage on a citadel, 120mm SAP does similar damage to 152mm AP from other tier II cruisers), and have a fixed penetration value allowing them to penetrate up to 34mm of armor. Additionally, the SAP has more favorable autobounce angles than the AP - whereas the former will begin checks for autobounce at 45° angles of impact, and automatically autobounce at 60°, the 120mm SAP of ''{{#var:ship_name}}'' will only begin checks at 80°, and automatically autobounce only at 85°. This allows for highly effective penetration of thinly armored portions of cruisers, battleships, and pretty much everywhere on destroyers, even at high angles of impact. | |||
| + | ||||
| + | With all this considered, the best strategy for ''{{#var:ship_name}}'' is to play a cautious-aggressive mix - at the start of the game, the player should stay cautious and fight at range where they can, using their guns to harass the enemy, and take down destroyers with SAP, which is highly effective against such targets. Later in the game, when there are less enemy ships around, ''{{#var:ship_name}}'' becomes considerably more dangerous thanks to its high speed and gunnery abilities. The player should know their enemies- certain ships will be highly vulnerable to SAP, but many others will have portions of their ship armored with 35mm+ plating (armor belts, battleship casemates, etc). AP will be required to damage these. If the player picks their fights and ammunition carefully, using their speed to control the range and their above-average handling to dodge incoming fire, they can have a great deal of success with ''{{#var:ship_name}}''. ''{{#var:ship_name}}'' is not an easy ship to use, but when used properly can be quite effective. | |||
| + | ||||
| <!-- | <!-- | |||
| PERFORMANCE SECTION GUIDELINES | PERFORMANCE SECTION GUIDELINES | |||
| Line 17: | Line 26: | |||
| |Pros=<!-- write list of positive points below. use * as in ordinary wiki-list. --> | |Pros=<!-- write list of positive points below. use * as in ordinary wiki-list. --> | |||
| ? | * | + | * Fastest tier II cruiser at 26.8 knots | |
| ? | * | + | * SAP has high damage potential (2,850) against lightly armored targets | |
| ? | * | + | * AP has high ballistic performance for its caliber, giving it similar penetration to 152mm guns at its tier | |
| + | * Good Handling | |||
| + | * Second stealthiest tech tree cruiser at tier II after ''[[Weymouth]]'' | |||
| |Cons=<!-- write list of negative points below. use * as in ordinary wiki-list. --> | |Cons=<!-- write list of negative points below. use * as in ordinary wiki-list. --> | |||
| ? | * is | + | * Lacks HE, preventing fire setting | |
| ? | * has | + | * AP damage is low due to the low caliber | |
| ? | * | + | * Health is low for tier II - only ''[[Novik]]'' has less | |
| ? | + | * Armor is very light, with a large citadel | ||
| ? | + | |||
| |Research=<!-- write text about priority sequence of research below --> | |Research=<!-- write text about priority sequence of research below --> | |||
Revision as of 14:55, 14 March 2020

| Research price100 exp |
| Purchase price85,000 |
| Hit Points15,500 |
| 120 mm/50 Elswick Pattern "EE" on a shielded mount8 х 1 pcs. |
| Rate of Fire5.45 shots/min. |
| Reload Time11 sec. |
| Rotation Speed8 deg./sec. |
| 180 Degree Turn Time22.5 sec. |
| Firing Range10.34 km. |
| Maximum Dispersion104 m. |
| Chance of Fire on Target Caused by HE Shell0 % |
| AP Shell120 mm proiettili AP 1909 |
| Maximum AP Shell Damage2,100 |
| Initial AP Shell Velocity850 m./s. |
| AP Shell Weight22.75 kg. |
| Maximum SAP Shell Damage2,600 |
| Initial SAP Shell Velocity840 m./s. |
| 76 mm/50 Model 1909 on a single mount6 х 1 pcs. |
| Firing Range3.2 km. |
| Rate of Fire10 shots/min. |
| Reload Time6 sec. |
| HE Shell76 mm proiettili HE 1909 |
| Maximum HE Shell Damage1,100 |
| Initial HE Shell Velocity815 m./s. |
| Chance of Fire on Target Caused by HE Shell4 % |
| 7.7 mm Lewis2 х 1 pcs. |
| . . . Average Damage per Second3.2 |
| . . . Firing Range0.99 km. |
| Maximum Speed26.8 knot |
| Turning Circle Radius480 m. |
| Rudder Shift Time6.7 sec. |
| Surface Detectability Range7.86 km. |
| Air Detectability Range3.96 km. |

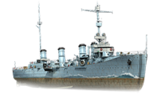
Nino Bixio — Italian Tier II cruiser.
At the beginning of the 20th century, the idea of a fast scout cruiser was popular in many countries. The first ship of that kind in the Italian Navy was armored cruiser Quarto. This was followed by the Nino Bixio class—they were larger than their predecessor and had more convenient artillery arrangement. During World War I, the lead ship of the series participated in the interception of Austro-Hungarian raiders and in the defense of the Entente transports. Nino Bixio served in the Navy until the end of the 1920s.
Modules
 |
Rate of Fire (shots/min) | 180° Turn Time (sec) | Maximum Dispersion (m) | Maximum HE Shell Damage (HP) | Chance of Fire on Target Caused by HE Shell (%) | Maximum AP Shell Damage (HP) |
Research price (exp) |
Purchase price ( | |
|---|---|---|---|---|---|---|---|---|---|
| 120 mm/50 Elswick Pattern "EE" on a shielded mount | 5.5 | 22.5 | 104 | 2,100 | 0 | 8,500 |
 |
Hit Points (HP) | Armor (mm) | Armor (mm) | Main Turrets (pcs.) | Secondary Gun Turrets (pcs.) | AA Mounts (pcs.) | Torpedo Tubes (pcs.) | Hangar Capacity (pcs.) |
Research price (exp) |
Purchase price ( | |
|---|---|---|---|---|---|---|---|---|---|---|---|
| Nino Bixio (A) | 15,500 | 6 | 100 | 8 | 6 | 2 | 0 | 10,500 | |||
| Nino Bixio (B) | 16,600 | 6 | 100 | 8 | 6 | 2 | 300 | 25,000 |
 |
IDS_SHIP_PARAM_SUO_INCREASE_DIST (%) | Maximum Firing Range (km) |
Research price (exp) |
Purchase price ( | |
|---|---|---|---|---|---|
| SDT 2 mod.1 | 0 | 0 | 5,000 | ||
| SDT 2 mod.2 | 0 | 180 | 15,000 |
 |
Maximum Speed (knot) |
Research price (exp) |
Purchase price ( | |
|---|---|---|---|---|
| Propulsion: 23,000 hp | 26.8 | 0 | 4,000 |
Compatible Upgrades
| Slot 1 |
|---|
Player Opinion
Performance
In gameplay, Nino Bixio reflects its design origins as a scout cruiser. Fast, with a fair armament, and poorly armored defines the first re searchable Italian cruiser. As a hull, the ship is the fastest cruiser at her tier by almost a full knot - though players should be cautious about this, as this can get them into trouble. As a product of her powerful machinery, Nino Bixio has a long citadel, and poorly armored at that - a 38mm sloped deck protects her vital spaces, which can easily be penetrated by most armor-piercing shells. She also lacks an armored belt, so she is very vulnerable to HE. To cut a long story short - her high speed should be used to keep her in a favorable position to participate, but also to quickly exit any action. She simply lacks the armor protection to mitigate much of the damage that comes at her, and this combined with one of the lowest health pools among tier II cruisers clearly indicates she cannot afford to trade blows directly.
As with any other tier II cruiser, guns are the bread and butter of Nino Bixio. Equipped with eight 120mm gun, up to five of these guns can be brought to bear against any given target. Given many of her tier mates are using 152mm guns, often in similar numbers, this doesn't bode well for Nino Bixio, especially in combination with the slow rate of fire (5 rpm). Additionally, lacking HE, Nino Bixio cannot rely on the traditional source of damage for most cruisers - direct HE damage and setting fires.
With all these cons to her firepower, Nino Bixio does have a few tricks up her sleeves. Her armor-piercing shells, which work the same as any others, have a relatively high ballistic performance, allowing them to have similar ballistic power (and thus flight times and penetration) to many of the 152mm guns used by other tier II cruisers, helping to offset the lower caliber (however, damage is still considerably less). Nino Bixio has an ace up its sleeve, however - Semi Armor-Piercing shells. These do considerably more damage than HE or AP (in fact, at 2,850 damage on a citadel, 120mm SAP does similar damage to 152mm AP from other tier II cruisers), and have a fixed penetration value allowing them to penetrate up to 34mm of armor. Additionally, the SAP has more favorable autobounce angles than the AP - whereas the former will begin checks for autobounce at 45° angles of impact, and automatically autobounce at 60°, the 120mm SAP of Nino Bixio will only begin checks at 80°, and automatically autobounce only at 85°. This allows for highly effective penetration of thinly armored portions of cruisers, battleships, and pretty much everywhere on destroyers, even at high angles of impact.
With all this considered, the best strategy for Nino Bixio is to play a cautious-aggressive mix - at the start of the game, the player should stay cautious and fight at range where they can, using their guns to harass the enemy, and take down destroyers with SAP, which is highly effective against such targets. Later in the game, when there are less enemy ships around, Nino Bixio becomes considerably more dangerous thanks to its high speed and gunnery abilities. The player should know their enemies- certain ships will be highly vulnerable to SAP, but many others will have portions of their ship armored with 35mm+ plating (armor belts, battleship casemates, etc). AP will be required to damage these. If the player picks their fights and ammunition carefully, using their speed to control the range and their above-average handling to dodge incoming fire, they can have a great deal of success with Nino Bixio. Nino Bixio is not an easy ship to use, but when used properly can be quite effective.Pros:
- Fastest tier II cruiser at 26.8 knots
- SAP has high damage potential (2,850) against lightly armored targets
- AP has high ballistic performance for its caliber, giving it similar penetration to 152mm guns at its tier
- Good Handling
- Second stealthiest tech tree cruiser at tier II after Weymouth
Cons:
- Lacks HE, preventing fire setting
- AP damage is low due to the low caliber
- Health is low for tier II - only Novik has less
- Armor is very light, with a large citadel
Optimal Configuration
Upgrades
The recommended upgrade for Nino Bixio is as follows:
- Slot 1: Main Armaments Modification 1

Commander Skills
| Recommended Commander Skills | ||||||||
|---|---|---|---|---|---|---|---|---|
| Cost (points) |
Endurance | Attack | Support | Versatility | ||||
| 1 |
|
|
|
Χ |
Χ |
Χ |
|
Χ |
| 2 |
|
Χ |
|
Χ |
Χ |
Χ |
|
|
| 3 |
|
|
Χ |
Χ |
|
Χ |
Χ |
|
| 4 |
Χ |
|
Χ |
Χ |
|
|
|
|
| Key: ★★★ - Extremely Useful ★★ - Frequently Useful ★ - Occasionally Useful No stars - Meh Χ - Not recommended | ||||||||
Consumables
Nino Bixio can equip the following consumable:
- Slot 1: Damage Control Party

Gallery
Historical Info
Historical Gallery
| Destroyers | II Curtatone • III Nazario Sauro • IV Turbine • V Maestrale • VI Aviere • VI Leone |
| Cruisers | I Eritrea • II Nino Bixio • III Taranto • IV Alberto di Giussano • V Raimondo Montecuccoli • V Genova |
| Battleships | IV Dante Alighieri • V Conte di Cavour • V Giulio Cesare |
| Aircraft Carriers | VIII Aquila |