Ryujo
| Revision as of 18:27, 21 October 2017 Added recommended signals tree; added gameplay gallery | Revision as of 20:18, 21 October 2017 Fixed signals tree and recommended commander skills tree; reworked upgrades section | |||
| Line 5: | Line 5: | |||
| |Performance=<!-- write text about performance in battles below --> | |Performance=<!-- write text about performance in battles below --> | |||
| ? | '' | + | ''{{#var:ship_name}}'' is a potent carrier due to its supply of reserve aircraft, choice between air superiority and strike loadouts, and access to manual attack options at Tier VI. ''{{#var:ship_name}}'' is a light carrier but with a larger hangar capacity than its counterpart ''[[Independence]]''. She uses the exact same torpedo bombers as ''[[Zuiho]]'', and has access to the tier 6 D3A1 "Val" dive bombers and tier 6 A6M2 "Zero" fighters. | |
| |Pros=<!-- write list of positive points below. use * as in ordinary wiki-list. --> | |Pros=<!-- write list of positive points below. use * as in ordinary wiki-list. --> | |||
| Line 32: | Line 32: | |||
| |Upgrades=<!-- write text about best upgrades below --> | |Upgrades=<!-- write text about best upgrades below --> | |||
| ? | As a | + | As a Tier VI carrier with four upgrade slots, the following upgrades are recommended on ''{{#var:ship_name}}'': | |
| + | ====Slot 1==== | |||
| + | *[[Ship:Upgrades#Air_Groups_Modification.C2.A01|Air Groups Modification 1]], in order to improve the fighters' damage capabilities and increase their chances of winning dogfights. | |||
| + | ====Slot 2==== | |||
| + | *[[Ship:Upgrades#Air_Groups_Modification.C2.A02|Air Groups Modification 2]], in order to further improve the fighters' chances of winning dogfights through increasing their survivability. | |||
| + | ====Slot 4==== | |||
| + | *[[Ship:Upgrades#Damage_Control_System_Modification.C2.A01|Damage Control System Modification 1]] is the top pick of the bunch, in order to reduce fire and flooding chance on the ship (as carriers rarely have their engine or rudder incapacitated). | |||
| + | ====Slot 5==== | |||
| + | *[[Ship:Upgrades#Propulsion_Modification.C2.A02|Propulsion Modification 2]], so that captains can quickly relocate their ship if any potential threat is approaching quickly. | |||
| |CommanderSkills=<!-- write text about best set of Commander Skills below --> | |CommanderSkills=<!-- write text about best set of Commander Skills below --> | |||
| ? | '' | + | ''{{#var:ship_name}}'' uses the standard IJN CV captain skill setup. Emphasis should be on skills that boost fighter and bomber effectiveness and AA protection. Aircraft Servicing Expert, Torpedo Acceleration, and Air Supremacy are "must have" skills. Dogfighting Expert is also useful if ''{{#var:ship_name}}'' faces a higher tier carrier, and the bonus to ammunition allows her fighters to remain airborne longer before returning to rearm. | |
| Torpedo Armament Expertise can be taken as well, however the preparation time of torpedo bombers is already short at 18 seconds, which is already an advantage over Independence's torpedo bombers at 32 seconds. | Torpedo Armament Expertise can be taken as well, however the preparation time of torpedo bombers is already short at 18 seconds, which is already an advantage over Independence's torpedo bombers at 32 seconds. | |||
| ? | For AA defense, '' | + | For AA defense, ''{{#var:ship_name}}'' has large-caliber 127mm guns that benefit greatly from Manual Fire Control for AA Armament. Basic Firing Training is also a good choice to boost all AA guns' DPS by 20%. While ''{{#var:ship_name}}''’s AA DPS output is not sufficient to wipe out entire squadrons, it can knock out a few planes and, in combination with maneuvering, can help avoid taking serious damage. | |
| ? | Evasive Maneuvers is not recommended because it only affects bombers that have dropped their payload and are returning to the carrier. | + | '''Evasive Maneuvers''' is not recommended because it only affects bombers that have dropped their payload and are returning to the carrier. | |
| ? | Any skills that are related to an enemy vessel firing on your carrier are not useful, as the cost-benefit of investing in survivability skills is not worth the minimal benefit they offer. '' | + | Any skills that are related to an enemy vessel firing on your carrier are not useful, as the cost-benefit of investing in survivability skills is not worth the minimal benefit they offer. ''{{#var:ship_name}}'' has a low HP pool and is large and unarmored, and will not survive an attack by any ship larger than a destroyer. ''{{#var:ship_name}}'' captains must position their ship near friendlies and far back from the enemy fleet. Concealment Expert may be taken to further reduce detection range if the captain so desires. | |
| + | {{block|!|content= ATTENTION | |||
| + | *Due to dive bombers having over 100% chance of causing fires, Demolition Expert is '''not''' recommended.}} | |||
| {{Commander Skills | {{Commander Skills | |||
| ? | | Priority Target = | + | | Priority Target = | |
| | Preventative Maintenance = | | Preventative Maintenance = | |||
| | Expert Loader = | | Expert Loader = | |||
| Line 53: | Line 63: | |||
| | Dogfighting Expert = 2 | | Dogfighting Expert = 2 | |||
| | Incoming Fire Alert = | | Incoming Fire Alert = | |||
| ? | | Evasive Maneuver = | + | | Evasive Maneuver = 2 | |
| | High Alert = | | High Alert = | |||
| Line 60: | Line 70: | |||
| | Torpedo Acceleration = 3 | | Torpedo Acceleration = 3 | |||
| | Smoke Screen Expert = | | Smoke Screen Expert = | |||
| ? | | Expert Rear Gunner = | + | | Expert Rear Gunner = 2 | |
| | Adrenaline Rush = | | Adrenaline Rush = | |||
| | Last Stand = | | Last Stand = | |||
| | Survivability Expert = | | Survivability Expert = | |||
| ? | | Basics of Survivability = | + | | Basics of Survivability = | |
| | Torpedo Armament Expertise = 3 | | Torpedo Armament Expertise = 3 | |||
| | Emergency Takeoff = 1 | | Emergency Takeoff = 1 | |||
| Line 84: | Line 94: | |||
| |Consumables=<!-- write text about selection of Consumables below --> | |Consumables=<!-- write text about selection of Consumables below --> | |||
| ? | As a carrier at Tier VI, '' | + | As a carrier at Tier VI, ''{{#var:ship_name}}'' has access to only {{Damage Control Party}}. | |
| |Camouflage=<!-- write text about useful camouflage below --> | |Camouflage=<!-- write text about useful camouflage below --> | |||
| [[Ship:Camouflage#Standard Camouflage|Type 1, 2, or 5 camouflage]] can be equipped for credits; Types 1 or 5 are recommended at a minimum to reduce detectability range. | [[Ship:Camouflage#Standard Camouflage|Type 1, 2, or 5 camouflage]] can be equipped for credits; Types 1 or 5 are recommended at a minimum to reduce detectability range. | |||
| ? | Players who wish to spend doubloons can equip '' | + | Players who wish to spend doubloons can equip ''{{#var:ship_name}}''[[Ship:Camouflage#Permanent_Camouflage|ith {{Type 16 camo]]lage}} that lowers her detection radius, reduces the accuracy of incoming shells, and increases the amount of experience she earns. | |
| |Signals=<!-- write text about best set of signals below --> | |Signals=<!-- write text about best set of signals below --> | |||
| ? | As a carrier, '' | + | As a carrier, ''{{#var:ship_name}}'' can only mount at most four signals at a time and has no risk of detonating. Players should mount Equal Speed Charlie London (for faster XP grinding / increased XP gain per battle), Zulu Hotel (when coupled with Equal Speed Charlie London greatly helps increase commander (re)training), and, for the last two / pair, November Echo Setteseven (for better bomber self-defense against fighters) and Juliet Whiskey Unaone (to have a better chance at causing flooding and dealing damage via flooding). However, the last two recommended signal flags are not highly recommended if the player wishes to conserve the signal for later tiers. | |
| + | {{block|!|content= ATTENTION | |||
| + | *Due to dive bombers having over 100% chance of causing fires, Victor Lima and India X-Ray are '''not''' recommended.}} | |||
| {{Signal Flags | {{Signal Flags | |||
| ? | | | + | | November Echo Setteseven = | |
| ? | | | + | | Mike Yankee Soxisix = | |
| ? | + | | India X-Ray = | ||
| ? | | | + | ||
| | Juliet Yankee Bissotwo = | | Juliet Yankee Bissotwo = | |||
| ? | | | + | | Victor Lima = | |
| + | | Hotel Yankee = | |||
| ? | + | | November Foxtrot = | ||
| ? | | November | + | ||
| ? | + | |||
| ? | + | |||
| | Sierra Mike = 1 | | Sierra Mike = 1 | |||
| ? | | | + | | India Delta = | |
| + | | Juliet Whiskey Unaone = 2 | |||
| + | | India Yankee = | |||
| + | | Juliet Charlie = | |||
| ? | | | + | | Zulu = 1 | |
| ? | + | | India Bravo Terrathree = | ||
| ? | | India | + | ||
| | Equal Speed Charlie London = 3 | | Equal Speed Charlie London = 3 | |||
| ? | | | + | | Zulu Hotel = 3 | |
| + | | Papa Papa = | |||
| + | ||||
| + | | Wyvern = 1 | |||
| + | | Red Dragon = 1 | |||
| | Dragon Flag = 1 | | Dragon Flag = 1 | |||
| + | | Ouroboros = | |||
| + | | Hydra = 1 | |||
| }} | }} | |||
Revision as of 20:18, 21 October 2017
{{WoWs_Ship|Promo=
|Anno=
|Performance= ' is a potent carrier due to its supply of reserve aircraft, choice between air superiority and strike loadouts, and access to manual attack options at Tier VI. ' is a light carrier but with a larger hangar capacity than its counterpart Independence. She uses the exact same torpedo bombers as Zuiho, and has access to the tier 6 D3A1 "Val" dive bombers and tier 6 A6M2 "Zero" fighters.
|Pros=
- Large reserve of planes for its tier at 48 compared to Independence at 37.
- 5 squadrons of planes, and at least 1 fighter squadron, in any of the upgraded loadouts.
- Low concealment.
- Relatively maneuverable, better than its predecessor Zuiho.
- Strike loadout will deal massive damage to enemy ships, similar to Zuiho.
- Planes outperform Independence's in almost every aspect - speed, loadout time and damage per minute.
- 127mm dual-purpose guns can be boosted by AA skills, particularly Manual Fire Control for AA Armament.
|Cons=
- Poor armor protection and large size make her prone to taking large hits and HE damage.
- Air superiority loadout is very slightly inferior to that of Independence's, since its fighters have 170 hitpoints lower and are 2 knots slower, though not significant.
- AA is weaker than her counterpart Independence.
- Stock flight control system (1-1-2) fails in terms of either dealing damage to enemy ships if not played carefully or enemy aircraft, frequently runs out of planes.
|Research= This is a suggested upgrade path:
- Type 6 Mod. 2 (Flight Control Mod)
- Mitsubishi A6M2 fighters
- Aichi D3A1 dive bombers
- Free XP the B hull, get the C hull for additional AA protection and rudder shift.
|OptimalConfiguration=
|Upgrades= As a Tier VI carrier with four upgrade slots, the following upgrades are recommended on ':
Slot 1
- Air Groups Modification 1, in order to improve the fighters' damage capabilities and increase their chances of winning dogfights.
Slot 2
- Air Groups Modification 2, in order to further improve the fighters' chances of winning dogfights through increasing their survivability.
Slot 4
- Damage Control System Modification 1 is the top pick of the bunch, in order to reduce fire and flooding chance on the ship (as carriers rarely have their engine or rudder incapacitated).
Slot 5
- Propulsion Modification 2, so that captains can quickly relocate their ship if any potential threat is approaching quickly.
|CommanderSkills= ' uses the standard IJN CV captain skill setup. Emphasis should be on skills that boost fighter and bomber effectiveness and AA protection. Aircraft Servicing Expert, Torpedo Acceleration, and Air Supremacy are "must have" skills. Dogfighting Expert is also useful if ' faces a higher tier carrier, and the bonus to ammunition allows her fighters to remain airborne longer before returning to rearm.
Torpedo Armament Expertise can be taken as well, however the preparation time of torpedo bombers is already short at 18 seconds, which is already an advantage over Independence's torpedo bombers at 32 seconds.
For AA defense, ' has large-caliber 127mm guns that benefit greatly from Manual Fire Control for AA Armament. Basic Firing Training is also a good choice to boost all AA guns' DPS by 20%. While '’s AA DPS output is not sufficient to wipe out entire squadrons, it can knock out a few planes and, in combination with maneuvering, can help avoid taking serious damage.
Evasive Maneuvers is not recommended because it only affects bombers that have dropped their payload and are returning to the carrier.
Any skills that are related to an enemy vessel firing on your carrier are not useful, as the cost-benefit of investing in survivability skills is not worth the minimal benefit they offer. ' has a low HP pool and is large and unarmored, and will not survive an attack by any ship larger than a destroyer. ' captains must position their ship near friendlies and far back from the enemy fleet. Concealment Expert may be taken to further reduce detection range if the captain so desires.
ATTENTION
- Due to dive bombers having over 100% chance of causing fires, Demolition Expert is not recommended.
| Recommended Commander Skills | ||||||||
|---|---|---|---|---|---|---|---|---|
| Cost (points) |
Endurance | Attack | Support | Versatility | ||||
| 1 |
|
|
|
★★★ |
|
|
|
|
| 2 |
|
|
|
★★★ |
|
|
|
|
| 3 |
|
|
★★★ |
|
★ |
|
|
|
| 4 |
|
|
|
|
★★ |
|
|
★★ |
| Key: ★★★ - Extremely Useful ★★ - Frequently Useful ★ - Occasionally Useful No stars - Meh Χ - Not recommended | ||||||||
|Consumables=
As a carrier at Tier VI, ' has access to only Damage Control Party ![]() .
.
|Camouflage= Type 1, 2, or 5 camouflage can be equipped for credits; Types 1 or 5 are recommended at a minimum to reduce detectability range.
Players who wish to spend doubloons can equip 'ith {{Type 16 camolage}} that lowers her detection radius, reduces the accuracy of incoming shells, and increases the amount of experience she earns.
|Signals= As a carrier, ' can only mount at most four signals at a time and has no risk of detonating. Players should mount Equal Speed Charlie London (for faster XP grinding / increased XP gain per battle), Zulu Hotel (when coupled with Equal Speed Charlie London greatly helps increase commander (re)training), and, for the last two / pair, November Echo Setteseven (for better bomber self-defense against fighters) and Juliet Whiskey Unaone (to have a better chance at causing flooding and dealing damage via flooding). However, the last two recommended signal flags are not highly recommended if the player wishes to conserve the signal for later tiers.
ATTENTION
- Due to dive bombers having over 100% chance of causing fires, Victor Lima and India X-Ray are not recommended.
Recommended Signal Flags 
| |||||
|---|---|---|---|---|---|
| Combat | |||||

|

|

|

|

|

|
 ★★ |

|

|
 ★ |

|

|

|

| ||||
Note: Use of the Juliet Charlie signal makes detonation impossible.
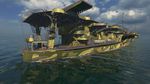

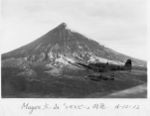
Ryūjō’s aircraft preparing to takeoff
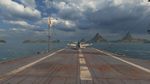
Ryūjō’s fighter squadron taking off
.jpg)
.jpg)
.jpg)
.jpg)
.jpg)
|History= Ryūjō (Japanese: 龍驤 "prancing dragon") was a light aircraft carrier built for the Imperial Japanese Navy (IJN) during the early 1930s. Small and lightly built in an attempt to exploit a loophole in the Washington Naval Treaty of 1922, she proved to be top-heavy and only marginally stable and was back in the shipyard for modifications to address those issues within a year of completion. With her stability improved, Ryūjō returned to service and was employed in operations during the Second Sino-Japanese War. During World War II, she provided air support for operations in the Philippines, Malaya, and the Dutch East Indies, where her aircraft participated in the Second Battle of the Java Sea. During the Indian Ocean raid in April 1942, the carrier attacked British merchant shipping with both her guns and her aircraft. Ryūjō next participated in the Battle of the Aleutian Islands in June. She was sunk by American carrier aircraft at the Battle of the Eastern Solomons on 24 August 1942.
Historical Inaccuracies
- The blue fuselage stripes on the A6M2 denotes an aircraft from the carrier Hiryu; Ryujo’s fighters wore a yellow stripe.
- The red fuselage stripe on the D3A1 and B5N2 denotes aircraft from the carrier Akagi. The yellow tail stripes on the latter aircraft represent the carrier group leader. "AI-301" belonged to Mitsuo Fuchida.
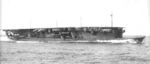
Oblique view of Ryūjō at speed, September 1934.
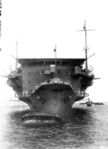
Bow view of Ryūjō, June 1933.
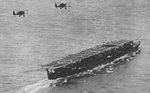
Ryūjō during the 1930s with a pair of Aichi D1A2 dive bombers overhead.
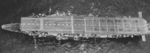
Overhead view of Ryūjō at sea around 1935.

The disabled Ryūjō (top center) being bombed from high altitude by B-17 bombers on 24 August 1942. The destroyer Amatsukaze (lower left) is moving away from Ryūjō at full speed and the destroyer Tokitsukaze (faintly visible, upper right) is backing away from the bow of Ryūjō in order to evade the B-17s' falling bombs.
Cockpit view from a B5N of a Ryūjō squadron in flight.


|Video=
|Ref=
}}