Salem
| Revision as of 10:31, 11 July 2018 | Revision as of 14:22, 11 July 2018 | |||
| Line 9: | Line 9: | |||
| |Performance=<!-- write text about performance in battles below --> | |Performance=<!-- write text about performance in battles below --> | |||
| ? | ''Salem'' plays almost exactly like her tech-tree sister, ''Des Moines'', albeit with a tad more survivability at the trade off of less team-play ability. Captains familiar with any other US cruiser will therefore have no issues playing her. | + | The first premium tier X ship in game, ''Salem'' plays almost exactly like her tech-tree sister, ''Des Moines'', albeit with a tad more survivability at the trade off of less team-play ability. Captains familiar with any other US cruiser will therefore have no issues playing her. | |
| ? | The largest difference between the two comes in the form of consumable choices, with ''Des Moines'' having a 9.9 km radar (or Spotter Aircraft) and a standard cruiser | + | The largest difference between the two comes in the form of consumable choices, with ''Des Moines'' having a 9.9 km radar (or Spotter Aircraft) and a standard cruiser Repair Party, while ''Salem'' has a 7.5 km radar (and no Spotter Plane option) and a Repair Party that is half-way between a standard and a British repair. The other options remain the same between the two. | |
| ? | A very noticeable trait on both ''Salem'' and ''Des Moines'' is their absurd rate of fire for a heavy cruiser with each turret loading rounds at 5.5 seconds which can quickly deal with destroyers, harm or outright destroy other cruisers with extreme fusillades of fire, force battleships to be wary of them as well as nervously check their hit points when they are subjected to the withering blows and frustrate carriers to no end due to the impressive AA suite which, with proper upgrades and skills, have their potency increased even further. With good ergonomics and good handling, one can say these heavy cruisers do it all; serving as both an AA and anti-ship screen, joining a cruiser squadron for rapid action as she can keep up thanks to her good speed and provide additional firepower, and functioning as a reasonable cruiser leader for a small destroyer group. However, unlike ''Des Moines'', ''Salem'''s radar will not be nearly as useful in assisting in the destruction of enemy destroyers due to | + | A very noticeable trait on both ''Salem'' and ''Des Moines'' is their absurd rate of fire for a heavy cruiser with each turret loading rounds at 5.5 seconds which can quickly deal with destroyers, harm or outright destroy other cruisers with extreme fusillades of fire, force battleships to be wary of them as well as nervously check their hit points when they are subjected to the withering blows and fires, and frustrate carriers to no end due to the impressive AA suite which, with proper upgrades and skills, have their potency increased even further. With good ergonomics and good handling, one can say these heavy cruisers do it all; serving as both an AA and anti-ship screen, joining a cruiser squadron for rapid action as she can keep up thanks to her good speed and provide additional firepower, and functioning as a reasonable cruiser leader for a small destroyer group. However, unlike ''Des Moines'', ''Salem'''s radar will not be nearly as useful in assisting in the destruction of enemy destroyers due to its short range and duration, making her less effective as a support ship and relying more on standalone combat. | |
| + | The cruiser's high shell arc and gun layout gives her a unique advantage that her cruiser colleagues at her tier lack and as such she is capable of sitting behind an island and using her high shell arc to lob shells at distant targets with relative safety. One can also park the ship around the corner of an island while bow on to act as a deterrent to advancing enemy ships, while presenting a relatively small target profile. Exploiting this technique allows one to turn a disadvantage into an advantage. Also, firing AP shells at bigger targets such as battleships can deal a surprising amount of damage in such a short time, however only do so when she is close enough to have the rounds deal maximum penetration or if the target is broadsiding. | |||
| ? | + | ''Salem'' possesses a stronger repair than ''Des Moines'', functioning similarly to that of British cruisers at Tiers VIII-X with 2% per second. However, it is still not as potent as it's British counterpart. When it comes to healing fire and HE damage, the heal is excellent, but with normal AP penetrations and citadel damage, it is far less effective (only about 33% can be repaired). Captains should not be relying on the heal to keep them alive in situations that ''Des Moines'' couldn't survive. | ||
| ? | + | Unlike every other Tier X cruiser, ''Salem'' cannot effectively fight as an anti-surface combatant on open water and her shell speed prevents her from faring well in ranged firefights. Instead, one should look to play defensively during the initial stages of the game such as hiding behind islands to protect yourself while you lob shells over them to harass enemies, and choose areas of the map that allow you to fight enemies at your terms in close to medium range. The closer ''Salem'' gets, the more dangerous and potentially devastating she becomes, but her own chances of survival drop as well. It should not come as a surprise that if played right, the cruiser can practically dictate the flow of battle and at the mid-game to late game stages where the strongest ships have likely killed each other off, the opportunity to become hyper aggressive and quickly mop up the enemy team with the withering rate of fire is now open to the player. This isn't the only way to play ''Salem'' as she can serve the player well with whatever tactics they bring to the field. Shift your play style depending on the situation to give your team the best chance of winning. Knowing when to go defensive or aggressive is key to doing well in this ship. | ||
| ? | + | |||
| ? | Unlike every other Tier X cruiser, ''Salem'' cannot effectively fight as an anti-surface combatant on open water and her shell speed prevents her from faring well in ranged firefights. Instead, one should look to play defensively during the initial stages of the game such as hiding behind islands to protect yourself while you lob shells over them to harass enemies, and choose areas of the map that allow you to fight enemies at your terms in close to medium range. The closer ''Salem'' gets, the more dangerous and potentially devastating she becomes. It should not come as a surprise that if played right, the cruiser can practically dictate the flow of battle and at the mid-game to late game stages where the strongest ships have likely killed each other off, the opportunity to become hyper aggressive and quickly mop up the enemy team with the withering rate of fire is now open to the player. This isn't the only way to play ''Salem'' as she can serve the player well with whatever tactics they bring to the field. Shift your play style depending on the situation to give your team the best chance of winning. Knowing when to go defensive or aggressive is key to doing well in this ship. | + | ||
| {{AnnoWiki|content= | {{AnnoWiki|content= | |||
| Line 35: | Line 34: | |||
| |Cons=<!-- write list of negative points below. use * as in ordinary wiki-list. --> | |Cons=<!-- write list of negative points below. use * as in ordinary wiki-list. --> | |||
| ? | *Small hit point pool for a tier X cruiser at 49,700. | + | * Small hit point pool for a tier X cruiser at 49,700. | |
| * High shell arcs make leading shots more difficult. | * High shell arcs make leading shots more difficult. | |||
| * Citadel is above water and easy to hit when showing broadside, and all 16 inch guns can overmatch her armor. | * Citadel is above water and easy to hit when showing broadside, and all 16 inch guns can overmatch her armor. | |||
Revision as of 14:22, 11 July 2018

| Purchase priceSpecial |
| Hit Points49,700 |
| 203 mm/55 RF Mk.16 in a turret3 х 3 pcs. |
| Rate of Fire10.91 shots/min. |
| Reload Time5.5 sec. |
| Rotation Speed6 deg./sec. |
| 180 Degree Turn Time30 sec. |
| Firing Range15.83 km. |
| Maximum Dispersion142 m. |
| HE Shell203 mm HE/HC Mk25 |
| Maximum HE Shell Damage2,800 |
| Chance of Fire on Target Caused by HE Shell14 % |
| Initial HE Shell Velocity823 m./s. |
| HE Shell Weight118 kg. |
| AP Shell203 mm AP Mk21 |
| Maximum AP Shell Damage5,000 |
| Initial AP Shell Velocity762 m./s. |
| AP Shell Weight152 kg. |
| 127 mm/38 Mk.12 on a Mk.32 mount6 х 2 pcs. |
| Firing Range7.3 km. |
| Rate of Fire10 shots/min. |
| Reload Time6 sec. |
| HE Shell127 mm HE Mk32 |
| Maximum HE Shell Damage1,800 |
| Initial HE Shell Velocity792 m./s. |
| Chance of Fire on Target Caused by HE Shell5 % |
| 127 mm/38 Mk.12 on a Mk.32 mount6 х 2 pcs. |
| . . . Average Damage per Second90.6 |
| . . . Firing Range5.01 km. |
| 76.2 mm/50 Mk.22 on a Mk.33 mount10 х 2 pcs. |
| . . . Average Damage per Second208 |
| . . . Firing Range3.99 km. |
| 76.2 mm/50 Mk.22 on a Mk.33 mount2 х 2 pcs. |
| . . . Average Damage per Second41.6 |
| . . . Firing Range3.99 km. |
| Maximum Speed33 knot |
| Turning Circle Radius770 m. |
| Rudder Shift Time8.6 sec. |
| Surface Detectability Range13.44 km. |
| Air Detectability Range7.9 km. |

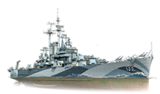
Salem — American special premium Tier X cruiser.
A Des Moines-class heavy cruiser. Her main battery mounts were equipped with an auto-loading mechanism, which provided her with the greatest firepower among ships of her type. The cruiser's advantages included advanced radar equipment, powerful AA artillery, and reliable horizontal armor protection.
Modules
 |
Rate of Fire (shots/min) | 180° Turn Time (sec) | Maximum Dispersion (m) | Maximum HE Shell Damage (HP) | Chance of Fire on Target Caused by HE Shell (%) | Maximum AP Shell Damage (HP) |
Research price (exp) |
Purchase price ( | |
|---|---|---|---|---|---|---|---|---|---|
| 203 mm/55 RF Mk.16 in a turret | 10.9 | 30 | 142 | 2,800 | 14 | 5,000 | 0 | 0 |
 |
Hit Points (HP) | Armor (mm) | Armor (mm) | Main Turrets (pcs.) | Secondary Gun Turrets (pcs.) | AA Mounts (pcs.) | Torpedo Tubes (pcs.) | Hangar Capacity (pcs.) |
Research price (exp) |
Purchase price ( | |
|---|---|---|---|---|---|---|---|---|---|---|---|
| Salem | 49,700 | 6 | 203 | 3 | 6 | 12/6 | 0 | 0 |
 |
IDS_SHIP_PARAM_SUO_INCREASE_DIST (%) | Maximum Firing Range (km) |
Research price (exp) |
Purchase price ( | |
|---|---|---|---|---|---|
| Mk10 mod. 1 | 0 | 0 | 0 |
 |
Maximum Speed (knot) |
Research price (exp) |
Purchase price ( | |
|---|---|---|---|---|
| Propulsion: 120,000 hp | 33 | 0 | 0 |
Compatible Upgrades
| Slot 1 |
|||||
|---|---|---|---|---|---|
| Slot 2 |
|||||
| Slot 3 |
|||||
| Slot 4 |
|||||
| Slot 5 |
|||||
| Slot 6 |
Player Opinion
Performance
The first premium tier X ship in game, Salem plays almost exactly like her tech-tree sister, Des Moines, albeit with a tad more survivability at the trade off of less team-play ability. Captains familiar with any other US cruiser will therefore have no issues playing her.
The largest difference between the two comes in the form of consumable choices, with Des Moines having a 9.9 km radar (or Spotter Aircraft) and a standard cruiser Repair Party, while Salem has a 7.5 km radar (and no Spotter Plane option) and a Repair Party that is half-way between a standard and a British repair. The other options remain the same between the two.
A very noticeable trait on both Salem and Des Moines is their absurd rate of fire for a heavy cruiser with each turret loading rounds at 5.5 seconds which can quickly deal with destroyers, harm or outright destroy other cruisers with extreme fusillades of fire, force battleships to be wary of them as well as nervously check their hit points when they are subjected to the withering blows and fires, and frustrate carriers to no end due to the impressive AA suite which, with proper upgrades and skills, have their potency increased even further. With good ergonomics and good handling, one can say these heavy cruisers do it all; serving as both an AA and anti-ship screen, joining a cruiser squadron for rapid action as she can keep up thanks to her good speed and provide additional firepower, and functioning as a reasonable cruiser leader for a small destroyer group. However, unlike Des Moines, Salem's radar will not be nearly as useful in assisting in the destruction of enemy destroyers due to its short range and duration, making her less effective as a support ship and relying more on standalone combat.
The cruiser's high shell arc and gun layout gives her a unique advantage that her cruiser colleagues at her tier lack and as such she is capable of sitting behind an island and using her high shell arc to lob shells at distant targets with relative safety. One can also park the ship around the corner of an island while bow on to act as a deterrent to advancing enemy ships, while presenting a relatively small target profile. Exploiting this technique allows one to turn a disadvantage into an advantage. Also, firing AP shells at bigger targets such as battleships can deal a surprising amount of damage in such a short time, however only do so when she is close enough to have the rounds deal maximum penetration or if the target is broadsiding.
Salem possesses a stronger repair than Des Moines, functioning similarly to that of British cruisers at Tiers VIII-X with 2% per second. However, it is still not as potent as it's British counterpart. When it comes to healing fire and HE damage, the heal is excellent, but with normal AP penetrations and citadel damage, it is far less effective (only about 33% can be repaired). Captains should not be relying on the heal to keep them alive in situations that Des Moines couldn't survive.
Unlike every other Tier X cruiser, Salem cannot effectively fight as an anti-surface combatant on open water and her shell speed prevents her from faring well in ranged firefights. Instead, one should look to play defensively during the initial stages of the game such as hiding behind islands to protect yourself while you lob shells over them to harass enemies, and choose areas of the map that allow you to fight enemies at your terms in close to medium range. The closer Salem gets, the more dangerous and potentially devastating she becomes, but her own chances of survival drop as well. It should not come as a surprise that if played right, the cruiser can practically dictate the flow of battle and at the mid-game to late game stages where the strongest ships have likely killed each other off, the opportunity to become hyper aggressive and quickly mop up the enemy team with the withering rate of fire is now open to the player. This isn't the only way to play Salem as she can serve the player well with whatever tactics they bring to the field. Shift your play style depending on the situation to give your team the best chance of winning. Knowing when to go defensive or aggressive is key to doing well in this ship.
Pros:
- Fast firing guns, like her sister ship (5.5 seconds base reload).
- 27 mm of armor protects against 15 inch guns, citadel is protected by a thick 152mm belt.
- Strong AA (though weaker than Des Moines).
- High shell arcs give her guns a lot of utility.
- Empowered Repair Party gives Salem much more survivability when compared to Des Moines (up to 47% of total durability repaired on each use and 4 charges).
- AP shells have more forgiving angles for ricochet prevention.
- Very high chances to set fires.
Cons:
- Small hit point pool for a tier X cruiser at 49,700.
- High shell arcs make leading shots more difficult.
- Citadel is above water and easy to hit when showing broadside, and all 16 inch guns can overmatch her armor.
- Salem shares the same Surveillance Radar as the T7 Atlanta, with short duration (25 s) and range (8.5 km).
- Has no torpedoes. Must rely on guns for damage.
- Lack of torpedo defense.
- Very short ranged for a Tier X cruiser with a stock reach of 15.8km and no Spotter Aircraft consumable.
- Slow gun rotation with a 6.0º/s.
- (possibly a beta oversight) Permanent camouflage is Type 10, with very limited bonuses (worse than any Tier IX premium ships for credit and experience gain).
- Ridiculous cost of 240,000 Coal, reduced to 180,000 with a coupon.
Research
Optimal Configuration
Commander Skills
As Salem shares many of the same characteristics as Des Moines, key skills for Salem commanders are the same: Jack of All Trades, Superintendent, and Advanced Firing Training.
| Recommended Commander Skills | ||||||||
|---|---|---|---|---|---|---|---|---|
| Cost (points) |
Endurance | Attack | Support | Versatility | ||||
| 1 |
★★★ |
★★ |
|
|
|
|
★ |
|
| 2 |
★ |
★★★ |
★★ |
|
|
|
★★★ |
|
| 3 |
★ |
★ |
|
|
★★ |
★★★ |
★★★ |
★ |
| 4 |
|
|
|
|
★★★ |
|
★★ |
★★★ |
| Key: ★★★ - Extremely Useful ★★ - Frequently Useful ★ - Occasionally Useful No stars - Meh Χ - Not recommended | ||||||||
Camouflage
As a premium ship, Salem comes included with Type 10 camouflage that lowers her detection radius, reduces the accuracy of incoming shells, and increases the amount of experience she earns.
Signals
Salem captains should mount standard signal flags to improve the ship's performance in battle. India Delta (![]() ) and November Foxtrot (
) and November Foxtrot (![]() ) flags are highly recommended to improve the ship's survivability. Sierra Mike (
) flags are highly recommended to improve the ship's survivability. Sierra Mike (![]() ) flags are also recommended to increase the ship's top speed. India X-Ray (
) flags are also recommended to increase the ship's top speed. India X-Ray (![]() ) and Victor Lima (
) and Victor Lima (![]() ) signal flags can be mounted to improve the ship's main battery. Lastly, economic and special signal flags can be mounted to increase the ship's economic gains per battle.
) signal flags can be mounted to improve the ship's main battery. Lastly, economic and special signal flags can be mounted to increase the ship's economic gains per battle.
Recommended Signal Flags 
| |||||
|---|---|---|---|---|---|
| Combat | |||||
 ★ |
 ★ |
 ★★ |

|
 ★★ |
 ★ |

|

|
 ★★ |
 ★★★ |
 ★★ |
 ★★★ |

|

| ||||
Note: Use of the Juliet Charlie signal makes detonation impossible.
Gallery


Historical Info
Historical Gallery
_underway_in_May_1949.jpg)


Video