Shimakaze

| Research price223000 exp |
| Purchase price19,300,000 |
| Hit Points17,900 |
| 127 mm/50 3rd Year Type on a Type D mount3 х 2 pcs. |
| Rate of Fire10.45 shots/min. |
| Reload Time5.74 sec. |
| Rotation Speed7.9 deg./sec. |
| 180 Degree Turn Time22.78 sec. |
| Firing Range11.37 km. |
| Maximum Dispersion100 m. |
| HE Shell127 mm HE Type1 |
| Maximum HE Shell Damage2,150 |
| Chance of Fire on Target Caused by HE Shell9 % |
| Initial HE Shell Velocity915 m./s. |
| HE Shell Weight23 kg. |
| AP Shell127 mm AP Type0 |
| Maximum AP Shell Damage2,200 |
| Initial AP Shell Velocity915 m./s. |
| AP Shell Weight23 kg. |
| 610 mm Quintuple3 х 5 pcs. |
| Rate of Fire0.4 shots/min. |
| Reload Time150 sec. |
| Rotation Speed25 deg./sec. |
| 180 Degree Turn Time7.2 sec. |
| TorpedoType93 |
| Maximum Damage20,967 |
| Torpedo Speed62 knot |
| Torpedo Range20.01 km. |
| 127 mm/50 3rd Year Type on a Type D mount3 х 2 pcs. |
| . . . Average Damage per Second30.3 |
| . . . Firing Range5.01 km. |
| 25 mm/60 Type 96 on a single mount14 х 1 pcs. |
| . . . Average Damage per Second25.2 |
| . . . Firing Range2.49 km. |
| 25 mm/60 Type 96 on a twin mount1 х 2 pcs. |
| . . . Average Damage per Second2.7 |
| . . . Firing Range2.49 km. |
| 25 mm/60 Type 96 on a triple mount2 х 3 pcs. |
| . . . Average Damage per Second6.6 |
| . . . Firing Range2.49 km. |
| Maximum Speed39 knot |
| Turning Circle Radius690 m. |
| Rudder Shift Time3 sec. |
| Surface Detectability Range6.9 km. |
| Air Detectability Range3.38 km. |

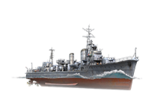
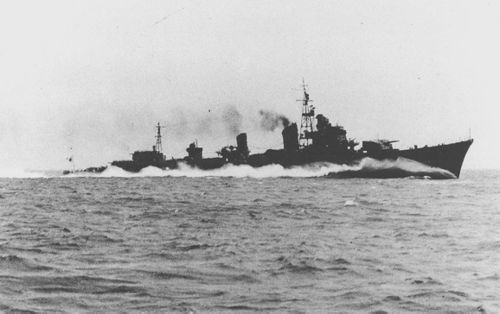
Shimakaze — Japanese Tier X destroyer.
Bourne out of the 1939 Design program, the experimental Shimakaze was envisioned as the pinnacle of fleet destroyer design. Larger than her contemporaries before her, she carried potent dual-purpose artillery, boasted the fastest maximum speed of any Japanese destroyer, and carried the largest torpedo broadside of any destroyer in WW2.
Modules
 |
Rate of Fire (shots/min) | 180° Turn Time (sec) | Maximum Dispersion (m) | Maximum HE Shell Damage (HP) | Chance of Fire on Target Caused by HE Shell (%) | Maximum AP Shell Damage (HP) |
Research price (exp) |
Purchase price ( | |
|---|---|---|---|---|---|---|---|---|---|
| 127 mm/50 3rd Year Type on a Type D mount | 10.5 | 22.8 | 100 | 2,150 | 9 | 2,200 | 0 | 1,700,000 |
 |
Hit Points (HP) | Armor (mm) | Armor (mm) | Main Turrets (pcs.) | Secondary Gun Turrets (pcs.) | AA Mounts (pcs.) | Torpedo Tubes (pcs.) | Hangar Capacity (pcs.) |
Research price (exp) |
Purchase price ( | |
|---|---|---|---|---|---|---|---|---|---|---|---|
| Shimakaze | 17,900 | 6 | 20 | 3 | 14/1/2/3 | 3 | 0 | 2,000,000 |
 |
Rate of Fire (shots/min) | Torpedo Tubes Reload Time (sec) | 180° Turn Time (sec) | Maximum Damage (HP) | Torpedo Speed (knot) | Torpedo Range (km) |
Research price (exp) |
Purchase price ( | |
|---|---|---|---|---|---|---|---|---|---|
| Type F3 | 0.5 | 131 | 7.2 | 21,366 | 76 | 8 | 30,000 | 2,500,000 | |
| Type93 mod. 3 | 0.4 | 153 | 7.2 | 23,766 | 67 | 12 | 30,000 | 2,500,000 | |
| Type93 | 0.4 | 150 | 7.2 | 20,966 | 62 | 20 | 0 | 2,500,000 |
 |
IDS_SHIP_PARAM_SUO_INCREASE_DIST (%) | Maximum Firing Range (km) |
Research price (exp) |
Purchase price ( | |
|---|---|---|---|---|---|
| Type10 mod. 1 | 0 | 0 | 1,100,000 |
 |
Maximum Speed (knot) |
Research price (exp) |
Purchase price ( | |
|---|---|---|---|---|
| Propulsion: 75,000 hp | 39 | 0 | 1,650,000 |
Compatible Upgrades
| Slot 1 |
|||||
|---|---|---|---|---|---|
| Slot 2 |
|||||
| Slot 3 |
|||||
| Slot 4 |
|||||
| Slot 5 |
|||||
| Slot 6 |
Player Opinion
Performance
As the pinnacle of the Japanese Destroyer tech-tree, the Shimakaze epitomizes the play-style of the main line of ships: a long-range torpedo boat with solid – albeit underwhelming – artillery.
The bread-and-butter of this ship are her torpedoes; therefore the first issue is choosing the appropriate tools. It is highly recommended to mount the F3 torpedoes, as their combination of high speed and heavy warhead make them the ideal choice. This comes at a cost of severely restricted range, so the key to success in this ship is to understand how to use these torpedoes. This ship does best when used with “hit-and-run-style” ambush tactics; taking advantage of her speed and torpedo broadside. After choosing a target, captains will want to loiter out of detection range until an opportune situation arises to engage; commonly if the enemy ship is sailing broadside to ensure the largest target picture. Afterwards, dropping in close, unleashing a torpedo broadside and escaping away should be done as succinctly as possible. This is where practice and experience is key; situation awareness and knowledge of target’s capability are crucial. Poor execution will lead to detection, and in time, captains will be able to gauge how close to approach a target to execute an attack. Proper engagements will result in the target being overwhelmed by a surprise torpedo assault, which will secure a lot of damage, if not a kill.
Contrary to popular belief, the guns on the Shimakaze are still a viable option, as long as the strengths and weaknesses are understood. The combination of decent rate-of-fire and high muzzle velocity allows her to attack unsuspecting enemy ships, even hunt down already-detected destroyers. The turret configuration also supplements the hit-and-run play-style mentioned above: as she is turning away to disengage, Shimakaze can still harass targets with a majority of her primary artillery. Prolong firefights are disadvantageous for the Shimakaze and are not recommended; ultimately she is not a gunboat and will be overwhelmed by enemy firepower.
In the hands of an aggressive, yet cunning hunter, the Shimakaze will shine.Pros:
- Great speed of 39 knots.
- Type 93 torpedoes have an extremely long range of 20 km; even if it doesn't hit the desired target, you can still hit someone behind him.
- Full salvo of fifteen torpedoes make it almost impossible to dodge at medium-close range.
- Absurd torpedo potential damage - over 300,000 - when mounting Type F3 torpedoes.
Cons:
- Decent artillery only against other destroyers, but very poor against cruisers, battleships and aircraft carriers.
- Relatively high surface detection range (7.6 km).
- Long torpedo reload time.
- Still fragile, module incapacitations will be a common occurrence when hit.
- Poor AA.
- Main armament placement is not ideal: two of her three turrets are mounted at the rear.
- Dropping torpedoes at maximum range makes it difficult to successfully hit a single target: once the time it takes for the torpedoes to get there, the target will almost definitely have moved.
- Wide torpedo spread makes it difficult to hit a ship if not launched at it's broadside.
Research
Optimal Configuration
Upgrades
Being a Tier X ship, Shimakaze has access to all six Upgrade Slots, with some flexibility in choice to allow preference to a particular play-style. For Upgrade Slot 1, Main Armaments Modification 1 is the best choice. For Upgrade Slot 2, Aiming Systems Modification 1 is the best choice. Upgrade Slot 3 will have some variety. Captains can take Torpedo Tubes Modification 3 to decrease the torpedo reload time, which is good for a torpedo build. Alternatively, captains can take Gun Fire Control System Modification 2 to increase the maximum firing range of primary artillery, which is good for a gun build. For Upgrade Slot 4, the recommended choice is Propulsion Modification 1, which reduces the chance of engine incapacitation so captains don’t lose Shimakazake’s advantage of speed. Although, Damage Control System Modification 1 is still a viable choice, as it decreases risk of fire and flooding. Upgrade Slot 5 also presents two good choices. Captains can pick Propulsion Modification 2 to increase acceleration to max speed; further taking advantage of her speed. Otherwise, pick Steering Gears Modification 2 for faster rudder shift time to increase the overall manoeuvrability of the ship. For Upgrade Slot 6, Concealment Systems Modification 1 is the best choice.
Commander Skills
Similar to Upgrades, variety within the Commander Skills allow captains to confer to a particular play-style they see fit. For Tier 1, captains have two solid choices in Basics of Survivability and Basic Fire Training. It is advised to pick Basic Fire Training with the 1st point, and take Basics of Survival with the 18th point. For Tier 2, captains have a plethora of choices, depending on the play-style they prefer. Captains are recommended to take Last Stand with the 3rd point, followed by Torpedo Armament Expertise with their 17th point if they wish to emphasize their torpedo armament. Alternatively, captains can switch Torpedo Armament Expertise for Expert Marksman if they wish to emphasize their primary artillery. For Tier 3, captains are recommended to take Vigilance in order to aid enemy torpedo detection; not only useful during knife-fights but provides a passive support for teammates as well. Conversely, captains can pick Superintendent in order to have extra charges of Smoke Generator and Engine Boost. For Tier 4, captains are recommended to pick Survivability Expert, as the additional HP will be handy in disadvantageous situations or knife-fights. Alternatively, captains can pick Demolition Expert to buff the fire-chance of their HE shells. For Tier 5, captains are recommended to pick Concealment Expert, as it is their best option.
| Recommended Commander Skills | ||||||||
|---|---|---|---|---|---|---|---|---|
| Cost (points) |
Endurance | Attack | Support | Versatility | ||||
| 1 |
|
|
|
|
|
|
|
|
| 2 |
|
|
★★ |
|
|
|
|
★★★ |
| 3 |
★★★ |
★★★ |
★★★ |
|
★★ |
★★★ |
★★ |
★★ |
| 4 |
|
|
|
|
|
|
|
★★★ |
| Key: ★★★ - Extremely Useful ★★ - Frequently Useful ★ - Occasionally Useful No stars - Meh Χ - Not recommended | ||||||||
Consumables
Shimakaze gets three consumables: Damage Control Party, Smoke Generator, and Engine Boost. It is recommended to take premium versions of all consumables that have the recourses to spare, but for those captains, whom are cash-strapped, prioritize Smoke Generator II. As it goes, a spotted DD is a dead DD; therefore having premium Smoke Generator will provide more chances to disappear from a disadvantageous situation.
Camouflage
Shimakaze has access to Type 1, 2, 5, or 6 Camouflage; the first three acquired via credits. Types 1 or 5 are recommended at a minimum as they reduce detectability range by sea. Players who wish to spend doubloons can equip Shimakaze with Type 20 Camouflage, which lowers her detection radius, reduces accuracy of incoming shells, increases credits & experience earned in battle, and decreases post-battle costs.
Signals
The choice of which Signal Flags to mount will confer to the individual preference of each captain, and are subject to great variation, although there are certain flags which are worth the further emphasis. Captains should mount India Yankee to decrease time to extinguish fires, mount November Foxtrot to decrease reload time of consumables, and mount Sierra Mike to increase the ship's maximum speed. To make their torpedoes more potent, captains should mount Juliet Whisky Unaone to increase chance of causing flooding and Juliet Charlie to mitigate risk to magazine detonation from mounting the former flag. If captains wish to buff their primary artillery, they are encouraged to mount Victor Lima + India X-ray to increase fire chance to HE shells.Gallery
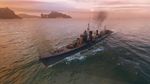
Shimakaze prepares for battle.
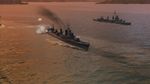
Shimakaze launches her torpedoes at enemy battleships.
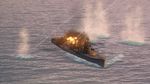
The destroyer attempts to dodge incoming fire.
Historical Info
Historical Gallery
References
Wikipedia - Shimakaze Class Destroyer