St. Louis
| Revision as of 23:48, 5 January 2018 | Revision as of 02:25, 13 February 2018 Fixed commander skills; cleaned up performance section and research section; added consumables, camouflage, and signals sections | |||
| Line 7: | Line 7: | |||
| |Performance=<!-- write text about performance in battles below --> | |Performance=<!-- write text about performance in battles below --> | |||
| ? | More pocket battleship than cruiser, new players and experienced hands alike will enjoy this ship's | + | More pocket battleship than cruiser, new players and experienced hands alike will enjoy this ship's high firepower but dislike it's slow top speed. With the decent fire rate and and large volume of shells, ''{{#var:ship_name}}'' is effective against all opponents, even at long range. When fighting enemy battleships, one should "rake" them - target the front, centre and back sections in turn to maximise your chances of setting multiple fires. Players should stay vigilant for enemy torpedoes as ''{{#var:ship_name}}'' doesn't have very good rudder shift time. Additionally, players should not need to activate {{Damage Control Party}} for any knocked main battery, as the ship still has another seven main batteries constantly firing. ''{{#var:ship_name}}'' is one of the few cruisers that can take on an equal Tier battleship on relatively even terms (especially the underpowered [[South Carolina]]). It can even prove a threat to the Tier IV ships. | |
| + | ||||
| + | |Pros=<!-- write list of positive points below. use * as in ordinary wiki-list. --> | |||
| + | * Has the most hit points of any Tier III cruiser - almost comparable to its fellow Tier III USN battleship ''[[South Carolina]]'' battleship | |||
| + | * The most main batteries and secondaries of any Tier III cruiser - boasts a whopping 14x1 152mm guns and 18x1 76.2mm guns, while its Tier III VMF cruiser counterpart ''[[Bogatyr]]'' has as many but only 130mm, fire, and turn slower. Additionally, due to the side mounted guns, it allows for flexibility and quick reaction to switching targets from either side. | |||
| + | * Side mounted guns means only a maximum of eight out of the fourteen primary guns can be used on a single target when broadside, and even fewer when facing directly ahead or rearward. | |||
| + | * Good turning radius. | |||
| + | ||||
| + | |Cons=<!-- write list of negative points below. use * as in ordinary wiki-list. --> | |||
| + | * Low top speed - barely faster than ''[[South Carolina]]'' | |||
| + | * Rather slow rudder shift time. | |||
| + | * Negligible anti-air capabilities - because it is Tier III, it will most likely see carriers [[Langley]] and [[Hosho]]; will have no self-defense | |||
| |Research=<!-- write text about priority sequence of research below --> | |Research=<!-- write text about priority sequence of research below --> | |||
| ? | + | This is a suggested research path: | ||
| ? | + | # St. Louis (B) Hull | ||
| ? | + | # 152 mm/50 Mk6 main batteries mod. 2 | ||
| + | # Mk3 FCS mod. 2 | |||
| |Upgrades=<!-- write text about best upgrades below --> | |Upgrades=<!-- write text about best upgrades below --> | |||
| + | The recommended upgrades for ''{{#var:ship_name}}'' are as follows: | |||
| * '''Slot 1''': {{Main Armaments Modification 1}} keeps the guns active and firing. | * '''Slot 1''': {{Main Armaments Modification 1}} keeps the guns active and firing. | |||
| * '''Slot 2''': {{Damage Control System Modification 1}} the ship takes a lot of HE shell hits, this helps decrease the amount of fires set. | * '''Slot 2''': {{Damage Control System Modification 1}} the ship takes a lot of HE shell hits, this helps decrease the amount of fires set. | |||
| {{Commander Skills | {{Commander Skills | |||
| ? | | Priority Target = | + | | Priority Target = 3 | |
| ? | | Preventative Maintenance = | + | | Preventative Maintenance = 2 | |
| | Expert Loader = 1 | | Expert Loader = 1 | |||
| | Aircraft Servicing Expert = | | Aircraft Servicing Expert = | |||
| Line 29: | Line 42: | |||
| | High Alert = 2 | | High Alert = 2 | |||
| ? | | Jack of All Trades = | + | | Jack of All Trades = | |
| ? | | Expert Marksman = | + | | Expert Marksman = 3 | |
| | Torpedo Acceleration = | | Torpedo Acceleration = | |||
| | Smoke Screen Expert = | | Smoke Screen Expert = | |||
| | Expert Rear Gunner = | | Expert Rear Gunner = | |||
| ? | | Adrenaline Rush = | + | | Adrenaline Rush = 2 | |
| ? | | Last Stand = | + | | Last Stand = 1 | |
| ? | | Survivability Expert = | + | | Survivability Expert = 1 | |
| ? | | Basics of Survivability = | + | | Basics of Survivability = 2 | |
| | Torpedo Armament Expertise = | | Torpedo Armament Expertise = | |||
| | Emergency Takeoff = | | Emergency Takeoff = | |||
| ? | | Basic Firing Training = | + | | Basic Firing Training = 1 | |
| | Superintendent = | | Superintendent = | |||
| | Demolition Expert = 3 | | Demolition Expert = 3 | |||
| Line 48: | Line 61: | |||
| | Manual Fire Control for Secondary Armament = | | Manual Fire Control for Secondary Armament = | |||
| | Fire Prevention = 2 | | Fire Prevention = 2 | |||
| ? | | Inertia Fuse for HE Shells = | + | | Inertia Fuse for HE Shells = 3 | |
| | Air Supremacy = | | Air Supremacy = | |||
| | Advanced Firing Training = | | Advanced Firing Training = | |||
| | Manual Fire Control for AA Armament = | | Manual Fire Control for AA Armament = | |||
| ? | | Radio Position Finding = | + | | Radio Position Finding = 1 | |
| ? | | Concealment Expert = | + | | Concealment Expert = 2 | |
| }} | }} | |||
| ? | | | + | |Consumables=<!-- write text about selection of Consumables below --> | |
| ? | + | As a Tier III USN cruiser, ''{{#var:ship_name}}'' has access to only {{Damage Control Party}}. | ||
| ? | + | |||
| ? | + | |||
| ? | + | |||
| ? | + | |||
| ? | + | |||
| ? | + | |||
| ? | + | |||
| ? | + | |||
| ? | + | |||
| ? | + | |||
| ? | + | |||
| ? | + | |||
| ? | + | |Camouflage=<!-- write text about useful camouflage below --> | ||
| ? | + | |||
| The St. Louis is one of the 3 tier III ships to have a premium [[Ship:Camouflage|camouflage]] known as "Igor" which is the Halloween variant of the St. Louis, it was available for limited time through Halloween crates that you could earn from the Scenario "A Sunray in the Darkness" each star would grant you a single Halloween crate or you could buy them from the Premium shop. | The St. Louis is one of the 3 tier III ships to have a premium [[Ship:Camouflage|camouflage]] known as "Igor" which is the Halloween variant of the St. Louis, it was available for limited time through Halloween crates that you could earn from the Scenario "A Sunray in the Darkness" each star would grant you a single Halloween crate or you could buy them from the Premium shop. | |||
| + | ||||
| + | |Signals=<!-- write text about best set of signals below --> | |||
| + | As a Tier III ship, it is highly recommended to save signals for use in the later tiers. But should the player have a surplus and enjoy playing this ship, they should utilize the following recommended signals. | |||
| + | {{Signal Flags | |||
| + | | November Echo Setteseven = | |||
| + | | Mike Yankee Soxisix = | |||
| + | | India X-Ray = 3 | |||
| + | | Juliet Whiskey Unaone = | |||
| + | | Victor Lima = 3 | |||
| + | | Hotel Yankee = 2 | |||
| + | ||||
| + | | November Foxtrot = 1 | |||
| + | | Sierra Mike = 2 | |||
| + | | India Delta = | |||
| + | | Juliet Yankee Bissotwo = | |||
| + | | India Yankee = 2 | |||
| + | | Juliet Charlie = 1 | |||
| + | ||||
| + | | Zulu = | |||
| + | | India Bravo Terrathree = | |||
| + | | Equal Speed Charlie London = 2 | |||
| + | | Zulu Hotel = 2 | |||
| + | | Papa Papa = | |||
| + | ||||
| + | | Wyvern = | |||
| + | | Red Dragon = | |||
| + | | Dragon Flag = | |||
| + | | Ouroboros = | |||
| + | | Hydra = | |||
| + | }} | |||
| |Gallery=<!-- write below list of files without tags. description (if necessary) for each should be separated with template {{!}} --><gallery> | |Gallery=<!-- write below list of files without tags. description (if necessary) for each should be separated with template {{!}} --><gallery> | |||
Revision as of 02:25, 13 February 2018
Not to be confused with the French Tier IX cruiser, the Saint-Louis.

| Research price2200 exp |
| Purchase price247,000 |
| Hit Points27,300 |
| IDS_PAGM096_6IN50_MK610 х 1 pcs. |
| Rate of Fire6 shots/min. |
| Reload Time10 sec. |
| Rotation Speed6 deg./sec. |
| 180 Degree Turn Time30 sec. |
| Firing Range11.32 km. |
| Maximum Dispersion111 m. |
| HE Shell152 mm HE 105 lb |
| Maximum HE Shell Damage2,100 |
| Chance of Fire on Target Caused by HE Shell7 % |
| Initial HE Shell Velocity853 m./s. |
| HE Shell Weight47.7 kg. |
| AP Shell152 mm AP 105 lb |
| Maximum AP Shell Damage3,000 |
| Initial AP Shell Velocity853 m./s. |
| AP Shell Weight47.7 kg. |
| 76.2 mm/50 Mk.5 on a single mount18 х 1 pcs. |
| Firing Range3.2 km. |
| Rate of Fire12 shots/min. |
| Reload Time5 sec. |
| HE Shell76 mm HE |
| Maximum HE Shell Damage1,100 |
| Initial HE Shell Velocity823 m./s. |
| Chance of Fire on Target Caused by HE Shell4 % |
| Maximum Speed22 knot |
| Turning Circle Radius450 m. |
| Rudder Shift Time8.4 sec. |
| Surface Detectability Range10.66 km. |
| Air Detectability Range5.06 km. |

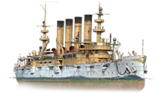
St. Louis — American Tier III cruiser.
Following the end of the Spanish-American War, the U.S. Congress enacted several laws to bolster its naval strength. Initially, plans were made to build three cruisers of the "improved Olympia" class. However, during the design phase, the cruisers grew in size, their armor got stronger, and the number of artillery guns they carried was increased as well. The final configuration featured 152 mm guns. Before World War I, USS St. Louis was assigned to the Pacific Fleet. During the war, her duties included escorting troop convoys and transporting persons of high standing.
Modules
 |
Rate of Fire (shots/min) | 180° Turn Time (sec) | Maximum Dispersion (m) | Maximum HE Shell Damage (HP) | Chance of Fire on Target Caused by HE Shell (%) | Maximum AP Shell Damage (HP) |
Research price (exp) |
Purchase price ( | |
|---|---|---|---|---|---|---|---|---|---|
| 152 mm/50 Mk.6 on a single mount/casemate mount | 6 | 30 | 111 | 2,100 | 7 | 3,000 | 0 | 28,000 | |
| 152 mm/50 Mk6 | 6.7 | 22.5 | 111 | 2,100 | 7 | 3,000 | 600 | 64,000 |
 |
Hit Points (HP) | Armor (mm) | Armor (mm) | Main Turrets (pcs.) | Secondary Gun Turrets (pcs.) | AA Mounts (pcs.) | Torpedo Tubes (pcs.) | Hangar Capacity (pcs.) |
Research price (exp) |
Purchase price ( | |
|---|---|---|---|---|---|---|---|---|---|---|---|
| St. Louis (A) | 27,300 | 6 | 102 | 10 | 18 | 0 | 40,000 | ||||
| St. Louis (B) | 29,500 | 6 | 102 | 14 | 18 | 8 | 800 | 98,000 |
 |
IDS_SHIP_PARAM_SUO_INCREASE_DIST (%) | Maximum Firing Range (km) |
Research price (exp) |
Purchase price ( | |
|---|---|---|---|---|---|
| Mk3 mod. 1 | 0 | 0 | 21,000 | ||
| Mk III mod. 2 | 0 | 400 | 53,000 |
 |
Maximum Speed (knot) |
Research price (exp) |
Purchase price ( | |
|---|---|---|---|---|
| Propulsion: 24,000 hp | 22 | 0 | 18,000 |
Compatible Upgrades
| Slot 1 |
||||
|---|---|---|---|---|
| Slot 2 |
Player Opinion
Performance
Pros:
- Has the most hit points of any Tier III cruiser - almost comparable to its fellow Tier III USN battleship South Carolina battleship
- The most main batteries and secondaries of any Tier III cruiser - boasts a whopping 14x1 152mm guns and 18x1 76.2mm guns, while its Tier III VMF cruiser counterpart Bogatyr has as many but only 130mm, fire, and turn slower. Additionally, due to the side mounted guns, it allows for flexibility and quick reaction to switching targets from either side.
- Side mounted guns means only a maximum of eight out of the fourteen primary guns can be used on a single target when broadside, and even fewer when facing directly ahead or rearward.
- Good turning radius.
Cons:
- Low top speed - barely faster than South Carolina
- Rather slow rudder shift time.
- Negligible anti-air capabilities - because it is Tier III, it will most likely see carriers Langley and Hosho; will have no self-defense
Research
This is a suggested research path:
- St. Louis (B) Hull
- 152 mm/50 Mk6 main batteries mod. 2
- Mk3 FCS mod. 2
Optimal Configuration
Upgrades
The recommended upgrades for St. Louis are as follows:
- Slot 1: Main Armaments Modification 1
 keeps the guns active and firing.
- Slot 2: Damage Control System Modification 1
 the ship takes a lot of HE shell hits, this helps decrease the amount of fires set.
| Recommended Commander Skills | ||||||||
|---|---|---|---|---|---|---|---|---|
| Cost (points) |
Endurance | Attack | Support | Versatility | ||||
| 1 |
★★★ |
★★ |
★ |
|
|
|
★ |
|
| 2 |
★★ |
|
★★★ |
|
|
|
★★ |
★ |
| 3 |
★★ |
★ |
|
|
★ |
|
★★★ |
★★ |
| 4 |
|
★★ |
★★★ |
|
|
|
★ |
★★ |
| Key: ★★★ - Extremely Useful ★★ - Frequently Useful ★ - Occasionally Useful No stars - Meh Χ - Not recommended | ||||||||
Consumables
As a Tier III USN cruiser, St. Louis has access to only Damage Control Party ![]() .
.
Camouflage
The St. Louis is one of the 3 tier III ships to have a premium camouflage known as "Igor" which is the Halloween variant of the St. Louis, it was available for limited time through Halloween crates that you could earn from the Scenario "A Sunray in the Darkness" each star would grant you a single Halloween crate or you could buy them from the Premium shop.
Signals
As a Tier III ship, it is highly recommended to save signals for use in the later tiers. But should the player have a surplus and enjoy playing this ship, they should utilize the following recommended signals.
Recommended Signal Flags 
| |||||
|---|---|---|---|---|---|
| Combat | |||||
 ★ |

|
 ★★ |
 ★★ |
 ★★★ |
 ★★★ |

|

|

|
 ★★ |
 ★ |

|

|

| ||||
Note: Use of the Juliet Charlie signal makes detonation impossible.
Gallery
Historical Info
Historical Gallery
