Taiho
| Revision as of 12:29, 23 August 2017 | Revision as of 01:15, 10 October 2020 | |||
20 intermediate revisions by 9 users not shown | ||||
| Line 3: | Line 3: | |||
| |Anno=<!-- you can write below short description for the ship. it will replace default once. --> | |Anno=<!-- you can write below short description for the ship. it will replace default once. --> | |||
| + | The mightiest aircraft carrier with the most advanced design, among ships of her type, built for the Imperial Japanese Navy. She featured an armored flight deck to provide protection from bomb hits. New dual-purpose artillery mounts significantly improved the ship's AA capabilities.<!-- <br><br>{{Model3DViewer|7d5d8056f1f54ccfa15f5ca7315f6ad1}}--> | |||
| |Performance=<!-- write text about performance in battles below --> | |Performance=<!-- write text about performance in battles below --> | |||
| |Research=<!-- write text about priority sequence of research below --> | |Research=<!-- write text about priority sequence of research below --> | |||
| + | This is a suggested research path: | |||
| + | # Type 9 mod. 2 or mod. 3 Flight Control | |||
| + | # Mitsubishi A7M1 fighters | |||
| + | # Aichi B7A2 torpedo bombers | |||
| + | # Aichi B7A2 dive bombers | |||
| + | # Hull (B) | |||
| + | ||||
| + | Researching mod. 2 or mod. 3 Flight Control depends on the player's preference. | |||
| |Pros=<!-- write list of positive points below. use * as in ordinary wiki-list. --> | |Pros=<!-- write list of positive points below. use * as in ordinary wiki-list. --> | |||
| + | * Very powerful alpha strike power with torpedo bombers. | |||
| + | * Much better concealment than her American counterpart. | |||
| + | * AA is quite good on the second hull. | |||
| |Cons=<!-- write list of negative points below. use * as in ordinary wiki-list. --> | |Cons=<!-- write list of negative points below. use * as in ordinary wiki-list. --> | |||
| + | ||||
| |OptimalConfiguration=<!-- write some general text about selection of optimal configuration below (optional)--> | |OptimalConfiguration=<!-- write some general text about selection of optimal configuration below (optional)--> | |||
| |Upgrades=<!-- write text about best upgrades below --> | |Upgrades=<!-- write text about best upgrades below --> | |||
| ? | + | The recommended upgrades for ''{{#var:ship_name}}'' are as follows: | ||
| + | *'''Slot 1''': {{Air Groups Modification 1}} | |||
| + | *'''Slot 2''': {{Damage Control System Modification 1}} | |||
| + | *'''Slot 3''': {{Air Groups Modification 2}} | |||
| + | *'''Slot 4''': {{Propulsion Modification 1}} | |||
| + | *'''Slot 5''': {{Concealment System Modification 1}} | |||
| + | *'''Slot 6''': {{Air Groups Modification 3}} | |||
| + | ||||
| + | '''Upgrade Slot 3''' is the 1st main choice of upgrades with ''{{#var:ship_name}}''. For players looking to improve their fighter's capabilities, {{Air Groups Modification 2}} is highly recommended, especially when using the Type 9 mod. 3 flight control system. Otherwise, the {{Flight Control Modification 1}} helps players land and launch ''{{#var:ship_name}}''’s multiple flight squadrons, as ''{{#var:ship_name}}'' has seven separate plane squadrons to manage. | |||
| + | ||||
| + | '''Upgrade Slot 5''' offers players {{Concealment System Modification 1}}, which stacks with [[Ship:Commander#Concealment_Expert|Concealment Expert]] and camouflage to bring ''{{#var:ship_name}}''’s surface detection down to a small range of 10.7 km. | |||
| + | ||||
| + | '''Upgrade Slot 6''' is the 2nd main choice of upgrades with ''{{#var:ship_name}}''. Due to the common presence of multiple battleships and cruisers with very high AA power, {{Air Groups Modification 3}} is highly recommended to make sure ''{{#var:ship_name}}''’s planes will survive their trip to and from their target. If survivability isn't the player's foremost preference, {{Flight Control Modification 2}} is viable, increasing the speed gap between ''{{#var:ship_name}}''’s and ''[[Essex]]''’s planes, allowing the smaller Japanese squadrons to outrun their American counterparts. | |||
| |CommanderSkills=<!-- write text about best set of Commander Skills below --> | |CommanderSkills=<!-- write text about best set of Commander Skills below --> | |||
| ? | + | ''{{#var:ship_name}}'' uses the standard Japanese carrier captain skill setup. Emphasis should be on skills that boost fighter and bomber effectiveness and AA protection. [[Ship:Commander#Aircraft_Servicing_Expert|Aircraft Servicing Expert]], [[Ship:Commander#Torpedo_Acceleration|Torpedo Acceleration]], [[Ship:Commander#Torpedo_Armament_Expertise|Torpedo Armament Expertise]], and [[Ship:Commander#Air_Supremacy|Air Supremacy]] are "must have" skills. [[Ship:Commander#Dogfighting_Expert|Dogfighting Expert]] is also a useful pick for ''{{#var:ship_name}}'' due to the bonus to ammunition which allows her fighters to remain airborne longer before returning to rearm. | ||
| ? | {{Commander | + | For AA defense, ''{{#var:ship_name}}'' has medium-caliber 100mm guns that benefit greatly from Manual Fire Control for AA Armament. [[Ship:Commander#Basic_Firing_Training|Basic Firing Training]] is also a good choice to boost all AA guns' DPS by 20%. And as ''{{#var:ship_name}}'' is a Tier IX carrier, the player has access to the special Japanese carrier version of {{Defensive AA Fire}}, which lasts for two minutes and increases the ship's AA DPS by a factor of '''1.75'''. Coupled with '''Basic Firing Training''' and [[Ship:Commander#Manual_Fire_Control_for_AA_Armament|Manual Fire Control for AA Armament]], the player can significantly increase the ship's AA DPS to shoot down enemy planes effectively and greatly reduce the damage taken from an enemy carrier's attack. | |
| ? | | | + | ||
| ? | + | |||
| ? | + | |||
| ? | + | |||
| ? | + | |||
| ? | + | |||
| ? | + | |||
| ? | | | + | ||
| ? | | | + | [[Ship:Commander#Evasive_Maneuver|Evasive Maneuvers]] is recommended as it increases the bombers' survivability when returning to the carrier, and is especially useful when the enemy targets have activated {{Defensive AA Fire}}. | |
| ? | + | |||
| ? | + | |||
| ? | + | |||
| ? | + | |||
| ? | + | |||
| ? | + | |||
| ? | + | |||
| ? | + | Any skills that are related to an enemy vessel firing on your carrier are not useful, as the cost-benefit of investing in survivability skills is not worth the minimal benefit they offer. ''{{#var:ship_name}}'' is large and unarmored, and will not survive an attack by any ship larger than a destroyer. ''{{#var:ship_name}}'' captains must position their ship near friendlies and far back from the enemy fleet. [[Ship:Commander#Concealment_Expert|Concealment Expert]] may be taken to further reduce detection range if the captain so desires. | ||
| ? | + | |||
| ? | | | + | ||
| ? | + | |||
| ? | + | |||
| ? | + | |||
| ? | + | |||
| ? | + | |||
| ? | | | + | {{Commander Skills 2 | |
| ? | | | + | <!-- This version enables a '0' rating. Use it for skills that have no effect (e.g. Improved Engines on a non-CV) or are detrimental to the ship. They should mirror what appears in the game client. --> | |
| ? | | | + | | rating11 = <!-- Priority Target --> | |
| ? | | Air Supremacy | + | | rating12 = <!-- Preventive Maint --> | |
| ? | | | + | | rating13 = 0 <!-- Expert Loader --> | |
| ? | | | + | | rating14 = <!-- Air Supremacy --> | |
| ? | | | + | | rating15 = <!-- Direction Center for Fighters --> | |
| ? | | | + | | rating16 = <!-- Improved Engine Boost --> | |
| ? | + | | rating17 = <!-- Incoming Fire Alert --> | ||
| + | | rating18 = <!-- Last Gasp --> | |||
| ? | | | + | | rating21 = <!-- High Alert --> | |
| ? | + | | rating22 = <!-- Jack of All Trades --> | ||
| ? | + | | rating23 = 0 <!-- Expert Marksman --> | ||
| ? | + | | rating24 = 0 <!-- Torpedo Acceleration --> | ||
| + | | rating25 = 0 <!-- Smoke Screen Expert --> | |||
| + | | rating26 = <!-- Improved Engines --> | |||
| + | | rating27 = <!-- Adrenaline Rush --> | |||
| + | | rating28 = <!-- Last Stand --> | |||
| + | | rating31 = <!-- Basics of Survivability --> | |||
| + | | rating32 = <!-- Survivability Expert--> | |||
| + | | rating33 = 0 <!-- Torpedo Armament Expertise--> | |||
| + | | rating34 = <!-- Aircraft Armor --> | |||
| + | | rating35 = <!-- Basic Firing Training --> | |||
| + | | rating36 = <!-- Superintendent --> | |||
| + | | rating37 = <!-- Demolition Expert --> | |||
| + | | rating38 = <!-- Vigilance --> | |||
| ? | + | | rating41 = <!-- Manual Fire Control for Secondary Armament --> | ||
| + | | rating42 = <!-- Fire Prevention --> | |||
| + | | rating43 = <!-- Inertia Fuse for HE Shells --> | |||
| + | | rating44 = <!-- Sight Stabilization --> | |||
| + | | rating45 = <!-- Advanced Firing Training --> | |||
| + | | rating46 = <!-- Massive AA Fire --> | |||
| + | | rating47 = <!-- Radio Position Finding --> | |||
| + | | rating48 = <!-- Concealment Expert --> | |||
| + | }} | |||
| + | ||||
| + | |Consumables=<!-- write text about selection of Consumables below --> | |||
| + | ''{{#var:ship_name}}'' can equip the following consumables: | |||
| + | * '''Slot 1:''' {{Damage Control Party}} | |||
| + | * '''Slot 2:''' {{Defensive AA Fire}} | |||
| |Camouflage=<!-- write text about useful camouflage below --> | |Camouflage=<!-- write text about useful camouflage below --> | |||
| ? | [[Ship:Camouflage#Standard Camouflage|Type 1, 2, or 5 camouflage]] can be equipped for credits; Types 1 or 5 are recommended at a minimum to reduce | + | [[Ship:Camouflage#Standard Camouflage|Type 1, 2, or 5 camouflage]] can be equipped for credits; Types 1 or 5 are recommended at a minimum to reduce detectibility range. | |
| ? | Players who wish to spend doubloons can equip '' | + | Players who wish to spend doubloons can equip ''{{#var:ship_name}}'' with [[Ship:Camouflage#Permanent_Camouflage|Type 19 camouflage]] that lowers her detection radius, reduces the accuracy of incoming shells, reduces cost of post-battle service, and increases the amount of experience she earns. | |
| |Signals=<!-- write text about best set of signals below --> | |Signals=<!-- write text about best set of signals below --> | |||
| ? | As a carrier, '' | + | As a carrier, ''{{#var:ship_name}}'' can only mount at most four signals at a time and has no risk of detonating. Players should mount Equal Speed Charlie London ({{Equal Speed Charlie London|Size=18px}}), Zulu Hotel ({{Zulu Hotel|Size=18px}}), and, for the last two: November Echo Setteseven ({{November Echo Setteseven|Size=18px}}) and Juliet Whiskey Unaone ({{Juliet Whiskey Unaone|Size=18px}}). | |
| {{Signal Flags | {{Signal Flags | |||
| + | | November Echo Setteseven = 3 | |||
| + | | Mike Yankee Soxisix = | |||
| + | | India X-Ray = | |||
| + | | Juliet Yankee Bissotwo = | |||
| + | | Victor Lima = | |||
| | Hotel Yankee = | | Hotel Yankee = | |||
| + | ||||
| + | | November Foxtrot = | |||
| + | | Sierra Mike = 1 | |||
| + | | India Delta = | |||
| + | | Juliet Whiskey Unaone = 3 | |||
| + | | India Yankee = | |||
| | Juliet Charlie = | | Juliet Charlie = | |||
| ? | ||||
| ? | ||||
| ? | ||||
| ? | ||||
| ? | + | | Zulu = 1 | ||
| ? | + | |||
| ? | | Zulu | + | ||
| | India Bravo Terrathree = | | India Bravo Terrathree = | |||
| ? | | | + | | Equal Speed Charlie London = 3 | |
| ? | | | + | | Zulu Hotel = 3 | |
| ? | + | |||
| ? | + | |||
| | Papa Papa = | | Papa Papa = | |||
| ? | + | |||
| ? | | | + | | Wyvern = 1 | |
| ? | | | + | | Red Dragon = 1 | |
| | Dragon Flag = 1 | | Dragon Flag = 1 | |||
| + | | Ouroboros = | |||
| + | | Hydra = 1 | |||
| }} | }} | |||
| |Gallery=<!-- write below list of files without tags. description (if necessary) for each should be separated with | --><gallery> | |Gallery=<!-- write below list of files without tags. description (if necessary) for each should be separated with | --><gallery> | |||
| ? | + | File:Taiho (6).jpg | ||
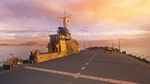
| + | File:Taiho (5).jpg|View of ''Taihō''’s flight deck. | |||
| + | File:Taiho shot (4).jpg | |||
| </gallery> | </gallery> | |||
| Line 107: | Line 143: | |||
| ===Historical Inaccuracies=== | ===Historical Inaccuracies=== | |||
| ? | * '' | + | * ''Taihō''’s dark gray paint scheme is missing. | |
| ? | * Hull (B) is | + | * Light and dark green camouflage was applied to aircraft carriers in mid-1944 after the battle of the Philippine Sea; ''Taihō'' was sunk in the battle of the Philippine Sea. | |
| ? | * Development of the Yokosuka D4Y2 began in October 1944; '' | + | * ''Taihō''’s actual aircraft complement consisted of 22 Mitsubishi A6M5 "Zeros", 22 Yokosuka D4Y1 "Suiseis", 3 Aichi D3A2 "Vals" and 18 Nakajima B6N2 "Tenzans". | |
| + | * Hull (B) is fictitious; ''Taihō'' was never equipped with the 40 mm Bofors. The Japanese version of the gun had a defective fuse design which limited its effective range to ~3km. | |||
| + | * Production of the Japanese 40 mm Bofors began in late 1944; ''Taihō'' was sunk in June 1944. | |||
| + | * Development of the Yokosuka D4Y2 began in October 1944; ''Taihō'' was sunk in June 1944. | |||
| * The A7M1 was a prototype aircraft and only two were built. | * The A7M1 was a prototype aircraft and only two were built. | |||
| * The N1K5-A designation is fictitious. The actual N1K5 only existed as a project and was intended as a high-altitude interceptor. | * The N1K5-A designation is fictitious. The actual N1K5 only existed as a project and was intended as a high-altitude interceptor. | |||
| Line 116: | Line 155: | |||
| |HistoricalGallery=<!-- write below list of files without tags. description (if necessary) for each should be separated with | --><gallery> | |HistoricalGallery=<!-- write below list of files without tags. description (if necessary) for each should be separated with | --><gallery> | |||
| File:Japanese aircraft carrier Taiho 02.jpg|Aircraft carrier ''Taihō''. | File:Japanese aircraft carrier Taiho 02.jpg|Aircraft carrier ''Taihō''. | |||
| ? | ||||
| </gallery> | </gallery> | |||
Revision as of 01:15, 10 October 2020
[[File:<value_unset_error>_icon_small.png|<value_unset_error>|link=Ship:<value_unset_error>]] [[File:<value_unset_error>_icon_small.png|<value_unset_error>|link=Ship:<value_unset_error>]] [[File:<value_unset_error>_icon_small.png|<value_unset_error>|link=Ship:<value_unset_error>]] |
| File:icon small.png |
[[File:<value_unset_error>_icon_small.png|<value_unset_error>|link=Ship:<value_unset_error>]] [[File:<value_unset_error>_icon_small.png|<value_unset_error>|link=Ship:<value_unset_error>]] [[File:<value_unset_error>_icon_small.png|<value_unset_error>|link=Ship:<value_unset_error>]] |
| Research pricelevel;mark_id;mark;shortmark_id;shortMark;description_id;description;price_credit;price_gold;nation;icon;name;aa_caliber_0;aa_caliber_1;aa_caliber_2;aa_caliber_3;aa_damage;aa_defense;aa_maxDist;aaMaxdist;aa_maxDist_0;aaMaxdist0;aa_maxDist_1;aaMaxdist1;aa_maxDist_2;aaMaxdist2;aa_maxDist_3;aaMaxdist3;aa_name_0;aaName0;aa_name_1;aaName1;aa_name_2;aaName2;aa_name_3;aaName3;aa_numBarrels_0;aaNumbarrels0;aa_numBarrels_1;aaNumbarrels1;aa_numBarrels_2;aaNumbarrels2;aa_numBarrels_3;aaNumbarrels3;aa_numGuns_0;aaNumguns0;aa_numGuns_1;aaNumguns1;aa_numGuns_2;aaNumguns2;aa_numGuns_3;aaNumguns3;air_support;air_support_bombDamage_depthcharge;air_support_bombName_depthcharge;air_support_maxDist_depthcharge;air_support_numBombsOnPlane_depthcharge;air_support_numPlanesInCharge_depthcharge;air_support_numSquadrons_depthcharge;air_support_planeMaxHealth_depthcharge;air_support_planeName_depthcharge;air_support_reloadTime_depthcharge;armour_casMax;armourCasmax;armour_casMin;armourCasmin;armour_citMax;armourCitmax;armour_citMin;armourCitmin;armour_deckMax;armourDeckmax;armour_deckMin;armourDeckmin;armour_extremitiesMax;armourExtremitiesmax;armour_extremitiesMin;armourExtremitiesmin;armour_rangeMax;armourRangemax;armour_rangeMin;armourRangemin;artillery_weaponry;atba_bulletMassHE_0;atba_bulletMassHE_1;atba_bulletSpeedHE_0;atba_bulletSpeedHE_1;atba_burnProbHE_0;atba_burnProbHE_1;atba_caliber_0;atba_caliber_1;atba_damageHE_0;atba_damageHE_1;atba_maxDist;atbaMaxdist;atba_nameHE_0;atba_nameHE_1;atba_name_0;atbaName0;atba_name_1;atbaName1;atba_numBarrels_0;atba_numBarrels_1;atba_numGuns_0;atba_numGuns_1;atba_piercingHE_0;atba_piercingHE_1;atba_shotDelay_0;atba_shotDelay_1;atba_shotSpeed;atba_shotSpeed_0;atba_shotSpeed_1;battleLevelRangeMax;battleLevelRangeMin;durability;floodDamage;health;mobility;mobility_maxSpeed;mobilityMaxspeed;mobility_rudderTime;mobilityRuddertime;mobility_turningRadius;mobilityTurningradius;planes_aviation;planes_bomber_forsageRestore;planes_bomber_forsageTime;planes_bomber_hangarVolume;planes_bomber_level;planes_bomber_maxSpeed;planes_bomber_name;planes_bomber_numAttackers;planes_bomber_numInSquadron;planes_bomber_numSquadrons;planesBomberNumsquadrons;planes_bomber_planesRestoreTime;planes_bomber_speed;planes_bomber_torpedo_maxDamage;planes_bomber_torpedo_maxDist;planes_bomber_torpedo_name;planes_bomber_torpedo_speed;planes_bomber_visibility;planes_bomber_vitality;planes_dive_bomb_bulletMassHE_alt;planes_dive_bomb_bulletMass_alt;planes_dive_bomb_bulletSpeedHE_alt;planes_dive_bomb_bulletSpeed_alt;planes_dive_bomb_burnProbHE_alt;planes_dive_bomb_burnProb_alt;planes_dive_bomb_damageHE_alt;planes_dive_bomb_nameHE_alt;planes_dive_bomb_numBombsHE_alt;planes_dive_forsageRestore_alt;planes_dive_forsageTime_alt;planes_dive_hangarVolume_alt;planes_dive_level_alt;planes_dive_maxSpeed_alt;planes_dive_name_alt;planes_dive_numAttackers_alt;planes_dive_numInSquadron_alt;planes_dive_numSquadrons_alt;planes_dive_planesRestoreTime_alt;planes_dive_speed_alt;planes_dive_visibility_alt;planes_dive_vitality_alt;planes_fighter_forsageRestore_alt;planes_fighter_forsageTime_alt;planes_fighter_hangarVolume_alt;planes_fighter_level_alt;planes_fighter_maxSpeed_alt;planes_fighter_name_alt;planes_fighter_numAttackers_alt;planes_fighter_numInSquadron_alt;planes_fighter_numSquadrons_alt;planes_fighter_planesRestoreTime_alt;planes_fighter_rocket_bulletMassHE_alt;planes_fighter_rocket_bulletSpeedHE_alt;planes_fighter_rocket_burnProbHE_alt;planes_fighter_rocket_damageHE_alt;planes_fighter_rocket_nameHE_alt;planes_fighter_rocket_numBombsHE_alt;planes_fighter_speed_alt;planes_fighter_visibility_alt;planes_fighter_vitality_alt;slotsNum;visibility_detection;visibility_distByPlane;visibilityDistbyplane;visibility_distByPlane_fire;visibility_distByPlane_mg;visibility_distByShip;visibilityDistbyship;visibility_distByShip_fire;visibility_distByShip_mg;visibility_distByShip_smoke;visibility_distBySubmarine exp |
| Purchase priceSpecial |
| Maximum SpeedExpression error: Unexpected * operator. knot |
[[Ship:|]] — N/A special premium Tier N/A.
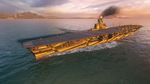
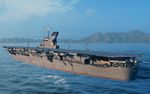
The mightiest aircraft carrier with the most advanced design, among ships of her type, built for the Imperial Japanese Navy. She featured an armored flight deck to provide protection from bomb hits. New dual-purpose artillery mounts significantly improved the ship's AA capabilities.
Modules
Compatible Upgrades
| Slot 1 |
||||||||||||||||||||||||||||
|---|---|---|---|---|---|---|---|---|---|---|---|---|---|---|---|---|---|---|---|---|---|---|---|---|---|---|---|---|
| Slot 2 |
Damage Control System Modification 3 | |||||||||||||||||||||||||||
| Slot 3 |
||||||||||||||||||||||||||||
| Slot 4 |
||||||||||||||||||||||||||||
| Slot 5 |
Torpedo Tubes Modification 3 |
Reinforced Bulkheads | ||||||||||||||||||||||||||
| Slot 6 |
Player Opinion
Pros:
- Very powerful alpha strike power with torpedo bombers.
- Much better concealment than her American counterpart.
- AA is quite good on the second hull.
Research
This is a suggested research path:
- Type 9 mod. 2 or mod. 3 Flight Control
- Mitsubishi A7M1 fighters
- Aichi B7A2 torpedo bombers
- Aichi B7A2 dive bombers
- Hull (B)
Optimal Configuration
Upgrades
The recommended upgrades for ' are as follows:
- Slot 1: Air Groups Modification 1

- Slot 2: Damage Control System Modification 1

- Slot 3: Air Groups Modification 2

- Slot 4: Propulsion Modification 1

- Slot 5: Concealment System Modification 1

- Slot 6: Air Groups Modification 3

Upgrade Slot 3 is the 1st main choice of upgrades with '. For players looking to improve their fighter's capabilities, Air Groups Modification 2 ![]() is highly recommended, especially when using the Type 9 mod. 3 flight control system. Otherwise, the Flight Control Modification 1
is highly recommended, especially when using the Type 9 mod. 3 flight control system. Otherwise, the Flight Control Modification 1 ![]() helps players land and launch '’s multiple flight squadrons, as ' has seven separate plane squadrons to manage.
helps players land and launch '’s multiple flight squadrons, as ' has seven separate plane squadrons to manage.
Upgrade Slot 5 offers players Concealment System Modification 1 ![]() , which stacks with Concealment Expert and camouflage to bring '’s surface detection down to a small range of 10.7 km.
, which stacks with Concealment Expert and camouflage to bring '’s surface detection down to a small range of 10.7 km.
Upgrade Slot 6 is the 2nd main choice of upgrades with '. Due to the common presence of multiple battleships and cruisers with very high AA power, Air Groups Modification 3 ![]() is highly recommended to make sure '’s planes will survive their trip to and from their target. If survivability isn't the player's foremost preference, Flight Control Modification 2
is highly recommended to make sure '’s planes will survive their trip to and from their target. If survivability isn't the player's foremost preference, Flight Control Modification 2 ![]() is viable, increasing the speed gap between '’s and Essex’s planes, allowing the smaller Japanese squadrons to outrun their American counterparts.
is viable, increasing the speed gap between '’s and Essex’s planes, allowing the smaller Japanese squadrons to outrun their American counterparts.
Commander Skills
' uses the standard Japanese carrier captain skill setup. Emphasis should be on skills that boost fighter and bomber effectiveness and AA protection. Aircraft Servicing Expert, Torpedo Acceleration, Torpedo Armament Expertise, and Air Supremacy are "must have" skills. Dogfighting Expert is also a useful pick for ' due to the bonus to ammunition which allows her fighters to remain airborne longer before returning to rearm.
For AA defense, ' has medium-caliber 100mm guns that benefit greatly from Manual Fire Control for AA Armament. Basic Firing Training is also a good choice to boost all AA guns' DPS by 20%. And as ' is a Tier IX carrier, the player has access to the special Japanese carrier version of Defensive AA Fire ![]() , which lasts for two minutes and increases the ship's AA DPS by a factor of 1.75. Coupled with Basic Firing Training and Manual Fire Control for AA Armament, the player can significantly increase the ship's AA DPS to shoot down enemy planes effectively and greatly reduce the damage taken from an enemy carrier's attack.
, which lasts for two minutes and increases the ship's AA DPS by a factor of 1.75. Coupled with Basic Firing Training and Manual Fire Control for AA Armament, the player can significantly increase the ship's AA DPS to shoot down enemy planes effectively and greatly reduce the damage taken from an enemy carrier's attack.
Evasive Maneuvers is recommended as it increases the bombers' survivability when returning to the carrier, and is especially useful when the enemy targets have activated Defensive AA Fire ![]() .
.
Any skills that are related to an enemy vessel firing on your carrier are not useful, as the cost-benefit of investing in survivability skills is not worth the minimal benefit they offer. ' is large and unarmored, and will not survive an attack by any ship larger than a destroyer. ' captains must position their ship near friendlies and far back from the enemy fleet. Concealment Expert may be taken to further reduce detection range if the captain so desires.
| Recommended Commander Skills | ||||||||
|---|---|---|---|---|---|---|---|---|
| Cost (points) |
Endurance | Attack | Support | Versatility | ||||
| 1 |
|
|
Χ |
|
|
|
|
|
| 2 |
|
|
Χ |
Χ |
Χ |
|
|
|
| 3 |
|
|
Χ |
|
|
|
|
|
| 4 |
|
|
|
|
|
|
|
|
| Key: ★★★ - Extremely Useful ★★ - Frequently Useful ★ - Occasionally Useful No stars - Meh Χ - Not recommended | ||||||||
Consumables
' can equip the following consumables:
- Slot 1: Damage Control Party

- Slot 2: Defensive AA Fire

Camouflage
Type 1, 2, or 5 camouflage can be equipped for credits; Types 1 or 5 are recommended at a minimum to reduce detectibility range.
Players who wish to spend doubloons can equip ' with Type 19 camouflage that lowers her detection radius, reduces the accuracy of incoming shells, reduces cost of post-battle service, and increases the amount of experience she earns.
Signals
As a carrier, ' can only mount at most four signals at a time and has no risk of detonating. Players should mount Equal Speed Charlie London (🚫), Zulu Hotel (🚫), and, for the last two: November Echo Setteseven (![]() ) and Juliet Whiskey Unaone (
) and Juliet Whiskey Unaone (![]() ).
).
Recommended Signal Flags 
| |||||
|---|---|---|---|---|---|
| Combat | |||||

|

|

|

|

|

|
 ★★★ |

|
 ★★★ |
 ★ |

|

|

|

| ||||
Note: Use of the Juliet Charlie signal makes detonation impossible.
Gallery
View of Taihō’s flight deck.
.jpg)
.jpg)
.jpg)
Historical Info
Historical Gallery

| Destroyers | |
| Cruisers | |
| Battleships | |
| Aircraft Carriers |
| Japan | |
| U.K. | |
| France | |
| U.S.S.R. | |
| U.S.A. | |
| Germany | |
| Pan-Asia | |
| Spain | |
| Europe | |
| Netherlands | |
| Italy | |
| Commonwealth | |
| Pan-America |