Tirpitz B

| Purchase priceSpecial |
| Hit Points69,300 |
| 380 mm/52 SK C/34 on a Drh LC/34 mount4 х 2 pcs. |
| Rate of Fire2.31 shots/min. |
| Reload Time26 sec. |
| Rotation Speed5 deg./sec. |
| 180 Degree Turn Time36 sec. |
| Firing Range21.45 km. |
| Maximum Dispersion274 m. |
| HE Shell380 mm Spr.Gr. L/4.6 |
| Maximum HE Shell Damage4,400 |
| Chance of Fire on Target Caused by HE Shell34 % |
| Initial HE Shell Velocity820 m./s. |
| HE Shell Weight800 kg. |
| AP Shell380 mm P.Spr.Gr. L/4.4 |
| Maximum AP Shell Damage11,600 |
| Initial AP Shell Velocity820 m./s. |
| AP Shell Weight800 kg. |
| 105 mm/65 SK C/33 on a Dop. L. C/37 mount8 х 2 pcs. |
| Firing Range7.6 km. |
| Rate of Fire17.91 shots/min. |
| Reload Time3.35 sec. |
| HE Shell105 mm Spr.Gr. Kz. |
| Maximum HE Shell Damage1,200 |
| Initial HE Shell Velocity900 m./s. |
| Chance of Fire on Target Caused by HE Shell5 % |
| 150 mm/55 SK C/28 on a Dop. L. C/34 mount2 х 2 pcs. |
| Firing Range7.6 km. |
| Rate of Fire8 shots/min. |
| Reload Time7.5 sec. |
| HE Shell150 mm Spr.Gr. L/4.5 |
| Maximum HE Shell Damage1,700 |
| Initial HE Shell Velocity875 m./s. |
| Chance of Fire on Target Caused by HE Shell8 % |
| 150 mm/55 SK C/28 on a Dop. L. C/34 mount4 х 2 pcs. |
| Firing Range7.6 km. |
| Rate of Fire8 shots/min. |
| Reload Time7.5 sec. |
| HE Shell150 mm Spr.Gr. L/4.5 |
| Maximum HE Shell Damage1,700 |
| Initial HE Shell Velocity875 m./s. |
| Chance of Fire on Target Caused by HE Shell8 % |
| 533 mm Vierling2 х 4 pcs. |
| Rate of Fire0.67 shots/min. |
| Reload Time90 sec. |
| Rotation Speed25 deg./sec. |
| 180 Degree Turn Time7.2 sec. |
| TorpedoG7a T1 |
| Maximum Damage13,700 |
| Torpedo Speed64 knot |
| Torpedo Range6 km. |
| 105 mm/65 SK C/33 on a Dop. L. C/37 mount8 х 2 pcs. |
| . . . Average Damage per Second133.6 |
| . . . Firing Range4.5 km. |
| 20 mm/65 C/38 on a Flak 35 Vierling L/38 mount8 х 4 pcs. |
| . . . Average Damage per Second48 |
| . . . Firing Range2.01 km. |
| 20 mm/65 C/38 on an L/30 single mount12 х 1 pcs. |
| . . . Average Damage per Second36 |
| . . . Firing Range2.01 km. |
| 37 mm/83 SK C/30 on a Dopp LC/30 mount8 х 2 pcs. |
| . . . Average Damage per Second20.8 |
| . . . Firing Range3.51 km. |
| Maximum Speed30.5 knot |
| Turning Circle Radius850 m. |
| Rudder Shift Time16 sec. |
| Surface Detectability Range15.89 km. |
| Air Detectability Range11.83 km. |

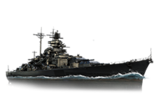
Tirpitz B — German special premium Tier VIII battleship.
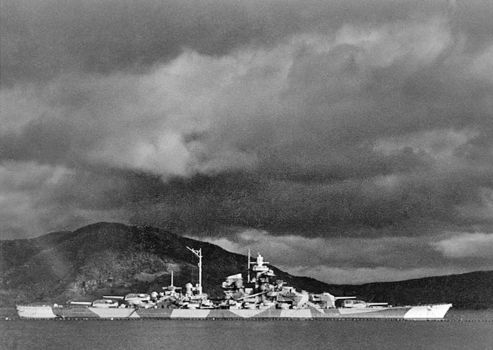
The second Bismarck-class battleship, Tirpitz, was built in Wilhelmshaven. A shortage of fuel and the fear of losing another large ship after the sinking of Bismarck were the reasons why this battleship wasn't very active during the war. Tirpitz attempted to attack Arctic convoys but encountered resistance. In autumn 1944, the battleship was struck twice by 6-ton bombs that almost incapacitated her, and then she was ultimately sunk by British Lancaster-type bombers.
Modules
 |
Rate of Fire (shots/min) | 180° Turn Time (sec) | Maximum Dispersion (m) | Maximum HE Shell Damage (HP) | Chance of Fire on Target Caused by HE Shell (%) | Maximum AP Shell Damage (HP) |
Research price (exp) |
Purchase price ( | |
|---|---|---|---|---|---|---|---|---|---|
| 380 mm/52 SK C/34 on a Drh LC/34 mount | 2.3 | 36 | 274 | 4,400 | 34 | 11,600 | 0 | 0 |
 |
Hit Points (HP) | Armor (mm) | Armor (mm) | Main Turrets (pcs.) | Secondary Gun Turrets (pcs.) | AA Mounts (pcs.) | Torpedo Tubes (pcs.) | Hangar Capacity (pcs.) |
Research price (exp) |
Purchase price ( | |
|---|---|---|---|---|---|---|---|---|---|---|---|
| Tirpitz B. | 69,300 | 19 | 360 | 4 | 8/6 | 12/8/8/8 | 2 | 0 | 0 |
 |
Rate of Fire (shots/min) | Torpedo Tubes Reload Time (sec) | 180° Turn Time (sec) | Maximum Damage (HP) | Torpedo Speed (knot) | Torpedo Range (km) |
Research price (exp) |
Purchase price ( | |
|---|---|---|---|---|---|---|---|---|---|
| G7a T1 | 0.7 | 90 | 7.2 | 13,700 | 64 | 6 | 0 | 0 |
 |
IDS_SHIP_PARAM_SUO_INCREASE_DIST (%) | Maximum Firing Range (km) |
Research price (exp) |
Purchase price ( | |
|---|---|---|---|---|---|
| FKS Typ 8 Mod. 1 | 0 | 0 | 0 |
 |
Maximum Speed (knot) |
Research price (exp) |
Purchase price ( | |
|---|---|---|---|---|
| Propulsion: 163,000 hp | 30.5 | 0 | 0 |
Compatible Upgrades
| Slot 1 |
|||||
|---|---|---|---|---|---|
| Slot 2 |
|||||
| Slot 3 |
|||||
| Slot 4 |
|||||
| Slot 5 |
Player Opinion
Performance
Referred to as the "Derpitz" or the "Torpitz" — due to a large number of inexperienced players choosing to purchase her outright without knowledge of high tier gameplay — Tirpitz is surprisingly flexible for a battleship and can be used as either a proper battleship or as an impromptu battlecruiser. Probably the most surprising thing players will find is that her main battery load time is about 26 seconds, which can be daunting to face. She also has torpedo tubes, useful for when cruisers or battleships get in too close or when the ship is able to work its way into melee range. Her 15-inch guns are the smallest BB guns on Tier VIII battleship (tied with her sister Bismarck), and have not only a high amount of dispersion when firing at maximum to extreme range but will find trouble punching through armor designed to protect against 16-inch shells. However, the smaller caliber means that shells are less likely to overpenetrate cruisers, and when combined with the good turret traverse and reload time (for a battleship), this can make Tirpitz excellent at clearing the battlefield of enemy cruisers.
Her AA suite — once considered sub-par — has gone through several rounds of improvements but is still unreliable, and will not save you from a dedicated carrier assault. As a capital ship, she will, of course, still be a priority target for enemy aircraft carriers, and thus captains must be wary of an enemy CV should they find themselves against one. At 30.7 knots, it may be easy for her to outrun her team; excellent map awareness and an eye on positioning of friendly ships is key to playing Tirpitz well, so much so that inexperienced players that fail to consider it quickly earn the ire of their teammates. Many Tirpitz captains will put too much or not enough trust in her armor, either rushing too far forward for a torpedo rush and quickly sinking from a focused enemy barrage, or staying too far back, where her guns are inaccurate, lose power, and make her vulnerable to plunging fire. The key to success with Tirpitz is proper positioning and knowing the right balance for your positioning in a given scenario. Being a German vessel, she was designed and built with the relatively short range battles of the northeast Atlantic and Baltic in mind, not the long range battles of the Pacific. Thus, her armor is a double-edged sword, very thick on the side for short range attacks, but very weak on the deck should a round manage to land and penetrate there. Similar to her cruiser counterparts in the German tech tree, her AP shells far outshine her HE shells, which leave much to be desired.
With her handling characteristics, there are two primary ways to drive this ship: either joining the main wave as part of the battle line, or as the capital ship for a cruiser group that did not join the main line to form a flanking unit. One important thing to remember is that Tirpitz has fallen from its place as the top brawler at tier VIII, for a number of reasons. While still a daunting opponent, the addition of the Bismarck means you can no longer be sure of beating anything at close range. With its equal secondary armament (though no longer superior as of the range buff in update 0.6.4) and access to Hydroacoustic Search, the Bismarck is fully capable of outbrawling the Tirpitz. However, If you find yourself in a close range fight, your torpedoes can provide a valuable advantage. But if you intend to utilize a brawling playstyle, remember that you are no longer assured of victory at close range.
Tirpitz is a very capable ship in the right hands, and especially inside its torpedo range, is not to be underestimated. However, it has become very difficult to play effectively. With all these things considered, team play and knowing where to be, when to be there, and using her assets effectively when you get there will carry you to victory.
Pros:
- Fast turret traverse and main battery reload time (26 seconds) for a battleship.
- Surprisingly nimble for a battleship of her size, with an excellent top speed (30 knots).
- Has one quadruple torpedo tube on each side located near amidships.
- Insanely good secondary battery.
- Reminiscent of earlier battleship gameplay: the closer she gets, the more dangerous she becomes to her enemies.
- Well-protected citadel and impressive durability. Tirpitz B is among the hardest ships in the game to land citadel hits against; most AP shells will land normal penetrations and are thus easier to repair damage from.
- Lower (for her tier and class) caliber shells result in fewer overpenetrations against broadside cruisers.
Cons:
- 15-inch guns have trouble with angled enemy battleships (use HE against the superstructure or choose a different target).
- Only has eight (8) barrels, while every other ship at this tier has nine (9) or more of a higher caliber.
- Torpedoes only have a 6.0 km range and are vulnerable to frequent incapacitations due to their location on her deck.
- Anti-aircraft suite is not as strong as that of sister ship Bismarck.
- Weak deck armor makes Tirpitz B susceptible to plunging fire at long range.
- Weak torpedo protection, although better than North Carolina.
- Extremely vulnerable to fires. Superstructures can be set on fire by calibers of any size quite easily.
- Armor scheme remains vulnerable to full penetrations by armor-piercing shells when showing the flat broadside of the ship to the enemy; may not take citadel damage, but a lot of regular penetration damage hurts just as badly.
Research
Optimal Configuration
Upgrades
Tirpitz B has access to five Upgrade Slots as a Tier VIII ship. Tirpitz B also has the option of building for Secondaries or for AA.
- Slot 1: Main Armaments Modification 1
 to improve her main battery survival.
- Slot 2: Damage Control System Modification 1
 to improve her overall survival in battle.
- Slot 3: Aiming Systems Modification 1
 to improve her main battery accuracy, AA Guns Modification 2 (
 ) for an AA build, or Secondary Battery Modification 1 (
 ) for a secondary build.
- Slot 4: Damage Control System Modification 2
 to further improve her overall survival. Steering Gears Modification 2
  is also an option to improve her maneuverability.
- Slot 5: Concealment System Modification 1
 to reduce her detection range. Target Acquisition System Modification 1 (
 ) is also a viable choice if torpedoes are a recurring threat.
Commander Skills
Secondary Battery Build: Following along with the theme of maximizing the punishment dished out by Tirpitz’s secondaries, captains should invest in Basic Firing Training, Expert Marskman, Superintendent, and Advanced Firing Training. Manual Control for Secondary Armament is a strong skill in this build, but it only allows the ship's secondaries to fire at a single target at a time. Some captains will prefer this skill; others will not. Extra skill points should be invested in either Basics of Survivability, High Alert, or Vigilance, as desired.
Anti-Aircraft Build: Similar to the secondary-focused build, Basic Firing Training, Expert Marskman, Superintendent, and Advanced Firing Training form the core of the commander skills. Captains then double up on Level 4 skills and pick up Manual Fire Control for AA Armament. German long-range AA batteries are all in excess of 85mm, allowing them to make good use of the skill and dish out extreme punishment to enemy aircraft.
| Recommended Commander Skills | ||||||||
|---|---|---|---|---|---|---|---|---|
| Cost (points) |
Endurance | Attack | Support | Versatility | ||||
| 1 |
★★ |
★★ |
★ |
|
|
|
★ |
|
| 2 |
★ |
★★ |
★★★ |
|
|
|
★ |
|
| 3 |
★★ |
★ |
|
|
★★ |
★★★ |
★ |
★★ |
| 4 |
★★★ |
★★ |
★ |
|
★★★ |
|
★ |
★★ |
| Key: ★★★ - Extremely Useful ★★ - Frequently Useful ★ - Occasionally Useful No stars - Meh Χ - Not recommended | ||||||||
Consumables
Tirpitz B can equip the following consumables:
- Slot 1: Damage Control Party

- Slot 2: Repair Party

- Slot 3: Spotting Aircraft
 or Catapult Fighter
A well-played Tirpitz B is likely to find herself under intense enemy fire and captains will want to have access to Repair Party as quickly as possible; thus, Repair Party II (![]() ) is recommended for the quicker cooldown. The premium version of Damage Control Party
) is recommended for the quicker cooldown. The premium version of Damage Control Party ![]() is recommended for similar reasons.
is recommended for similar reasons.
Camouflage
As a premium ship, Tirpitz comes included with Type 10 camouflage that lowers her detection radius, reduces the accuracy of incoming shells, and increases the amount of experience she earns.
Tirpitz B also has two alternate premium camouflages. The first, "Tarnanstrich", was earned through the Santa's Christmas Convoys event of December 2016 to January 2017; the other is called "Magnu-S", in which she appears as she does during the Halloween scenario "Sunray in the Darkness".
Signals
Recommended Signal Flags 
| |||||
|---|---|---|---|---|---|
| Combat | |||||

|
 ★★ |
 ★★ |
 ★ |
 ★ |
 ★ |

|
 ★★★ |
 ★★ |
 ★★★ |
 ★ |
 ★★★ |

|

| ||||
Note: Use of the Juliet Charlie signal makes detonation impossible.
Gallery

Flag of Tirpitz. Given to players who purchased a special bundle containing Tirpitz.

Historical Info
Historical Gallery


Video