Vampire
| Revision as of 18:06, 3 December 2017 | Revision as of 10:58, 18 July 2019 Fixed commander skill names | |||
17 intermediate revisions by 10 users not shown | ||||
| Line 3: | Line 3: | |||
| {{WoWs_Ship | {{WoWs_Ship | |||
| |Promo=<!-- in case of gift or promo ship write conditions to get it. (optional)--> | |Promo=<!-- in case of gift or promo ship write conditions to get it. (optional)--> | |||
| ? | + | |||
| |Anno=<!-- you can write below short description for the ship. it will replace default once. --> | |Anno=<!-- you can write below short description for the ship. it will replace default once. --> | |||
| ? | [[File:Wows flag Australia.png|50px|frameless|right|link=]]One in a series of advantageous Type 5 flotilla leaders designed and built for the Royal Navy. In 1933, the ship was transferred to the Royal Australian Navy. During World War II, she was slightly upgraded and partially rearmed. | + | [[File:Wows flag Australia.png|50px|frameless|right|link=]]One in a series of advantageous Type 5 flotilla leaders designed and built for the Royal Navy. In 1933, the ship was transferred to the Royal Australian Navy. During World War II, she was slightly upgraded and partially rearmed.<br><br>''{{#var:ship_name}}'' was awarded for free to players who completed a [https://worldofwarships.com/en/news/common/whats-this/ series of in-game missions] in December 2017, and also offered for sale worldwide starting on 5 December 2017.<br><br>{{Model3DViewer|c5582e3830bd47a6a5c0f764966a4e60}} | |
| |Performance=<!-- write text about performance in battles below --> | |Performance=<!-- write text about performance in battles below --> | |||
| + | ''{{#var:ship_name}}'' is a Tier III Commonwealth destroyer that combines good maneuverability, great guns, and surprising torpedoes into a deadly package. Rounding her toolkit off is a decent stealth with the Concealment Expert [[Ship:Commander|commander skill]], allowing stealth torpedo attacks on unsuspecting victims. | |||
| + | ||||
| + | Her guns are her bread and butter. They have a high rate of fire at 12 rounds a minute, a decent fire chance at 5% (buff-able to 8% with relevant [[Ship:Commander|commander skills]] and [[Ship:Flags|signal flags]]), and excellent fields of fire for the A, B, and X, turrets, with X turret practically able to fire forward. Her armor piercing rounds are very potent as well, having excellent penetration for a 102mm shell — able to citadel cruisers at mid-to-close range — while also being able to get decent penetration damage on broadside battleships and cruisers at mid to long range. | |||
| + | ||||
| + | Her torpedo launcher is a different matter, though one that isn't as bad as the stats may say. She has one triple torpedo launcher able to fire 6.0 km range torpedoes; the tricky part is the firing patterns. She has two patterns: single launch and wide spread. Wide spread is great for large groups of enemies, and the single launcher allows precision firing of the torpedoes one at a time at targets. A quick 62 second reload has torpedoes in the tubes quickly for the next strike. | |||
| + | ||||
| + | Her AA isn't much to write home about; captains should steer clear of aircraft wherever possible. Her maneuverability is fantastic with a 520m turning circle and 2.5s rudder shift time. She is able to dodge and weave incoming fire very well, and makes retreating from enemies much easier. | |||
| + | ''{{#var:ship_name}}''’s {{Smoke Generator}} is a key part of her arsenal; it is the same one afforded to her American cousins, packing a 109 second uptime for her smoke giving her ample time to fire out of her smoke as she caps, deals damage, or simply retreats. | |||
| + | ||||
| + | {{AnnoWiki|content= | |||
| + | '''[https://forum.worldofwarships.com/topic/144224-premium-ship-review-hmas-vampire/ LittleWhiteMouse's Premium Ship Review: HMAS Vampire] from the NA forums'''}} | |||
| |Pros=<!-- write list of positive points below. use * as in ordinary wiki-list. --> | |Pros=<!-- write list of positive points below. use * as in ordinary wiki-list. --> | |||
| ? | * | + | * Main guns have a great fire rate and range for her tier. | |
| ? | * | + | * The wide firing arcs of the main guns allow captains to fire without exposing much of the ship’s side. | |
| ? | * | + | * Like ''[[Gallant]]'', ''Vampire'' can launch each torpedo individually, allowing for more precise torpedo attacks. | |
| ? | * | + | * Quick rudder shift time combined with a tight turning circle allow the ship to easily dodge incoming fire. | |
| + | * ''{{#var:ship_name}}''’s [[Ship:Smoke Screens|smoke screen]] has a longer duration than most other destroyers at her tier. | |||
| |Cons=<!-- write list of negative points below. use * as in ordinary wiki-list. --> | |Cons=<!-- write list of negative points below. use * as in ordinary wiki-list. --> | |||
| ? | * | + | * Shell arcs are only slightly below orbital. | |
| ? | * | + | * ''Vampire'' only has three torpedoes. | |
| ? | * | + | * Inability to stealth torpedo without Concealment Expert. With the captain skill, she has a 200 meter stealth torpedo window. | |
| ? | + | |||
| |Research=<!-- write text about priority sequence of research below --> | |Research=<!-- write text about priority sequence of research below --> | |||
| Line 31: | Line 42: | |||
| * '''Slot 1''': {{Main Armaments Modification 1}}<nowiki>*</nowiki> | * '''Slot 1''': {{Main Armaments Modification 1}}<nowiki>*</nowiki> | |||
| * '''Slot 2''': {{Propulsion Modification 1}} | * '''Slot 2''': {{Propulsion Modification 1}} | |||
| ? | ||||
| '''Upgrade Slot 1''' provides players with a choice between two viable upgrade options. The first is '''Main Armaments Modification 1''', which improves the survivability and repair time of the ship's main armaments. Alternatively, some players may choose to mount {{Magazine Modification 1}}, an upgrade which significantly reduces the chance of [[Ship:Detonation|detonation]]. | '''Upgrade Slot 1''' provides players with a choice between two viable upgrade options. The first is '''Main Armaments Modification 1''', which improves the survivability and repair time of the ship's main armaments. Alternatively, some players may choose to mount {{Magazine Modification 1}}, an upgrade which significantly reduces the chance of [[Ship:Detonation|detonation]]. | |||
| ? | ||||
| |CommanderSkills=<!-- write text about best set of Commander Skills below --> | |CommanderSkills=<!-- write text about best set of Commander Skills below --> | |||
| ? | + | Key skills for ''{{#var:ship_name}}'' commanders include anything that boosts her gun power — such as Basic Firing Training, Adrenaline Rush, and Demolition Expert — as well as other destroyer staples like Last Stand, Survivability Expert, and Concealment Expert. With only a single torpedo launcher, ''{{#var:ship_name}}'' does not benefit as much from torpedo skills as other destroyers. | ||
| {{Commander Skills | {{Commander Skills | |||
| ? | | Priority Target = | + | | Priority Target = 2 | |
| ? | | Preventative Maintenance = | + | | Preventative Maintenance = 1 | |
| ? | | Expert Loader = | + | | Expert Loader = 1 | |
| ? | | | + | | Air Supremacy = | |
| ? | | Direction Center for | + | | Direction Center for Fighters = | |
| ? | | | + | | Improved Engine Boost = | |
| ? | | Incoming Fire Alert = | + | | Incoming Fire Alert = 1 | |
| ? | | | + | | Last Gasp = | |
| ? | | High Alert = | + | | High Alert = 1 | |
| | Jack of All Trades = | | Jack of All Trades = | |||
| ? | | Expert Marksman = | + | | Expert Marksman = 1 | |
| | Torpedo Acceleration = | | Torpedo Acceleration = | |||
| ? | | Smoke Screen Expert = | + | | Smoke Screen Expert = 1 | |
| ? | | | + | | Improved Engines = | |
| ? | | Adrenaline Rush = | + | | Adrenaline Rush = 3 | |
| ? | | Last Stand = | + | | Last Stand = 3 | |
| ? | | Basics of Survivability = | + | | Basics of Survivability = 1 | |
| ? | | Survivability Expert = | + | | Survivability Expert = 2 | |
| ? | | Torpedo Armament Expertise = | + | | Torpedo Armament Expertise = 1 | |
| ? | | | + | | Aircraft Armor = | |
| ? | | Basic Firing Training = | + | | Basic Firing Training = 3 | |
| ? | | Superintendent = | + | | Superintendent = 3 | |
| ? | | Demolition Expert = | + | | Demolition Expert = 3 | |
| ? | | Vigilance = | + | | Vigilance = 2 | |
| | Manual Fire Control for Secondary Armament = | | Manual Fire Control for Secondary Armament = | |||
| ? | | Fire Prevention = | + | | Fire Prevention = 1 | |
| | Inertia Fuse for HE Shells = | | Inertia Fuse for HE Shells = | |||
| ? | | | + | | Sight Stabilization = | |
| ? | | Advanced Firing Training = | + | | Advanced Firing Training = 1 | |
| | Manual Fire Control for AA Armament = | | Manual Fire Control for AA Armament = | |||
| | Radio Position Finding = | | Radio Position Finding = | |||
| ? | | Concealment Expert = | + | | Concealment Expert = 3 | |
| ? | }} | + | }} | |
| |Consumables=<!-- write text about selection of Consumables below --> | |Consumables=<!-- write text about selection of Consumables below --> | |||
| ? | + | ''{{#var:ship_name}}'' can equip the following consumables: | ||
| * '''Slot 1:''' {{Damage Control Party}} | * '''Slot 1:''' {{Damage Control Party}} | |||
| ? | * | + | * '''Slot 2:''' {{Smoke Generator}} | |
| ? | + | * '''Slot 3:''' {{Engine Boost}} | ||
| ? | * | + | ||
| ? | + | Premium consumables — notably {{Damage Control Party II}} and {{Smoke Generator II}} — are recommended. | ||
| ? | + | |||
| ? | + | |||
| ? | + | |||
| |Camouflage=<!-- write text about useful camouflage below --> | |Camouflage=<!-- write text about useful camouflage below --> | |||
| Line 92: | Line 98: | |||
| |Signals=<!-- write text about best set of signals below --> | |Signals=<!-- write text about best set of signals below --> | |||
| + | ''{{#var:ship_name}}'' can utilize various signal flags that can boost her offensive and defensive capabilities. India X-Ray ({{India X-Ray|Size=18px}}) and Victor Lima ({{Victor Lima|Size=18px}}) are very useful in boosting main battery power by increasing fire chance, while Juliet Whiskey Unaone ({{Juliet Whiskey Unaone|Size=18px}}) helps increase flooding chance for torpedoes. Taking Sierra Mike ({{Sierra Mike|Size=18px}}) will increase ''{{#var:ship_name}}''’s the top speed. Finally, Juliet Charlie ({{Juliet Charlie|Size=18px}}) is a recommended to prevent an early exit to port via [[Ship:Detonation|detonation]]. | |||
| ? | + | {{Signal Flags | ||
| | November Echo Setteseven = | | November Echo Setteseven = | |||
| | Mike Yankee Soxisix = | | Mike Yankee Soxisix = | |||
| ? | | India X-Ray = | + | | India X-Ray = 3 | |
| ? | | Juliet Whiskey Unaone = | + | | Juliet Whiskey Unaone = 2 | |
| ? | | Victor Lima = | + | | Victor Lima = 3 | |
| | Hotel Yankee = | | Hotel Yankee = | |||
| ? | | November Foxtrot = | + | | November Foxtrot = 1 | |
| ? | | Sierra Mike = | + | | Sierra Mike = 3 | |
| | India Delta = | | India Delta = | |||
| | Juliet Yankee Bissotwo = | | Juliet Yankee Bissotwo = | |||
| | India Yankee = | | India Yankee = | |||
| ? | | Juliet Charlie = | + | | Juliet Charlie = 2 | |
| ? | | Zulu = | + | | Zulu = 1 | |
| ? | | India Bravo Terrathree = | + | | India Bravo Terrathree = 1 | |
| ? | | Equal Speed Charlie London = | + | | Equal Speed Charlie London = 1 | |
| ? | | Zulu Hotel = | + | | Zulu Hotel = 1 | |
| ? | | Papa Papa = | + | | Papa Papa = 1 | |
| | Wyvern = | | Wyvern = | |||
| Line 119: | Line 126: | |||
| | Ouroboros = | | Ouroboros = | |||
| | Hydra = | | Hydra = | |||
| ? | }} | + | }} | |
| |Gallery=<!-- write below list of files with description (if necessary) separated with | --><gallery> | |Gallery=<!-- write below list of files with description (if necessary) separated with | --><gallery> | |||
| Line 132: | Line 139: | |||
| File:Vampire_4.jpg | File:Vampire_4.jpg | |||
| File:Vampire_5.jpg | File:Vampire_5.jpg | |||
| + | File:PCEE144_Vampire_Flag.png|[[Ship:Flags#List_of_Ship_Flags|Flag]] of ''Vampire''. Given to players who purchased a special bundle containing ''Vampire''. | |||
| </gallery> | </gallery> | |||
| Line 185: | Line 193: | |||
| ''Vampire'' belonged to the Admiralty "V"-class of flotilla leaders. Their design stemmed from the creation of the "S" class of destroyers which were capable of reaching a 36-knot top speed. Since the existing flotilla leaders were incapable of matching this speed, the Royal Navy requested a new class of leaders capable of keeping pace with the "S" class. | ''Vampire'' belonged to the Admiralty "V"-class of flotilla leaders. Their design stemmed from the creation of the "S" class of destroyers which were capable of reaching a 36-knot top speed. Since the existing flotilla leaders were incapable of matching this speed, the Royal Navy requested a new class of leaders capable of keeping pace with the "S" class. | |||
| ? | The V-class | + | The "V"-class leaders were built under Britain's "Wartime Emergency Programme", so to speed production time they were built using the existing machinery designs of the "R"-class destroyers. The "R" class was larger than the proposed "V" class, so the larger machinery resulted in a higher weight and larger dimensions than originally planned, and further resulted in a decreased top speed of 34 knots. | |
| ? | The original V-class leaders were armed with two twin 21-inch torpedo tubes, and a later modification with two triple 21-inch tubes would become the "W" class. ''Vampire'', however, was initially built as a test bed for the triple tubes, and as such, is still a V-class. | + | The original "V"-class leaders were armed with two twin 21-inch torpedo tubes, and a later modification with two triple 21-inch tubes would become the "W" class. ''Vampire'', however, was initially built as a test bed for the triple tubes, and as such, is still a "V"-class. The "V"-class introduced other improvements over previous classes, such as super firing guns in an AB-XY layout that would continue to be used for most of the following Royal Navy destroyer classes. | |
| ? | + | Throughout her carrier in the Royal Australian Navy, ''Vampire'' went through constant refits in order to maintain the functionality of her systems and update her armaments as the shape of naval combat changed. Particularly, there was a push to increase her anti-aircraft firepower. A refit in summer of 1941 had installed a single 12-pounder gun for a brief time. Her most extensive refit occurred in January 1942, where her aft torpedo-tube launcher was removed in order to install two 2-pounder guns in their place. | ||
| ? | + | |||
| ? | Throughout her carrier in the Australian Navy, ''Vampire'' went through constant refits in order to maintain the functionality of her systems and update her armaments as the | + | ||
| ====Service==== | ====Service==== | |||
| ? | + | In 1933, the British Admiralty agreed to loan a flotilla leader and four "V" and "W" class destroyers to the Royal Australian Navy to replace the ageing "S"-class destroyers that were currently in service in the RAN; HMS ''Vampire'' (D68) was among them. Sailing across the seas, ''Vampire'' reached Sydney on 21 December 1933, and was officially recommissioned into the RAN as HM'''A'''S ''Vampire'' on 14 July 1936. ''Vampire'' initially saw little duty beyond ordinary training and patrols, until the outbreak of World War II. | ||
| + | ||||
| + | With the onset of war in the fall of 1939, ''Vampire'' and her flotilla departed from their bases of Sydney and Fremantle for Singapore. It was intended for the flotilla to be based at Singapore for a period of training, but it was decided that their stop at Singapore would be brief, and that they would continue on to the Mediterranean. ''Vampire'' arrived at Malta on 24 December 1939, her flotilla mates and herself forming the 19th Destroyer Division of the Mediterranean Fleet. At the time, Italy had not yet joined the war, so the Allies enjoyed naval supremacy in the Mediterranean. ''Vampire''’s assigned duties were primarily routine escort and patrols from one end of the Mediterranean to the other. By 4 March 1940, she entered drydock at Malta for a 30-day refit. Following the refit, she returned to her escort duties without incident. Her first action came on 29 June 1940, when Italian aircraft attempted and failed to bomb her from high levels. Italy had declared war on Britain in early June, and the situation in the Mediterranean was changing rapidly. No longer were the waters exclusively in Allied or Neutral hand; there were but a few ports the Allies held, and the ''Regia Marina'' striking out from the heart of the Mediterranean. | |||
| + | ||||
| + | ''Vampire''’s days in the Mediterranean with her flotilla mates became the legacy of the "Scrap Iron Flotilla". This all-Australian flotilla would prove to be the thorn in the side of the ''Regia Marina'', with ''Vampire'' at the head of it. Her first fight was the Battle of Calabria on 9 July 1940, where ''Vampire'' and her sister-ship HMAS ''Voyager'' screened the British carrier HMS ''Eagle''. ''Vampire'' learned the value of violent evasive maneuvers when she came under repeated air attacks from Italian aircraft. ''Vampire'' was at sea for six whole days during Operation MA5 with the Mediterranean Fleet, her war diary recording that an estimated 1,350 bombs were dropped on her fleet. While ''Vampire'' avoided being hit directly, she suffered considerable damage from splinters, shrapnel, and near misses. Following repairs in Alexandria, Egypt, she resumed escort duty, covering convoys sailing from Alexandria to Malta and back again, operating out of Malta or Alexandria. Suffering only from repeated air raids, this was the norm for ''Vampire'' until the Italian invasion of Greece in late October 1940. ''Vampire'' joined the forces bound for the Aegean Sea to reinforce Greek resistance on land and sea, escorting troop convoys back and forth from Alexandria to Greece and Crete. By December 1940, ''Vampire'' joined the fleet supporting the Western Desert Campaign, striking into Italian Libya with resounding success, remaining off the coast of western Libya until 1941. | |||
| + | ||||
| + | Things were continuing to change in the Mediterranean, however, for the Germans had arrived to aide their Italian allies. It gradually became much tougher to sail across the Mediterranean without coming under attack, and ''Vampire''’s escort duties increased accordingly. She primarily found herself screening convoys in the western Mediterranean, particularly those ferrying vital men and equipment from Egypt to Greece, past the Axis-held Dodecanese Islands. During one such convoy run, ''Vampire'' transported ex-Yugoslav Prime Minister Milan Stojadinović from the Gulf of Athens to Alexandria. While on an escort mission on 17 April 1941, ''Vampire'' came under attack from four German Ju88 dive bombers, successfully driving them off and hitting one in the port engine – twenty minutes later, only three Ju88s returned, and the plane kill was credited to ''Vampire''. In Greece, however, the Greeks and British were fast losing ground to the German offensives, and a full-scale evacuation by sea was ordered. ''Vampire'' — as well as HMAS ''[[Perth]]'' and every other Australian warship in the Mediterranean — took part in the evacuations, screening unarmed troop convoys while carrying men themselves. With the German arrival in North Africa and the loss of Greece, Allied military fortunes were at a low, with the British being pushed back to the borders of Egypt by the Germans (save the garrison of the fortress of Tobruk, which was doggedly held by Australian troops). The duty of supplying these troops in Tobruk fell to the navy, and the "Tobruk Ferry" began. | |||
| + | ||||
| + | For ''Vampire''’s first "Ferry" trip on 13 May 1941, she set sail with materiel and 102 troops for Tobruk. She returned two days later with 180 wounded. On 21 May she sailed again, but limped back to Alexandria a tired, beaten ship. She was badly in need of repairs, and couldn’t maintain the speeds required for "Tobruk Ferry" work. The Admiralty reluctantly decided to withdraw her from the Mediterranean and send her to Singapore for an extensive refit. She departed via the Suez Canal at the end of May, reached Singapore in mid-June and entered drydock, remaining there until late November 1941. Returning to active duty on 26 November 1941, ''Vampire'' operated out of Singapore, becoming an escort for HMS ''Prince of Wales'' and HMS ''Repulse''. On 8 December 1941, ''Prince of Wales'' and ''Repulse'' set sail with ''Vampire'' in tow in an attempt to intercept the Japanese invasion of Malaya. Following the disastrous loss of ''Prince of Wales'' and ''Repulse'' at the hands of Japanese aviation, ''Vampire'' recovered all the sailors she could and escaped back to Singapore. | |||
| + | ||||
| + | Each day, the Japanese threat grew closer to ''Vampire''. She kept busy escorting inward and outward convoys to Singapore. On 26 January 1942, she was sent alongside destroyer HMS ''Thanet'' to intercept Japanese transports within 80 miles of Singapore. These transports were escorted by the Japanese light cruiser ''Sendai'' and six Japanese destroyers. The resulting engagement sunk hopelessly outnumbered ''Thanet'', but ''Vampire'' refused to sink that day, escaping back to Singapore — unscathed — by the following morning. She was dispatched to the British-held island of Ceylon, joining the screening force for aircraft carrier HMS ''Hermes'' until the end of March. It was clear to the British Admiralty that the overwhelming successes of Japanese operations on land and at sea was driving them further and further out of the Far East; if Ceylon fell, Australia and New Zealand would essentially be on their own against Japan, and a Japanese strike force was already underway for Ceylon. The Royal Navy rallied a force of five battleships, three aircraft carriers, six cruisers, and fourteen destroyers — including ''Vampire'' — to defend Ceylon. The Japanese striking force — comprised of five fast carriers and four battleships — fell upon the defenses of Ceylon too quickly for the Royal Navy to intervene. Cruisers HMS ''Dorsetshire'' and HMS ''Cornwall'' were lost at sea less than fifteen minutes after leaving Trincomalee, and ''Vampire'' and ''Hermes'' escaped south by the early morning of 9 April. At 10:35am on the 9th, aircraft were sighted by ''Hermes'' as Japanese dive bombers suddenly fell upon her, sinking the aircraft-less ''Hermes'' in twenty minutes. With ''Hermes'' sunk, the dive bombers turned their attention to lone ''Vampire''. Fighting back with all her guns, she downed at least one aircraft before she broke in half after repeated hits, sinking in less than ten minutes and going down with her commanding officer and eight of her 130 men. The survivors from both ''Hermes'' and ''Vampire'' were recovered by the hospital ship ''Vita''. | |||
| + | ||||
| + | The ships of the "Scrap Iron Flotilla" became part of RAN legend. In 1949, four ''Daring''-class destroyers were ordered by the Royal Australian Navy, each of them named after ships of the "Scrap Iron Flotilla": ''Vampire'', ''Vendetta'', ''Voyager'', and ''Waterhen''. Only the first three were completed and saw service with the RAN. The second HMAS ''Vampire'' (D11) had a long and illustrious career with the RAN, and was decommissioned in June 1986 before being transformed into a [https://www.anmm.gov.au/whats-on/vessels/destroyer-hmas-vampire military museum ship]. Today, HMAS ''Vampire''’s legacy lives on as a part of the many exhibits of the [https://www.anmm.gov.au/ Australian National Maritime Museum] in Darling Harbour, Sydney. | |||
| |HistoricalGallery=<!-- write below list of files with description (if necessary) separated with | --><gallery> | |HistoricalGallery=<!-- write below list of files with description (if necessary) separated with | --><gallery> | |||
| File:HMAS Vampire (AWM 012563).jpg|HMAS ''Vampire'', circa 1940. | File:HMAS Vampire (AWM 012563).jpg|HMAS ''Vampire'', circa 1940. | |||
| + | File:Vampire1.jpg|HMAS ''Vampire'' in her original configuration. Note the division markings on her stacks. | |||
| + | File:HMAS Vampire Allan-Green.jpg|''Vampire'' in peacetime colors. | |||
| + | File:Vampire3.jpg|''Vampire'' at anchor with her full set of awnings in place. | |||
| + | File:Vampire4.jpg|''Vampire'' after her second torpedo launcher had been landed. Note her contrast camouflage scheme. | |||
| + | File:Vampire5.jpg|''Vampire'' at sea, her contrast camouflage pattern fully visible. | |||
| </gallery> | </gallery> | |||
| |Video=<!-- put below video clips with using template VideoYT. You can use html-tags for formatting. --> | |Video=<!-- put below video clips with using template VideoYT. You can use html-tags for formatting. --> | |||
| + | {{VideoYT|LrWuLLxWKPk}} | |||
| + | {{VideoYT|LLVyb7AK4uM}} | |||
| |Ref= <!-- write below --> | |Ref= <!-- write below --> | |||
Revision as of 10:58, 18 July 2019

| Purchase priceSpecial |
| Hit Points9,500 |
| 102 mm/45 QF Mk.V on an LA CP Mk.II mount4 х 1 pcs. |
| Rate of Fire12 shots/min. |
| Reload Time5 sec. |
| Rotation Speed10 deg./sec. |
| 180 Degree Turn Time18 sec. |
| Firing Range10.11 km. |
| Maximum Dispersion90 m. |
| HE Shell102 mm HE 31 lb |
| Maximum HE Shell Damage1,500 |
| Chance of Fire on Target Caused by HE Shell5 % |
| Initial HE Shell Velocity805 m./s. |
| HE Shell Weight14.06 kg. |
| AP Shell102 mm SAP 31 lb |
| Maximum AP Shell Damage1,700 |
| Initial AP Shell Velocity805 m./s. |
| AP Shell Weight15.2 kg. |
| 533 mm TR Mk I1 х 3 pcs. |
| Rate of Fire0.97 shots/min. |
| Reload Time62 sec. |
| Rotation Speed25 deg./sec. |
| 180 Degree Turn Time7.2 sec. |
| Torpedo533 mm Mk II |
| Maximum Damage10,000 |
| Torpedo Speed53 knot |
| Torpedo Range6 km. |
| 40 mm/39 Vickers QF Mk.II on a Mk.II HA mount2 х 1 pcs. |
| . . . Average Damage per Second11.4 |
| . . . Firing Range2.49 km. |
| 20 mm Breda Model 1940 on a Model 1940 mount1 х 1 pcs. |
| . . . Average Damage per Second3.4 |
| . . . Firing Range2.01 km. |
| 13.2 mm Breda Model 1931 on a twin mount2 х 2 pcs. |
| . . . Average Damage per Second8.2 |
| . . . Firing Range1.2 km. |
| Maximum Speed34 knot |
| Turning Circle Radius520 m. |
| Rudder Shift Time2.5 sec. |
| Surface Detectability Range6.29 km. |
| Air Detectability Range2.38 km. |

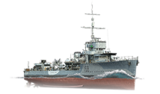
Vampire — Commonwealth special premium Tier III destroyer.
Vampire was awarded for free to players who completed a series of in-game missions in December 2017, and also offered for sale worldwide starting on 5 December 2017.
Modules
 |
Rate of Fire (shots/min) | 180° Turn Time (sec) | Maximum Dispersion (m) | Maximum HE Shell Damage (HP) | Chance of Fire on Target Caused by HE Shell (%) | Maximum AP Shell Damage (HP) |
Research price (exp) |
Purchase price ( | |
|---|---|---|---|---|---|---|---|---|---|
| 102 mm/45 QF Mk.V on an LA CP Mk.II mount | 12 | 18 | 90 | 1,500 | 5 | 1,700 | 0 | 0 |
 |
Hit Points (HP) | Armor (mm) | Armor (mm) | Main Turrets (pcs.) | Secondary Gun Turrets (pcs.) | AA Mounts (pcs.) | Torpedo Tubes (pcs.) | Hangar Capacity (pcs.) |
Research price (exp) |
Purchase price ( | |
|---|---|---|---|---|---|---|---|---|---|---|---|
| Vampire | 9,500 | 6 | 10 | 4 | 2/1/2 | 1 | 0 | 0 |
 |
Rate of Fire (shots/min) | Torpedo Tubes Reload Time (sec) | 180° Turn Time (sec) | Maximum Damage (HP) | Torpedo Speed (knot) | Torpedo Range (km) |
Research price (exp) |
Purchase price ( | |
|---|---|---|---|---|---|---|---|---|---|
| 533 mm Mk II | 1 | 62 | 7.2 | 10,000 | 53 | 6 | 0 | 0 |
 |
IDS_SHIP_PARAM_SUO_INCREASE_DIST (%) | Maximum Firing Range (km) |
Research price (exp) |
Purchase price ( | |
|---|---|---|---|---|---|
| Mk III | 0 | 0 | 0 |
 |
Maximum Speed (knot) |
Research price (exp) |
Purchase price ( | |
|---|---|---|---|---|
| Propulsion: 27,000 hp | 34 | 0 | 0 |
Compatible Upgrades
| Slot 1 |
||||
|---|---|---|---|---|
| Slot 2 |
Player Opinion
Performance
Vampire is a Tier III Commonwealth destroyer that combines good maneuverability, great guns, and surprising torpedoes into a deadly package. Rounding her toolkit off is a decent stealth with the Concealment Expert commander skill, allowing stealth torpedo attacks on unsuspecting victims.
Her guns are her bread and butter. They have a high rate of fire at 12 rounds a minute, a decent fire chance at 5% (buff-able to 8% with relevant commander skills and signal flags), and excellent fields of fire for the A, B, and X, turrets, with X turret practically able to fire forward. Her armor piercing rounds are very potent as well, having excellent penetration for a 102mm shell — able to citadel cruisers at mid-to-close range — while also being able to get decent penetration damage on broadside battleships and cruisers at mid to long range.
Her torpedo launcher is a different matter, though one that isn't as bad as the stats may say. She has one triple torpedo launcher able to fire 6.0 km range torpedoes; the tricky part is the firing patterns. She has two patterns: single launch and wide spread. Wide spread is great for large groups of enemies, and the single launcher allows precision firing of the torpedoes one at a time at targets. A quick 62 second reload has torpedoes in the tubes quickly for the next strike.
Her AA isn't much to write home about; captains should steer clear of aircraft wherever possible. Her maneuverability is fantastic with a 520m turning circle and 2.5s rudder shift time. She is able to dodge and weave incoming fire very well, and makes retreating from enemies much easier.
Vampire’s Smoke Generator ![]() is a key part of her arsenal; it is the same one afforded to her American cousins, packing a 109 second uptime for her smoke giving her ample time to fire out of her smoke as she caps, deals damage, or simply retreats.
is a key part of her arsenal; it is the same one afforded to her American cousins, packing a 109 second uptime for her smoke giving her ample time to fire out of her smoke as she caps, deals damage, or simply retreats.
Pros:
- Main guns have a great fire rate and range for her tier.
- The wide firing arcs of the main guns allow captains to fire without exposing much of the ship’s side.
- Like Gallant, Vampire can launch each torpedo individually, allowing for more precise torpedo attacks.
- Quick rudder shift time combined with a tight turning circle allow the ship to easily dodge incoming fire.
- Vampire’s smoke screen has a longer duration than most other destroyers at her tier.
Cons:
- Shell arcs are only slightly below orbital.
- Vampire only has three torpedoes.
- Inability to stealth torpedo without Concealment Expert. With the captain skill, she has a 200 meter stealth torpedo window.
Research
Optimal Configuration
Upgrades
The recommended upgrades for Vampire are as follows:
- Slot 1: Main Armaments Modification 1
 *
*
- Slot 2: Propulsion Modification 1

Upgrade Slot 1 provides players with a choice between two viable upgrade options. The first is Main Armaments Modification 1, which improves the survivability and repair time of the ship's main armaments. Alternatively, some players may choose to mount Magazine Modification 1 ![]() , an upgrade which significantly reduces the chance of detonation.
, an upgrade which significantly reduces the chance of detonation.
Commander Skills
Key skills for Vampire commanders include anything that boosts her gun power — such as Basic Firing Training, Adrenaline Rush, and Demolition Expert — as well as other destroyer staples like Last Stand, Survivability Expert, and Concealment Expert. With only a single torpedo launcher, Vampire does not benefit as much from torpedo skills as other destroyers.
| Recommended Commander Skills | ||||||||
|---|---|---|---|---|---|---|---|---|
| Cost (points) |
Endurance | Attack | Support | Versatility | ||||
| 1 |
★★ |
★ |
★ |
|
|
|
★ |
|
| 2 |
★ |
|
★ |
|
★ |
|
★★★ |
★★★ |
| 3 |
★ |
★★ |
★ |
|
★★★ |
★★★ |
★★★ |
★★ |
| 4 |
|
★ |
|
|
★ |
|
|
★★★ |
| Key: ★★★ - Extremely Useful ★★ - Frequently Useful ★ - Occasionally Useful No stars - Meh Χ - Not recommended | ||||||||
Consumables
Vampire can equip the following consumables:
- Slot 1: Damage Control Party

- Slot 2: Smoke Generator

- Slot 3: Engine Boost

Premium consumables — notably Damage Control Party II (![]() ) and Smoke Generator II (
) and Smoke Generator II (![]() ) — are recommended.
) — are recommended.
Camouflage
As a premium ship, Vampire comes included with Type 9 camouflage that lowers her detection radius, reduces the accuracy of incoming shells, and increases the amount of experience she earns.
Signals
Vampire can utilize various signal flags that can boost her offensive and defensive capabilities. India X-Ray (![]() ) and Victor Lima (
) and Victor Lima (![]() ) are very useful in boosting main battery power by increasing fire chance, while Juliet Whiskey Unaone (
) are very useful in boosting main battery power by increasing fire chance, while Juliet Whiskey Unaone (![]() ) helps increase flooding chance for torpedoes. Taking Sierra Mike (
) helps increase flooding chance for torpedoes. Taking Sierra Mike (![]() ) will increase Vampire’s the top speed. Finally, Juliet Charlie (
) will increase Vampire’s the top speed. Finally, Juliet Charlie (![]() ) is a recommended to prevent an early exit to port via detonation.
) is a recommended to prevent an early exit to port via detonation.
Recommended Signal Flags 
| |||||
|---|---|---|---|---|---|
| Combat | |||||
 ★★ |

|

|

|
 ★★★ |
 ★★★ |
 ★★ |

|

|
 ★★★ |
 ★ |

|

|

| ||||
Note: Use of the Juliet Charlie signal makes detonation impossible.
Gallery
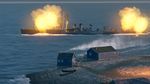
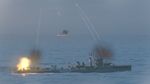
Vampire unleashes its ordinance.
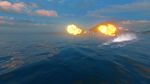
Vampire destroys an enemy Langley.

Flag of Vampire. Given to players who purchased a special bundle containing Vampire.


Historical Info
Historical Gallery
.jpg)


Video
References
https://www.navy.gov.au/hmas-vampire-i