Wakatake
| Revision as of 23:20, 11 December 2016 | Revision as of 23:03, 18 January 2017 | |||
| Line 29: | Line 29: | |||
| |CommanderSkills=<!-- write text about best set of Commander Skills below --> | |CommanderSkills=<!-- write text about best set of Commander Skills below --> | |||
| {{Commander Skills | {{Commander Skills | |||
| ? | | Expert Loader= | + | | Priority Target = 1 | |
| ? | | | + | | Preventative Maintenance = 3 | |
| ? | | | + | | Expert Loader = | |
| ? | | Expert | + | | Aircraft Servicing Expert = | |
| + | | Direction Center for Catapult Aircraft = | |||
| + | | Dogfighting Expert = | |||
| + | | Incoming Fire Alert = 1 | |||
| + | | Evasive Maneuver = | |||
| ? | | Expert Marksman=1 | + | | High Alert = 1 | |
| ? | | Torpedo | + | | Jack of All Trades = 2 | |
| ? | | | + | | Expert Marksman = 1 | |
| ? | | | + | | Torpedo Acceleration = 1 | |
| ? | | Last Stand=3 | + | | Smoke Screen Expert = 1 | |
| + | | Expert Rear Gunner = | |||
| + | | Adrenaline Rush = 1 | |||
| + | | Last Stand = 3 | |||
| ? | | | + | | Survivability Expert = | |
| ? | | | + | | Basics of Survivability = 2 | |
| ? | | | + | | Torpedo Armament Expertise = 2 | |
| ? | | | + | | Emergency Takeoff = | |
| ? | | Superintendent=3 | + | | Basic Firing Training = | |
| + | | Superintendent = 3 | |||
| + | | Demolition Expert = | |||
| + | | Vigilance = 1 | |||
| ? | | | + | | Manual Fire Control for Secondary Armament = | |
| ? | | | + | | Fire Prevention = | |
| ? | | | + | | Inertia Fuse for HE Shells = 1 | |
| ? | | | + | | Air Supremacy = | |
| ? | | | + | | Advanced Firing Training = 2 | |
| ? | + | | Manual Fire Control for AA Armament = | ||
| ? | + | | Radio Position Finding = 2 | ||
| ? | | Manual Fire Control for | + | | Concealment Expert = 3 | |
| ? | | | + | ||
| ? | | Concealment Expert=3 | + | ||
| ? | + | |||
| ? | + | |||
| }} | }} | |||
Revision as of 23:03, 18 January 2017
Wakatake

Tech Tree Position
stock
top
General
| Research price2000 exp |
| Purchase price256,000 |
| Hit Points7,300 |
Main Battery
| 120 mm/45 3rd Year Type on a Model G mount3 х 1 pcs. |
| Rate of Fire5 shots/min. |
| Reload Time12 sec. |
| Rotation Speed6 deg./sec. |
| 180 Degree Turn Time30 sec. |
| Firing Range9.41 km. |
| Maximum Dispersion85 m. |
| HE Shell120 mm HE Type1 |
| Maximum HE Shell Damage1,700 |
| Chance of Fire on Target Caused by HE Shell7 % |
| Initial HE Shell Velocity825 m./s. |
| HE Shell Weight20.3 kg. |
| AP Shell120 mm AP Type0 |
| Maximum AP Shell Damage2,000 |
| Initial AP Shell Velocity825 m./s. |
| AP Shell Weight20.3 kg. |
Torpedo Tubes
| 533 mm Twin2 х 2 pcs. |
| Rate of Fire1.54 shots/min. |
| Reload Time39 sec. |
| Rotation Speed25 deg./sec. |
| 180 Degree Turn Time7.2 sec. |
| Torpedo533 mm Type44 mod. 2 |
| Maximum Damage9,067 |
| Torpedo Speed57 knot |
| Torpedo Range6.99 km. |
AA Defense
| 6.5 mm/115 3rd Year Type on a single mount2 х 1 pcs. |
| . . . Average Damage per Second2.4 |
| . . . Firing Range0.99 km. |
Maneuverability
| Maximum Speed35.5 knot |
| Turning Circle Radius470 m. |
| Rudder Shift Time4 sec. |
Concealment
| Surface Detectability Range5.94 km. |
| Air Detectability Range2.04 km. |
Battle Levels
12345678910

III
256,000
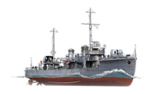
Wakatake — Japanese Tier III destroyer.
The last class of Japanese "small" destroyers comprised eight Wakatake-class ships built between 1921 and 1923. They effectively constituted an enlarged Momi class. The lead ship of the series was laid down in December 1921. She participated in the Sino-Japanese War, patrolling the coast of China. During World War II, she served as an escort ship. The ship was sunk on March 30, 1944, during an Allied air raid on Palau.
Modules
 |
Rate of Fire (shots/min) | 180° Turn Time (sec) | Maximum Dispersion (m) | Maximum HE Shell Damage (HP) | Chance of Fire on Target Caused by HE Shell (%) | Maximum AP Shell Damage (HP) |
Research price (exp) |
Purchase price ( | |
|---|---|---|---|---|---|---|---|---|---|
| 120 mm/45 3rd Year Type on a Model G mount | 5 | 30 | 85 | 1,700 | 7 | 2,000 | 0 | 21,000 |
 |
Hit Points (HP) | Armor (mm) | Armor (mm) | Main Turrets (pcs.) | Secondary Gun Turrets (pcs.) | AA Mounts (pcs.) | Torpedo Tubes (pcs.) | Hangar Capacity (pcs.) |
Research price (exp) |
Purchase price ( | |
|---|---|---|---|---|---|---|---|---|---|---|---|
| Wakatake (A) | 7,300 | 6 | 12 | 3 | 2 | 2 | 0 | 30,000 | |||
| Wakatake (B) | 8,200 | 6 | 12 | 3 | 1 | 2 | 950 | 70,000 |
 |
Rate of Fire (shots/min) | Torpedo Tubes Reload Time (sec) | 180° Turn Time (sec) | Maximum Damage (HP) | Torpedo Speed (knot) | Torpedo Range (km) |
Research price (exp) |
Purchase price ( | |
|---|---|---|---|---|---|---|---|---|---|
| Type44 mod. 2 | 1.5 | 39 | 7.2 | 9,066 | 57 | 7 | 0 | 24,000 |
 |
IDS_SHIP_PARAM_SUO_INCREASE_DIST (%) | Maximum Firing Range (km) |
Research price (exp) |
Purchase price ( | |
|---|---|---|---|---|---|
| Type3 mod. 1 | 0 | 0 | 18,500 |
 |
Maximum Speed (knot) |
Research price (exp) |
Purchase price ( | |
|---|---|---|---|---|
| Propulsion: 21,500 hp | 35.5 | 0 | 19,500 |
Compatible Upgrades
| Slot 1 |
||||
|---|---|---|---|---|
| Slot 2 |
Player Opinion
Performance
The Wakatake is a very fragile ship, so one would need to keep the concealment distance (6.1 KM) and torpedo range (7 KM) memorized and balance between them. With 8,200 HP max, there isn't much leeway for mistake, so be sure to only go for an attack if you're certain that you will destroy the enemy ship. Stay away from areas with many ships and attack stragglers. The artillery on the ship isn't the strongest, so the guns should be used on few occasions such as lighting enemy carriers on fire as a flaming deck cannot launch or refuel planes, or when the enemy ship is low and can be killed. It is a very bad idea, worse than usual, to shoot at an enemy if There are multiple enemy ships in the area, if you have not been spotted, or if there are ships that can cut you down at a range i.e. cruisers and battleships. Also, it is important to turn off your AA, as it is literally worthless. Your AA gives away your position to enemy aircraft very quickly at a greater range than aerial spotting range. Also, when using torpedoes, launch them when the enemy is showing their broadside. This will make turning to avoid the torpedoes much harder and will yield greater success.
Pros:
- Very agile and maneuverable, can out-run and out-turn almost any ship.
- Detection range allows for close range torpedo drops and easy flanking.
- The Torpedoes on the Wakatake are the strongest in tier III. The Wakatake has the capability of destroying any ship in tier III with a perfect torpedo salvo.
- High speed and good concealment make for a good ship to get these torpedoes on target.
Cons:
- Turret rotation cannot keep up with maneuvers. Hard to get a shot off in twisting attacks.
- Torpedo range similar to detection range, thus leaving you a small window of attack.
- Vulnerable to rudder and engine damage.
- Low HP compared to other ships.
- Almost no AA.
- Has very weak artillery.
- Torpedo distance is shorter than that of her predecessor, the Umikaze in exchange for damage
- Has fewer hit points than that of the Umikaze
Research
The Wakatake only has one upgrade to research, the hull. Hull must be researched in order to unlock the Isokaze.
Optimal Configuration
Commander Skills
| Recommended Commander Skills | ||||||||
|---|---|---|---|---|---|---|---|---|
| Cost (points) |
Endurance | Attack | Support | Versatility | ||||
| 1 |
★ |
★★★ |
|
|
|
|
★ |
|
| 2 |
★ |
★★ |
★ |
★ |
★ |
|
★ |
★★★ |
| 3 |
★★ |
|
★★ |
|
|
★★★ |
|
★ |
| 4 |
|
|
★ |
|
★★ |
|
★★ |
★★★ |
| Key: ★★★ - Extremely Useful ★★ - Frequently Useful ★ - Occasionally Useful No stars - Meh Χ - Not recommended | ||||||||
Camouflage
Type 1, 2, or 5 camouflage can be equipped for credits; Types 1 or 5 are recommended at a minimum to reduce detectability range.Gallery
Historical Info
Historical Gallery
Ships of Japan
Destroyers
Categories: