Yūdachi
| Revision as of 03:45, 3 October 2019 Added service history | Revision as of 02:20, 24 October 2019 Commander Skills 2 | |||
| Line 54: | Line 54: | |||
| Key skills for ''{{#var:ship_name}}'' commanders include Survivability Expert, Torpedo Armament Expertise, and Concealment Expert. | Key skills for ''{{#var:ship_name}}'' commanders include Survivability Expert, Torpedo Armament Expertise, and Concealment Expert. | |||
| ? | {{Commander Skills | + | {{Commander Skills 2 | |
| ? | | | + | <!-- This version enables a '0' rating. Use it for skills that have no effect (e.g. Improved Engines on a non-CV) or are detrimental to the ship. They should mirror what appears in the game client. --> | |
| ? | | | + | | rating11 = 3 <!-- Priority Target --> | |
| ? | | Expert Loader | + | | rating12 = 2 <!-- Preventive Maint --> | |
| ? | | Air Supremacy | + | | rating13 = <!-- Expert Loader --> | |
| ? | | Direction Center for Fighters | + | | rating14 = 0 <!-- Air Supremacy --> | |
| ? | | Improved Engine Boost | + | | rating15 = 0 <!-- Direction Center for Fighters --> | |
| ? | | Incoming Fire Alert | + | | rating16 = 0 <!-- Improved Engine Boost --> | |
| ? | | Last Gasp | + | | rating17 = <!-- Incoming Fire Alert --> | |
| + | | rating18 = 0 <!-- Last Gasp --> | |||
| ? | | High Alert | + | | rating21 = <!-- High Alert --> | |
| ? | | Jack of All Trades | + | | rating22 = <!-- Jack of All Trades --> | |
| ? | | Expert Marksman | + | | rating23 = <!-- Expert Marksman --> | |
| ? | | | + | | rating24 = 2 <!-- Torpedo Acceleration --> | |
| ? | | Smoke Screen Expert | + | | rating25 = 1 <!-- Smoke Screen Expert --> | |
| ? | | Improved Engines | + | | rating26 = 0 <!-- Improved Engines --> | |
| ? | | | + | | rating27 = 2 <!-- Adrenaline Rush --> | |
| ? | | | + | | rating28 = 3 <!-- Last Stand --> | |
| ? | | Basics of Survivability | + | | rating31 = <!-- Basics of Survivability --> | |
| ? | | | + | | rating32 = 3 <!-- Survivability Expert--> | |
| ? | | Torpedo Armament Expertise | + | | rating33 = 3 <!-- Torpedo Armament Expertise--> | |
| ? | | Aircraft Armor | + | | rating34 = 0 <!-- Aircraft Armor --> | |
| ? | | Basic Firing Training | + | | rating35 = <!-- Basic Firing Training --> | |
| ? | | | + | | rating36 = 3 <!-- Superintendent --> | |
| ? | | Demolition Expert | + | | rating37 = <!-- Demolition Expert --> | |
| ? | | Vigilance | + | | rating38 = <!-- Vigilance --> | |
| ? | | Manual Fire Control for Secondary Armament | + | | rating41 = <!-- Manual Fire Control for Secondary Armament --> | |
| ? | | Fire Prevention | + | | rating42 = <!-- Fire Prevention --> | |
| ? | | Inertia Fuse for HE Shells | + | | rating43 = <!-- Inertia Fuse for HE Shells --> | |
| ? | | Sight Stabilization | + | | rating44 = 0 <!-- Sight Stabilization --> | |
| ? | | Advanced Firing Training | + | | rating45 = <!-- Advanced Firing Training --> | |
| ? | | Massive AA Fire | + | | rating46 = <!-- Massive AA Fire --> | |
| ? | | Radio Position Finding | + | | rating47 = <!-- Radio Position Finding --> | |
| ? | | | + | | rating48 = 3 <!-- Concealment Expert --> | |
| }} | }} | |||
Revision as of 02:20, 24 October 2019

| Purchase priceSpecial |
| Hit Points13,200 |
| 127 mm/50 3rd Year Type on a Type B mount1 х 1 / 2 х 2 pcs. |
| Rate of Fire6.67 shots/min. |
| Reload Time9 sec. |
| Rotation Speed6 deg./sec. |
| 180 Degree Turn Time30 sec. |
| Firing Range11.81 km. |
| Maximum Dispersion103 m. |
| HE Shell127 mm HE Type1 |
| Maximum HE Shell Damage2,150 |
| Chance of Fire on Target Caused by HE Shell9 % |
| Initial HE Shell Velocity915 m./s. |
| HE Shell Weight23 kg. |
| AP Shell127 mm AP Type0 |
| Maximum AP Shell Damage2,200 |
| Initial AP Shell Velocity915 m./s. |
| AP Shell Weight23 kg. |
| 610 mm Quad2 х 4 pcs. |
| Rate of Fire0.6 shots/min. |
| Reload Time100 sec. |
| Rotation Speed25 deg./sec. |
| 180 Degree Turn Time7.2 sec. |
| TorpedoType90 |
| Maximum Damage15,633 |
| Torpedo Speed64 knot |
| Torpedo Range15 km. |
| 40 mm/62 "HI" Type 91 on a single mount2 х 1 pcs. |
| . . . Average Damage per Second11.2 |
| . . . Firing Range2.01 km. |
| Maximum Speed34 knot |
| Turning Circle Radius570 m. |
| Rudder Shift Time3.2 sec. |
| Surface Detectability Range6.79 km. |
| Air Detectability Range3.01 km. |

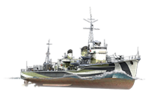
Yūdachi — Japanese special premium Tier VII destroyer.
Yūdachi, a Shiratsuyu-class destroyer, was laid down in October 1934 and entered service in January 1937. During World War II, she escorted troop transports during the invasions of the Philippines and the Dutch East Indies, and she engaged in the Battles of the Java Sea and off the Santa Cruz Islands. In 1942, the ship delivered reinforcements during the Pacific campaigns. During the First Naval Battle of Guadalcanal, she was damaged by USS Sterett and was subsequently abandoned by her crew. The abandoned hull of Yūdachi was sunk by gunfire from cruiser USS Portland.
Modules
 |
Rate of Fire (shots/min) | 180° Turn Time (sec) | Maximum Dispersion (m) | Maximum HE Shell Damage (HP) | Chance of Fire on Target Caused by HE Shell (%) | Maximum AP Shell Damage (HP) |
Research price (exp) |
Purchase price ( | |
|---|---|---|---|---|---|---|---|---|---|
| 127 mm/50 3rd Year Type on a Type B / Type C mount | 6.7 | 30 | 103 | 2,150 | 9 | 2,200 | 0 | 0 |
 |
Hit Points (HP) | Armor (mm) | Armor (mm) | Main Turrets (pcs.) | Secondary Gun Turrets (pcs.) | AA Mounts (pcs.) | Torpedo Tubes (pcs.) | Hangar Capacity (pcs.) |
Research price (exp) |
Purchase price ( | |
|---|---|---|---|---|---|---|---|---|---|---|---|
| Yūdachi | 13,200 | 10 | 20 | 1/2 | 2 | 2 | 0 | 0 |
 |
Rate of Fire (shots/min) | Torpedo Tubes Reload Time (sec) | 180° Turn Time (sec) | Maximum Damage (HP) | Torpedo Speed (knot) | Torpedo Range (km) |
Research price (exp) |
Purchase price ( | |
|---|---|---|---|---|---|---|---|---|---|
| Type90 | 0.6 | 100 | 7.2 | 15,633 | 64 | 15 | 0 | 0 |
 |
IDS_SHIP_PARAM_SUO_INCREASE_DIST (%) | Maximum Firing Range (km) |
Research price (exp) |
Purchase price ( | |
|---|---|---|---|---|---|
| Type7 mod. 1 | 0 | 0 | 0 |
 |
Maximum Speed (knot) |
Research price (exp) |
Purchase price ( | |
|---|---|---|---|---|
| Propulsion: 42,000 hp | 34 | 0 | 0 |
Compatible Upgrades
| Slot 1 |
|||||
|---|---|---|---|---|---|
| Slot 2 |
|||||
| Slot 3 |
|||||
| Slot 4 |
Player Opinion
Performance
Yūdachi is a Shiratsuyu class destroyer representing the Japanese Navy at Tier VII. Despite visible similarities between herself and her tech tree counterpart, Yūdachi features many improved features, such as increased torpedo range, hit point (HP) pool, and access to the Torpedo Reload Booster ![]() consumable without having to sacrifice her smoke generator.
consumable without having to sacrifice her smoke generator.
Overall, Yūdachi represents the essential Japanese destroyer playstyle, wherein players must engage by delivering patient and deliberate strikes. Yūdachi features long-range torpedoes and excellent concealment, providing her with an enormous window to fire her torpedoes without being spotted. Her main guns exist purely as a last resort and will be primarily ineffective due to slow turret traverse and reload times. In a situation where Yūdachi is spotted, it is recommended that players deploy smoke and return to concealment unless the enemy is at very low health. Even so, with such a small HP pool, it is important to preserve health whenever possible. Yūdachi will excel in stalking and hunting enemy capital ships, but it is recommended that players avoid contesting objectives early in the game or straying far from the fleet when there is a threat of encountering aircraft.
Pros:
- Access to both a Smoke Generator
 and Torpedo Reload Booster
  consumable.
- Excellent concealment.
- Excellent torpedo range.
- Slightly better than her tech-tree counterpart, Shiratsuyu.
Cons:
- Torpedoes are slow and easily spotted.
- Poor turret traverse speed and reload time.
- Poor anti-aircraft armament.
Research
Optimal Configuration
Upgrades
The recommended upgrades for Yūdachi are as follows:
- Slot 1: Main Armaments Modification 1

- Slot 2: Steering Gears Modification 1

- Slot 3: Aiming Systems Modification 1

- Slot 4: Propulsion Modification 1 (
 )
)
Commander Skills
Key skills for Yūdachi commanders include Survivability Expert, Torpedo Armament Expertise, and Concealment Expert.
| Recommended Commander Skills | ||||||||
|---|---|---|---|---|---|---|---|---|
| Cost (points) |
Endurance | Attack | Support | Versatility | ||||
| 1 |
★★★ |
★★ |
|
Χ |
Χ |
Χ |
|
Χ |
| 2 |
|
|
|
★★ |
★ |
Χ |
★★ |
★★★ |
| 3 |
|
★★★ |
★★★ |
Χ |
|
★★★ |
|
|
| 4 |
|
|
|
Χ |
|
|
|
★★★ |
| Key: ★★★ - Extremely Useful ★★ - Frequently Useful ★ - Occasionally Useful No stars - Meh Χ - Not recommended | ||||||||
Consumables
Yūdachi can equip the following consumables:
- Slot 1: Damage Control Party

- Slot 2: Smoke Generator
- Slot 3: Engine Boost

- Slot 4: Torpedo Reload Booster
Camouflage
As a premium ship, Yūdachi comes included with Type 10 camouflage that lowers her detection radius, reduces the accuracy of incoming shells, reduces her repair costs, and increases the amount of experience she earns.
Signals
Recommended Signal Flags 
| |||||
|---|---|---|---|---|---|
| Combat | |||||
 ★★★ |

|

|

|

|

|
 ★★★ |

|

|
 ★★★ |
 ★★★ |

|

|

| ||||
Note: Use of the Juliet Charlie signal makes detonation impossible.
Gallery


Historical Info
Historical Gallery

Video