Yamato
| Revision as of 05:35, 6 January 2017 Added Research, Camouflage and Commander Skills sections. Re-organized Historical section. Improved wording of Pros/Cons. | Revision as of 17:00, 18 January 2017 Updated Commander Skills section to 0.6.0 skills and added recommended Upgrades section | |||
| Line 38: | Line 38: | |||
| |Upgrades=<!-- write text about best upgrades below --> | |Upgrades=<!-- write text about best upgrades below --> | |||
| + | Yamato's strengths lie in her immensely powerful main guns and fearsome secondaries. It is your choice whether you want to improve the performance of her main guns or amp up the power of her secondaries. | |||
| + | ||||
| + | If you want to focus on your main guns, [[Ship:Upgrades#Main_Armaments_Modification.C2.A01|Main Armaments Modification 1]] is recommended to reduce the likelihood of your turrets being knocked out, with [[Ship:Upgrades#Aiming_Systems_Modification.C2.A01|Aiming Systems Modification 1]] in your second slot to increase your accuracy. [[Ship:Upgrades#Main_Battery_Modification.C2.A02|Main Battery Modification 2]] can be viable as Yamato's turrets can be painfully slow, but this sacrifices precious reload speed. For your third slot,[[Ship:Upgrades#Main_Battery_Modification.C2.A03|Main Battery Modification 3]] instead sacrifices turret traverse speed for an improved rate of fire, allowing you to fire - and theoretically hit - your enemies more often. [[Ship:Upgrades#Gun_Fire_Control_System_Modification.C2.A02|Gun Fire Control System Modification 2]] isn't really necessary, as you already have the highest base gun range in the game. | |||
| + | ||||
| + | If your focus is on your secondaries, you can't go wrong with bringing [[Ship:Upgrades#Auxiliary_Armaments_Modification.C2.A01|Auxiliary Armaments Modification 1]] to greatly improve the surviveability of your secondaries, [[Ship:Upgrades#Secondary_Battery_Modification.C2.A02|Secondary Battery Modification 2]] to greatly increase the range of your secondaries (as by now they should be at a range of almost 9km, Advanced Firing Training will take this above 10km) which also decreases their dispersion by 20%, and finally [[Ship:Upgrades#Secondary_Battery_Modification.C2.A03|Secondary Battery Modification 3]] to improve the rate of fire of your secondaries. | |||
| + | ||||
| + | For your other three slots, [[Ship:Upgrades#Damage_Control_System_Modification.C2.A01|Damage Control System Modification 1]] is almost a must for your fourth slot, as your engines and steering will almost never be incapacitated, and you'll have to deal with fires and flooding more often. For your fifth slot, all three choices of [[Ship:Upgrades#Damage_Control_System_Modification.C2.A02|Damage Control System Modification 2]] to reduce the duration of fires and flooding, [[Ship:Upgrades#Steering_Gears_Modification.C2.A02|Steering Gears Modification 2]] to increase Yamato's sluggish rudder speed, or [[Ship:Upgrades#Propulsion_Modification.C2.A02|Propulsion Modification 2]] to improve her propulsion to maximum speed, are viable options and depend on your personal playstyle. Finally, [[Ship:Upgrades#Target_Acquisition_System_Modification.C2.A01|Target Acquisition System Modification 1]] is a good choice to increase your acquisition radius of torpedoes, which can be almost impossible to dodge if not spotted as soon as possible. While [[Ship:Upgrades#Concealment_System_Modification.C2.A01|Concealment System Modification 1]] can be useful, once she's fired her guns Yamato can be spotted from over 30km away, making concealment redundant. | |||
| |CommanderSkills=<!-- write text about best set of Commander Skills below --> | |CommanderSkills=<!-- write text about best set of Commander Skills below --> | |||
| {{Commander Skills | {{Commander Skills | |||
| ? | | | + | | Priority Target = 1 | |
| ? | + | | Preventative Maintenance = 2 | ||
| ? | | | + | | Expert Loader = 1 | |
| ? | | Expert | + | | Aircraft Servicing Expert = | |
| ? | + | | Direction Center for Catapult Aircraft = 2 | ||
| ? | | Expert | + | | Dogfighting Expert = | |
| ? | | | + | | Incoming Fire Alert = 1 | |
| ? | | | + | | Evasive Maneuver = | |
| ? | | Incoming Fire Alert= | + | ||
| ? | | | + | ||
| ? | + | | High Alert = 2 | ||
| ? | | High Alert=2 | + | | Jack of All Trades = 2 | |
| ? | | | + | | Expert Marksman = 3 | |
| ? | | | + | | Torpedo Acceleration = | |
| ? | | | + | | Smoke Screen Expert = | |
| + | | Expert Rear Gunner = | |||
| + | | Adrenaline Rush = 1 | |||
| + | | Last Stand = 1 | |||
| ? | | | + | | Survivability Expert = 1 | |
| ? | | | + | | Basics of Survivability = 2 | |
| ? | | | + | | Torpedo Armament Expertise = | |
| ? | | | + | | Emergency Takeoff = | |
| ? | | | + | | Basic Firing Training = 3 | |
| + | | Superintendent = 3 | |||
| + | | Demolition Expert = 1 | |||
| + | | Vigilance = 1 | |||
| ? | + | | Manual Fire Control for Secondary Armament = 3 | ||
| ? | | Manual Fire Control for Secondary Armament= | + | | Fire Prevention = 2 | |
| ? | | | + | | Inertia Fuse for HE Shells = 1 | |
| ? | | | + | | Air Supremacy = | |
| ? | | Air Supremacy= | + | | Advanced Firing Training = 3 | |
| ? | | | + | | Manual Fire Control for AA Armament = 1 | |
| + | | Radio Position Finding = 1 | |||
| + | | Concealment Expert = 1 | |||
| }} | }} | |||
Revision as of 17:00, 18 January 2017

| Research price249000 exp |
| Purchase price20,600,000 |
| Hit Points97,200 |
| 460 mm/45 Type 94 in a triple turret3 х 3 pcs. |
| Rate of Fire2 shots/min. |
| Reload Time30 sec. |
| Rotation Speed3 deg./sec. |
| 180 Degree Turn Time60 sec. |
| Firing Range26.63 km. |
| Maximum Dispersion275 m. |
| HE Shell460 mm HE Type0 |
| Maximum HE Shell Damage7,300 |
| Chance of Fire on Target Caused by HE Shell35 % |
| Initial HE Shell Velocity805 m./s. |
| HE Shell Weight1360 kg. |
| AP Shell460 mm AP/APC Type91 |
| Maximum AP Shell Damage14,800 |
| Initial AP Shell Velocity780 m./s. |
| AP Shell Weight1460 kg. |
| 127 mm/40 Type 89 on a Model A1 Mod.3 mount6 х 2 pcs. |
| Firing Range7.3 km. |
| Rate of Fire10 shots/min. |
| Reload Time6 sec. |
| HE Shell127 mm HE Type0 |
| Maximum HE Shell Damage2,100 |
| Initial HE Shell Velocity725 m./s. |
| Chance of Fire on Target Caused by HE Shell8 % |
| 127 mm/40 Type 89 on a Model A1 mount6 х 2 pcs. |
| Firing Range7.3 km. |
| Rate of Fire12 shots/min. |
| Reload Time5 sec. |
| HE Shell127 mm HE Type0 |
| Maximum HE Shell Damage2,100 |
| Initial HE Shell Velocity725 m./s. |
| Chance of Fire on Target Caused by HE Shell8 % |
| 155 mm/60 3rd Year Type in a triple turret2 х 3 pcs. |
| Firing Range7.3 km. |
| Rate of Fire5 shots/min. |
| Reload Time12 sec. |
| HE Shell155 mm HE Type0 |
| Maximum HE Shell Damage2,600 |
| Initial HE Shell Velocity925 m./s. |
| Chance of Fire on Target Caused by HE Shell10 % |
| 127 mm/40 Type 89 on a Model A1 Mod.3 mount6 х 2 pcs. |
| . . . Average Damage per Second60.6 |
| . . . Firing Range5.01 km. |
| 127 mm/40 Type 89 on a Model A1 mount6 х 2 pcs. |
| . . . Average Damage per Second60.6 |
| . . . Firing Range5.01 km. |
| 25 mm/60 Type 96 on a triple mount4 х 3 pcs. |
| . . . Average Damage per Second13.2 |
| . . . Firing Range2.49 km. |
| 25 mm/60 Type 96 on a triple mount24 х 3 pcs. |
| . . . Average Damage per Second79.2 |
| . . . Firing Range2.49 km. |
| 25 mm/60 Type 96 on a triple mount16 х 3 pcs. |
| . . . Average Damage per Second52.8 |
| . . . Firing Range2.49 km. |
| 25 mm/60 Type 96 on a single mount6 х 1 pcs. |
| . . . Average Damage per Second10.8 |
| . . . Firing Range2.49 km. |
| 25 mm/60 Type 96 on a triple mount8 х 3 pcs. |
| . . . Average Damage per Second26.4 |
| . . . Firing Range2.49 km. |
| 13 mm/76 Type 93 on a twin mount2 х 2 pcs. |
| . . . Average Damage per Second4 |
| . . . Firing Range1.2 km. |
| Maximum Speed27 knot |
| Turning Circle Radius900 m. |
| Rudder Shift Time22.1 sec. |
| Surface Detectability Range17.46 km. |
| Air Detectability Range12.79 km. |

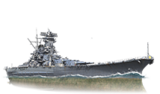
Yamato — Japanese Tier X battleship.
The biggest warship of World War II and the world's largest battleship. Yamato was designed around the idea that an individual ship could have superiority over any battleship of a potential enemy. Her main guns had overwhelming firepower. The ship maintained a very high level of survivability due to reliable armor and robust torpedo protection. Yamato’s AA capabilities were highly efficient due to carrying numerous AA artillery guns.
Modules
 |
Rate of Fire (shots/min) | 180° Turn Time (sec) | Maximum Dispersion (m) | Maximum HE Shell Damage (HP) | Chance of Fire on Target Caused by HE Shell (%) | Maximum AP Shell Damage (HP) |
Research price (exp) |
Purchase price ( | |
|---|---|---|---|---|---|---|---|---|---|
| 460 mm/45 Type 94 in a triple turret | 2 | 60 | 275 | 7,300 | 35 | 14,800 | 0 | 2,300,000 |
 |
Hit Points (HP) | Armor (mm) | Armor (mm) | Main Turrets (pcs.) | Secondary Gun Turrets (pcs.) | AA Mounts (pcs.) | Torpedo Tubes (pcs.) | Hangar Capacity (pcs.) |
Research price (exp) |
Purchase price ( | |
|---|---|---|---|---|---|---|---|---|---|---|---|
| Yamato | 97,200 | 19 | 650 | 3 | 6/6/2 | 2/6/52/6/6 | 0 | 3,300,000 |
 |
IDS_SHIP_PARAM_SUO_INCREASE_DIST (%) | Maximum Firing Range (km) |
Research price (exp) |
Purchase price ( | |
|---|---|---|---|---|---|
| Type10 mod. 1 | 0 | 0 | 2,100,000 |
 |
Maximum Speed (knot) |
Research price (exp) |
Purchase price ( | |
|---|---|---|---|---|
| Propulsion: 150,000 hp | 27 | 0 | 590,000 |
Compatible Upgrades
| Slot 1 |
|||||
|---|---|---|---|---|---|
| Slot 2 |
|||||
| Slot 3 |
|||||
| Slot 4 |
|||||
| Slot 5 |
|||||
| Slot 6 |
Player Opinion
Performance
The pinnacle of all Japanese battleship design philosophy and possibly of the entire world, Yamato gains its place as the most solid battleship at her tier. She has the second largest hit points of any ship in the game at a staggering 97200 next to Großer Kurfürst’s 105k and her guns have the highest citadel hit damage of any round in the game, at 14800 HP per citadel hit. The AA suite aboard matches her size and potency, with nearly 150 25mm AA barrels (in real life, 162 25mm AA barrels in latest upgrade). With a turning radius of 800m and a top speed of 27.2 kts, she is also surprisingly maneuverable despite her large size, but with a long rudder shift time and extremely slow turret traverse, one must plan all actions in advance, or risk being caught off-guard and unable to react. The guns, while accurate, are very unforgiving, with a 30 second reload stock, which can be decreased to just under 27 seconds at the expense of further reducing its abysmal turret traverse further by using a piece of equipment. Being one of the biggest ships in the game, Yamato is constantly targeted by Aircraft Carriers, and despite the numerous AA guns, high tier carriers can still get planes through, so it is advised to stay near ships that have solid AA suites such as cruisers for an AA "aegis" to be created. In addition, even though your armor is the most solid in the game you should still try to angle your ship as sometimes shells may have a chance to hit home and deal glaring damage. Keep in mind that her citadel can easily be hit if the enemy manages to penetrate your armor.
Pros:
- Unrivaled main battery guns that can even penetrate other battleships at close range when they're bow on.
- Extremely good dispersion, but landing hits on targets beyond beyond 18km is still challenging.
- Second largest health pool and heaviest armor in the game.
- Large quantity of secondaries can easily kill a destroyer at very close range.
- Surprisingly good agility for its size.
- Impressive torpedo bulge as long as torpedoes hit her torpedo belt.
- Longest main battery range in the game, but shells take a long time to travel and are extremely inaccurate when firing at targets that far out.
Cons:
- Extremely large size but still smaller than Izumo and Großer Kurfürst.
- Very high notoriety and potential danger makes her a priority target for the enemy team.
- Even with upgraded AA the lack of short range AA guns will make you very vulnerable to enemy carriers should their strike aircraft get close enough to dump their payload.
- Extremely slow turret traverse rate of 72 seconds for traversing 180 degrees.
- Poor shell velocity of the main battery makes it difficult to hit distant targets.
- Long rudder shift time.
- Casemate armor can be easily penetrated by other battleships, and even cruiser armor piercing rounds at close range.
- Extremely vulnerable to fires due to the percent damage dealt to health pools.
- Portion of her frontal deck armor relies heavily on angle.
- Armor penetration at long ranges is abysmal.
- Despite being heavily armored, her citadel is still highly vulnerable when enemies have a clear shot at her broadside.
Research
Optimal Configuration
Upgrades
Yamato's strengths lie in her immensely powerful main guns and fearsome secondaries. It is your choice whether you want to improve the performance of her main guns or amp up the power of her secondaries.
If you want to focus on your main guns, Main Armaments Modification 1 is recommended to reduce the likelihood of your turrets being knocked out, with Aiming Systems Modification 1 in your second slot to increase your accuracy. Main Battery Modification 2 can be viable as Yamato's turrets can be painfully slow, but this sacrifices precious reload speed. For your third slot,Main Battery Modification 3 instead sacrifices turret traverse speed for an improved rate of fire, allowing you to fire - and theoretically hit - your enemies more often. Gun Fire Control System Modification 2 isn't really necessary, as you already have the highest base gun range in the game.
If your focus is on your secondaries, you can't go wrong with bringing Auxiliary Armaments Modification 1 to greatly improve the surviveability of your secondaries, Secondary Battery Modification 2 to greatly increase the range of your secondaries (as by now they should be at a range of almost 9km, Advanced Firing Training will take this above 10km) which also decreases their dispersion by 20%, and finally Secondary Battery Modification 3 to improve the rate of fire of your secondaries.
For your other three slots, Damage Control System Modification 1 is almost a must for your fourth slot, as your engines and steering will almost never be incapacitated, and you'll have to deal with fires and flooding more often. For your fifth slot, all three choices of Damage Control System Modification 2 to reduce the duration of fires and flooding, Steering Gears Modification 2 to increase Yamato's sluggish rudder speed, or Propulsion Modification 2 to improve her propulsion to maximum speed, are viable options and depend on your personal playstyle. Finally, Target Acquisition System Modification 1 is a good choice to increase your acquisition radius of torpedoes, which can be almost impossible to dodge if not spotted as soon as possible. While Concealment System Modification 1 can be useful, once she's fired her guns Yamato can be spotted from over 30km away, making concealment redundant.
Commander Skills
| Recommended Commander Skills | ||||||||
|---|---|---|---|---|---|---|---|---|
| Cost (points) |
Endurance | Attack | Support | Versatility | ||||
| 1 |
★ |
★★ |
★ |
|
|
|
★ |
|
| 2 |
★★ |
★★ |
★★★ |
|
|
|
★ |
★ |
| 3 |
★★ |
★ |
|
|
★★★ |
★★★ |
★ |
★ |
| 4 |
★★★ |
★★ |
★ |
|
★★★ |
|
★ |
★ |
| Key: ★★★ - Extremely Useful ★★ - Frequently Useful ★ - Occasionally Useful No stars - Meh Χ - Not recommended | ||||||||
Camouflage
Type 1, 2, or 5 camouflage can be equipped for credits; Types 2 or 5 are recommended at a minimum to reduce the accuracy of incoming shells.
Players who wish to spend doubloons can equip Yamato with Type 20 camouflage that lowers her detection radius, reduces the accuracy of incoming shells, reduces her repair costs, increases her credit earnings, and increases the amount of experience she earns.Gallery
Historical Info
Historical Gallery


