Yamato
| Revision as of 17:00, 18 January 2017 Updated Commander Skills section to 0.6.0 skills and added recommended Upgrades section | Latest revision as of 19:54, 26 March 2024 Changed protection level for "Ship:Yamato" ([Edit=Allow only administrators] (indefinite) [Move=Allow only administrators] (indefinite)) [cascading] | |||
121 intermediate revisions by 48 users not shown | ||||
| Line 4: | Line 4: | |||
| |Anno=<!-- you can write below short description for the ship. it will replace default once. --> | |Anno=<!-- you can write below short description for the ship. it will replace default once. --> | |||
| The biggest warship of World War II and the world's largest battleship. ''Yamato'' was designed around the idea that an individual ship could have superiority over any battleship of a potential enemy. Her main guns had overwhelming firepower. The ship maintained a very high level of survivability due to reliable armor and robust torpedo protection. ''Yamato''’s AA capabilities were highly efficient due to carrying numerous AA artillery guns. | The biggest warship of World War II and the world's largest battleship. ''Yamato'' was designed around the idea that an individual ship could have superiority over any battleship of a potential enemy. Her main guns had overwhelming firepower. The ship maintained a very high level of survivability due to reliable armor and robust torpedo protection. ''Yamato''’s AA capabilities were highly efficient due to carrying numerous AA artillery guns. | |||
| + | <!-- {{Model3DViewer|fbca35bd9e2b4eca85cbdcff6bcce4ef}}--> | |||
| |Performance=<!-- write text about performance in battles below --> | |Performance=<!-- write text about performance in battles below --> | |||
| ? | The pinnacle of all Japanese battleship design philosophy and possibly of the entire world, ''Yamato'' gains its place as the most solid | + | {{AA Sidebar Warning Insert}} | |
| + | The pinnacle of all Japanese battleship design philosophy and possibly of the entire world, ''Yamato'' gains its place as one of the most solid battleships at her tier. She has the fourth-largest hit points of any ship at tier X at a staggering 97200 next to ''[[Vermont]]''’s 102800'' [[Großer Kurfürst]]''’s 105800, and ''[[Kremlin]]''’s 108300. Her guns have the one of the highest citadel hit damage of any round in the game, at 14800 HP per citadel hit. While her individual AA mounts are mediocre, the sheer number of AA guns, nearly 150 25mm AA barrels (in real life, 162 25mm AA barrels in the latest upgrade), and 24 127mm DP guns provide a mild deterrent, particularly against lower-tier carriers. She, along with her sister ship ''[[Musashi]]'' holds the record for best torpedo protection in the game, with a value of 56%, which is rather surprising considering that in real life, they both suffered from weak torpedo protection due to design flaws with the area joining the upper and lower armor belts. In the game, ''Yamato'' represents the upgraded 1945 variant while ''Musashi'' depicts the original version. | |||
| ? | + | With a turning radius of 800m and a top speed of 27 knots, she is also surprisingly maneuverable despite her large size, though still quite short of her real-life maneuverability. However, with a long rudder shift time and extremely slow turret traverse, one must plan all actions, or risk being caught off-guard and unable to react. The guns, while having better accuracy than ''[[Conqueror]]'', ''[[Montana]]'', and ''[[Großer Kurfürst]]'', are very unforgiving, with a 30 second reload stock, which can be decreased to just under 27 seconds at the expense of further reducing its abysmal turret traverse by using a piece of equipment. Being one of the biggest ships in the game, ''Yamato'' is constantly targeted by Aircraft Carriers, and despite the numerous AA guns, ''Yamato''’s AA firepower is quite lacking when compared to other T10 battleships, so much so that a high tier carrier can still get planes through, making aerial attacks Yamato's greatest weakness. Hence it is advised to stay near ships that have solid AA suites such as cruisers for an AA "aegis" to be created. In addition, even though your armor is solid, in the game you should still try to angle your ship as sometimes shells may have a chance to hit home and deal glaring damage. Keep in mind that her high citadel can easily be hit if the enemy manages to penetrate your armor, especially since the citadel is weirdly shaped and can be punched through below the a and b turret and and y turret. | ||
| + | Despite all of these drawbacks, Yamato is a very robust battleship in a long-ranged and defensive position. She may not be the fastest, the stealthiest, or the Tier X battleship with the highest RoF, but her armor, gun caliber, and health more than makeup for it. Her guns are so massive, and combined with their immense accuracy, she is a formidable foe. With some good aim and luck, ''Yamato's'' glaring damage can wipe battleships off the sea, allowing more vulnerable cruisers, such as ''[[Des Moines]]'' and ''[[Hindenburg]]'', to mop up the remaining enemies. Overall, she is a powerful asset that, with the right build, good teammates, and in the hands of a skilled player, will dominate the battle and can even control it. | |||
| + | ||||
| |Pros=<!-- write list of positive points below. use * as in ordinary wiki-list. --> | |Pros=<!-- write list of positive points below. use * as in ordinary wiki-list. --> | |||
| ? | * | + | * Amazing main battery range, Second best in the game for a battleship falling just shy of ''[[Satsuma]]'' | |
| ? | + | * ''Yamato'''s main gun caliber is large enough to let AP shells overmatch 32mm plating | ||
| ? | + | * Great main battery accuracy, which can be further improved with {{UU Yamato}} | ||
| ? | * | + | * Shell velocity is average, but does not bleed much at range thanks to shell mass | |
| ? | * | + | * Large hitpoint pool and thick deck and belt armor make ''Yamato'' durable when properly positioned | |
| ? | * Impressive torpedo | + | * Impressive torpedo damage reduction | |
| ? | * | + | * Ridiculous main battery armor, ''Yamato'''s main turrets are very hard to disable or destroy | |
| |Cons=<!-- write list of negative points below. use * as in ordinary wiki-list. --> | |Cons=<!-- write list of negative points below. use * as in ordinary wiki-list. --> | |||
| ? | * | + | * Despite the great accuracy, dispersion can be frustratingly poor at times | |
| ? | + | * Extremely slow main battery traverse speed | ||
| ? | + | * Second slowest Tier 10 battleship, with the second slowest rudder shift | ||
| ? | * Extremely slow | + | * Massive target with poor concealment | |
| ? | * | + | * Poor AA defenses, aircraft carriers will have no trouble striking ''Yamato'' | |
| ? | + | * Enormous citadel that, while well armored, rises high above the waterline and makes ''Yamato'' exceptionally vulnerable when showing broadside, or when her bow "cheeks" (the bow plating below the main turrets) are presented to enemy guns | ||
| ? | * | + | * Priority target due to its powerful guns and real life history | |
| ? | * | + | ||
| ? | * | + | ||
| ? | + | |||
| ? | + | |||
| |Research=<!-- write text about priority sequence of research below --> | |Research=<!-- write text about priority sequence of research below --> | |||
| ? | As a Tier X ship, ''Yamato'' has no additional modules to research. | + | As a Tier X ship, ''Yamato'' has no additional modules to research and comes elite on purchase. | |
| + | ||||
| + | ''[[Satsuma]]'' is researched off ''{{#var:ship_name}}'' at a cost of 1 XP. | |||
| |OptimalConfiguration=<!-- write some general text about selection of optimal configuration below (optional)--> | |OptimalConfiguration=<!-- write some general text about selection of optimal configuration below (optional)--> | |||
| |Upgrades=<!-- write text about best upgrades below --> | |Upgrades=<!-- write text about best upgrades below --> | |||
| ? | ||||
| ? | ||||
| ? | ||||
| ? | + | The recommended upgrades for ''{{#var:ship_name}}'' are as follows: | ||
| + | * '''Slot 1''': {{Main Armaments Modification 1}} | |||
| + | * '''Slot 2''': {{Damage Control System Modification 1}} | |||
| + | * '''Slot 3''': {{Aiming Systems Modification 1}} | |||
| + | * '''Slot 4''': {{Damage Control System Modification 2}} | |||
| + | * '''Slot 5''': {{Concealment System Modification 1}} | |||
| + | * '''Slot 6''': {{Main Battery Modification 3}} ''or'' {{UU Yamato}} | |||
| ? | + | '''Slot 6''' gives players a choice between {{Main Battery Modification 3}} to improve rate of fire, or {{UU Yamato}} to further improve accuracy. | ||
| |CommanderSkills=<!-- write text about best set of Commander Skills below --> | |CommanderSkills=<!-- write text about best set of Commander Skills below --> | |||
| + | ''{{#var:ship_name}}'' should be built for survivability, as it lacks AA power to be worth specializing into and is overall dreadful at brawling range due to its size and sluggishness. | |||
| ? | {{Commander Skills | + | {{Commander Skills 3 BB | |
| ? | | | + | | rating11 = 1 <!-- Gun Feeder --> | |
| ? | | | + | | rating12 = <!-- Pyrotechnician --> | |
| ? | | | + | | rating13 = <!-- Consumables Specialist --> | |
| ? | | | + | | rating14 = 2 <!-- Emergency Repair Specialist --> | |
| ? | + | | rating15 = <!-- Incoming Fire Alert --> | ||
| ? | | | + | | rating16 = 1 <!-- Preventive Maintenance --> | |
| ? | + | |||
| ? | | | + | ||
| ? | | | + | | rating21 = 3 <!-- Grease the Gears --> | |
| ? | + | | rating22 = <!-- Inertial Fuse for HE Shells --> | ||
| ? | + | | rating23 = <!-- Consumables Enhancements --> | ||
| ? | | | + | | rating24 = 2 <!-- Vigilance --> | |
| ? | | | + | | rating25 = 2 <!-- Priority Target --> | |
| ? | | | + | | rating26 = <!-- AA Gunner --> | |
| ? | | | + | ||
| ? | | | + | ||
| ? | | | + | | rating31 = <!-- Super-Heavy AP Shells --> | |
| ? | | | + | | rating32 = <!-- Long-Range Secondary Battery Shells --> | |
| ? | | | + | | rating33 = 3 <!-- Adrenaline Rush --> | |
| ? | + | | rating34 = 3 <!-- Basics of Survivability --> | ||
| ? | + | | rating35 = <!-- Enhanced Anti-Torpedo Protection --> | ||
| ? | | | + | | rating36 = <!-- Expert AA Marksman --> | |
| ? | | | + | ||
| ? | | | + | ||
| ? | | | + | | rating41 = <!-- Swift in Slience --> | |
| ? | | | + | | rating42 = <!-- Improved Secondary Battery Aiming --> | |
| ? | | | + | | rating43 = <!-- Close Quarters Combat --> | |
| ? | | | + | | rating44 = 3 <!-- Emergency Repair Expert --> | |
| ? | | | + | | rating45 = 3 <!-- Concealment Expert --> | |
| ? | | | + | | rating46 = 3 <!-- Fire Prevention Expert --> | |
| ? | + | |||
| ? | + | |||
| }} | }} | |||
| |Consumables=<!-- write text about selection of Consumables below --> | |Consumables=<!-- write text about selection of Consumables below --> | |||
| + | ''{{#var:ship_name}}'' can equip the following consumables: | |||
| + | * '''Slot 1:''' {{Damage Control Party}} | |||
| + | * '''Slot 2:''' {{Repair Party}} | |||
| + | * '''Slot 3:''' {{Spotting Aircraft}} '''or''' {{Catapult Fighter}} | |||
| + | {{Catapult Fighter}} is recommended to defend against aircraft. {{Spotting Aircraft}} will be quite useless in the game, considering that Yamato's guns are capable of shooting literally anywhere on the map. | |||
| |Camouflage=<!-- write text about useful camouflage below --> | |Camouflage=<!-- write text about useful camouflage below --> | |||
| ? | + | |Camouflage= {{TT Ship Camo Insert|shiptier=10}} | ||
| ? | ||||
| |Signals=<!-- write text about best set of signals below --> | |Signals=<!-- write text about best set of signals below --> | |||
| + | ''Yamato'' comes with 21 [[Ship:Flags#Signals|signal flag]] slots. The three most important flags are India Delta, Juliet Yankee Bissotwo and India Yankee; all of which will improve your survivability. If the captain goes with the '''Secondary Build''', the addition of Mike Yankee Soxisix will further improve the performance of ''Yamato''`s secondaries. | |||
| ? | + | {{Signal Flags | ||
| + | | Hotel Yankee = 1 | |||
| + | | Juliet Charlie = 1 | |||
| + | | November Foxtrot = 1 | |||
| + | | Zulu = 3 | |||
| + | | Juliet Yankee Bissotwo = 2 | |||
| + | | India Delta = 3 | |||
| + | | India Yankee = 3 | |||
| + | | November Echo Setteseven = 1 | |||
| + | | Zulu Hotel = 2 | |||
| + | | India Bravo Terrathree = 3 | |||
| + | | Sierra Mike = 1 | |||
| + | | Victor Lima = | |||
| + | ||||
| + | | Mike Yankee Soxisix = 3 | |||
| + | | Papa Papa = 1 | |||
| + | | India X-Ray = | |||
| + | | Equal Speed Charlie London = | |||
| + | | Juliet Whiskey Unaone = | |||
| + | ||||
| + | }} | |||
| + | ||||
| + | |Gallery=<!-- write below list of files without tags. description (if necessary) for each should be separated with template {{!}} --><gallery> | |||
| + | File:YamScout.jpg | |||
| + | File:YamDead.jpg | |||
| + | File:KremlinKillsYam.jpg | A Kremlin kisses a Yamato on the cheek to end a Succession League battle. | |||
| </gallery> | </gallery> | |||
| |History=<!-- write text below --> | |History=<!-- write text below --> | |||
| <div class="thumb tright"> | <div class="thumb tright"> | |||
| ? | {{AnnoWiki|content=<h3>Construction</h3> | + | {{AnnoWiki|content= | |
| ? | :Kure Naval Yard; Kure, Japan | + | <h2>''{{#var:ship_name}}'', 1942</h2> | |
| + | <h3>Construction</h3> | |||
| + | :Builder: Kure Naval Yard; Kure, Japan | |||
| :Laid down: 4 November 1937 | :Laid down: 4 November 1937 | |||
| :Launched: 8 August 1940 | :Launched: 8 August 1940 | |||
| Line 110: | Line 140: | |||
| ===Specifications=== | ===Specifications=== | |||
| :62,315 tons displacement, standard | :62,315 tons displacement, standard | |||
| + | :71,659 tons displacement, full load | |||
| :263m length | :263m length | |||
| :36.9m beam | :36.9m beam | |||
| Line 142: | Line 173: | |||
| }}</div> | }}</div> | |||
| + | {{VideoYT|zYrj3gzXgeA}} | |||
| + | ===History=== | |||
| + | ====Design==== | |||
| + | The ''Yamato''-class battleships were the next class of warships designed by the Japanese Navy after a long hiatus due to the ratification of a plethora of interwar naval treaties. But by the 1930s, Japan’s increasingly expansionist policies came under scrutiny by the League of Nations. To the world’s shock, Japan decided to withdraw from the League, which also meant she didn’t have to adhere to the aforementioned treaties. The Government understood that her empire would come into conflict with the United States, and devised plans for countering this new, potential threat. Knowing that Japan couldn’t out-produce the US, the IJN opted to make individual ships that were superior to their US counterparts. | |||
| + | Design work on this new class of battleships commenced in 1934, the year Japan pulled out of the League. The ambitious project started out with a selection process of 24 designs. The three most integral components were the ones that were under intense selection: armor, armament, and propulsion. The ideas for propulsion were uncharacteristically creative at a time when turbine power was staple. Many considerations of diesel and hybrid-diesel systems were considered due to the promise of greater endurance. Ultimately, it was narrowed down to conventional turbine propulsion, as previous experimentation with diesel propulsion for a capital ship proved problematic. The system – at such a scale – was highly unreliable, and to replace major components required the removal of many appliqués of armor. As well, the displacement was finally pegged at just under 66,000 tonnes, making this the largest battleship ever constructed, and with such allocation of space, the designers were able to authorize the implementation of 18.1”-caliber guns as opposed to a more traditional choice of 16” guns. By 1937, the designs were finalized, and the construction of five ''Yamato''-class battleships was planned. | |||
| + | The ships were imposing beasts; as ambition fueled much of the design process. From the get-go, the idea was for such a vessel to engage multiple capital ships simultaneously. To do so, it required the armor to maintain sustaining power in a firefight. The belt was no less than 16.1”, and the bulkheads were a tad thinner at 13.7”. The top was capped with a plate about 8” thick, made of improved homogeneous armor. Furthermore, the armored deck was sloped at the outboard edges, thickened to 9", to save on some weight by reducing belt height. But the thickest plates were not on the sides, but found on the faces of the turrets, at an impressive thickness of 26” at most; they were truly impregnable from the front. The novel technique of arc welding was used in the construction process. Its use was justified, as not only was the seams between the armor plates were even tighter, but it also allowed for designers to attach a larger lower armor belt than with previous methods. | |||
| + | The scheme was not perfect though. While the torpedo protection system on paper looked impressive in concept and on paper, poor detailed design of the system meant that in actuality the performance was subpar. The bulges were adequate in their depth, but the riveted seam between the upper and lower belt was directly underneath the bulge, which was shown to be prone to rupture upon impact. | |||
| + | To move such a heavy vessel, the class used 12 Kampon oil-fired boilers, which fed to 4 turbines. This generated an impressive 150,000 shaft horsepower, but it was not enough to break the 30 knot mark; shy by three knots. This was a compromise the designers were willing to take, but went against their venerated belief of speed is key. This drawback prevented the battleships to keep pace with fleet carriers in combined-arms action, as fuel consumption would be unsustainable. | |||
| + | The most characteristic feature of these massive ships was their choice in armaments. Welding nine 18.1” guns in three triple-turrets; two super firing in the front, and one facing the rear. This gave the battleships the ability to hurdle 13 tonnes on ordinance onto a target up to 42 kilometers away at a pace of 1.5 - 2 salvos per minute. The hope was that such firepower would be sufficient to deter aggressors from taking action; a feat of intimidation not hard to believe. Supplementary, the ships initially carried twelve 155mm dual-purpose guns in the form of six twin-gun turrets; three on each flank of the main superstructure. Additionally, the ''Yamato''-class carried a dozen 127mm AA guns in six dual-mounts, and twenty-four 25mm AA guns in eight triple-mounts for defense. By 1944 it was understood that the anti-aircraft firepower of these ships were severely handicapped, and the class underwent modifications. Two of the secondary turrets were removed, and in their place, another 12, 127mm guns were added and a whopping 138, 25mm guns were added. | |||
| + | ''Yamato'', named after the Yamato Province, was the lead-ship of her class. Built by the Kure Naval Arsenal, she was laid down on 4 November 1937. She was launched 8 August 1940 and commissioned 16 December 1941. | |||
| ? | + | ====Service==== | ||
| ? | + | Throughout 1942, she served as the flagship of the Japanese Combined Fleet, and in June 1942 Admiral Isoroku Yamamoto directed the fleet from her bridge during the Battle of Midway, a disastrous defeat for Japan. ''[[Musashi]]'' took over as the Combined Fleet flagship in early 1943, and ''Yamato'' spent the rest of the year, and much of 1944, moving between the major Japanese naval bases of Truk and Kure in response to American threats. Although present at the Battle of the Philippine Sea in June 1944, she played no part in the battle. | ||
| ? | + | |||
| ? | + | |||
| ? | + | |||
| ? | === | + | ||
| ? | + | |||
| ? | + | |||
| ? | + | |||
| The only time ''Yamato'' fired her main guns at enemy surface targets was in October 1944, when she was sent to engage American forces invading the Philippines during the Battle of Leyte Gulf. On the verge of success the Japanese force turned back, believing they were engaging an entire US carrier fleet rather than the light escort carrier group that was all that stood between the battleship and the vulnerable troop transports. | The only time ''Yamato'' fired her main guns at enemy surface targets was in October 1944, when she was sent to engage American forces invading the Philippines during the Battle of Leyte Gulf. On the verge of success the Japanese force turned back, believing they were engaging an entire US carrier fleet rather than the light escort carrier group that was all that stood between the battleship and the vulnerable troop transports. | |||
| Line 164: | Line 198: | |||
| During 1944, the balance of naval power in the Pacific decisively turned against Japan, and by early 1945 its fleet was much depleted and badly hobbled by critical fuel shortages in the home islands. In a desperate attempt to slow the Allied advance, ''Yamato'' was dispatched on a one-way mission to Okinawa in April 1945, with orders to beach herself and fight until destroyed protecting the island. The task force was spotted south of Kyushu by US submarines and aircraft, and on 7 April 1945 she was sunk by American carrier-based bombers and torpedo bombers with the loss of most of her crew. | During 1944, the balance of naval power in the Pacific decisively turned against Japan, and by early 1945 its fleet was much depleted and badly hobbled by critical fuel shortages in the home islands. In a desperate attempt to slow the Allied advance, ''Yamato'' was dispatched on a one-way mission to Okinawa in April 1945, with orders to beach herself and fight until destroyed protecting the island. The task force was spotted south of Kyushu by US submarines and aircraft, and on 7 April 1945 she was sunk by American carrier-based bombers and torpedo bombers with the loss of most of her crew. | |||
| + | ===Historical Inaccuracies=== | |||
| + | * ''Yamato''’s overall dark gray paint scheme is missing. Demounting the premium camouflage reveals the ship's historical appearance, but players will not benefit from the camouflage's bonuses. | |||
| + | * Light and dark green camouflage was only applied to aircraft carriers. ''Yamato'' was painted in dark gray throughout her career. | |||
| + | * ''Yamato''’s radars fitted on the rangefinder are rotateable as seen on official trailer videos. However the radars remain stationary in-game. | |||
| + | * ''Yamato''’s name written in hiragana on the stern is missing. | |||
| ? | |HistoricalGallery=<!-- write below list of files without tags. description (if necessary) for each should be separated with | + | |HistoricalGallery=<!-- write below list of files without tags. description (if necessary) for each should be separated with | --><gallery> | |
| ? | image:Yamato_during_Trial_Service.jpg|''Yamato'' on trials in 1941 | + | image:Yamato_during_Trial_Service.jpg|''Yamato'' on trials in 1941. | |
| ? | image:YamatoClassBattleships.jpg|''Yamato'' and ''Musashi'' anchored in the waters off of the Truk Islands in 1943 | + | image:YamatoClassBattleships.jpg|''Yamato'' and ''Musashi'' anchored in the waters off of the Truk Islands in 1943. | |
| image:Yamato_history_1.jpg| | image:Yamato_history_1.jpg| | |||
| image:Yamato_hit_by_bomb.jpeg| | image:Yamato_hit_by_bomb.jpeg| | |||
| ? | File:Yamato sea trials 2.jpg|''Yamato'' undergoing trials | + | File:Yamato sea trials 2.jpg|''Yamato'' undergoing trials. | |
| File:Yamato model AA guns.jpg|''Yamato''’s port-side anti-aircraft armament as depicted in the model of the ship at the 'Yamato Museum' in Kure | File:Yamato model AA guns.jpg|''Yamato''’s port-side anti-aircraft armament as depicted in the model of the ship at the 'Yamato Museum' in Kure | |||
| ? | File:Yamato-armorsheme-DE - magazines cut.svg|Protection schematics of the class at the rear turret. Here is another cut amidships | + | File:Yamato_protection_scheme-Fixed.jpeg|Overall armor schematic and machinery placement. | |
| ? | File:YAMATO Moder.JPG|Visitors to the Yamato Museum examine the museum's 1:10 scale model of the battleship in 2006 | + | File:Yamato-armorsheme-DE - magazines cut.svg|Protection schematics of the class at the rear turret. Here is another cut amidships. | |
| + | File:YAMATO Moder.JPG|Visitors to the Yamato Museum examine the museum's 1:10 scale model of the battleship in 2006. | |||
| </gallery> | </gallery> | |||
| |Video=<!-- put below video clips with using template VideoYT. You can use html-tags for formatting. --> | |Video=<!-- put below video clips with using template VideoYT. You can use html-tags for formatting. --> | |||
| + | {{VideoYT|hsexhqe_sZg}} | |||
| + | {{VideoYT|p_nFc7cFFqU}} | |||
| + | {{VideoYT|Cs5RQneOrrs}} | |||
| + | {{VideoYT|rgleqUmSgQk}} | |||
| + | {{VideoYT|YTegxCoiRzE}} | |||
| |Ref= <!-- write below --> | |Ref= <!-- write below --> | |||
| + | <references /> | |||
| + | # [https://en.wikipedia.org/wiki/Japanese_battleship_Yamato Japanese battleship ''Yamato'' - Wikipedia] | |||
| + | # [https://en.wikipedia.org/wiki/Yamato-class_battleship ''Yamato''-class battleship - Wikipedia] | |||
| + | # [https://worldofwarships.com/en/news/general-news/142-yamato-trailer/ 1:42 Scale: Yamato – Trailer - News - World of Warships] | |||
| + | # [https://worldofwarships.com/en/news/general-news/142-yamato/ 1:42 Scale: Yamato - News - World of Warships] | |||
| + | # [https://worldofwarships.com/en/news/general-news/armada-yamato/ Armada: Yamato - News - World of Warships] | |||
| + | # [https://worldofwarships.com/en/news/general-news/dry-dock-yamato/ Dry Dock: Yamato - News - World of Warships] | |||
| + | # [https://worldofwarships.com/en/news/game-updates/yamato-in-wows/ Naval Legends in World of Warships: Yamato - 04/22/2019 - News - World of Warships] | |||
| + | # [https://worldofwarships.com/en/news/general-news/naval-legends-yamato/ Naval Legends: Yamato - 08/21/2015 - News - World of Warships] | |||
| + | # [https://worldofwarships.com/en/news/general-news/squall-line-sunken-ships-yamato/ Squall Line: Yamato - News - World of Warships] | |||
| + | # [https://worldofwarships.com/en/news/history/yamato-ten-go/ Yamato’s Final Mission: Operation Ten-Go - News - World of Warships] | |||
| + | # [https://www.youtube.com/watch?v=Cs5RQneOrrs Armada: Battleship Yamato - World of Warships Official Channel - YouTube] | |||
| + | # [https://www.youtube.com/watch?v=rgleqUmSgQk Dry Dock: Yamato - World of Warships Official Channel - YouTube] | |||
| + | # [https://www.youtube.com/watch?v=Yy98fOPhM4E Naval Legends in World of Warships: Yamato - World of Warships Official Channel - YouTube] | |||
| + | # [https://www.youtube.com/watch?v=ZM9M1E90GLk Operation Ten-Go: Yamato's Final Mission - World of Warships Official Channel - YouTube] | |||
| + | # [https://www.youtube.com/watch?v=Ddx_iUHkVjQ Scale 1:42. Yamato. Trailer - World of Warships Official Channel - YouTube] | |||
| + | # [https://www.youtube.com/watch?v=YTegxCoiRzEScale 1:42. Yamato - World of Warships Official Channel - YouTube] | |||
| + | {{WoWS Ship Changelog Insert|1= | |||
| + | *Added to the game in Update 0.1.1 (alpha version). | |||
| + | *Update 0.1.2: | |||
| + | **The horizontal aiming angles of the second and third turrets of the main battery were reduced (due to visualization errors). | |||
| + | **Reduced maneuverability. | |||
| + | *Update 0.3.1: | |||
| + | **Increased rate of fire for main battery guns. | |||
| + | *Update 0.3.1.4: | |||
| + | **Secondary firing range increased to 7 km. | |||
| + | *Update 0.4.0: | |||
| + | **Air detectability decreased from 17 to 16 km. | |||
| + | *Update 0.5.2: | |||
| + | **Experience earnings increased by 9%. | |||
| + | **Credit profitability increased by 8%. | |||
| + | *Update 0.5.11: | |||
| + | **The armored model of the hull was refined. | |||
| + | *Update 0.6.2: | |||
| + | **The national flag was moved from the stern to the mast. | |||
| + | *Update 0.6.4: | |||
| + | **Improved appearance. | |||
| + | *Update 0.6.5: | |||
| + | **Aircraft catapults are now positioned symmetrically. | |||
| + | *Update 0.6.12: | |||
| + | **Detectability when firing main guns in smoke changed to 19.27 km. | |||
| + | **Detection range of Kawanishi E15K1 carrier-based aircraft was adjusted to the correct values: from 4 km to 7 km when detected by air and to 8 km when detected by sea. | |||
| + | *Update 0.7.0.2: | |||
| + | **The bug with incorrect armor of the main battery turrets due to which damage to the main battery turrets was inflicted by any projectile, was fixed. | |||
| + | *Update 0.7.2: | |||
| + | **Players who have collected the "Rewards" sub-collection of the "Yamomoto Isoroku" collection can use an alternate permanent camouflage color. | |||
| + | *Update 0.7.6: | |||
| + | **Improved display of thin elements on the hull. | |||
| + | *Update 0.7.7: | |||
| + | **Main battery turret traverse speed increased from 2.5 to 3.0 degrees per second. | |||
| + | *Update 0.7.9: | |||
| + | **Added air defense installations on main battery turrets. | |||
| + | *Update 0.7.11: | |||
| + | **Armor-piercing shells of 155-mm secondary battery guns were replaced with high-explosive shells. | |||
| + | *Update 0.8.3: | |||
| + | **The appearance of the ship was radically changed. | |||
| + | **The composition of the air defense was changed. | |||
| + | **Continuous damage per second in the area of air defense was increased from 851 to 955. | |||
| + | **Fixed a bug where the aircraft takeoff animation was jerky. | |||
| + | *Update 0.8.4: | |||
| + | **The dimensions of the torpedo belt were increased. Now they correspond to the dimensions of the ship's torpedo belt before the 3D model update. | |||
| + | *Update 0.8.7: | |||
| + | **Minor fixes to geometry and textures. | |||
| + | *Update 0.9.7: | |||
| + | **Minor fixes to geometry and textures. | |||
| + | *Update 0.9.8: | |||
| + | **Minor fixes to textures and geometry of the ship. | |||
| + | *Update 0.9.11: | |||
| + | **Fixed geometry and textures of the ship. | |||
| + | *Update 0.10.0: | |||
| + | **The firing range of the secondary battery was increased to 7.3 km. | |||
| + | *Update 0.10.6: | |||
| + | **Fighters, as well as spotting aircraft, now launch from the catapults a bit faster. | |||
| + | *Update 0.10.10: | |||
| + | **Minor fixes to geometry and textures of the ship. | |||
| + | *Update 0.11.0: | |||
| + | **Fixed an error that caused the acceleration time not to change if the engine was damaged. | |||
| + | *Update 0.11.6: | |||
| + | **Minor fixes to model and textures of the ship. | |||
| + | *Update 12.3: | |||
| + | **The Japanese Lacquer permanent camouflage was added. | |||
| + | }} | |||
| }}<!-- DO NOT DELETE THIS LINE. DO NOT INSERT ANYTHING BELOW THIS LINE --> | }}<!-- DO NOT DELETE THIS LINE. DO NOT INSERT ANYTHING BELOW THIS LINE --> | |||
Latest revision as of 19:54, 26 March 2024

| Research price249000 exp |
| Purchase price20,600,000 |
| Hit Points97,200 |
| 460 mm/45 Type 94 in a triple turret3 х 3 pcs. |
| Rate of Fire2 shots/min. |
| Reload Time30 sec. |
| Rotation Speed3 deg./sec. |
| 180 Degree Turn Time60 sec. |
| Firing Range26.63 km. |
| Maximum Dispersion275 m. |
| HE Shell460 mm HE Type0 |
| Maximum HE Shell Damage7,300 |
| Chance of Fire on Target Caused by HE Shell35 % |
| Initial HE Shell Velocity805 m./s. |
| HE Shell Weight1360 kg. |
| AP Shell460 mm AP/APC Type91 |
| Maximum AP Shell Damage14,800 |
| Initial AP Shell Velocity780 m./s. |
| AP Shell Weight1460 kg. |
| 127 mm/40 Type 89 on a Model A1 Mod.3 mount6 х 2 pcs. |
| Firing Range7.3 km. |
| Rate of Fire10 shots/min. |
| Reload Time6 sec. |
| HE Shell127 mm HE Type0 |
| Maximum HE Shell Damage2,100 |
| Initial HE Shell Velocity725 m./s. |
| Chance of Fire on Target Caused by HE Shell8 % |
| 127 mm/40 Type 89 on a Model A1 mount6 х 2 pcs. |
| Firing Range7.3 km. |
| Rate of Fire12 shots/min. |
| Reload Time5 sec. |
| HE Shell127 mm HE Type0 |
| Maximum HE Shell Damage2,100 |
| Initial HE Shell Velocity725 m./s. |
| Chance of Fire on Target Caused by HE Shell8 % |
| 155 mm/60 3rd Year Type in a triple turret2 х 3 pcs. |
| Firing Range7.3 km. |
| Rate of Fire5 shots/min. |
| Reload Time12 sec. |
| HE Shell155 mm HE Type0 |
| Maximum HE Shell Damage2,600 |
| Initial HE Shell Velocity925 m./s. |
| Chance of Fire on Target Caused by HE Shell10 % |
| 127 mm/40 Type 89 on a Model A1 Mod.3 mount6 х 2 pcs. |
| . . . Average Damage per Second60.6 |
| . . . Firing Range5.01 km. |
| 127 mm/40 Type 89 on a Model A1 mount6 х 2 pcs. |
| . . . Average Damage per Second60.6 |
| . . . Firing Range5.01 km. |
| 25 mm/60 Type 96 on a triple mount4 х 3 pcs. |
| . . . Average Damage per Second13.2 |
| . . . Firing Range2.49 km. |
| 25 mm/60 Type 96 on a triple mount24 х 3 pcs. |
| . . . Average Damage per Second79.2 |
| . . . Firing Range2.49 km. |
| 25 mm/60 Type 96 on a triple mount16 х 3 pcs. |
| . . . Average Damage per Second52.8 |
| . . . Firing Range2.49 km. |
| 25 mm/60 Type 96 on a single mount6 х 1 pcs. |
| . . . Average Damage per Second10.8 |
| . . . Firing Range2.49 km. |
| 25 mm/60 Type 96 on a triple mount8 х 3 pcs. |
| . . . Average Damage per Second26.4 |
| . . . Firing Range2.49 km. |
| 13 mm/76 Type 93 on a twin mount2 х 2 pcs. |
| . . . Average Damage per Second4 |
| . . . Firing Range1.2 km. |
| Maximum Speed27 knot |
| Turning Circle Radius900 m. |
| Rudder Shift Time22.1 sec. |
| Surface Detectability Range17.46 km. |
| Air Detectability Range12.79 km. |

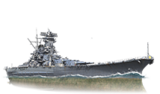
Yamato — Japanese Tier X battleship.
The biggest warship of World War II and the world's largest battleship. Yamato was designed around the idea that an individual ship could have superiority over any battleship of a potential enemy. Her main guns had overwhelming firepower. The ship maintained a very high level of survivability due to reliable armor and robust torpedo protection. Yamato’s AA capabilities were highly efficient due to carrying numerous AA artillery guns.
Modules
 |
Rate of Fire (shots/min) | 180° Turn Time (sec) | Maximum Dispersion (m) | Maximum HE Shell Damage (HP) | Chance of Fire on Target Caused by HE Shell (%) | Maximum AP Shell Damage (HP) |
Research price (exp) |
Purchase price ( | |
|---|---|---|---|---|---|---|---|---|---|
| 460 mm/45 Type 94 in a triple turret | 2 | 60 | 275 | 7,300 | 35 | 14,800 | 0 | 2,300,000 |
 |
Hit Points (HP) | Armor (mm) | Armor (mm) | Main Turrets (pcs.) | Secondary Gun Turrets (pcs.) | AA Mounts (pcs.) | Torpedo Tubes (pcs.) | Hangar Capacity (pcs.) |
Research price (exp) |
Purchase price ( | |
|---|---|---|---|---|---|---|---|---|---|---|---|
| Yamato | 97,200 | 19 | 650 | 3 | 6/6/2 | 2/6/52/6/6 | 0 | 3,300,000 |
 |
IDS_SHIP_PARAM_SUO_INCREASE_DIST (%) | Maximum Firing Range (km) |
Research price (exp) |
Purchase price ( | |
|---|---|---|---|---|---|
| Type10 mod. 1 | 0 | 0 | 2,100,000 |
 |
Maximum Speed (knot) |
Research price (exp) |
Purchase price ( | |
|---|---|---|---|---|
| Propulsion: 150,000 hp | 27 | 0 | 590,000 |
Compatible Upgrades
| Slot 1 |
|||||
|---|---|---|---|---|---|
| Slot 2 |
|||||
| Slot 3 |
|||||
| Slot 4 |
|||||
| Slot 5 |
|||||
| Slot 6 |
Player Opinion
Performance
Refer to the in-game Port screens for more useful data.
The pinnacle of all Japanese battleship design philosophy and possibly of the entire world, Yamato gains its place as one of the most solid battleships at her tier. She has the fourth-largest hit points of any ship at tier X at a staggering 97200 next to Vermont’s 102800 Großer Kurfürst’s 105800, and Kremlin’s 108300. Her guns have the one of the highest citadel hit damage of any round in the game, at 14800 HP per citadel hit. While her individual AA mounts are mediocre, the sheer number of AA guns, nearly 150 25mm AA barrels (in real life, 162 25mm AA barrels in the latest upgrade), and 24 127mm DP guns provide a mild deterrent, particularly against lower-tier carriers. She, along with her sister ship Musashi holds the record for best torpedo protection in the game, with a value of 56%, which is rather surprising considering that in real life, they both suffered from weak torpedo protection due to design flaws with the area joining the upper and lower armor belts. In the game, Yamato represents the upgraded 1945 variant while Musashi depicts the original version.
With a turning radius of 800m and a top speed of 27 knots, she is also surprisingly maneuverable despite her large size, though still quite short of her real-life maneuverability. However, with a long rudder shift time and extremely slow turret traverse, one must plan all actions, or risk being caught off-guard and unable to react. The guns, while having better accuracy than Conqueror, Montana, and Großer Kurfürst, are very unforgiving, with a 30 second reload stock, which can be decreased to just under 27 seconds at the expense of further reducing its abysmal turret traverse by using a piece of equipment. Being one of the biggest ships in the game, Yamato is constantly targeted by Aircraft Carriers, and despite the numerous AA guns, Yamato’s AA firepower is quite lacking when compared to other T10 battleships, so much so that a high tier carrier can still get planes through, making aerial attacks Yamato's greatest weakness. Hence it is advised to stay near ships that have solid AA suites such as cruisers for an AA "aegis" to be created. In addition, even though your armor is solid, in the game you should still try to angle your ship as sometimes shells may have a chance to hit home and deal glaring damage. Keep in mind that her high citadel can easily be hit if the enemy manages to penetrate your armor, especially since the citadel is weirdly shaped and can be punched through below the a and b turret and and y turret.
Despite all of these drawbacks, Yamato is a very robust battleship in a long-ranged and defensive position. She may not be the fastest, the stealthiest, or the Tier X battleship with the highest RoF, but her armor, gun caliber, and health more than makeup for it. Her guns are so massive, and combined with their immense accuracy, she is a formidable foe. With some good aim and luck, Yamato's glaring damage can wipe battleships off the sea, allowing more vulnerable cruisers, such as Des Moines and Hindenburg, to mop up the remaining enemies. Overall, she is a powerful asset that, with the right build, good teammates, and in the hands of a skilled player, will dominate the battle and can even control it.Pros:
- Amazing main battery range, Second best in the game for a battleship falling just shy of Satsuma
- Yamato's main gun caliber is large enough to let AP shells overmatch 32mm plating
- Great main battery accuracy, which can be further improved with Main Battery Director System (
 )
)
- Shell velocity is average, but does not bleed much at range thanks to shell mass
- Large hitpoint pool and thick deck and belt armor make Yamato durable when properly positioned
- Impressive torpedo damage reduction
- Ridiculous main battery armor, Yamato's main turrets are very hard to disable or destroy
Cons:
- Despite the great accuracy, dispersion can be frustratingly poor at times
- Extremely slow main battery traverse speed
- Second slowest Tier 10 battleship, with the second slowest rudder shift
- Massive target with poor concealment
- Poor AA defenses, aircraft carriers will have no trouble striking Yamato
- Enormous citadel that, while well armored, rises high above the waterline and makes Yamato exceptionally vulnerable when showing broadside, or when her bow "cheeks" (the bow plating below the main turrets) are presented to enemy guns
- Priority target due to its powerful guns and real life history
Research
As a Tier X ship, Yamato has no additional modules to research and comes elite on purchase.
Satsuma is researched off Yamato at a cost of 1 XP.Optimal Configuration
Upgrades
The recommended upgrades for Yamato are as follows:
- Slot 1: Main Armaments Modification 1

- Slot 2: Damage Control System Modification 1

- Slot 3: Aiming Systems Modification 1

- Slot 4: Damage Control System Modification 2

- Slot 5: Concealment System Modification 1

- Slot 6: Main Battery Modification 3
 or Main Battery Director System ()
Slot 6 gives players a choice between Main Battery Modification 3 ![]() to improve rate of fire, or Main Battery Director System (
to improve rate of fire, or Main Battery Director System (![]() ) to further improve accuracy.
) to further improve accuracy.
Commander Skills
Yamato should be built for survivability, as it lacks AA power to be worth specializing into and is overall dreadful at brawling range due to its size and sluggishness.
| Recommended Commander Skills | ||||||
|---|---|---|---|---|---|---|
| Cost (points) |
Attack | Defense | ||||
| 1 |
★ |
|
|
★★ |
|
★ |
| 2 |
★★★ |
|
|
★★ |
★★ |
|
| 3 |
|
|
★★★ |
★★★ |
|
|
| 4 |
|
|
|
★★★ |
★★★ |
★★★ |
| Key: ★★★ - Extremely Useful ★★ - Frequently Useful ★ - Occasionally Useful No stars - Not Useful | ||||||
Consumables
Yamato can equip the following consumables:
- Slot 1: Damage Control Party

- Slot 2: Repair Party

- Slot 3: Spotting Aircraft
 or Catapult Fighter
Catapult Fighter ![]() is recommended to defend against aircraft. Spotting Aircraft
is recommended to defend against aircraft. Spotting Aircraft ![]() will be quite useless in the game, considering that Yamato's guns are capable of shooting literally anywhere on the map.
will be quite useless in the game, considering that Yamato's guns are capable of shooting literally anywhere on the map.
Signals
Yamato comes with 21 signal flag slots. The three most important flags are India Delta, Juliet Yankee Bissotwo and India Yankee; all of which will improve your survivability. If the captain goes with the Secondary Build, the addition of Mike Yankee Soxisix will further improve the performance of Yamato`s secondaries.
Recommended Signal Flags 
| |||||
|---|---|---|---|---|---|
| Combat | |||||
 ★ |
 ★★ |
 ★★★ |
 ★ |

|

|

|
 ★★★ |
 ★ |
 ★ |
 ★ |
 ★★★ |

|

| ||||
Note: Use of the Juliet Charlie signal makes detonation impossible.
Gallery
A Kremlin kisses a Yamato on the cheek to end a Succession League battle.


Historical Info
Historical Gallery


Video
References
- Japanese battleship Yamato - Wikipedia
- Yamato-class battleship - Wikipedia
- 1:42 Scale: Yamato – Trailer - News - World of Warships
- 1:42 Scale: Yamato - News - World of Warships
- Armada: Yamato - News - World of Warships
- Dry Dock: Yamato - News - World of Warships
- Naval Legends in World of Warships: Yamato - 04/22/2019 - News - World of Warships
- Naval Legends: Yamato - 08/21/2015 - News - World of Warships
- Squall Line: Yamato - News - World of Warships
- Yamato’s Final Mission: Operation Ten-Go - News - World of Warships
- Armada: Battleship Yamato - World of Warships Official Channel - YouTube
- Dry Dock: Yamato - World of Warships Official Channel - YouTube
- Naval Legends in World of Warships: Yamato - World of Warships Official Channel - YouTube
- Operation Ten-Go: Yamato's Final Mission - World of Warships Official Channel - YouTube
- Scale 1:42. Yamato. Trailer - World of Warships Official Channel - YouTube
- 1:42. Yamato - World of Warships Official Channel - YouTube
Ship Change Log
See here for links to Update notes.
- Added to the game in Update 0.1.1 (alpha version).
- Update 0.1.2:
- The horizontal aiming angles of the second and third turrets of the main battery were reduced (due to visualization errors).
- Reduced maneuverability.
- Update 0.3.1:
- Increased rate of fire for main battery guns.
- Update 0.3.1.4:
- Secondary firing range increased to 7 km.
- Update 0.4.0:
- Air detectability decreased from 17 to 16 km.
- Update 0.5.2:
- Experience earnings increased by 9%.
- Credit profitability increased by 8%.
- Update 0.5.11:
- The armored model of the hull was refined.
- Update 0.6.2:
- The national flag was moved from the stern to the mast.
- Update 0.6.4:
- Improved appearance.
- Update 0.6.5:
- Aircraft catapults are now positioned symmetrically.
- Update 0.6.12:
- Detectability when firing main guns in smoke changed to 19.27 km.
- Detection range of Kawanishi E15K1 carrier-based aircraft was adjusted to the correct values: from 4 km to 7 km when detected by air and to 8 km when detected by sea.
- Update 0.7.0.2:
- The bug with incorrect armor of the main battery turrets due to which damage to the main battery turrets was inflicted by any projectile, was fixed.
- Update 0.7.2:
- Players who have collected the "Rewards" sub-collection of the "Yamomoto Isoroku" collection can use an alternate permanent camouflage color.
- Update 0.7.6:
- Improved display of thin elements on the hull.
- Update 0.7.7:
- Main battery turret traverse speed increased from 2.5 to 3.0 degrees per second.
- Update 0.7.9:
- Added air defense installations on main battery turrets.
- Update 0.7.11:
- Armor-piercing shells of 155-mm secondary battery guns were replaced with high-explosive shells.
- Update 0.8.3:
- The appearance of the ship was radically changed.
- The composition of the air defense was changed.
- Continuous damage per second in the area of air defense was increased from 851 to 955.
- Fixed a bug where the aircraft takeoff animation was jerky.
- Update 0.8.4:
- The dimensions of the torpedo belt were increased. Now they correspond to the dimensions of the ship's torpedo belt before the 3D model update.
- Update 0.8.7:
- Minor fixes to geometry and textures.
- Update 0.9.7:
- Minor fixes to geometry and textures.
- Update 0.9.8:
- Minor fixes to textures and geometry of the ship.
- Update 0.9.11:
- Fixed geometry and textures of the ship.
- Update 0.10.0:
- The firing range of the secondary battery was increased to 7.3 km.
- Update 0.10.6:
- Fighters, as well as spotting aircraft, now launch from the catapults a bit faster.
- Update 0.10.10:
- Minor fixes to geometry and textures of the ship.
- Update 0.11.0:
- Fixed an error that caused the acceleration time not to change if the engine was damaged.
- Update 0.11.6:
- Minor fixes to model and textures of the ship.
- Update 12.3:
- The Japanese Lacquer permanent camouflage was added.