Zuiho
| Revision as of 07:02, 1 August 2017 Adrenaline Rush is useless for carriers | Revision as of 19:56, 3 July 2020 CS2 | |||
13 intermediate revisions by 6 users not shown | ||||
| Line 3: | Line 3: | |||
| |Anno=<!-- you can write below short description for the ship. it will replace default once. --> | |Anno=<!-- you can write below short description for the ship. it will replace default once. --> | |||
| ? | A small and reasonably fast aircraft carrier originally built as a submarine tender then subsequently converted into a carrier. Despite her small size, that did not allow her to carry a large air group, ''Zuiho'' was equipped with good torpedo protection and | + | A small and reasonably fast aircraft carrier originally built as a submarine tender then subsequently converted into a carrier. Despite her small size, that did not allow her to carry a large air group, ''Zuiho'' was equipped with good torpedo protection and sufficiently powerful artillery for her type.<!-- <br><br>{{Model3DViewer|65d75d5efca54515ac10da3cc6b2d2c1}}--> | |
| |Performance=<!-- write text about performance in battles below --> | |Performance=<!-- write text about performance in battles below --> | |||
| ? | ''Zuiho'' is almost twice as fast as ''[[Bogue]]'' and has better surface concealment, but is more easily detected by aircraft. She has the speed and maneuverability to flee and evade incoming fire, but can put up surprisingly stiff resistance with her AA and secondary batteries. However, its aircraft are | + | ''Zuiho'' is almost twice as fast as ''[[Bogue]]'' and has better surface concealment, but is more easily detected by aircraft. She has the speed and maneuverability to flee and evade incoming fire, but can put up surprisingly stiff resistance with her AA and secondary batteries. However, its aircraft are easily shredded, and your plane reserve only contains enough to replace each squadron once. | |
| |Research=<!-- write text about priority sequence of research below --> | |Research=<!-- write text about priority sequence of research below --> | |||
| Line 14: | Line 14: | |||
| * Reasonable AA and secondary battery capabilities. | * Reasonable AA and secondary battery capabilities. | |||
| * Good concealment, speed and maneuverability. | * Good concealment, speed and maneuverability. | |||
| ? | * Upgraded flight control loadout gives enemy ships a real pain | + | * Upgraded flight control loadout gives enemy ships a real pain when played correctly. | |
| * Decent armor, allowing for HE shells to be negated somewhat. | * Decent armor, allowing for HE shells to be negated somewhat. | |||
| ? | * Ship speed almost twice as fast as its counterpart ''[[Bogue]]''. | + | * Ship speed almost twice as fast as its American counterpart ''[[Bogue]]''. | |
| ? | * Aircraft speed is superior to | + | * Aircraft speed is superior to any planes ''Bogue'' has access to. | |
| ? | * Plane reserve holds 2 more planes than ''Bogue'' | + | * Plane reserve holds 2 more planes than ''Bogue''. | |
| * 4 squadrons compared to ''Bogue''’s maximum of 3 squadrons , allowing for better projection of airpower across more of the map at once. | * 4 squadrons compared to ''Bogue''’s maximum of 3 squadrons , allowing for better projection of airpower across more of the map at once. | |||
| * A fighter squadron comes with every loadout. | * A fighter squadron comes with every loadout. | |||
| Line 32: | Line 32: | |||
| |Upgrades=<!-- write text about best upgrades below --> | |Upgrades=<!-- write text about best upgrades below --> | |||
| ? | + | The recommended upgrades for ''Zuiho'' are as follows: | ||
| + | The recommended upgrades for ''{{#var:ship_name}}'' are as follows: | |||
| + | *'''Slot 1''': {{Air Groups Modification 1}} | |||
| + | *'''Slot 2''': {{Damage Control System Modification 1}} | |||
| + | *'''Slot 3''': {{Air Groups Modification 2}} | |||
| + | ||||
| + | '''Upgrade Slot 3''' is the main choice of upgrades with ''{{#var:ship_name}}''. For players looking to improve their fighter's capabilities, {{Air Groups Modification 2}} is highly recommended, as ''[[Bogue]]'' is capable of having up to 7 fighters in the air at once. Otherwise, the {{Flight Control Modification 1}} helps players land and launch ''{{#var:ship_name}}''`s multiple flight squadrons. | |||
| |CommanderSkills=<!-- write text about best set of Commander Skills below --> | |CommanderSkills=<!-- write text about best set of Commander Skills below --> | |||
| ? | + | ''{{#var:ship_name}}'' uses the standard Japanese carrier captain skill setup. Emphasis should be on skills that boost fighter and bomber effectiveness and AA protection. [[Ship:Commander#Aircraft_Servicing_Expert|Aircraft Servicing Expert]], [[Ship:Commander#Torpedo_Acceleration|Torpedo Acceleration]], [[Ship:Commander#Torpedo_Armament_Expertise|Torpedo Armament Expertise]], and [[Ship:Commander#Air_Supremacy|Air Supremacy]] are "must have" skills. [[Ship:Commander#Dogfighting_Expert|Dogfighting Expert]] is also useful if ''{{#var:ship_name}}'' faces a higher tier carrier, and the bonus to ammunition allows her fighters to remain airborne longer before returning to rearm. | ||
| ? | + | |||
| ? | + | |||
| ? | + | |||
| ? | {{Commander | + | For AA defense, ''{{#var:ship_name}}'' has large-caliber 127mm guns that benefit from [[Ship:Commander#Manual_Fire_Control_for_AA_Armament|Manual Fire Control for AA Armament]]. [[Ship:Commander#Basic_Firing_Training|Basic Firing Training]] is also a good choice to boost all AA guns' DPS by 20%. While ''{{#var:ship_name}}''’s AA DPS output is not sufficient to wipe out entire squadrons, it can knock out a few planes and, in combination with maneuvering, can help avoid taking serious damage. | |
| ? | | | + | ||
| ? | + | |||
| ? | + | |||
| ? | + | |||
| ? | + | |||
| ? | | | + | ||
| ? | + | |||
| ? | + | |||
| ? | | | + | For bomber aircraft, [[Ship:Commander#Evasive_Maneuver|Evasive Maneuvers]] increases the bombers' survivability when returning to the carrier, and is especially useful when the enemy targets have activated [[Ship:Consumables#Defensive_AA_Fire|Defensive Fire]]. | |
| ? | | | + | ||
| ? | + | |||
| ? | + | |||
| ? | + | |||
| ? | + | |||
| ? | + | |||
| ? | + | |||
| ? | | | + | Any skills that are related to an enemy vessel firing on your carrier are not useful, as the cost-benefit of investing in survivability skills is not worth the minimal benefit they offer. ''{{#var:ship_name}}'' has a low HP pool, is large, unarmored, and will not survive an attack by any ship larger than a destroyer. ''{{#var:ship_name}}'' captains must position their ship near friendlies and far back from the enemy fleet. [[Ship:Commander#Concealment_Expert|Concealment Expert]] may be taken to further reduce detection range if the captain so desires. | |
| ? | | | + | {{block|!!|content=As of [[Ship:Update 0.6.3|Update 0.6.3]], this carrier can no longer use the manual attack function.}} | |
| ? | | | + | ||
| ? | | | + | ||
| ? | + | |||
| ? | + | |||
| ? | + | |||
| ? | + | |||
| ? | | Manual Fire Control for Secondary Armament | + | {{Commander Skills 2 | |
| ? | | Fire Prevention | + | <!-- This version enables a '0' rating. Use it for skills that have no effect (e.g. Improved Engines on a non-CV) or are detrimental to the ship. They should mirror what appears in the game client. --> | |
| ? | | Inertia Fuse for HE Shells | + | | rating11 = <!-- Priority Target --> | |
| ? | | | + | | rating12 = <!-- Preventive Maint --> | |
| ? | | Advanced Firing Training | + | | rating13 = 0 <!-- Expert Loader --> | |
| ? | | | + | | rating14 = <!-- Air Supremacy --> | |
| ? | | Radio Position Finding | + | | rating15 = <!-- Direction Center for Fighters --> | |
| ? | | Concealment Expert | + | | rating16 = <!-- Improved Engine Boost --> | |
| + | | rating17 = <!-- Incoming Fire Alert --> | |||
| + | | rating18 = <!-- Last Gasp --> | |||
| + | ||||
| + | | rating21 = <!-- High Alert --> | |||
| + | | rating22 = <!-- Jack of All Trades --> | |||
| + | | rating23 = 0 <!-- Expert Marksman --> | |||
| + | | rating24 = 0 <!-- Torpedo Acceleration --> | |||
| + | | rating25 = 0 <!-- Smoke Screen Expert --> | |||
| + | | rating26 = <!-- Improved Engines --> | |||
| + | | rating27 = <!-- Adrenaline Rush --> | |||
| + | | rating28 = <!-- Last Stand --> | |||
| + | ||||
| + | | rating31 = <!-- Basics of Survivability --> | |||
| + | | rating32 = <!-- Survivability Expert--> | |||
| + | | rating33 = 0 <!-- Torpedo Armament Expertise--> | |||
| + | | rating34 = <!-- Aircraft Armor --> | |||
| + | | rating35 = <!-- Basic Firing Training --> | |||
| + | | rating36 = <!-- Superintendent --> | |||
| + | | rating37 = <!-- Demolition Expert --> | |||
| + | | rating38 = <!-- Vigilance --> | |||
| + | ||||
| + | | rating41 = <!-- Manual Fire Control for Secondary Armament --> | |||
| + | | rating42 = <!-- Fire Prevention --> | |||
| + | | rating43 = <!-- Inertia Fuse for HE Shells --> | |||
| + | | rating44 = <!-- Sight Stabilization --> | |||
| + | | rating45 = <!-- Advanced Firing Training --> | |||
| + | | rating46 = <!-- Massive AA Fire --> | |||
| + | | rating47 = <!-- Radio Position Finding --> | |||
| + | | rating48 = <!-- Concealment Expert --> | |||
| }} | }} | |||
| |Consumables=<!-- write text about selection of Consumables below --> | |Consumables=<!-- write text about selection of Consumables below --> | |||
| ? | + | ''{{#var:ship_name}}'' can equip the following consumables: | ||
| + | * '''Slot 1:''' {{Damage Control Party}} | |||
| |Camouflage=<!-- write text about useful camouflage below --> | |Camouflage=<!-- write text about useful camouflage below --> | |||
| Line 85: | Line 97: | |||
| |Signals=<!-- write text about best set of signals below --> | |Signals=<!-- write text about best set of signals below --> | |||
| ? | As a carrier, '' | + | As a carrier, ''{{#var:ship_name}}'' can only mount at most four signals at a time and has no risk of detonating. Players should mount Equal Speed Charlie London ({{Equal Speed Charlie London|Size=18px}}), Zulu Hotel ({{Zulu Hotel|Size=18px}}), and, for the last two: November Echo Setteseven ({{November Echo Setteseven|Size=18px}}) and Juliet Whiskey Unaone ({{Juliet Whiskey Unaone|Size=18px}}). However, the latter two signal flags are not highly recommended if the player wishes to conserve the signals for later tiers. | |
| ? | | | + | {{Signal Flags | |
| + | | November Echo Setteseven = 2 | |||
| + | | Mike Yankee Soxisix = | |||
| + | | India X-Ray = | |||
| + | | Juliet Yankee Bissotwo = | |||
| + | | Victor Lima = | |||
| + | | Hotel Yankee = | |||
| + | | November Foxtrot = | |||
| + | | Sierra Mike = 1 | |||
| + | | India Delta = | |||
| + | | Juliet Whiskey Unaone = 2 | |||
| + | | India Yankee = | |||
| + | | Juliet Charlie = | |||
| + | ||||
| + | | Zulu = 1 | |||
| + | | India Bravo Terrathree = | |||
| + | | Equal Speed Charlie London = 3 | |||
| + | | Zulu Hotel = 3 | |||
| + | | Papa Papa = | |||
| + | ||||
| + | | Wyvern = 1 | |||
| + | | Red Dragon = 1 | |||
| + | | Dragon Flag = 1 | |||
| + | | Ouroboros = | |||
| + | | Hydra = 1 | |||
| + | }} | |||
| + | ||||
| + | |Gallery=<!-- write below list of files without tags. description (if necessary) for each should be separated with | --><gallery> | |||
| + | File:Zuiho Screenshot.jpeg| | |||
| </gallery> | </gallery> | |||
| |History=<!-- write text below --> | |History=<!-- write text below --> | |||
| ? | + | <div class="thumb tright"> | ||
| + | {{AnnoWiki|content= | |||
| + | <h2>''Zuiho'', 1940</h2> | |||
| + | ===Construction=== | |||
| + | :Laid down: 20 June 1935 | |||
| + | :Launched: 19 June 1936 | |||
| + | :Builder: Yokosuka Naval Arsenal, Yokosuka, Japan | |||
| + | :Completed: 27 December 1940 | |||
| + | :Commissioned: 27 December 1940 | |||
| + | ---- | |||
| + | ===Specifications=== | |||
| + | :Displacement: 11,262, standard | |||
| + | :Length: 205.5m | |||
| + | :Beam: 18.2m | |||
| + | :Draft: 6.64m | |||
| + | ---- | |||
| + | ====Machinery==== | |||
| + | :4 Kampon boilers, 2 Kampon geared steam turbines, 2 shafts | |||
| + | :2,600 tons of fuel oil | |||
| + | ---- | |||
| + | ====Performance==== | |||
| + | :28 knots at 52,000 shaft horsepower | |||
| + | :7,800 nautical miles at 18 knots | |||
| + | ---- | |||
| + | ====Armament==== | |||
| + | =====Secondary===== | |||
| + | :4 × 2 - 12.7 cm/40 Type 89 gun | |||
| + | =====Anti-Aircraft===== | |||
| + | :4 × 2 - Type 96 25 mm anti-aircraft guns | |||
| + | ---- | |||
| + | ====Aircraft==== | |||
| + | =====Total===== | |||
| + | :15 aircraft | |||
| + | =====Fighters===== | |||
| + | :Fifteen (15) Mitsubishi A6M2 "Zero" | |||
| + | =====Torpedo Bombers===== | |||
| + | :Four (4) Nakajima B5N2 "Kate" | |||
| + | :Eleven (11) Nakajima B6N "Jill" | |||
| + | ---- | |||
| + | ====Complement==== | |||
| + | :785 men | |||
| + | }} | |||
| + | </div> | |||
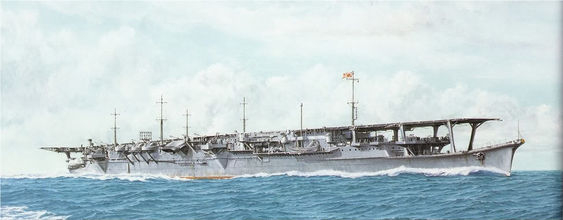
| + | [[File:Zuiho class 002.jpg|left|x220px|frame|link=|Artist's rendition of ''Zuiho'' at sea.]] | |||
| + | ||||
| + | ===Design=== | |||
| + | ''Zuihō'', originally named ''Takasaki'', was part of a group of two aircraft carriers built for the Imperial Japanese Navy before World War II. Both ships were originally built as submarine tenders, but were subsequently converted into carriers. After conversion, she was given a pair of destroyer-type geared steam turbines as replacement for the original diesel engines, one for each propeller. | |||
| + | ||||
| + | For a light carrier, ''Zuihō'' boasts a 180m long flight deck, a single hangar (124m x 18m) served by two octagonal centerline aircraft elevators (the rear elevator being a little smaller than the forward), and six-cable arresting gear. However, she was not outfitted with an aircraft catapult. Overall, she is a major improvement over Japan's and the world's first aircraft carrier, ''[[Hosho]]''. | |||
| + | ===Service=== | |||
| + | Converted, commissioned, and completed in late 1940, ''Zuihō'' remained in Japanese waters until late 1941, when Captain Sueo Ōbayashi assumed command and she became flagship of the Third Carrier Division. ''Zuihō'' played a secondary role in the Battle of Midway in mid-1942 and did not engage any American aircraft or ships during the battle. The ship participated in the Guadalcanal Campaign during the rest of 1942. She was lightly damaged during the Battle of the Santa Cruz Islands during this campaign and covered the evacuation of Japanese forces from the island in early 1943 after repairs. | |||
| Afterwards, her aircraft were disembarked several times in mid to late 1943 and used from land bases in a number of battles in the South West Pacific. ''Zuihō'' participated in the Philippine Sea and Leyte Gulf in mid-1944. In this last battle, ''Zuihō'' mainly served as a decoy for the main striking forces and she was finally sunk by American aircraft fulfilling her task. In between engagements, the ship served as a ferry carrier and a training ship. | Afterwards, her aircraft were disembarked several times in mid to late 1943 and used from land bases in a number of battles in the South West Pacific. ''Zuihō'' participated in the Philippine Sea and Leyte Gulf in mid-1944. In this last battle, ''Zuihō'' mainly served as a decoy for the main striking forces and she was finally sunk by American aircraft fulfilling her task. In between engagements, the ship served as a ferry carrier and a training ship. | |||
| + | ||||
| + | Throughout the years, ''Zuihō''’s aircraft configuration varied widely between 1941 and the time of her sinking: she never had more than 31 planes and no less than 14 at a time. Each configuration was mostly comprised of fighters, or evenly split with half bombers and half fighters. | |||
| + | ===Historical Inaccuracies=== | |||
| + | *''Zuiho''’s 1944 disruptive camouflage scheme is missing. | |||
| + | *''Zuiho''’s actual aircraft loadout was six A5Ms, six A6M2s and twelve B5N torpedo bombers. At Guadalcanal, she carried eighteen A6M2s and six B5Ns. In mid-1943, her air group consisted of eighteen Zeros and eight Aichi D3A dive bombers. In June 1944, during the Battle of the Philippine Sea, she carried six A6M5s, fifteen A6M2s, six B5N2s and three B6N1s. Finally, at Leyte Gulf where ''Zuiho'' was sunk, she carried twelve A6M5s and five B6N1s. | |||
| + | *The blue fuselage stripes on the A6M2 denotes an aircraft from the carrier ''Hiryu'', while the red fuselage stripe on the B5N2 is from ''Akagi''; ''Zuiho'''s aircraft had triple white stripes, though these were removed by early 1943. | |||
| |HistoricalGallery=<!-- write below list of files without tags. description (if necessary) for each should be separated with | --><gallery> | |HistoricalGallery=<!-- write below list of files without tags. description (if necessary) for each should be separated with | --><gallery> | |||
| Line 101: | Line 197: | |||
| File:Zuiho.jpg|''Zuihō'' during the Battle of Cape Engaño, October 1944. | File:Zuiho.jpg|''Zuihō'' during the Battle of Cape Engaño, October 1944. | |||
| File:Fig_of_japanese_aircraft_carrier_Shoho_in_1942.gif|Artist's rendering of ''Shōhō'' in 1942. | File:Fig_of_japanese_aircraft_carrier_Shoho_in_1942.gif|Artist's rendering of ''Shōhō'' in 1942. | |||
| + | File:Zuiho1944.jpg|''Zuihō'' underway at sea, 1944. | |||
| + | File:Zuiho1944(2).jpg|Stock photo of aircraft carrier ''Zuihō''. | |||
| + | File:Zuiho1944(3).jpg|''Zuihō'' anchored in port, 1944. | |||
| + | File:Zuiho1944shema.png|Basic scheme of ''Zuihō'' in 1944. | |||
| </gallery> | </gallery> | |||
Revision as of 19:56, 3 July 2020
[[File:<value_unset_error>_icon_small.png|<value_unset_error>|link=Ship:<value_unset_error>]] [[File:<value_unset_error>_icon_small.png|<value_unset_error>|link=Ship:<value_unset_error>]] [[File:<value_unset_error>_icon_small.png|<value_unset_error>|link=Ship:<value_unset_error>]] |
| File:icon small.png |
[[File:<value_unset_error>_icon_small.png|<value_unset_error>|link=Ship:<value_unset_error>]] [[File:<value_unset_error>_icon_small.png|<value_unset_error>|link=Ship:<value_unset_error>]] [[File:<value_unset_error>_icon_small.png|<value_unset_error>|link=Ship:<value_unset_error>]] |
| Research pricelevel;mark_id;mark;shortmark_id;shortMark;description_id;description;price_credit;price_gold;nation;icon;name;aa_caliber_0;aa_caliber_1;aa_caliber_2;aa_caliber_3;aa_damage;aa_defense;aa_maxDist;aaMaxdist;aa_maxDist_0;aaMaxdist0;aa_maxDist_1;aaMaxdist1;aa_maxDist_2;aaMaxdist2;aa_maxDist_3;aaMaxdist3;aa_name_0;aaName0;aa_name_1;aaName1;aa_name_2;aaName2;aa_name_3;aaName3;aa_numBarrels_0;aaNumbarrels0;aa_numBarrels_1;aaNumbarrels1;aa_numBarrels_2;aaNumbarrels2;aa_numBarrels_3;aaNumbarrels3;aa_numGuns_0;aaNumguns0;aa_numGuns_1;aaNumguns1;aa_numGuns_2;aaNumguns2;aa_numGuns_3;aaNumguns3;air_support;air_support_bombDamage_depthcharge;air_support_bombName_depthcharge;air_support_maxDist_depthcharge;air_support_numBombsOnPlane_depthcharge;air_support_numPlanesInCharge_depthcharge;air_support_numSquadrons_depthcharge;air_support_planeMaxHealth_depthcharge;air_support_planeName_depthcharge;air_support_reloadTime_depthcharge;armour_casMax;armourCasmax;armour_casMin;armourCasmin;armour_citMax;armourCitmax;armour_citMin;armourCitmin;armour_deckMax;armourDeckmax;armour_deckMin;armourDeckmin;armour_extremitiesMax;armourExtremitiesmax;armour_extremitiesMin;armourExtremitiesmin;armour_rangeMax;armourRangemax;armour_rangeMin;armourRangemin;artillery_weaponry;atba_bulletMassHE_0;atba_bulletMassHE_1;atba_bulletSpeedHE_0;atba_bulletSpeedHE_1;atba_burnProbHE_0;atba_burnProbHE_1;atba_caliber_0;atba_caliber_1;atba_damageHE_0;atba_damageHE_1;atba_maxDist;atbaMaxdist;atba_nameHE_0;atba_nameHE_1;atba_name_0;atbaName0;atba_name_1;atbaName1;atba_numBarrels_0;atba_numBarrels_1;atba_numGuns_0;atba_numGuns_1;atba_piercingHE_0;atba_piercingHE_1;atba_shotDelay_0;atba_shotDelay_1;atba_shotSpeed;atba_shotSpeed_0;atba_shotSpeed_1;battleLevelRangeMax;battleLevelRangeMin;durability;floodDamage;health;mobility;mobility_maxSpeed;mobilityMaxspeed;mobility_rudderTime;mobilityRuddertime;mobility_turningRadius;mobilityTurningradius;planes_aviation;planes_bomber_forsageRestore;planes_bomber_forsageTime;planes_bomber_hangarVolume;planes_bomber_level;planes_bomber_maxSpeed;planes_bomber_name;planes_bomber_numAttackers;planes_bomber_numInSquadron;planes_bomber_numSquadrons;planesBomberNumsquadrons;planes_bomber_planesRestoreTime;planes_bomber_speed;planes_bomber_torpedo_maxDamage;planes_bomber_torpedo_maxDist;planes_bomber_torpedo_name;planes_bomber_torpedo_speed;planes_bomber_visibility;planes_bomber_vitality;planes_dive_bomb_bulletMassHE_alt;planes_dive_bomb_bulletMass_alt;planes_dive_bomb_bulletSpeedHE_alt;planes_dive_bomb_bulletSpeed_alt;planes_dive_bomb_burnProbHE_alt;planes_dive_bomb_burnProb_alt;planes_dive_bomb_damageHE_alt;planes_dive_bomb_nameHE_alt;planes_dive_bomb_numBombsHE_alt;planes_dive_forsageRestore_alt;planes_dive_forsageTime_alt;planes_dive_hangarVolume_alt;planes_dive_level_alt;planes_dive_maxSpeed_alt;planes_dive_name_alt;planes_dive_numAttackers_alt;planes_dive_numInSquadron_alt;planes_dive_numSquadrons_alt;planes_dive_planesRestoreTime_alt;planes_dive_speed_alt;planes_dive_visibility_alt;planes_dive_vitality_alt;planes_fighter_forsageRestore_alt;planes_fighter_forsageTime_alt;planes_fighter_hangarVolume_alt;planes_fighter_level_alt;planes_fighter_maxSpeed_alt;planes_fighter_name_alt;planes_fighter_numAttackers_alt;planes_fighter_numInSquadron_alt;planes_fighter_numSquadrons_alt;planes_fighter_planesRestoreTime_alt;planes_fighter_rocket_bulletMassHE_alt;planes_fighter_rocket_bulletSpeedHE_alt;planes_fighter_rocket_burnProbHE_alt;planes_fighter_rocket_damageHE_alt;planes_fighter_rocket_nameHE_alt;planes_fighter_rocket_numBombsHE_alt;planes_fighter_speed_alt;planes_fighter_visibility_alt;planes_fighter_vitality_alt;slotsNum;visibility_detection;visibility_distByPlane;visibilityDistbyplane;visibility_distByPlane_fire;visibility_distByPlane_mg;visibility_distByShip;visibilityDistbyship;visibility_distByShip_fire;visibility_distByShip_mg;visibility_distByShip_smoke;visibility_distBySubmarine exp |
| Purchase priceSpecial |
| Maximum SpeedExpression error: Unexpected * operator. knot |
[[Ship:|]] — N/A special premium Tier N/A.
A small and reasonably fast aircraft carrier originally built as a submarine tender then subsequently converted into a carrier. Despite her small size, that did not allow her to carry a large air group, Zuiho was equipped with good torpedo protection and sufficiently powerful artillery for her type.
Modules
Compatible Upgrades
| Slot 1 |
||||||||||||||||||||||||||||
|---|---|---|---|---|---|---|---|---|---|---|---|---|---|---|---|---|---|---|---|---|---|---|---|---|---|---|---|---|
| Slot 2 |
Damage Control System Modification 3 | |||||||||||||||||||||||||||
| Slot 3 |
||||||||||||||||||||||||||||
| Slot 4 |
||||||||||||||||||||||||||||
| Slot 5 |
Torpedo Tubes Modification 3 |
Reinforced Bulkheads | ||||||||||||||||||||||||||
| Slot 6 |
Player Opinion
Performance
Pros:
- Reasonable AA and secondary battery capabilities.
- Good concealment, speed and maneuverability.
- Upgraded flight control loadout gives enemy ships a real pain when played correctly.
- Decent armor, allowing for HE shells to be negated somewhat.
- Ship speed almost twice as fast as its American counterpart Bogue.
- Aircraft speed is superior to any planes Bogue has access to.
- Plane reserve holds 2 more planes than Bogue.
- 4 squadrons compared to Bogue’s maximum of 3 squadrons , allowing for better projection of airpower across more of the map at once.
- A fighter squadron comes with every loadout.
Cons:
- Aircraft are easily outclassed and shot down by American fighters, have low HP and easily get knocked out by surface AA.
- Can only deploy one squadron of fighters.
- Planes are still very fragile, and the increasing AA is a threat to be wary of.
- Small reserve, can only replace the entire air group once, making it very hard to play.
- Depends heavily on allied AA.
Research
Optimal Configuration
Upgrades
The recommended upgrades for Zuiho are as follows: The recommended upgrades for ' are as follows:
- Slot 1: Air Groups Modification 1

- Slot 2: Damage Control System Modification 1

- Slot 3: Air Groups Modification 2

Upgrade Slot 3 is the main choice of upgrades with '. For players looking to improve their fighter's capabilities, Air Groups Modification 2 ![]() is highly recommended, as Bogue is capable of having up to 7 fighters in the air at once. Otherwise, the Flight Control Modification 1
is highly recommended, as Bogue is capable of having up to 7 fighters in the air at once. Otherwise, the Flight Control Modification 1 ![]() helps players land and launch '`s multiple flight squadrons.
helps players land and launch '`s multiple flight squadrons.
Commander Skills
' uses the standard Japanese carrier captain skill setup. Emphasis should be on skills that boost fighter and bomber effectiveness and AA protection. Aircraft Servicing Expert, Torpedo Acceleration, Torpedo Armament Expertise, and Air Supremacy are "must have" skills. Dogfighting Expert is also useful if ' faces a higher tier carrier, and the bonus to ammunition allows her fighters to remain airborne longer before returning to rearm.
For AA defense, ' has large-caliber 127mm guns that benefit from Manual Fire Control for AA Armament. Basic Firing Training is also a good choice to boost all AA guns' DPS by 20%. While '’s AA DPS output is not sufficient to wipe out entire squadrons, it can knock out a few planes and, in combination with maneuvering, can help avoid taking serious damage.
For bomber aircraft, Evasive Maneuvers increases the bombers' survivability when returning to the carrier, and is especially useful when the enemy targets have activated Defensive Fire.
Any skills that are related to an enemy vessel firing on your carrier are not useful, as the cost-benefit of investing in survivability skills is not worth the minimal benefit they offer. ' has a low HP pool, is large, unarmored, and will not survive an attack by any ship larger than a destroyer. ' captains must position their ship near friendlies and far back from the enemy fleet. Concealment Expert may be taken to further reduce detection range if the captain so desires.
As of Update 0.6.3, this carrier can no longer use the manual attack function.
| Recommended Commander Skills | ||||||||
|---|---|---|---|---|---|---|---|---|
| Cost (points) |
Endurance | Attack | Support | Versatility | ||||
| 1 |
|
|
Χ |
|
|
|
|
|
| 2 |
|
|
Χ |
Χ |
Χ |
|
|
|
| 3 |
|
|
Χ |
|
|
|
|
|
| 4 |
|
|
|
|
|
|
|
|
| Key: ★★★ - Extremely Useful ★★ - Frequently Useful ★ - Occasionally Useful No stars - Meh Χ - Not recommended | ||||||||
Consumables
' can equip the following consumables:
- Slot 1: Damage Control Party

Camouflage
Type 1, 2, or 5 camouflage can be equipped for credits; Types 1 or 5 are recommended at a minimum to reduce chances of being detected by the enemy.
Signals
As a carrier, ' can only mount at most four signals at a time and has no risk of detonating. Players should mount Equal Speed Charlie London (🚫), Zulu Hotel (🚫), and, for the last two: November Echo Setteseven (![]() ) and Juliet Whiskey Unaone (
) and Juliet Whiskey Unaone (![]() ). However, the latter two signal flags are not highly recommended if the player wishes to conserve the signals for later tiers.
). However, the latter two signal flags are not highly recommended if the player wishes to conserve the signals for later tiers.
Recommended Signal Flags 
| |||||
|---|---|---|---|---|---|
| Combat | |||||

|

|

|

|

|

|
 ★★ |

|
 ★★ |
 ★ |

|

|

|

| ||||
Note: Use of the Juliet Charlie signal makes detonation impossible.
Gallery

Historical Info
Historical Gallery


.jpg)
.jpg)

| Destroyers | |
| Cruisers | |
| Battleships | |
| Aircraft Carriers |
| Japan | |
| U.K. | |
| France | |
| U.S.S.R. | |
| U.S.A. | |
| Germany | |
| Pan-Asia | |
| Spain | |
| Europe | |
| Netherlands | |
| Italy | |
| Commonwealth | |
| Pan-America |