Zuiho
| Revision as of 20:29, 25 October 2017 | Revision as of 19:56, 3 July 2020 CS2 | |||
5 intermediate revisions by 3 users not shown | ||||
| Line 3: | Line 3: | |||
| |Anno=<!-- you can write below short description for the ship. it will replace default once. --> | |Anno=<!-- you can write below short description for the ship. it will replace default once. --> | |||
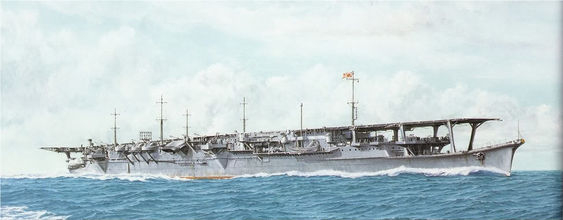
| ? | A small and reasonably fast aircraft carrier originally built as a submarine tender then subsequently converted into a carrier. Despite her small size, that did not allow her to carry a large air group, ''Zuiho'' was equipped with good torpedo protection and sufficiently powerful artillery for her type. | + | A small and reasonably fast aircraft carrier originally built as a submarine tender then subsequently converted into a carrier. Despite her small size, that did not allow her to carry a large air group, ''Zuiho'' was equipped with good torpedo protection and sufficiently powerful artillery for her type.<!-- <br><br>{{Model3DViewer|65d75d5efca54515ac10da3cc6b2d2c1}}--> | |
| |Performance=<!-- write text about performance in battles below --> | |Performance=<!-- write text about performance in battles below --> | |||
| Line 33: | Line 33: | |||
| |Upgrades=<!-- write text about best upgrades below --> | |Upgrades=<!-- write text about best upgrades below --> | |||
| The recommended upgrades for ''Zuiho'' are as follows: | The recommended upgrades for ''Zuiho'' are as follows: | |||
| ? | *'''Slot 1''': | + | The recommended upgrades for ''{{#var:ship_name}}'' are as follows: | |
| ? | *'''Slot 2''': | + | *'''Slot 1''': {{Air Groups Modification 1}} | |
| ? | *'''Slot | + | *'''Slot 2''': {{Damage Control System Modification 1}} | |
| + | *'''Slot 3''': {{Air Groups Modification 2}} | |||
| ? | + | '''Upgrade Slot 3''' is the main choice of upgrades with ''{{#var:ship_name}}''. For players looking to improve their fighter's capabilities, {{Air Groups Modification 2}} is highly recommended, as ''[[Bogue]]'' is capable of having up to 7 fighters in the air at once. Otherwise, the {{Flight Control Modification 1}} helps players land and launch ''{{#var:ship_name}}''`s multiple flight squadrons. | ||
| ? | '''Upgrade Slot | + | ||
| |CommanderSkills=<!-- write text about best set of Commander Skills below --> | |CommanderSkills=<!-- write text about best set of Commander Skills below --> | |||
| ? | ''{{#var:ship_name}}'' uses the standard | + | ''{{#var:ship_name}}'' uses the standard Japanese carrier captain skill setup. Emphasis should be on skills that boost fighter and bomber effectiveness and AA protection. [[Ship:Commander#Aircraft_Servicing_Expert|Aircraft Servicing Expert]], [[Ship:Commander#Torpedo_Acceleration|Torpedo Acceleration]], [[Ship:Commander#Torpedo_Armament_Expertise|Torpedo Armament Expertise]], and [[Ship:Commander#Air_Supremacy|Air Supremacy]] are "must have" skills. [[Ship:Commander#Dogfighting_Expert|Dogfighting Expert]] is also useful if ''{{#var:ship_name}}'' faces a higher tier carrier, and the bonus to ammunition allows her fighters to remain airborne longer before returning to rearm. | |
| For AA defense, ''{{#var:ship_name}}'' has large-caliber 127mm guns that benefit from [[Ship:Commander#Manual_Fire_Control_for_AA_Armament|Manual Fire Control for AA Armament]]. [[Ship:Commander#Basic_Firing_Training|Basic Firing Training]] is also a good choice to boost all AA guns' DPS by 20%. While ''{{#var:ship_name}}''’s AA DPS output is not sufficient to wipe out entire squadrons, it can knock out a few planes and, in combination with maneuvering, can help avoid taking serious damage. | For AA defense, ''{{#var:ship_name}}'' has large-caliber 127mm guns that benefit from [[Ship:Commander#Manual_Fire_Control_for_AA_Armament|Manual Fire Control for AA Armament]]. [[Ship:Commander#Basic_Firing_Training|Basic Firing Training]] is also a good choice to boost all AA guns' DPS by 20%. While ''{{#var:ship_name}}''’s AA DPS output is not sufficient to wipe out entire squadrons, it can knock out a few planes and, in combination with maneuvering, can help avoid taking serious damage. | |||
| Line 47: | Line 47: | |||
| For bomber aircraft, [[Ship:Commander#Evasive_Maneuver|Evasive Maneuvers]] increases the bombers' survivability when returning to the carrier, and is especially useful when the enemy targets have activated [[Ship:Consumables#Defensive_AA_Fire|Defensive Fire]]. | For bomber aircraft, [[Ship:Commander#Evasive_Maneuver|Evasive Maneuvers]] increases the bombers' survivability when returning to the carrier, and is especially useful when the enemy targets have activated [[Ship:Consumables#Defensive_AA_Fire|Defensive Fire]]. | |||
| ? | Any skills that are related to an enemy vessel firing on your carrier are not useful, as the cost-benefit of investing in survivability skills is not worth the minimal benefit they offer. ''{{#var:ship_name}}'' has a low HP pool | + | Any skills that are related to an enemy vessel firing on your carrier are not useful, as the cost-benefit of investing in survivability skills is not worth the minimal benefit they offer. ''{{#var:ship_name}}'' has a low HP pool, is large, unarmored, and will not survive an attack by any ship larger than a destroyer. ''{{#var:ship_name}}'' captains must position their ship near friendlies and far back from the enemy fleet. [[Ship:Commander#Concealment_Expert|Concealment Expert]] may be taken to further reduce detection range if the captain so desires. | |
| ? | {{block|!!|content= | + | {{block|!!|content=As of [[Ship:Update 0.6.3|Update 0.6.3]], this carrier can no longer use the manual attack function.}} | |
| ? | + | |||
| ? | + | |||
| ? | {{Commander Skills | + | {{Commander Skills 2 | |
| ? | | Priority Target | + | <!-- This version enables a '0' rating. Use it for skills that have no effect (e.g. Improved Engines on a non-CV) or are detrimental to the ship. They should mirror what appears in the game client. --> | |
| ? | | | + | | rating11 = <!-- Priority Target --> | |
| ? | | Expert Loader | + | | rating12 = <!-- Preventive Maint --> | |
| ? | | | + | | rating13 = 0 <!-- Expert Loader --> | |
| ? | | Direction Center for | + | | rating14 = <!-- Air Supremacy --> | |
| ? | | | + | | rating15 = <!-- Direction Center for Fighters --> | |
| ? | | Incoming Fire Alert | + | | rating16 = <!-- Improved Engine Boost --> | |
| ? | | | + | | rating17 = <!-- Incoming Fire Alert --> | |
| + | | rating18 = <!-- Last Gasp --> | |||
| ? | | High Alert | + | | rating21 = <!-- High Alert --> | |
| ? | | Jack of All Trades | + | | rating22 = <!-- Jack of All Trades --> | |
| ? | | Expert Marksman | + | | rating23 = 0 <!-- Expert Marksman --> | |
| ? | | Torpedo Acceleration | + | | rating24 = 0 <!-- Torpedo Acceleration --> | |
| ? | | Smoke Screen Expert | + | | rating25 = 0 <!-- Smoke Screen Expert --> | |
| ? | | | + | | rating26 = <!-- Improved Engines --> | |
| ? | | Adrenaline Rush | + | | rating27 = <!-- Adrenaline Rush --> | |
| ? | | Last Stand | + | | rating28 = <!-- Last Stand --> | |
| ? | | | + | | rating31 = <!-- Basics of Survivability --> | |
| ? | + | | rating32 = <!-- Survivability Expert--> | ||
| ? | | Torpedo Armament Expertise | + | | rating33 = 0 <!-- Torpedo Armament Expertise--> | |
| ? | | | + | | rating34 = <!-- Aircraft Armor --> | |
| ? | | Basic Firing Training | + | | rating35 = <!-- Basic Firing Training --> | |
| ? | | | + | | rating36 = <!-- Superintendent --> | |
| ? | | Demolition Expert | + | | rating37 = <!-- Demolition Expert --> | |
| ? | | | + | | rating38 = <!-- Vigilance --> | |
| ? | | Manual Fire Control for Secondary Armament | + | | rating41 = <!-- Manual Fire Control for Secondary Armament --> | |
| ? | | Fire Prevention | + | | rating42 = <!-- Fire Prevention --> | |
| ? | | Inertia Fuse for HE Shells | + | | rating43 = <!-- Inertia Fuse for HE Shells --> | |
| ? | | | + | | rating44 = <!-- Sight Stabilization --> | |
| ? | | Advanced Firing Training | + | | rating45 = <!-- Advanced Firing Training --> | |
| ? | | | + | | rating46 = <!-- Massive AA Fire --> | |
| ? | | Radio Position Finding | + | | rating47 = <!-- Radio Position Finding --> | |
| ? | | Concealment Expert | + | | rating48 = <!-- Concealment Expert --> | |
| }} | }} | |||
| |Consumables=<!-- write text about selection of Consumables below --> | |Consumables=<!-- write text about selection of Consumables below --> | |||
| ? | + | ''{{#var:ship_name}}'' can equip the following consumables: | ||
| + | * '''Slot 1:''' {{Damage Control Party}} | |||
| |Camouflage=<!-- write text about useful camouflage below --> | |Camouflage=<!-- write text about useful camouflage below --> | |||
| Line 97: | Line 97: | |||
| |Signals=<!-- write text about best set of signals below --> | |Signals=<!-- write text about best set of signals below --> | |||
| ? | As a carrier, ''{{#var:ship_name}}'' can only mount at most four signals at a time and has no risk of detonating. Players should mount | + | As a carrier, ''{{#var:ship_name}}'' can only mount at most four signals at a time and has no risk of detonating. Players should mount Equal Speed Charlie London ({{Equal Speed Charlie London|Size=18px}}), Zulu Hotel ({{Zulu Hotel|Size=18px}}), and, for the last two: November Echo Setteseven ({{November Echo Setteseven|Size=18px}}) and Juliet Whiskey Unaone ({{Juliet Whiskey Unaone|Size=18px}}). However, the latter two signal flags are not highly recommended if the player wishes to conserve the signals for later tiers. | |
| ? | + | |||
| ? | + | |||
| {{Signal Flags | {{Signal Flags | |||
Revision as of 19:56, 3 July 2020
[[File:<value_unset_error>_icon_small.png|<value_unset_error>|link=Ship:<value_unset_error>]] [[File:<value_unset_error>_icon_small.png|<value_unset_error>|link=Ship:<value_unset_error>]] [[File:<value_unset_error>_icon_small.png|<value_unset_error>|link=Ship:<value_unset_error>]] |
| File:icon small.png |
[[File:<value_unset_error>_icon_small.png|<value_unset_error>|link=Ship:<value_unset_error>]] [[File:<value_unset_error>_icon_small.png|<value_unset_error>|link=Ship:<value_unset_error>]] [[File:<value_unset_error>_icon_small.png|<value_unset_error>|link=Ship:<value_unset_error>]] |
| Research pricelevel;mark_id;mark;shortmark_id;shortMark;description_id;description;price_credit;price_gold;nation;icon;name;aa_caliber_0;aa_caliber_1;aa_caliber_2;aa_caliber_3;aa_damage;aa_defense;aa_maxDist;aaMaxdist;aa_maxDist_0;aaMaxdist0;aa_maxDist_1;aaMaxdist1;aa_maxDist_2;aaMaxdist2;aa_maxDist_3;aaMaxdist3;aa_name_0;aaName0;aa_name_1;aaName1;aa_name_2;aaName2;aa_name_3;aaName3;aa_numBarrels_0;aaNumbarrels0;aa_numBarrels_1;aaNumbarrels1;aa_numBarrels_2;aaNumbarrels2;aa_numBarrels_3;aaNumbarrels3;aa_numGuns_0;aaNumguns0;aa_numGuns_1;aaNumguns1;aa_numGuns_2;aaNumguns2;aa_numGuns_3;aaNumguns3;air_support;air_support_bombDamage_depthcharge;air_support_bombName_depthcharge;air_support_maxDist_depthcharge;air_support_numBombsOnPlane_depthcharge;air_support_numPlanesInCharge_depthcharge;air_support_numSquadrons_depthcharge;air_support_planeMaxHealth_depthcharge;air_support_planeName_depthcharge;air_support_reloadTime_depthcharge;armour_casMax;armourCasmax;armour_casMin;armourCasmin;armour_citMax;armourCitmax;armour_citMin;armourCitmin;armour_deckMax;armourDeckmax;armour_deckMin;armourDeckmin;armour_extremitiesMax;armourExtremitiesmax;armour_extremitiesMin;armourExtremitiesmin;armour_rangeMax;armourRangemax;armour_rangeMin;armourRangemin;artillery_weaponry;atba_bulletMassHE_0;atba_bulletMassHE_1;atba_bulletSpeedHE_0;atba_bulletSpeedHE_1;atba_burnProbHE_0;atba_burnProbHE_1;atba_caliber_0;atba_caliber_1;atba_damageHE_0;atba_damageHE_1;atba_maxDist;atbaMaxdist;atba_nameHE_0;atba_nameHE_1;atba_name_0;atbaName0;atba_name_1;atbaName1;atba_numBarrels_0;atba_numBarrels_1;atba_numGuns_0;atba_numGuns_1;atba_piercingHE_0;atba_piercingHE_1;atba_shotDelay_0;atba_shotDelay_1;atba_shotSpeed;atba_shotSpeed_0;atba_shotSpeed_1;battleLevelRangeMax;battleLevelRangeMin;durability;floodDamage;health;mobility;mobility_maxSpeed;mobilityMaxspeed;mobility_rudderTime;mobilityRuddertime;mobility_turningRadius;mobilityTurningradius;planes_aviation;planes_bomber_forsageRestore;planes_bomber_forsageTime;planes_bomber_hangarVolume;planes_bomber_level;planes_bomber_maxSpeed;planes_bomber_name;planes_bomber_numAttackers;planes_bomber_numInSquadron;planes_bomber_numSquadrons;planesBomberNumsquadrons;planes_bomber_planesRestoreTime;planes_bomber_speed;planes_bomber_torpedo_maxDamage;planes_bomber_torpedo_maxDist;planes_bomber_torpedo_name;planes_bomber_torpedo_speed;planes_bomber_visibility;planes_bomber_vitality;planes_dive_bomb_bulletMassHE_alt;planes_dive_bomb_bulletMass_alt;planes_dive_bomb_bulletSpeedHE_alt;planes_dive_bomb_bulletSpeed_alt;planes_dive_bomb_burnProbHE_alt;planes_dive_bomb_burnProb_alt;planes_dive_bomb_damageHE_alt;planes_dive_bomb_nameHE_alt;planes_dive_bomb_numBombsHE_alt;planes_dive_forsageRestore_alt;planes_dive_forsageTime_alt;planes_dive_hangarVolume_alt;planes_dive_level_alt;planes_dive_maxSpeed_alt;planes_dive_name_alt;planes_dive_numAttackers_alt;planes_dive_numInSquadron_alt;planes_dive_numSquadrons_alt;planes_dive_planesRestoreTime_alt;planes_dive_speed_alt;planes_dive_visibility_alt;planes_dive_vitality_alt;planes_fighter_forsageRestore_alt;planes_fighter_forsageTime_alt;planes_fighter_hangarVolume_alt;planes_fighter_level_alt;planes_fighter_maxSpeed_alt;planes_fighter_name_alt;planes_fighter_numAttackers_alt;planes_fighter_numInSquadron_alt;planes_fighter_numSquadrons_alt;planes_fighter_planesRestoreTime_alt;planes_fighter_rocket_bulletMassHE_alt;planes_fighter_rocket_bulletSpeedHE_alt;planes_fighter_rocket_burnProbHE_alt;planes_fighter_rocket_damageHE_alt;planes_fighter_rocket_nameHE_alt;planes_fighter_rocket_numBombsHE_alt;planes_fighter_speed_alt;planes_fighter_visibility_alt;planes_fighter_vitality_alt;slotsNum;visibility_detection;visibility_distByPlane;visibilityDistbyplane;visibility_distByPlane_fire;visibility_distByPlane_mg;visibility_distByShip;visibilityDistbyship;visibility_distByShip_fire;visibility_distByShip_mg;visibility_distByShip_smoke;visibility_distBySubmarine exp |
| Purchase priceSpecial |
| Maximum SpeedExpression error: Unexpected * operator. knot |
[[Ship:|]] — N/A special premium Tier N/A.
A small and reasonably fast aircraft carrier originally built as a submarine tender then subsequently converted into a carrier. Despite her small size, that did not allow her to carry a large air group, Zuiho was equipped with good torpedo protection and sufficiently powerful artillery for her type.
Modules
Compatible Upgrades
| Slot 1 |
||||||||||||||||||||||||||||
|---|---|---|---|---|---|---|---|---|---|---|---|---|---|---|---|---|---|---|---|---|---|---|---|---|---|---|---|---|
| Slot 2 |
Damage Control System Modification 3 | |||||||||||||||||||||||||||
| Slot 3 |
||||||||||||||||||||||||||||
| Slot 4 |
||||||||||||||||||||||||||||
| Slot 5 |
Torpedo Tubes Modification 3 |
Reinforced Bulkheads | ||||||||||||||||||||||||||
| Slot 6 |
Player Opinion
Performance
Pros:
- Reasonable AA and secondary battery capabilities.
- Good concealment, speed and maneuverability.
- Upgraded flight control loadout gives enemy ships a real pain when played correctly.
- Decent armor, allowing for HE shells to be negated somewhat.
- Ship speed almost twice as fast as its American counterpart Bogue.
- Aircraft speed is superior to any planes Bogue has access to.
- Plane reserve holds 2 more planes than Bogue.
- 4 squadrons compared to Bogue’s maximum of 3 squadrons , allowing for better projection of airpower across more of the map at once.
- A fighter squadron comes with every loadout.
Cons:
- Aircraft are easily outclassed and shot down by American fighters, have low HP and easily get knocked out by surface AA.
- Can only deploy one squadron of fighters.
- Planes are still very fragile, and the increasing AA is a threat to be wary of.
- Small reserve, can only replace the entire air group once, making it very hard to play.
- Depends heavily on allied AA.
Research
Optimal Configuration
Upgrades
The recommended upgrades for Zuiho are as follows: The recommended upgrades for ' are as follows:
- Slot 1: Air Groups Modification 1

- Slot 2: Damage Control System Modification 1

- Slot 3: Air Groups Modification 2

Upgrade Slot 3 is the main choice of upgrades with '. For players looking to improve their fighter's capabilities, Air Groups Modification 2 ![]() is highly recommended, as Bogue is capable of having up to 7 fighters in the air at once. Otherwise, the Flight Control Modification 1
is highly recommended, as Bogue is capable of having up to 7 fighters in the air at once. Otherwise, the Flight Control Modification 1 ![]() helps players land and launch '`s multiple flight squadrons.
helps players land and launch '`s multiple flight squadrons.
Commander Skills
' uses the standard Japanese carrier captain skill setup. Emphasis should be on skills that boost fighter and bomber effectiveness and AA protection. Aircraft Servicing Expert, Torpedo Acceleration, Torpedo Armament Expertise, and Air Supremacy are "must have" skills. Dogfighting Expert is also useful if ' faces a higher tier carrier, and the bonus to ammunition allows her fighters to remain airborne longer before returning to rearm.
For AA defense, ' has large-caliber 127mm guns that benefit from Manual Fire Control for AA Armament. Basic Firing Training is also a good choice to boost all AA guns' DPS by 20%. While '’s AA DPS output is not sufficient to wipe out entire squadrons, it can knock out a few planes and, in combination with maneuvering, can help avoid taking serious damage.
For bomber aircraft, Evasive Maneuvers increases the bombers' survivability when returning to the carrier, and is especially useful when the enemy targets have activated Defensive Fire.
Any skills that are related to an enemy vessel firing on your carrier are not useful, as the cost-benefit of investing in survivability skills is not worth the minimal benefit they offer. ' has a low HP pool, is large, unarmored, and will not survive an attack by any ship larger than a destroyer. ' captains must position their ship near friendlies and far back from the enemy fleet. Concealment Expert may be taken to further reduce detection range if the captain so desires.
As of Update 0.6.3, this carrier can no longer use the manual attack function.
| Recommended Commander Skills | ||||||||
|---|---|---|---|---|---|---|---|---|
| Cost (points) |
Endurance | Attack | Support | Versatility | ||||
| 1 |
|
|
Χ |
|
|
|
|
|
| 2 |
|
|
Χ |
Χ |
Χ |
|
|
|
| 3 |
|
|
Χ |
|
|
|
|
|
| 4 |
|
|
|
|
|
|
|
|
| Key: ★★★ - Extremely Useful ★★ - Frequently Useful ★ - Occasionally Useful No stars - Meh Χ - Not recommended | ||||||||
Consumables
' can equip the following consumables:
- Slot 1: Damage Control Party

Camouflage
Type 1, 2, or 5 camouflage can be equipped for credits; Types 1 or 5 are recommended at a minimum to reduce chances of being detected by the enemy.
Signals
As a carrier, ' can only mount at most four signals at a time and has no risk of detonating. Players should mount Equal Speed Charlie London (🚫), Zulu Hotel (🚫), and, for the last two: November Echo Setteseven (![]() ) and Juliet Whiskey Unaone (
) and Juliet Whiskey Unaone (![]() ). However, the latter two signal flags are not highly recommended if the player wishes to conserve the signals for later tiers.
). However, the latter two signal flags are not highly recommended if the player wishes to conserve the signals for later tiers.
Recommended Signal Flags 
| |||||
|---|---|---|---|---|---|
| Combat | |||||

|

|

|

|

|

|
 ★★ |

|
 ★★ |
 ★ |

|

|

|

| ||||
Note: Use of the Juliet Charlie signal makes detonation impossible.
Gallery

Historical Info
Historical Gallery


.jpg)
.jpg)

| Destroyers | |
| Cruisers | |
| Battleships | |
| Aircraft Carriers |
| Japan | |
| U.K. | |
| France | |
| U.S.S.R. | |
| U.S.A. | |
| Germany | |
| Pan-Asia | |
| Spain | |
| Europe | |
| Netherlands | |
| Italy | |
| Commonwealth | |
| Pan-America |