Maps
| Revision as of 13:09, 30 October 2018 | Revision as of 23:50, 30 October 2018 | |||
| Line 20: | Line 20: | |||
| Water : it will slow your units | Water : it will slow your units | |||
| ? | ||||
| ? | ||||
| High Grass : that type of terrain provides no bonuses, but will greatly reduce your vision. Beware of ambushes. | High Grass : that type of terrain provides no bonuses, but will greatly reduce your vision. Beware of ambushes. | |||
Revision as of 23:50, 30 October 2018
Contents
Overall Description
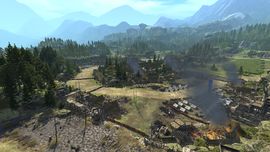
Maps are the locations where you will battle for victory. They are usually composed of the following elements :
Two bases, that you will need to keep an eye on/attack to win. Your base is symbonized by a blue flag, while your enemy's base is symbolized by a red flag.
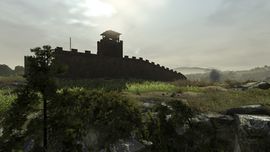
Watch towers : they give vision on a circle of 200m around their location. They are a key element to victory if controlled and use properly ! When a watch tower is controlled, its indicator (an eye) becomes blue if your team owns it or red if the other team owns it. Keep an eye on those indiactors to see if you have a risk (or not) to get ambushed.
Terrain. There are different types of terrain in Arena, and they affect units differently according to their weight/type :
Forest : it will affect cavalry and heavy units negatively and light infantry (barbarian infantry mostly) positively
Road : it will boost your unit stats. Heavy units will benefit the most from it.
Light Forest : same as forest, but with less extreme buffs and debuffs.
Mud : it will slow down units and reduce their melee defence
Water : it will slow your units
High Grass : that type of terrain provides no bonuses, but will greatly reduce your vision. Beware of ambushes.
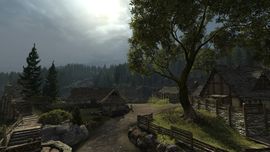
Maps are set up on a place inspired by or where important historical events happened, whether it is for battles or great deeds.
Regular Maps
Capitoline Hill
- Battle Tiers: 1-3
This map is quite small. It has two towers, situated on each side of the hill, and they can be easily defended. One side has forest which allows each team to be able to go behind their enemies while still being hidden in the forest. The other side and the middle area are quite open, perfect for flanking manoeuvers. Make sure you have vision and that you can't get surrounded when you are on the hill.
This map is made for beginners, with a low amount of terrain types. It is also fairly symmetrical.
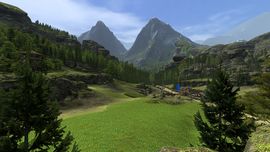
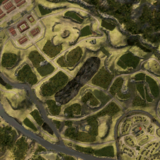
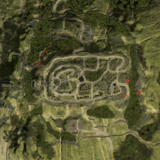
Marathon
- Battle Tiers: 2-10
Two towers, each with their own strengths. The right one gives vision on the high grass nearby, and makes it a good offensive tool when controlled. The one on the left gives vision on the forest on the left and below.
Half of the map is open (the middle and forest at the bottom part), while the other has cliffs and narrow passages. There is a passage in the forest on the top of the map which can allow to to sneak up behind the enemy lines. Be aware that the towers will spot you as soon as you get out of the forest pass. Watch your flanks on this map, especially in the middle : it's very open and you can get outnumbered very quickly.
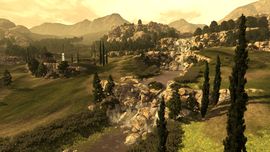
Thermopylae
- Battle Tiers: 2-10
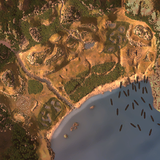
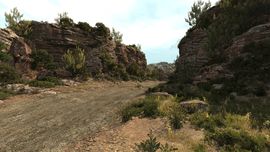
This map, inspired by the battle led by King Leonidas, is quite wide. There is only one watchtower, but its role is important as it gives vision on the forest under it. Whoever controls it controls the forest.
There is a goat path on the bottom of the map. From there, you can go behind your enemy, but it's a long way, and it won't necessarily be a safe one. Down below that path is the tower, ready to be contested for control. The middle is full of craters, but is very open. A tiny bit of forest is on top of that, above the path that is called "the Hot Gates". This narrow path can be easily protected, but don't forget that you can take fire from the cliffs above. Finally, on the top of the map (cf picture), there is path that goes close to the sea that allow you to to go behind the hot gates, but it can also be protected.
The map is wide. Sneaking units by the goat pass can be a good way to trap your oppoenent or to capture their base.
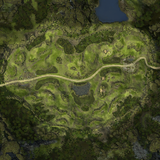
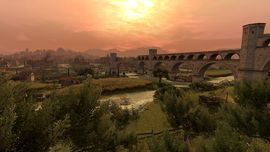
Hadrian's Wall
- Battle Tiers: 3-10
This map is split in two parts by a wall. There are two towers on each side of the map, ready to be contested by both teams. There are five openings in the wall : one in the middle, in muddy terrain, and two on each side, with one on each side leading to the tower.
Try to protect the holes in the walls as best as you can. If there is no opposition, push through, but be careful of counter attacks !
The middle gap
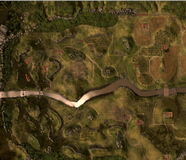
Salernum
- Battle Tiers: 3-10
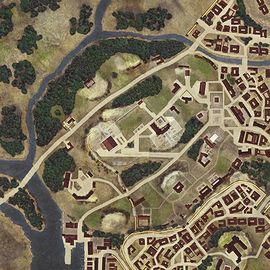
The map is divided into three main parts : city, middle, and tower (and you can add top to that, but it's usually linked to tower). Note that there are two defensive towers (one on each side of the map) that give vision on the light forest close to each base.
The city is almost symmetrical for both teams. All streets can be blocked by units. The middle is composed of a road and high grass, upon which the tower gives vision.
The tower is a key element of this map : it gives vision on the high grass below and around it as well as on the forest just above it. Controlling it gives the team an incredible advantage. It will be a source of fights to control it.
The upper road is right outside the vision perimeter of the tower, which means that you can sneak up behind your enemy thanks to that.
Usually, cavalry units will rush the central tower. If you have missile infantry and you are on top, make sure they are protected.
When in the center, make sure you have the tower (or at least that the enemy doesn't have it) before going forward. Otherwise, you could get ambushed. When in the city, make sure you close every street, and check your rear
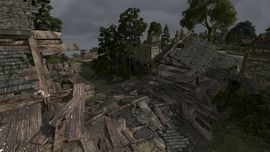
Teutoburg Forest
- Battle Tiers: 3-10
Two watchtowers on this map. This map contains three main locations for fights : top, middle and bottom, each close to the river. The cliffs give the team who are on them an important height advantage.
The river is usually surrounded by bushes/mud on either side, making the progression of an army difficult and slow. There is also a lot of forest on this map, which could be the perfect place to prepare ambushes.
How to play on this map ?
All depends on your army composition ! With a lot of ranged, you can use the cliffs to your advantage. With an offensive army (lot of fast units), you want to avoid the places where you can get ambushed and fire at and go to the sides. Find holes in the enemy lines and pressure them. Capture the base if an enemy spot is too well defended : this is also viable on other maps, but even more important here.
Alpis Graia (Summer)
- Battle Tiers: 4-10
Three towers on this map, two defensive ones, on the cliffs, and one ready to be contested, on the hill. This tower is extremly important due to the vision range it gives and the surroundinig terrain. Whoever owns the hill gains a great advantage.
A road goes down the hill, but is dangerous because of the tower nearby and the high grass around it. Down below is high grass with a cliff over it in its middle. The cliff has forest on it, where skirmishers can be ambushed to rain down death on your units.
Finally, on the bottom of the map, there are cliffs with multiple chokepoints, perfect for defensive units and long range skirmishers. The fight here is usualy less intense than on the hill where the tower is, but it will give the opportunity to teh winning team to capture the enemy base.
This map comes in a summer and winter variant depending on the season.
Rubicon
- Battle Tiers: 4-10
A very open map. Bases are quite close to each other and each side is separated by a river (the Rubicon) There are two towers on one each side of the river, on the left (bottom side on the cliffs) one on the right (on the top side, in the farmlands).
Behind the bases are cliffs with forest on the back of the cliffs. The right side is full of high grass where you can ambush your units or sneak beind the enemy lines. The left side is more hilly, with cliffs and chokepoints.
The bases are close to each other. Expect mid rushes.
The map is wide and open, therefore cavalry units can often go behind the enemy lines. Defending skirmishers on this map can be a real challenge.
The tower in the farmlands is very powerful. Do not rush it blindly or you will get ambushed.
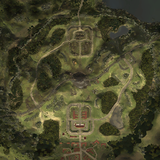
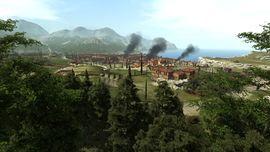
Capua
- Battle Tiers: 5-10
An assymetrical map : one base is in the city (bottom), one is in the fields (on the top).
There are two towers situated on this map, one is close to the aqueduct (closer to teh bottom spawns), the other is close to the city (closer to the spawns from top), ready to be fought for.
The right side is the city side, with a wide and open area in its center. Most of it can be blocked, but there are numerous ways to go around the chokepoints.
The left side is the fields side. It's fairly open, with an aqueduct in the middle and a river separating the fields (and the map) in two. The far left side (on top of the picture, at the extreme parts of the map) is where forests are. There are a couple of cliffs in the fields, along with some high grass to hide skirmishers or artillery.
Most of the fights on the farmlands will be to get the tower. As the map is quite small, expect your base to be under pressure quickly.
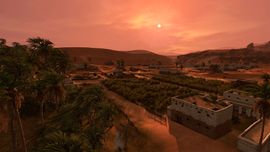
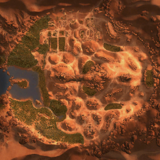
Oasis
- Battle Tiers: 5-10
No watchtowers on this map ! Castellum Elephantum (down) Cirta(up). This map is quite open.
There is a lake on the left part of the map, with shallow water where units can go in. The lake is surrounded by tall grass on the right and forest on the north and south. The center is narrow in its middle. There are two sets of high grass (one on each side of the map), where skirmishers can go and fire at units without being seen. Those high grass spots are perfect to impact the fight for the middle aprt of the map.
The top is hilly and filled with chokepoints. It's easily defendable, so whoever gets here first will gain an advantage (plus the fact that you can surround the players in the high grass thanks to that.)
Finally, close to each base, there is a cliff where artillery can set up on and be defended.

Passage of Augustus
- Battle Tiers: 5-10
A map mostly designed for rushes : bases are very close to each other and are positioned ahead of the deployment spots. Each base has a cliff above it, allowing skirmishers to fire at anyone in it.
There are two towers on this map, one on each side (one on the left, one on the right), giving vision on the surrounding high grass. There is one cliff close to it, allowing skirmishers to influence the fight for the towers. The road linking the two bases is dangerous as there are cliffs and forest on one side, good places to set up your ambushes.
The fights will be focused on the towers at first. Gaining vision here can be key to surprise and defeat your opponents. Gaining the fight on a tower will either give you a good opportunity to capture the enemy base or a good defensive position to defend yours, depending on which side you are on.

Germania
- Battle Tiers: 7-10
A very wide map, with a large variety of terrain types. There are 4 watchtowers on this map.
There are three main roads that link both bases, each with their own dangers and specificities : the upper one goes to the cliffs. Vision is key here, as there is a lot of tall grass. Two towers are here to provide that.
The middle road is the more direct one, but also the most dangerous one : it goes through the center, where your units can get stuck into the mud and get attacked from units that are positioned on the cliffs. And if you succeed to get through the mud, high grass awaits on each side of the road, ready to let enemies appear to ambush you.
The down road (that goes through the river), is fairly open. It has a variety of terrain, and ambush possibilities with the high grass and forest situated on each side of the road. Like for the upper road, vision is key here, and can be provided by two watchtowers.
This map is wide, and supporting your allies/returning to your base can be a challenge. Don't get too over extended without support.
There are several roads to the enemy base, each with its own dangers and with several places where you can be ambushed. Towers are keys to avoid that or to anticipate that.
As the map is wide, openings will be created, where you can sneak through and either cap the base or cause havoc behind the enemy lines. Check your minimap to be sure that it doesn't happen to you and to to see where the openings are. You can use the enemy towers and terrain to your advantage on this map.
Positioning is extremly important on this map, because of its variety of terrain, and the importance of vision.
Long range units can go top or middle on this map, as they have the cliffs to gain an advantage of height over their opponents. Barbarians usually go to the forest in the middle/low part of the map.
The top is the perfect place for defensive units as there are chokepoints there. It's also the perfect place for units that counters defensive units, when used properly...
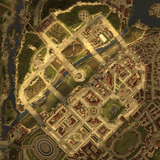
Gergovia
- Battle Tiers: 8-10
A city map, with numerous openings and roads. There are two sections of forest on each side, that could allow player to circumnavigate around the city.
Three watchtowers are ready to be contested on this map : two on the oppidum, and one on the right side of the map, giving vision on the forest part of this map.
This map contains a lot of chokepoints, but not a lot of terrain types. There is a bit of forest in the middle part of the map, but vision can be given on that part by the towers.
The control of the oppidum is usually the key to victory, but the sides can play a major role in the capture of a base.
Be sure to control every chokepoint around your ranged units, so that cavalry can't have access to them. It's fairly easy to do so on this map.
You can set up traps on the high grass on the sides, close to the center. Be aware that towers give vision on that part.
Map awareness is important here to see where the enemy is deployed, and if there are opportunities to corner them in a street.
Defensive units are great in this map, as they can block the streets.