Difference between revisions of "Tactics"
| Revision as of 14:26, 6 December 2012 Added the Sidescrape Position | Revision as of 16:02, 13 December 2012 small update for 8.2 visibility system change | |||
| Line 6: | Line 6: | |||
| [[File:Tactics knockDownTrees.png]] | [[File:Tactics knockDownTrees.png]] | |||
| ? | '''Don't knock down trees!''' It gives the enemy your location even if they can't see your tank. | + | '''Don't knock down trees!''' It gives the enemy your location even if they can't see your tank. | |
| [[File:Tactics cover.png]] | [[File:Tactics cover.png]] | |||
Revision as of 16:02, 13 December 2012
These are basic tank tactics that every driver should use on the battlefield.
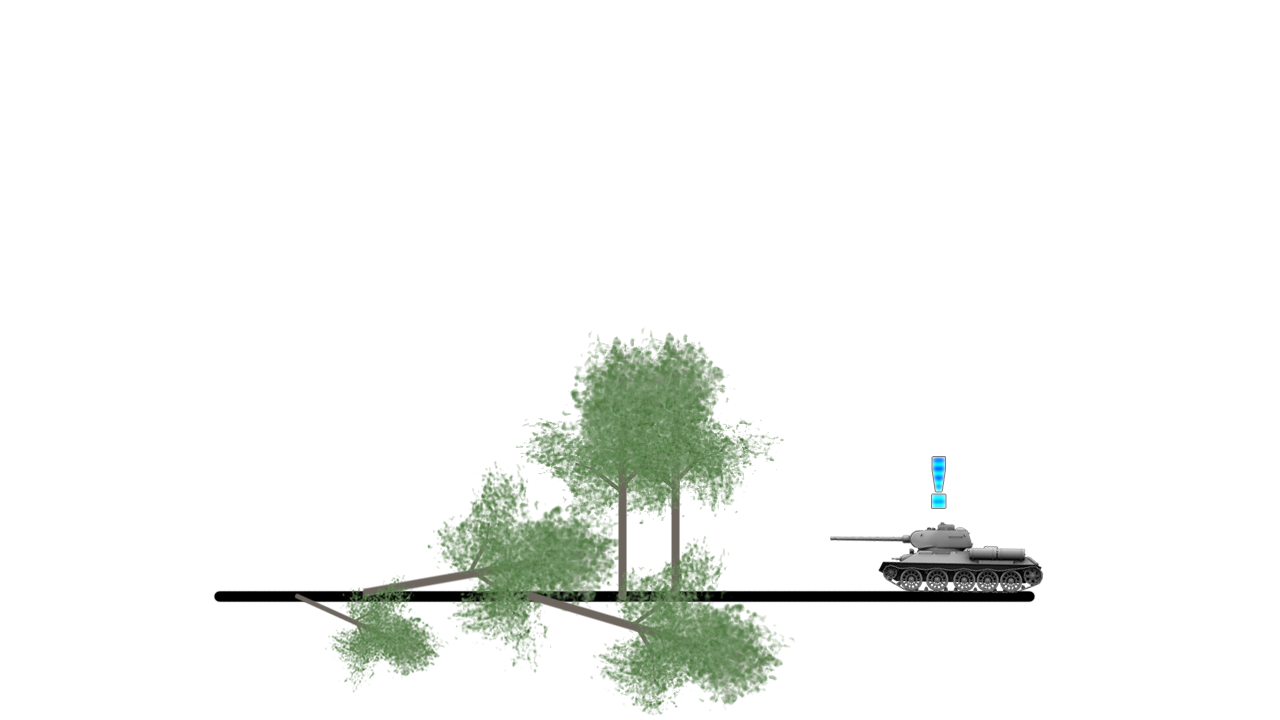
Don't knock down trees! It gives the enemy your location even if they can't see your tank.
Use the terrain to your advantage. "Fire from Cover" or "Fire and Cover" (a.k.a. "Peek-a-boo"). Find solid cover, such as a building, rock, hill or tank corpse. Duck out to fire, then pull back behind cover while reloading. This way you can deal damage and be protected while you reload.
Use the terrain to your advantage. You can protect yourself while still returning fire from a "hull down" position using a hill or ridge. This means the hull of your tank is below the ridge line and only your turret is exposed. Duck out to fire, then pull back behind cover while reloading. Note that this is the preferred strategy for American tanks which are designed with better-than-average turret armor for the price of less-than-average hull armor.
Don't expose yourself to multiple targets. This can mean anything from using cover to confront one enemy at a time to avoiding obvious choke points on the map.
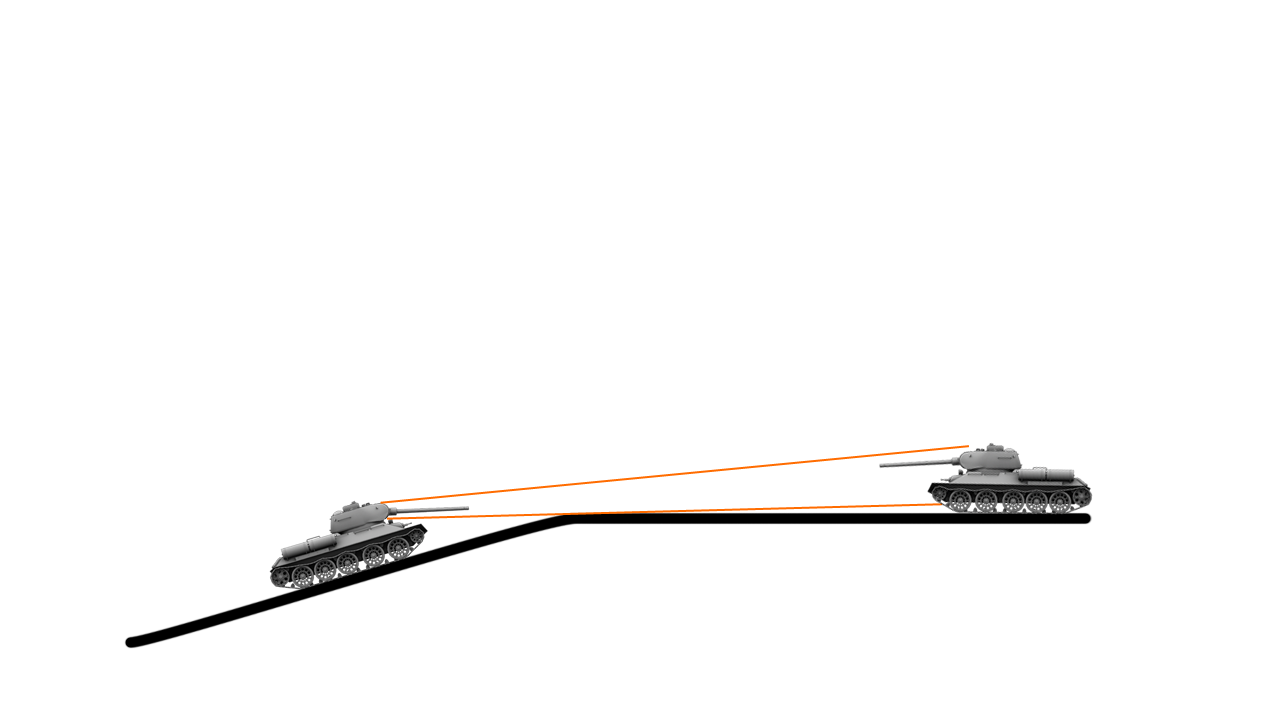
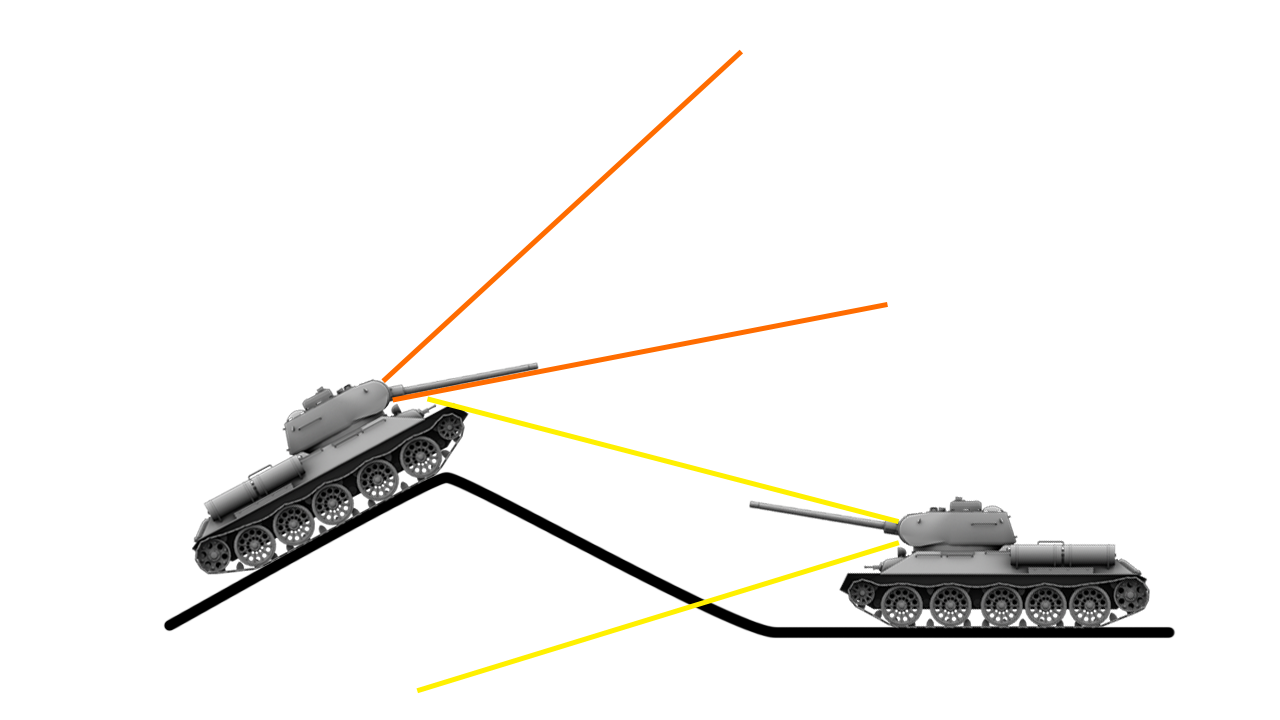
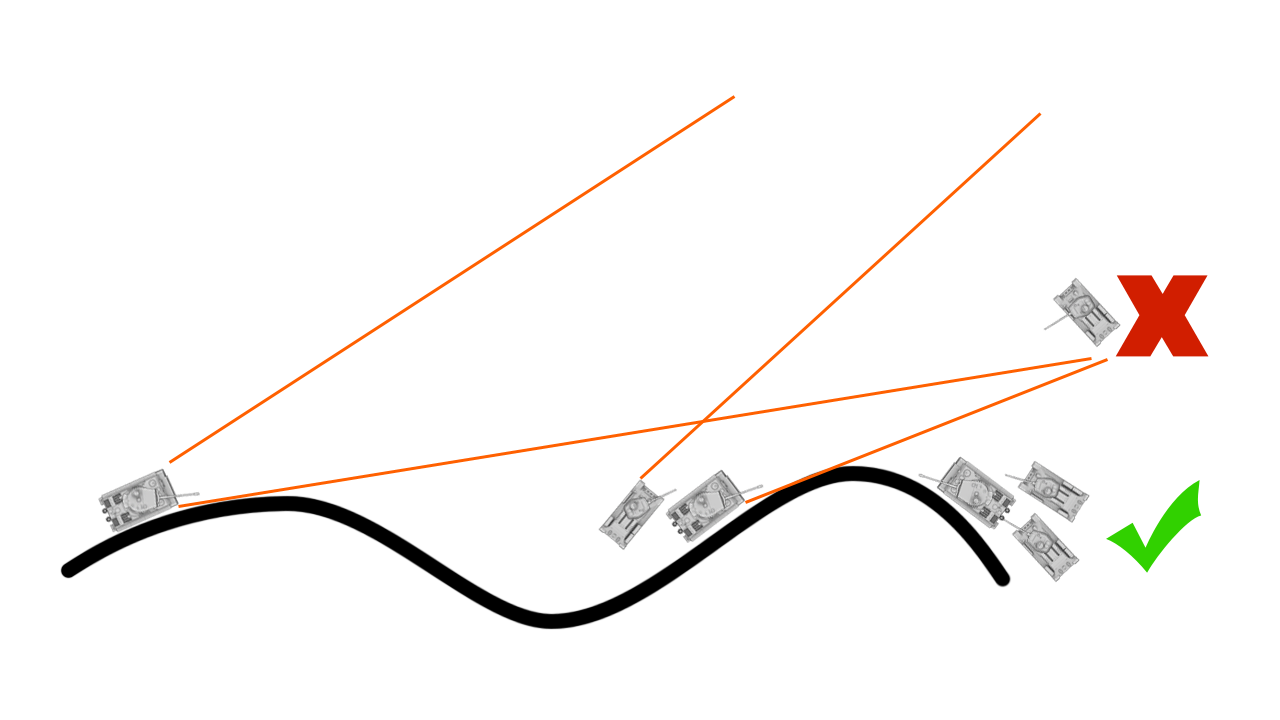
Tanks cresting a ridge are particularly vulnerable. They expose the weak underside of their glacis plate without being able to return fire. Tracking (destroying the tracks of) high priority tanks when they're atop the ridge allows allies to shoot them when they're exposed and helpless to retreat.
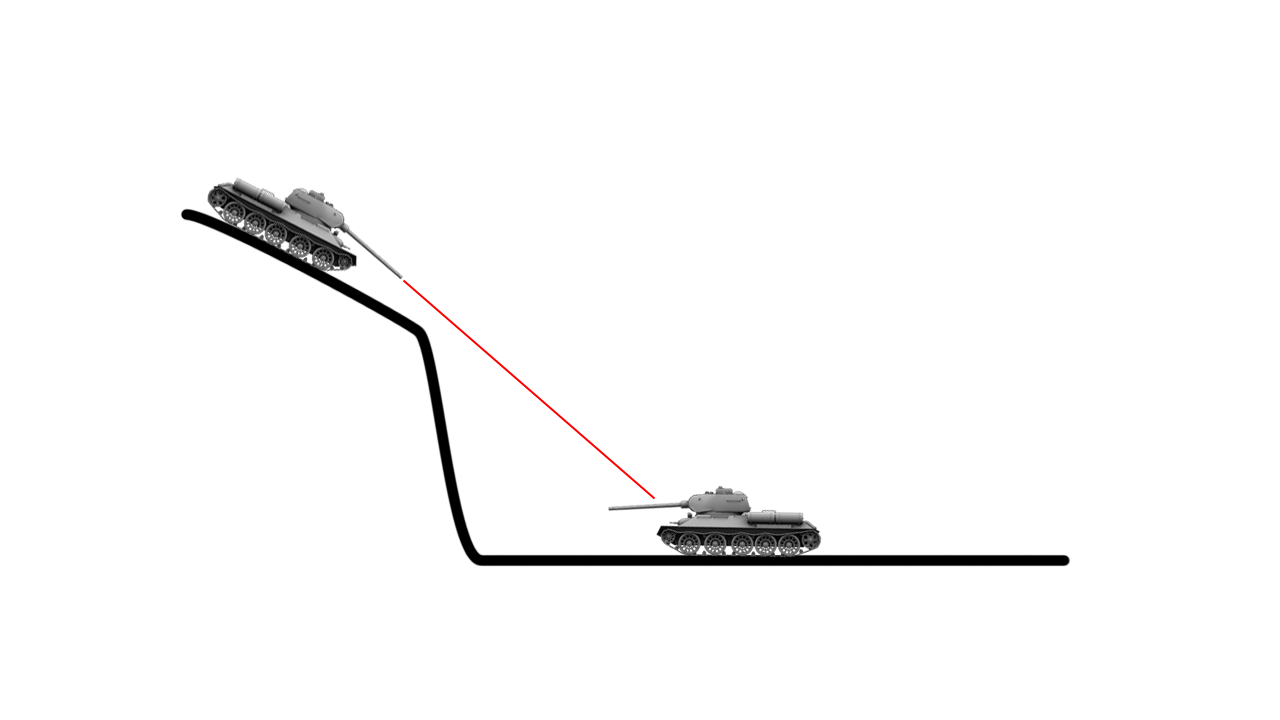
Firing from a high ridge can be risky by exposing your underside to fire, but can pay off big by hitting the soft topside of tanks.
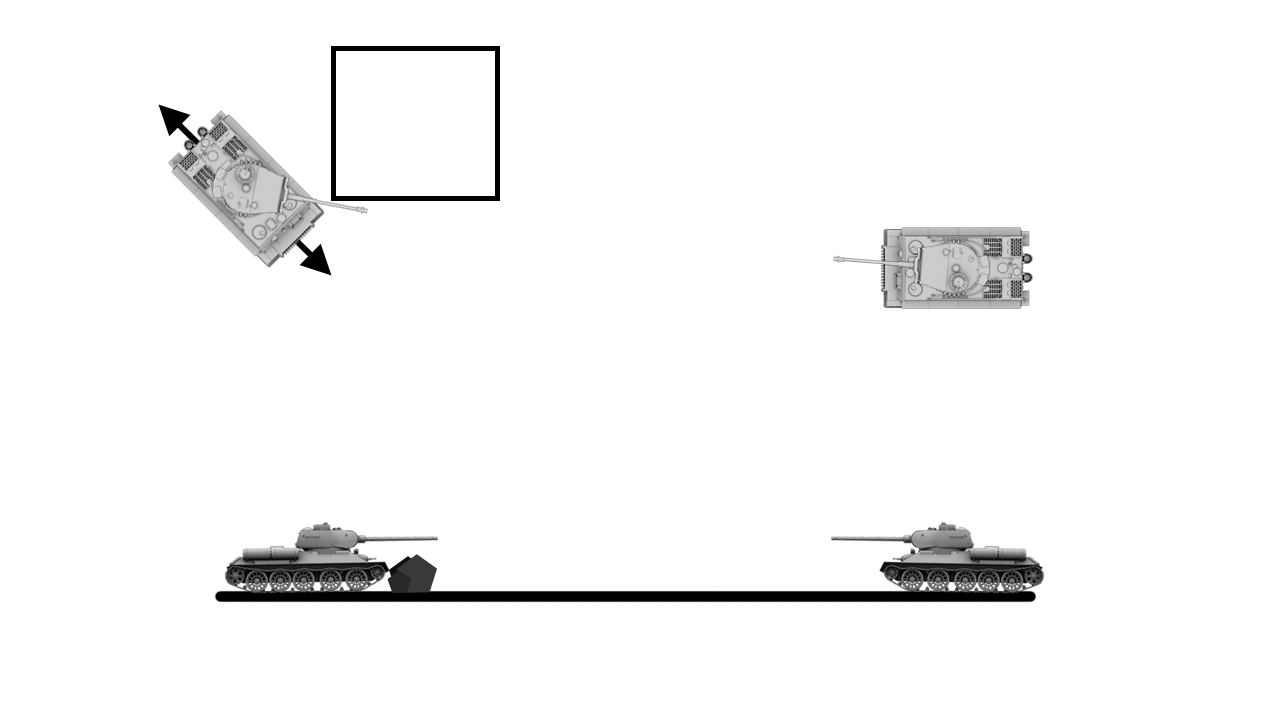
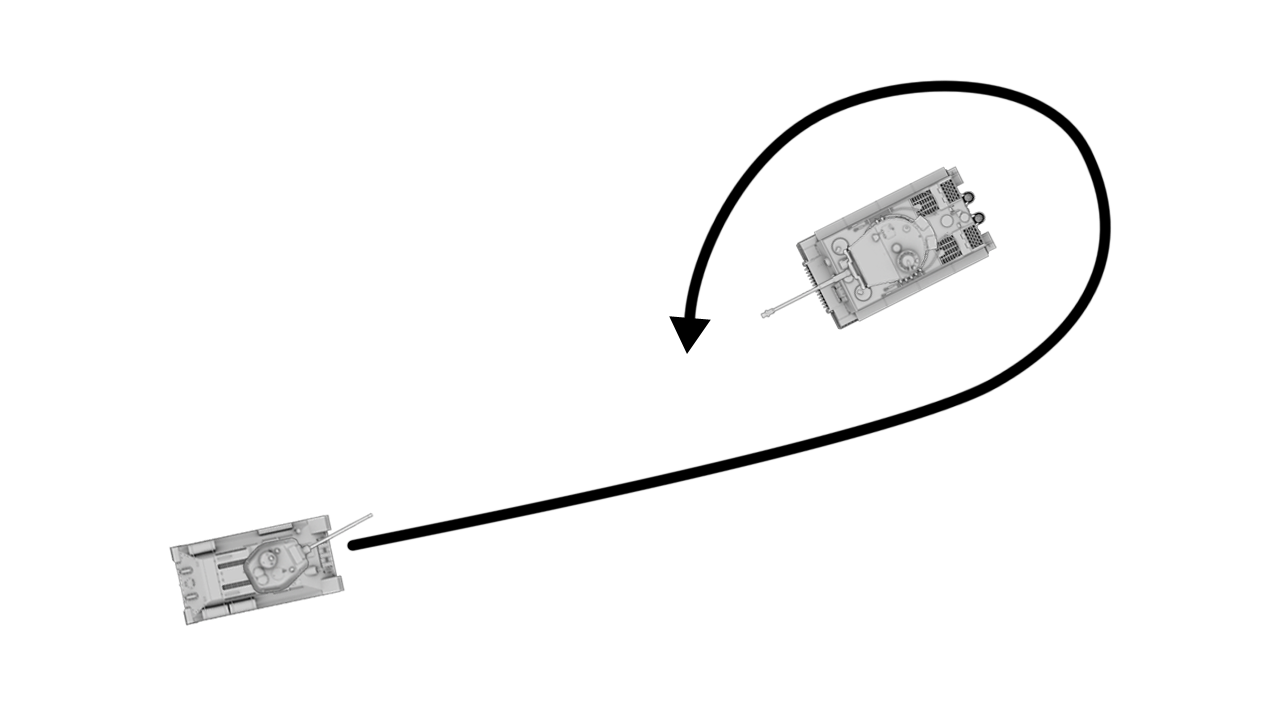
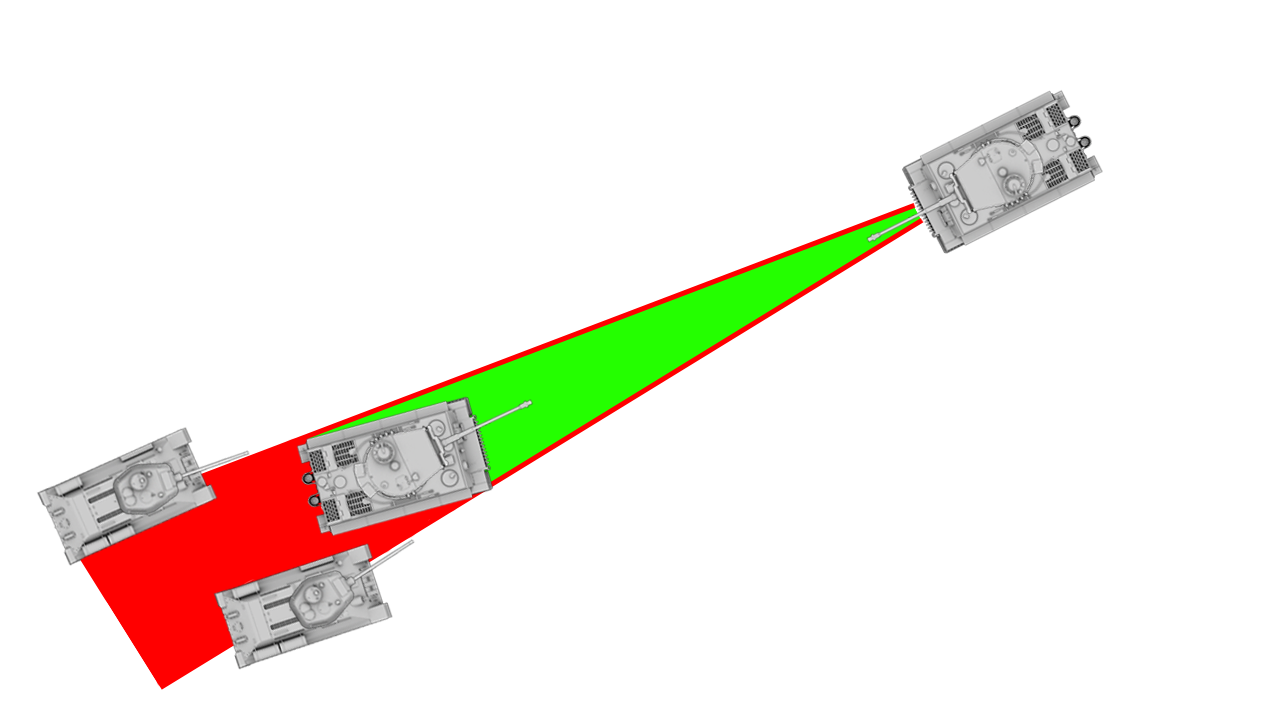
Flank your enemy's weak sides and rear, especially against slower targets. Tanks have heavy armor up front, lighter armor on the sides and are weakest in the rear. A quick medium tank may be able to outmatch a stronger heavy tank by simply outmaneuvering it and firing at its weakest points while avoiding its slowly rotating turret. This is particularly effective in one-on-one combat on open ground where there's little cover.
Note that the T-34 is charging straight at the Tiger, which allows the Tiger to shoot off the T-34's tracks. Flanking ingame is best done with two smaller tanks against one heavier tank, allowing one of the lighter tanks to get close while the heavy tank destroys the other flanker. In more hilly maps a lone medium tank can successfully flank a heavy tank from the side if able to approach the target unnoticed.
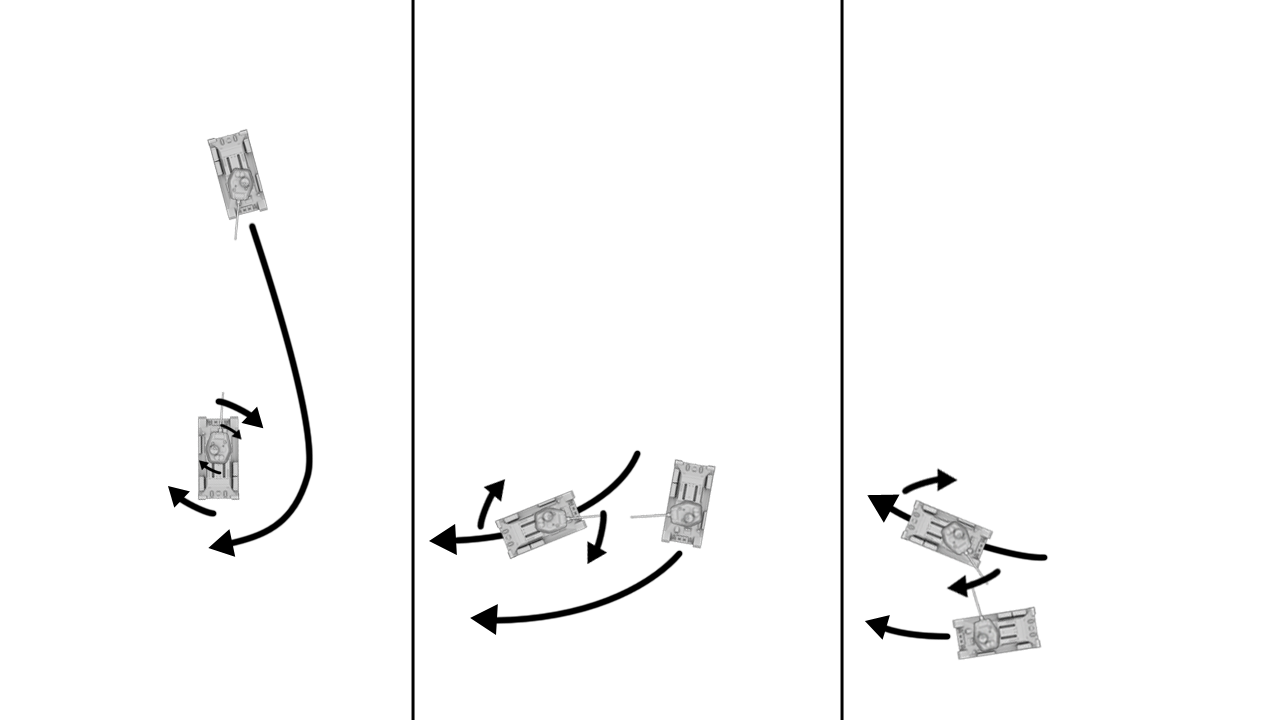
Don't allow yourself to be flanked - one-on-one. When engaging a single enemy that's trying to flank you, continue to turn and face him while reversing. This will force him to make a wider turn than you, exposing his weaker side armor while he must penetrate your thick front armor.
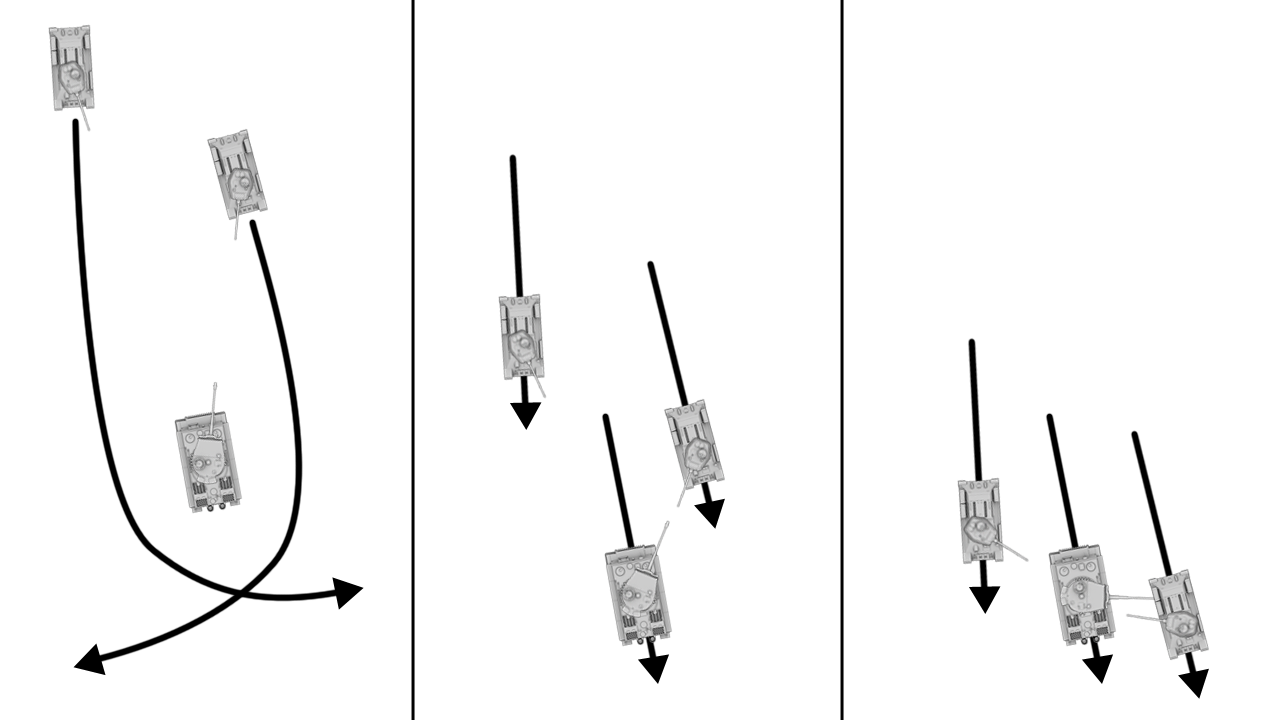 Don't allow yourself to be flanked - multiple targets / forward threat (more common). When multiple enemies are attempting to flank you or you're about to be flanked while there's the threat of enemy fire from forward your position, simply reverse, keeping your front armor facing the most serious threat (whether that be one of the flanking tanks or a sniping tank directly in front). This will delay the enemy from flanking your rear, allowing you to get shots off in the mean time. Remember to concentrate your damage on one target until it's gone or you are.
By tracking your enemy, you'll "stop them in their tracks." Tracking (short for "De-Tracking"), or destroying the tracks, renders a tank immobile until the crew is able to repair it. You can track a tank by ramming it (dependent on the speed and weight of the "rammer" and "ramee") or firing upon the tracks. Tracking high priority targets in the open will make them vulnerable to artillery fire. If you have teammates behind you in a lane (like on a city map) and a tank pops out from a building/street in front of you...track it! Every tank sitting behind you can get a free shot, track it again, and hopefully destroy it before it can get behind cover again.
From 6.4 Patch Notes: "- Changed damage mechanics for tracks. You can damage tracks if you hit the leading or the rearmost wheel of the tank. It will be much more difficult to de-track it by hitting middle part of the tank."
Attacking tank destroyers from the front can mean certain death due to their often both thick and sloped frontal armor and powerful forward-locked gun, but their weak side and rear armor and inability to shoot in any direction but forward means tracking them and maneuvering around them can make for an easy kill. Note that some US tank destroyers are equipped with slowly turning turrets, meaning you'll still have to move in a circle around your target, though due to the slow turrets, these TDs are still not much of a threat if tracked.
Your odds of survival increase when sticking together. Except for certain circumstances, supporting one another in groups is preferable to going rogue and venturing out by yourself. When you're together, you can deal more damage and spread the damage dealt, attacking and defending more effectively. This can mean staying together even if you don't agree with the strategy--a coordinated bad plan has a higher chance of success than an uncoordinated bad plan. What this doesn't mean is cluster en masse--when the majority of your team takes one route, it exposes other flanks, giving a coordinated enemy an easy victory.
Destroy one at a time. Targeting one enemy at a time until they're destroyed is better than targeting multiple tanks simultaneously, as it quickly removes that tank and its ability to deal damage, where as a half-damaged tank can still deal full damage.
Prioritize your targets. Know yourself. Are you a heavy tank, a medium tank, a TD? For example, as a heavy tank, you shouldn't waste time firing upon an "easy kill" when there's a more prevalent threat, such as an enemy heavy behind cover waiting to duck out and fire. Just the same, as a medium tank, don't waste your fire on targets you know you can't penetrate, go for the softer ones to support your heavies. An exception to this is when the "easy kill" target is scouting your position for enemy artillery or a heavy target is about to capture your base. In both cases, the tank has just become a bigger threat and primary target.
Use more armored friendlies as cover to avoid fire, especially when supporting heavy tanks against enemy heavies. Stay alive so you can continue to dish out damage and support your team. Be aware of their intentions and don't block their path to retreat behind cover.
Don't be predictable, it's easy to counter.
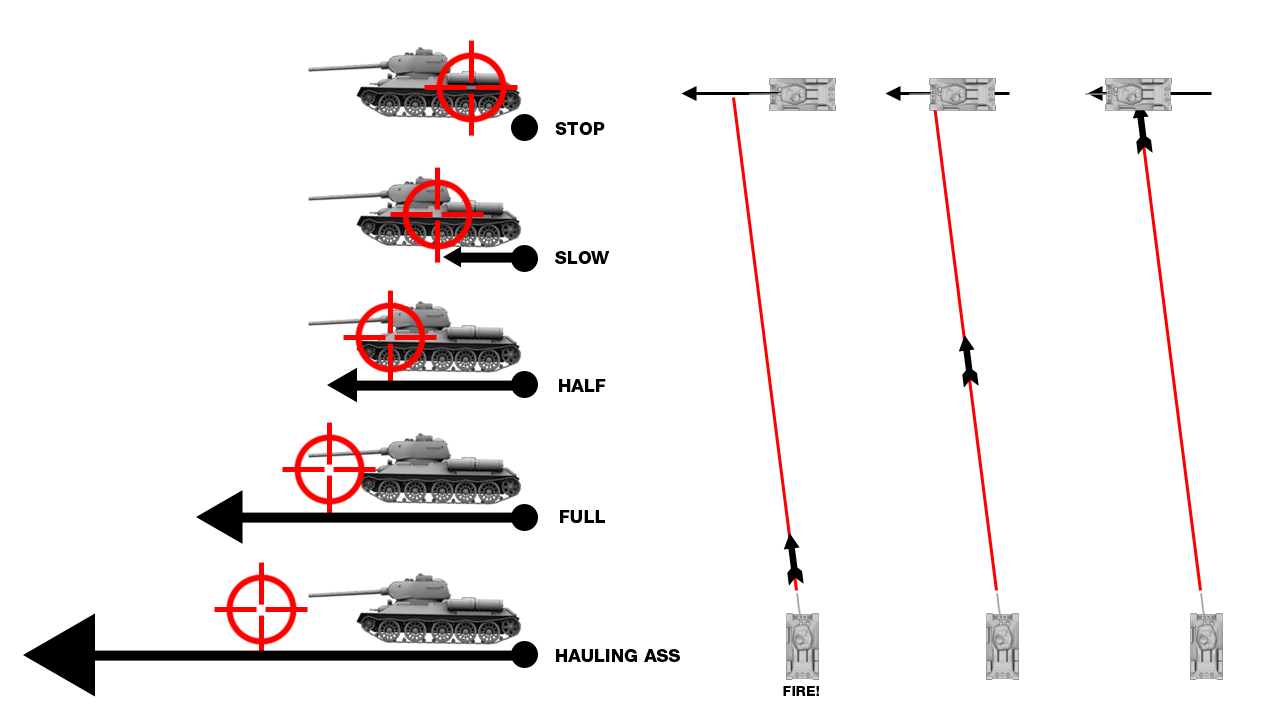
Fire ahead of fast moving targets. In World of Tanks, once fired, shots take an arcing path (gravity exists but the your aiming reticle accounts for the shell drop from gravity, so aim for what you want to hit) over a certain time (dependent on distance and shell velocity, slower shells have a higher arc, while faster shells have a lower). This delay means you must aim a certain distance in front of the target's path depending on the target's speed and distance from you--called the Angle of Deflection. If calculated properly, the shell will reach its target just as the enemy drives into your line of fire. Shell Speed and tank speed are a relatively small factor in the equation to lead a tank. But your Lag is a much bigger factor when firing at a rapidly moving tank.
Don't be afraid to run away. If your strategy is failing or you're against impossible odds, instead of suicide rushing toward the enemy, retreat, regroup and change your strategy.
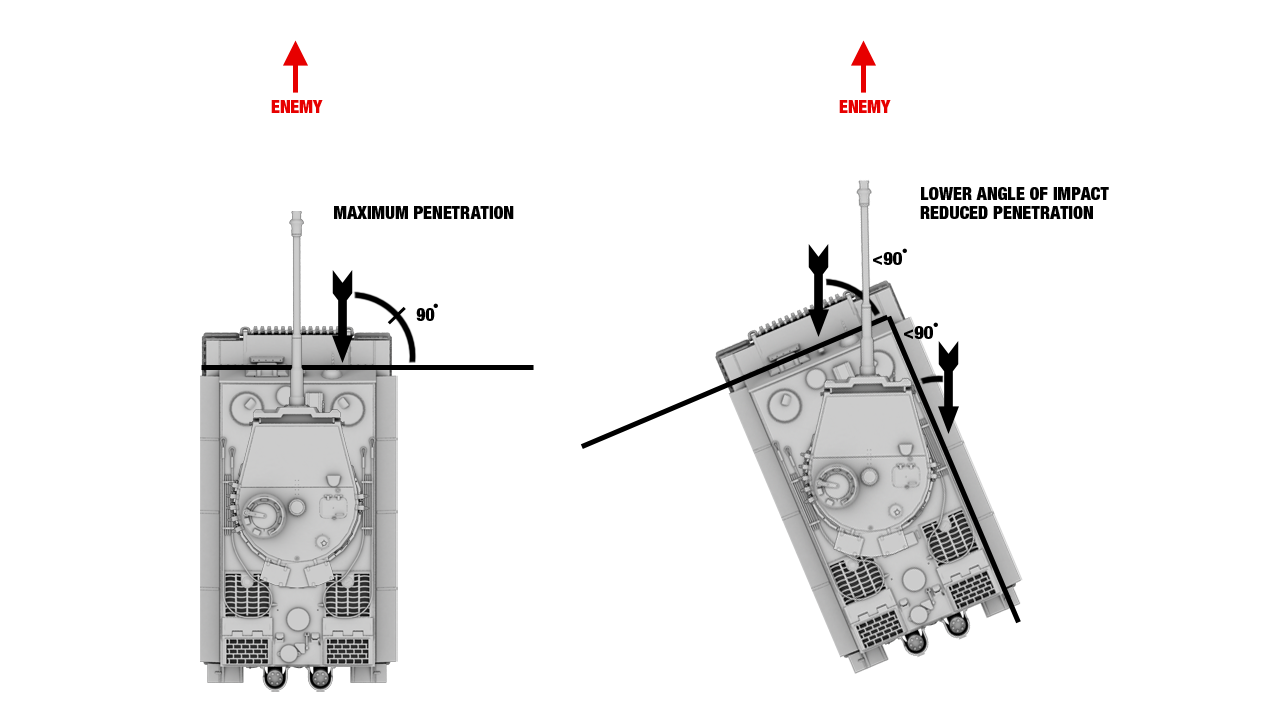
Slant your armor to decrease the angle of impact. Slanting your tank (30-40 degrees) toward an enemy will decrease the angle of impact and improve the chances the round will fail to penetrate (ricochet). Be aware, this can increase your angle of impact for an enemy to the far right or far left forward your position, which is why it's best used in tighter spaces or one-on-one combat.
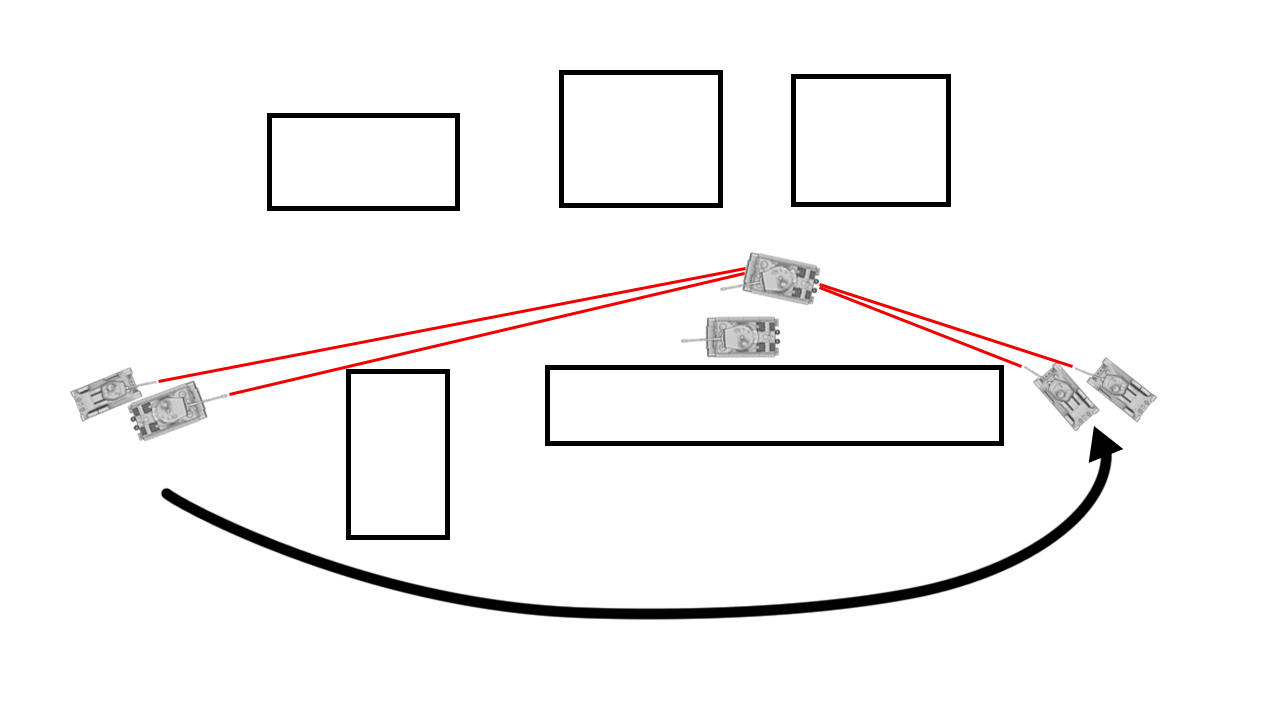
Continue to coordinate your attack as events develop. In the example above, as the two enemy heavy tanks are distracted, medium tanks take a flank position. Split into groups and work together to overpower the enemy in a coordinated effort. Use cover, camouflage, terrain and the abilities of the tanks at hand to your advantage.
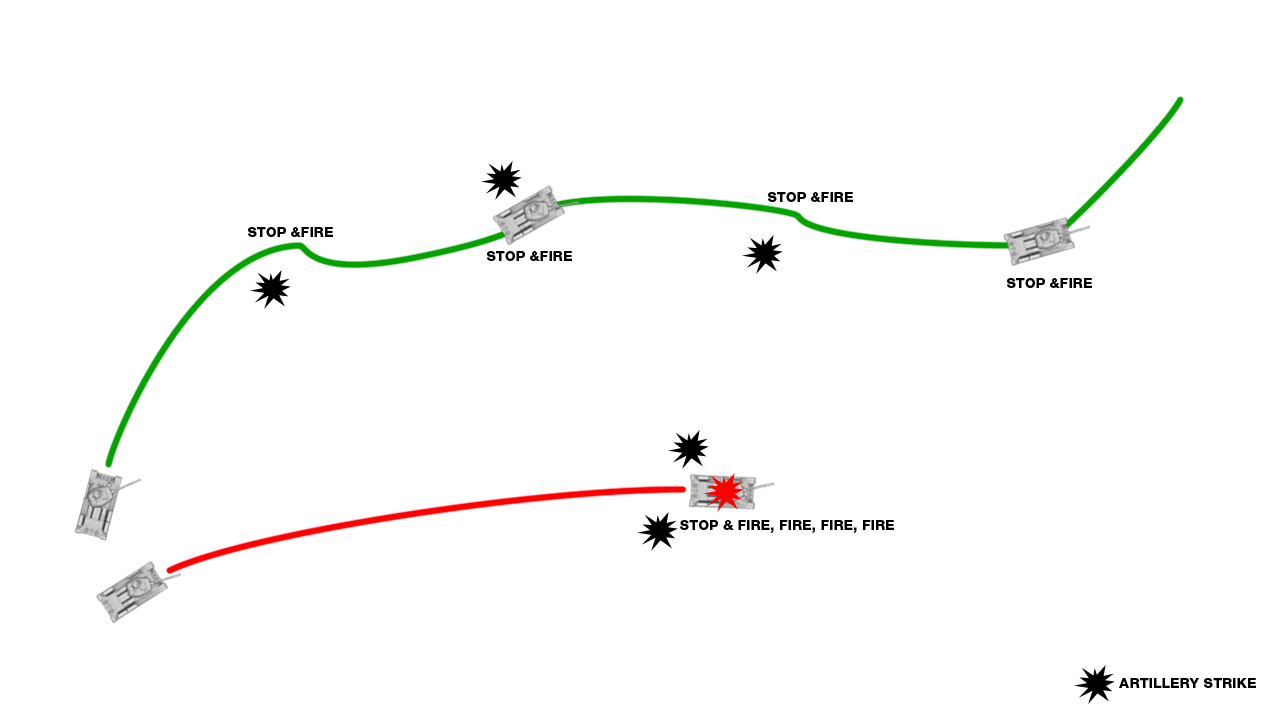
Keep it moving on open terrain. Exposed , a sitting tank is a soon-to-be-scrap tank. Slow or stop, quickly aim and fire, then continue to take up a better position against the enemy while reloading. If you stand still, you'll be easy prey for enemy tanks and artillery.
Hug the edge while rounding cover to expose yourself to as little enemy fire as possible. In areas where tanks will build up on opposite sides of a ridge, running out into the open is certain death. If you're unable to help duke it out while rounding the ridge, try changing your tactics and taking a different route.
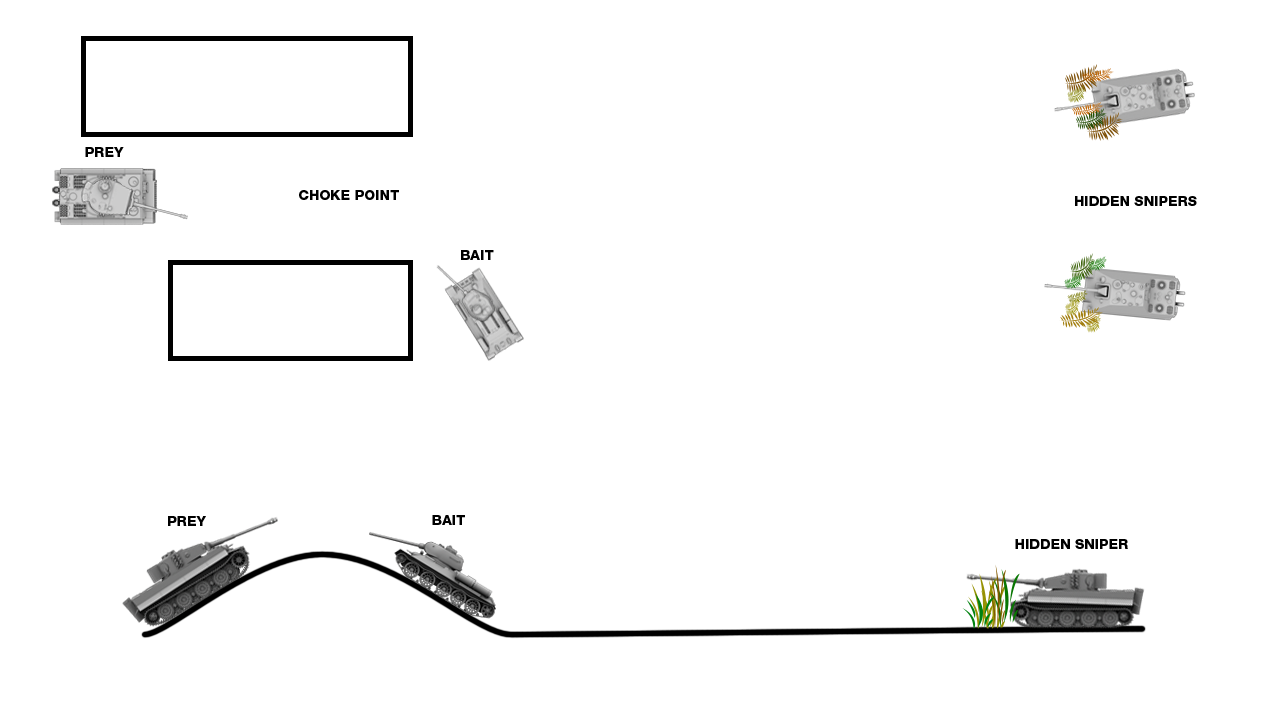
Beware enemy baiting tactics and learn how to use them to your advantage. You may get more than you bargained for by cresting a ridge or moving through a choke point to get to a tasty kill. Know how to spot obvious baiting, note enemy behavior and the map for potential sniper locations.
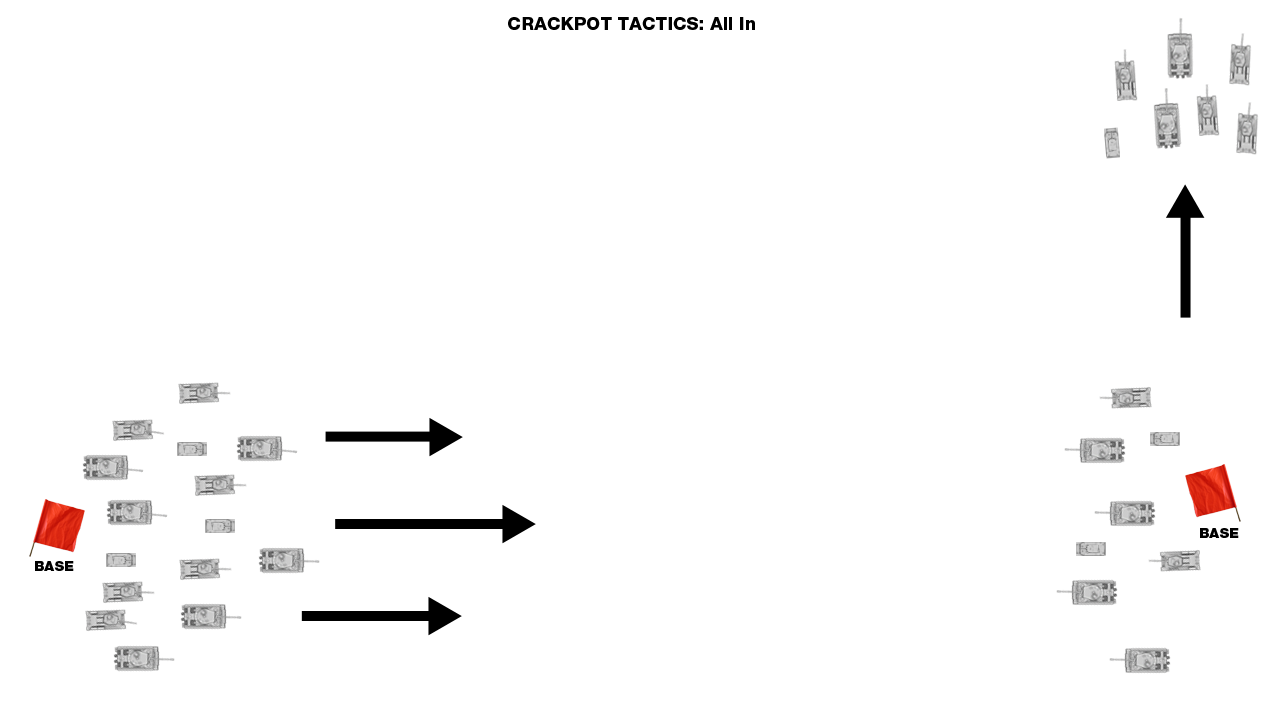
These are high risk tactics with no basis in reality.
Risk everything, go all in! When the round starts, the enemy team will begin to disperse, but not you...you're throwing everything you've got at them from one direction. With good timing and luck, you can break through their base defenders and begin to capture the base before they're able to organize a counterattack or capture your own base. This is most often referred to as "rushing" the enemy.
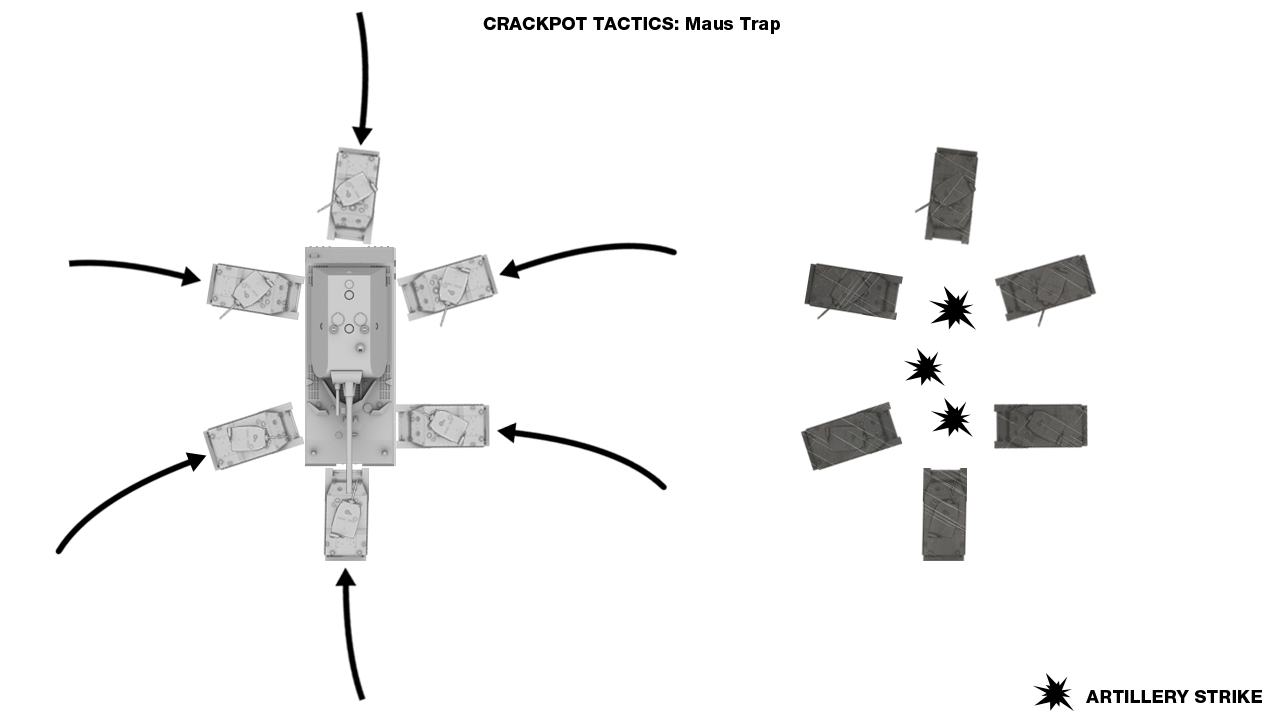
David swarm vs. Goliath. Maus, IS-7s and other lumbering beasts will be hammered into the dirt by your pathetic team of tier 2 speedy light tanks and few artillery. Their easy win will never come once they're trapped in a cage of burning wrecks and artillery is shaving off HP firing at the "circle o' corpses" from across the map. This no longer applies as described as now you can move wrecks away, tho due to how long it takes to move such wreaks this tactic is still valid to a certain extent as it would definitely slow the big tank down enough to have arty put him down.
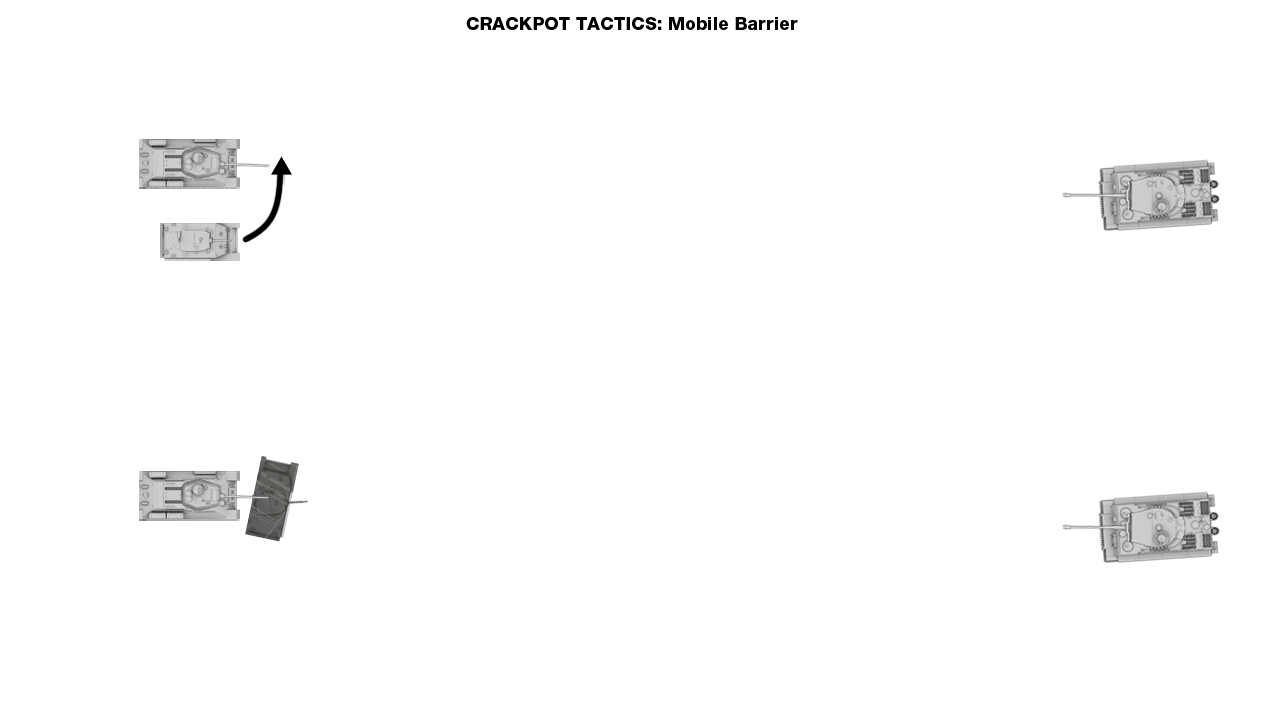
Use expendable tanks to shield you. With the plethora of low tier tanks in training matches, they can be used as perfect height cover to block incoming fire against your hull. You can now move the wrecks very slowly to use as a mobile shield, thus a heavy tank can use a light tank to block off incoming shots. Use movable wrecks to your advantage! }}
Other Tactics
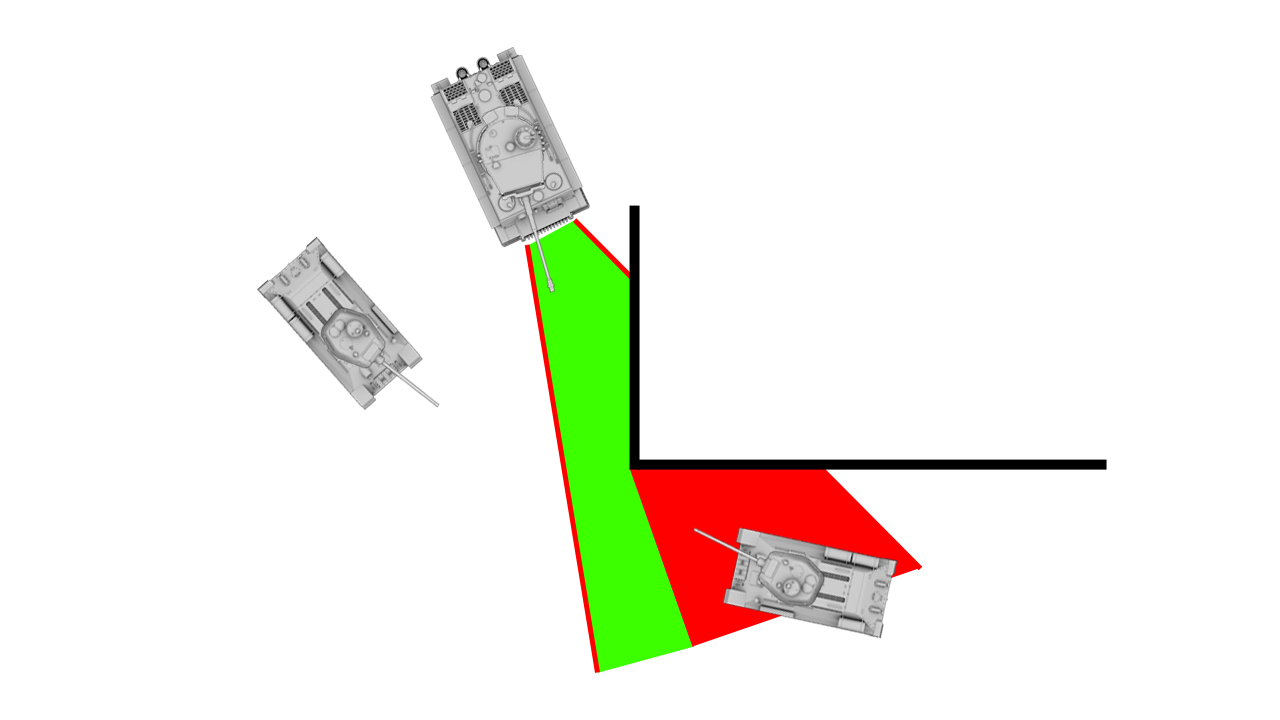
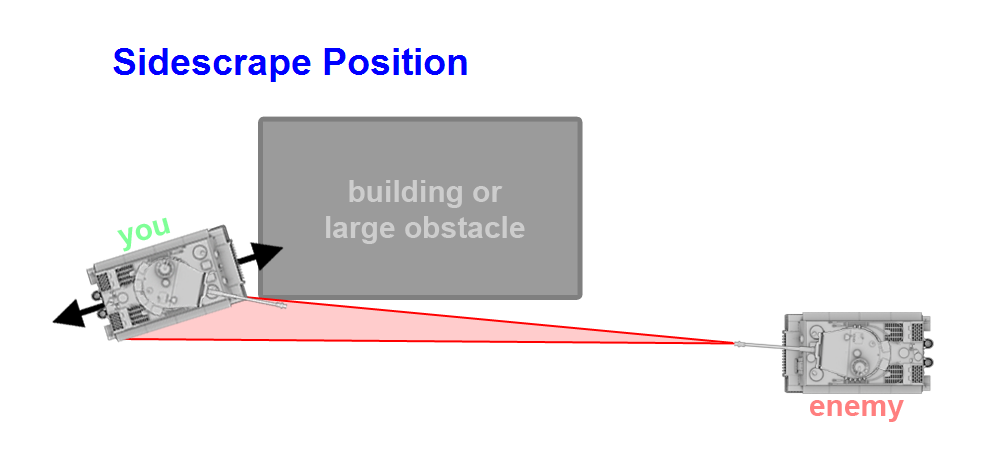
An alternative to moving the front of your tank slightly around a corner, firing, and then backing up again ("Peek-a-boo") is to maneuver your tank into what's referred to on the forums as the Sidescrape Position. In this position you expose the side of your tank rather than the front, at an angle that presents a very high chance of a ricochet. You also do not move in and out of cover. On German tanks especially, this avoids exposing the front of the tank and potentially taking engine hits. Under many circumstances, this position offers more protection. Just be aware of the enem(ies) you're facing and the potential downsides.
The main downsides are:
- It can only be used when alone.
- You can't move completely behind cover between shots.
- The entire side of your tank is exposed to artillery splash damage.
- The angle doesn't help much against HE rounds.

