Welcome to Wargaming.net Wiki!
Variants

T6 Medium

Jump to: navigation, search
Revision as of 19:13, 8 May 2020Revision as of 03:55, 9 May 2020
Line 1:Line 1:
 {{TankData|Tank=T6 Medium {{TankData|Tank=T6 Medium
?|The predecessor of the famous [[M4 Sherman]] of WWII, the T6 medium replaced the infamous [[M3 Lee]] in Update 1.9. This tank is essentially a M4 Sherman with worse gun handling and slower speed.+|The predecessor of the famous [[M4 Sherman]] of WWII, the T6 medium replaced the infamous [[M3 Lee]] in Update 1.9. This tank is essentially a M4 Sherman one tier lower with worse gun handling and slower speed.
  
 |InTheGame_pros= |InTheGame_pros=
Line 20:Line 20:
  
 |InTheGame_performance= |InTheGame_performance=
?Like the M4 Sherman, the T6 Medium's hull armor is a bit lacking and will most likely be penetrated by other tanks of its tier. However, it is not hopelessly thin; many lower-tier tanks will have a difficult time punching through the front armor. Due to its ridiculous gun depression, it can fight on hills and use terrain features much more effectively than its counterparts, which is a compensation for its weak hull armor. By only exposing its strong frontal turret(even stronger than the M4 Sherman!), it can consistently damage enemies while bouncing off shots. However, unlike the M4 Sherman, its speed and maneuverability are on the low side. Flanking an enemy can be difficult due to the sluggish mobility.+The T6 Medium's hull armor is a bit lacking and will most likely be penetrated by other tanks of its tier. However, it is not hopelessly thin; many lower-tier tanks will have a difficult time punching through the front armor. Due to its ridiculous gun depression, it can fight on hills and use terrain features much more effectively than its counterparts, which is a compensation for its weak hull armor. By only exposing its strong frontal turret(even stronger than the M4 Sherman!), it can consistently damage enemies while bouncing off shots. Its speed and maneuverability are on the low side and flanking an enemy can be difficult due to the sluggish mobility.
  
 Depending on the gun equipped, the tank may need to change tactics to match. The 75 mm Gun M3 is a very versatile gun. While it may not have the raw power of the 105mm Howitzer M4, it possesses a very high-penetration gun capable of challenging most opponents. It is far more consistent in terms of damage and can be adapted to use in many situations.  Depending on the gun equipped, the tank may need to change tactics to match. The 75 mm Gun M3 is a very versatile gun. While it may not have the raw power of the 105mm Howitzer M4, it possesses a very high-penetration gun capable of challenging most opponents. It is far more consistent in terms of damage and can be adapted to use in many situations.
  
?Another powerful option is the 105mm Howitzer M4. It is a very powerful, close-range gun capable of damaging many opponents and the large HE charge in each shell can one-shot many Tier III vehicles. However, the 105mm derp gun has a very slow shell velocity compared to the M4 Sherman and shots should not be wasted on shooting moving targets from long ranges. In addition, it has a very slow reload unlike the M4 Sherman and you should ideally have a cover to hide behind while waiting for the reload. +Another powerful option is the 105mm Howitzer M4. It is a very powerful, close-range gun capable of damaging many opponents and the large HE charge in each shell can one-shot many Tier III vehicles. However, the 105mm derp gun has a very slow shell velocity and shots should not be wasted on shooting moving targets from long ranges. In addition, it has a very slow reload and you should ideally have a cover to hide behind while waiting for the gun to reload.
  
 Like all mediums, the T6 Medium should advance from behind allied heavy tanks when possible and providing fire support. Sniping is also possible in some matches when equipped with the 75 mm Gun M3. To capitalise on the T6 Medium's excellent gun depression, it is highly recommended to take a hull down position or try to find cover in matches.  Like all mediums, the T6 Medium should advance from behind allied heavy tanks when possible and providing fire support. Sniping is also possible in some matches when equipped with the 75 mm Gun M3. To capitalise on the T6 Medium's excellent gun depression, it is highly recommended to take a hull down position or try to find cover in matches.
  
?Overall, the T6 Medium is a versatile tank and is an excellent tank for its tier. The T6 Medium makes the grind to the M4 Sherman much more comfortable and also prepares new players for the playstyle of the M4 Sherman.+Overall, the T6 Medium is a versatile tank and is an excellent tank for its tier. The T6 Medium makes the grind to the M4 Sherman much more comfortable and also prepares players for the M4 Sherman.
  
  
Line 42:Line 42:
  
 |History= |History=
 +The U.S. Army Ordnance Department designed the M4 medium tank as a replacement for the M3 medium tank. The M3 was an up-gunned development of the M2 Medium Tank of 1939, in turn derived from the M2 light tank of 1935. The M3 was developed as a stopgap measure until a new turret mounting a 75 mm gun could be devised. While it was a big improvement when tried by the British in Africa against early German tanks, the placement of a 37 mm gun turret on top gave it a very high profile, and the unusual side-sponson mounted main gun, with limited traverse, could not be aimed across the other side of the tank. Though reluctant to adopt British weapons into their arsenal, the American designers were prepared to accept proven British ideas. British ideas, as embodied in a tank designed by the Canadian General Staff, also influenced the development of the American Sherman tank. Before long, American military agencies and designers had accumulated sufficient experience to forge ahead on several points. In the field of tank armament the American 75 mm and 76 mm dual-purpose tank guns won the acknowledgement of British tank experts.[1] Detailed design characteristics for the M4 were submitted by the Ordnance Department on 31 August 1940, but development of a prototype was delayed while the final production designs of the M3 were finished and the M3 entered full-scale production. On 18 April 1941, the U.S. Armored Force Board chose the simplest of five designs. Known as the T6, the design was a modified M3 hull and chassis, carrying a newly designed turret mounting the M3's 75 mm gun. This would later become the Sherman.[2]
  
 +The T6 prototype was completed on 2 September 1941. The upper hull of the T6 was a single large casting. It featured a single overhead hatch for the driver, and a hatch in the side of the hull. In the later M4A1 production model, this large casting was maintained, although the side hatch was eliminated and a second overhead hatch was added for the assistant driver. The modified T6 was standardized as the M4, and production began in February 1942.[3] The cast-hull models would later be re-standardized as M4A1, with the first welded-hull models receiving the designation M4. In August, 1942, a variant of the M4 was put forth by the Detroit Arsenal to have angled, rather than rounded hull and turret armor. The changes were intended to improve the tank's protection without increasing weight or degrading other technical characteristics.
  
 |HistAcc= |HistAcc=
Line 51:Line 53:
  
 |Ref_references= |Ref_references=
? +# British War Production by Michael Postan (1952) p. 245<br/>
 +# Conners, Chris (2000–2013). "Medium Tank M4A1 Sherman"<br/>
 +# Canavan, Michael J., Opening Salvo: M4A1 Sherman Tank, Avalon Hill / Wizards.com<br/>
  
 |Ref_sources= |Ref_sources=
Line 57:Line 61:
  
 |Ref_links= |Ref_links=
 +* [https://en.wikipedia.org/wiki/M4_Sherman#U.S._design_prototype]
  
 }} }}
  
 [[Category:USA Tanks]] [[Category:USA Tanks]]

Revision as of 03:55, 9 May 2020


Ambox_important.png This article requires additional modification.
The design and/or content of this article do not conform to wiki standards.

Missing Content:

  • Gallery
  • Player Opinion: Equipment
  • Historical Gallery


T6 Medium

AnnoA129_T6_medium.png
Battle Tier
1234567891011
Overview
Mouse over "
Well, the ones further down, of course.
" for more information
[Client Values; Actual values in
Specifically, the mismatch in crew values caused by commander's 10% crew skill bonus. Outside of a crew of 1 commander only, 100% crew is a fiction. The client values, given for 100% crew, will normally be taken into battle with 110% crew skill members aside from specific functions, causing their actual performance to deviate from the expected client value. These differences are taken into account in tooltip boxes.
]
126,000  Credits Cost
510120 HP Hit Points
25.48/2713.11/28.5 t Weight Limit
Crew
  1. Commander
  2. Gunner
  3. Driver
  4. Radio Operator
  5. Loader
Mobility
350460 hp Engine Power
40/16 km/h Speed Limit
3234 deg/s Traverse
13.7435.09 hp/t Power/Wt Ratio
NoNo Pivot
Armor
// mm Hull Armor
65/40/4076.2/50.8/50.8 mm Turret Armor
Armament


{{#ifeq:ARMOR_PIERCING_CR|ARMOR_PIERCING||


{{#ifeq:HIGH_EXPLOSIVE|ARMOR_PIERCING||


AP/APCR/HE


{{#ifeq:HOLLOW_CHARGE|ARMOR_PIERCING||


{{#ifeq:|ARMOR_PIERCING||


HE/HEAT
Shells


56/2800/56


166/4000/56
Shell Cost
110/110/175410/350/175 HP Damage
90/125/3853/102/38 mm Penetration


|


|}}

|


|}}


13.33 r/m 

Standard Gun

Reload Times
Nominal: 4.5 s
50% Crew: 5.57 s
75% Crew: 4.87 s
100% Crew: 4.31 s
Rammer: 3.88 s
Vents: 4.22 s
Both: 3.79 s
Both and BiA: 3.71 s
Both and Max Crew %: 3.56 s

See Crew, Consumables, or Equipment for more information.


|


|}}

|


|}}


4.44 r/m 

Standard Gun

Reload Times
Nominal: 13.5 s
50% Crew: 16.72 s
75% Crew: 14.6 s
100% Crew: 12.94 s
Rammer: 11.65 s
Vents: 12.65 s
Both: 11.39 s
Both and BiA: 11.14 s
Both and Max Crew %: 10.68 s

See Crew, Consumables, or Equipment for more information.
Rate of Fire


|


|}}

|


|}}


1466.3

Standard Gun

Using Shell Type 1 (110 Damage):


Theoretical Damage Per Minute
Nominal DPM: 1466.3
50% Crew: 1183.6
75% Crew: 1355.2
100% Crew: 1529
100% Crew
Vents: 1563.1
Rammer: 1698.4
Both: 1736.9
Both and BiA: 1775.4
Both and Max Crew %: 1852.4

Advantageous Damage Per Minute
First-shot DPM: 1576.3
50% Crew: 1293.6
75% Crew: 1465.2
100% Crew: 1639
100% Crew
Rammer: 1808.4
Vents: 1673.1
Both: 1846.9
Both and BiA: 1885.4
Both and Max Crew %: 1962.4

See here, here, or here for more information.

Standard Gun

Using Shell Type 2 (110 Damage):


Theoretical Damage Per Minute
Nominal DPM: 1466.3
50% Crew: 1183.6
75% Crew: 1355.2
100% Crew: 1529
100% Crew
Vents: 1563.1
Rammer: 1698.4
Both: 1736.9
Both and BiA: 1775.4
Both and Max Crew %: 1852.4

Advantageous Damage Per Minute
First-shot DPM: 1576.3
50% Crew: 1293.6
75% Crew: 1465.2
100% Crew: 1639
100% Crew
Rammer: 1808.4
Vents: 1673.1
Both: 1846.9
Both and BiA: 1885.4
Both and Max Crew %: 1962.4

See here, here, or here for more information.

Standard Gun

Using Shell Type 3 (175 Damage):
With wholly penetrating hits

Theoretical Damage Per Minute
Nominal DPM: 2332.75
50% Crew: 1883
75% Crew: 2156
100% Crew: 2432.5
100% Crew
Vents: 2486.75
Rammer: 2702
Both: 2763.25
Both and BiA: 2824.5
Both and Max Crew %: 2947

Advantageous Damage Per Minute
First-shot DPM: 2507.75
50% Crew: 2058
75% Crew: 2331
100% Crew: 2607.5
100% Crew
Rammer: 2877
Vents: 2661.75
Both: 2938.25
Both and BiA: 2999.5
Both and Max Crew %: 3122

See here, here, or here for more information.


|


|}}

|


|}}


1820.4

Standard Gun

Using Shell Type 1 (410 Damage):
With wholly penetrating hits

Theoretical Damage Per Minute
Nominal DPM: 1820.4
50% Crew: 1467.8
75% Crew: 1681
100% Crew: 1898.3
100% Crew
Vents: 1939.3
Rammer: 2107.4
Both: 2156.6
Both and BiA: 2205.8
Both and Max Crew %: 2300.1

Advantageous Damage Per Minute
First-shot DPM: 2230.4
50% Crew: 1877.8
75% Crew: 2091
100% Crew: 2308.3
100% Crew
Rammer: 2517.4
Vents: 2349.3
Both: 2566.6
Both and BiA: 2615.8
Both and Max Crew %: 2710.1

See here, here, or here for more information.

Standard Gun

Using Shell Type 2 (350 Damage):


Theoretical Damage Per Minute
Nominal DPM: 1554
50% Crew: 1253
75% Crew: 1435
100% Crew: 1620.5
100% Crew
Vents: 1655.5
Rammer: 1799
Both: 1841
Both and BiA: 1883
Both and Max Crew %: 1963.5

Advantageous Damage Per Minute
First-shot DPM: 1904
50% Crew: 1603
75% Crew: 1785
100% Crew: 1970.5
100% Crew
Rammer: 2149
Vents: 2005.5
Both: 2191
Both and BiA: 2233
Both and Max Crew %: 2313.5

See here, here, or here for more information.

Standard Gun

Using Shell Type 3 (175 Damage):


Theoretical Damage Per Minute
Nominal DPM: 777
50% Crew: 626.5
75% Crew: 717.5
100% Crew: 810.25
100% Crew
Vents: 827.75
Rammer: 899.5
Both: 920.5
Both and BiA: 941.5
Both and Max Crew %: 981.75

Advantageous Damage Per Minute
First-shot DPM: 952
50% Crew: 801.5
75% Crew: 892.5
100% Crew: 985.25
100% Crew
Rammer: 1074.5
Vents: 1002.75
Both: 1095.5
Both and BiA: 1116.5
Both and Max Crew %: 1156.75

See here, here, or here for more information.
Damage Per Minute


|


|}}


0.47 m 

With 50% Crew: 0.582 m
With 75% Crew: 0.508 m
With 100% Crew: 0.451 m
With BiA: 0.441 m
With BiA and Vents: 0.431 m
Maximum possible: 0.413 m

For more details, see Crew


|


|}}


0.6 m 

With 50% Crew: 0.743 m
With 75% Crew: 0.649 m
With 100% Crew: 0.575 m
With BiA: 0.563 m
With BiA and Vents: 0.55 m
Maximum possible: 0.528 m

For more details, see Crew
Accuracy


|


|}}


1.9 s 

With 50% Crew: 2.354 s
With 75% Crew: 2.055 s
With 100% Crew: 1.822 s
With GLD: 1.656 s
With BiA: 1.782 s
With BiA and Vents: 1.743 s
With both and GLD: 1.584 s
Maximum possible: 1.519 s

For more details, see Crew or Equipment


|


|}}


3.3 s 

With 50% Crew: 4.088 s
With 75% Crew: 3.569 s
With 100% Crew: 3.164 s
With GLD: 2.877 s
With BiA: 3.094 s
With BiA and Vents: 3.027 s
With both and GLD: 2.752 s
Maximum possible: 2.638 s

For more details, see Crew or Equipment
Aim time
3437 deg/s Turret Traverse
360° Gun Arc
-12°/+25°-12°/+25° Elevation Arc
7570 rounds Ammo Capacity
General
2020 % Chance of Fire


320 m 

With 50% Crew: 251.4 m
With 75% Crew: 285.7 m
With 100% Crew: 320 m
With Recon and Situational Awareness: 336.2 m
With Coated Optics: 352 m
With Binocular Telescope: 400 m
Maximum possible: 458.1 m

For more details, see Skills or Equipment


340 m 

With 50% Crew: 267.1 m
With 75% Crew: 303.6 m
With 100% Crew: 340 m
With Recon and Situational Awareness: 357.2 m
With Coated Optics: 374 m
With Binocular Telescope: 425 m
Maximum possible: 486.7 m

For more details, see Skills or Equipment
View Range


|


|}}


325 m 

With 50% Crew: 262.4 m
With 75% Crew: 300.5 m
With 100% Crew: 339 m
With 100% Signal Boost: 390 m
When affected by 100% Relaying: 357.5 m
Maximum possible: 487.9 m

For more details, see Skills or Equipment


|


|}}


615 m 

With 50% Crew: 496.5 m
With 75% Crew: 568.6 m
With 100% Crew: 641.4 m
With 100% Signal Boost: 738 m
When affected by 100% Relaying: 676.5 m
Maximum possible: 923.2 m

For more details, see Skills or Equipment
Signal Range
Values are Stock - click for Top


IV

AnnoA129_T6_medium.png

126000

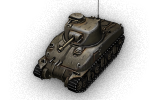
The T6 Medium is an American tier 4 medium tank.

Despite the launch of mass production of the M3 medium tank in the summer of 1941, the development of an improved version with a 75 mm gun in a rotating turret was started earlier in winter of the same year. Two prototypes were produced by the autumn of 1941. The military was mostly satisfied with the improved version but also requested some improvements. As a result, the vehicle lost its side doors and the commander's cupola machine gun. On September 5, 1941, the Armaments committee recommended standardizing the vehicle under the Medium Tank M4 designation.

The predecessor of the famous M4 Sherman of WWII, the T6 medium replaced the infamous M3 Lee in Update 1.9. This tank is essentially a M4 Sherman one tier lower with worse gun handling and slower speed.

The T6 Medium leads to the M4A1 Sherman, the M8A1, and the T1 Heavy Tank.

Modules / Available Equipment and Consumables

Modules

Ico_gun_alpha.png

Guns

Tier Gun Penetration
(mm)
Damage
(HP)
Rate of fire
(rounds/minute)
Dispersion
(m/100m)
Aiming time
(s)
Weight
(kg)
Price
(Credits)

IV 75 mm Gun M3 92/127/38 110/110/175 14.56 0.4 2.1 1437 30000
V 105 mm M4 53/102/38 410/350/175 4.44 0.6 3.3 2600 40300
IV 75 mm Gun M2 90/125/38 110/110/175 13.95 0.46 1.8 1237 23000
IV 75 mm M3 Tank Howitzer 38/92/38 175/110/175 13.04 0.53 3.2 138 23100

Ico_engine_alpha.png

Engines

Tier Engine Engine Power
(hp)
Chance of Fire on Impact
(%)
Weight
(kg)
Price
(Credits)

IV Wright Continental R-975EC2 350 20 515 10500
V Wright Continental R-975C4 460 20 550 13900

Ico_suspension_alpha.png

Suspensions

Tier Suspension Load Limit
(т)
Traverse Speed
(gr/sec)
Rmin Weight
(kg)
Price
(Credits)

III VVSS T412 27 32 B/2 5000 1500
IV VVSS T482 28.5 34 B/2 5000 3900

Ico_radio_alpha.png

Radios

Tier Radio Signal Range
(m)
Weight
(kg)
Price
(Credits)

IV SCR 210 325 80 1980
IX SCR 506 615 110 33600

Compatible Equipment

Low Noise Exhaust System Class 3 Camouflage Net Class 3 Coated Optics Class 3 Experimental Optics Wear-Resistant Gun Laying Drive Venting System Enhanced Gun Laying Drive Class 3 Improved Hardening Class 3 Additional Grousers Class 3 Improved Ventilation Class 3 Binocular Telescope Class 3 Turbocharger Class 3 

Compatible Consumables

Automatic Fire Extinguisher Natural Cover Optical Calibration Case of Cola Aim Tuning Experienced Firefighters 100-octane Gasoline 105-octane Gasoline Manual Fire Extinguisher Vent Purge Large First Aid Kit Large Repair Kit Duty Comes First Shell Organizer Focus on Target Increased Focus Small First Aid Kit Small Repair Kit Gearbox Intricacy Steady Hand Combat Course 


Player Opinion

Pros and Cons

Pros:


  • Strong frontal turret
  • Good selection of high-damage cannons: the 75mm Gun M3 and the 105mm Howitzer M4
  • 105mm howitzer has very good alpha with HE
  • Exceptional gun depression
  • 3rd best View Range among the Tier IV mediums and also high Radio Range


Cons:


  • Quite sluggish
  • Hull armour is weak
  • Very slow reload for the 105mm howitzer (M4 Sherman has a faster reload even though they have the same gun)
  • Terrible dispersion and accuracy on 105mm howitzer
  • Slow shell velocity on the 105mm howitzer compared to M4 Sherman's


Performance

The T6 Medium's hull armor is a bit lacking and will most likely be penetrated by other tanks of its tier. However, it is not hopelessly thin; many lower-tier tanks will have a difficult time punching through the front armor. Due to its ridiculous gun depression, it can fight on hills and use terrain features much more effectively than its counterparts, which is a compensation for its weak hull armor. By only exposing its strong frontal turret(even stronger than the M4 Sherman!), it can consistently damage enemies while bouncing off shots. Its speed and maneuverability are on the low side and flanking an enemy can be difficult due to the sluggish mobility.

Depending on the gun equipped, the tank may need to change tactics to match. The 75 mm Gun M3 is a very versatile gun. While it may not have the raw power of the 105mm Howitzer M4, it possesses a very high-penetration gun capable of challenging most opponents. It is far more consistent in terms of damage and can be adapted to use in many situations.

Another powerful option is the 105mm Howitzer M4. It is a very powerful, close-range gun capable of damaging many opponents and the large HE charge in each shell can one-shot many Tier III vehicles. However, the 105mm derp gun has a very slow shell velocity and shots should not be wasted on shooting moving targets from long ranges. In addition, it has a very slow reload and you should ideally have a cover to hide behind while waiting for the gun to reload.

Like all mediums, the T6 Medium should advance from behind allied heavy tanks when possible and providing fire support. Sniping is also possible in some matches when equipped with the 75 mm Gun M3. To capitalise on the T6 Medium's excellent gun depression, it is highly recommended to take a hull down position or try to find cover in matches.

Overall, the T6 Medium is a versatile tank and is an excellent tank for its tier. The T6 Medium makes the grind to the M4 Sherman much more comfortable and also prepares players for the M4 Sherman.


Early Research

  • Upon purchasing this tank, the only thing that carries over from the M5 Stuart is the SCR 506 radio.
  • Go for tracks first.
  • Research the engine next to improve mobility.
  • Choice of researching the 75 mm Gun M3 or the turret and 75mm M3 Tank Howitzer for the 105mm M4 howitzer.
  • Finish researching any remaining modules.


Gallery

Historical Info

The U.S. Army Ordnance Department designed the M4 medium tank as a replacement for the M3 medium tank. The M3 was an up-gunned development of the M2 Medium Tank of 1939, in turn derived from the M2 light tank of 1935. The M3 was developed as a stopgap measure until a new turret mounting a 75 mm gun could be devised. While it was a big improvement when tried by the British in Africa against early German tanks, the placement of a 37 mm gun turret on top gave it a very high profile, and the unusual side-sponson mounted main gun, with limited traverse, could not be aimed across the other side of the tank. Though reluctant to adopt British weapons into their arsenal, the American designers were prepared to accept proven British ideas. British ideas, as embodied in a tank designed by the Canadian General Staff, also influenced the development of the American Sherman tank. Before long, American military agencies and designers had accumulated sufficient experience to forge ahead on several points. In the field of tank armament the American 75 mm and 76 mm dual-purpose tank guns won the acknowledgement of British tank experts.[1] Detailed design characteristics for the M4 were submitted by the Ordnance Department on 31 August 1940, but development of a prototype was delayed while the final production designs of the M3 were finished and the M3 entered full-scale production. On 18 April 1941, the U.S. Armored Force Board chose the simplest of five designs. Known as the T6, the design was a modified M3 hull and chassis, carrying a newly designed turret mounting the M3's 75 mm gun. This would later become the Sherman.[2] The T6 prototype was completed on 2 September 1941. The upper hull of the T6 was a single large casting. It featured a single overhead hatch for the driver, and a hatch in the side of the hull. In the later M4A1 production model, this large casting was maintained, although the side hatch was eliminated and a second overhead hatch was added for the assistant driver. The modified T6 was standardized as the M4, and production began in February 1942.[3] The cast-hull models would later be re-standardized as M4A1, with the first welded-hull models receiving the designation M4. In August, 1942, a variant of the M4 was put forth by the Detroit Arsenal to have angled, rather than rounded hull and turret armor. The changes were intended to improve the tank's protection without increasing weight or degrading other technical characteristics.


Sources and External Links

USA
Light Tanks IT1 Cunningham IIM2 Light Tank IIT1E6 IIT2 Light Tank IIT7 Combat Car IIIM22 Locust IIIM3 Stuart IIIMTLS-1G14 IVM5 Stuart VM24 Chaffee VM7 VIM24E2 Super Chaffee VIT21 VIT37 VIIT71 CMCD VIIT71 DA VIIIT92 VIIIM41 Walker Bulldog IXT49 XXM551 Sheridan
Medium Tanks IIT2 Medium Tank IIIConvert. Medium Tank T3 IIIM2 Medium Tank IVT6 Medium IVM3 Lee VM4 Improved VM4A2E4 Sherman VM4A1 Sherman VRam II VIM4A3E8 Fury VIM4A3E8 Thunderbolt VII VIM4A3E8 Sherman VIM4A3E2 Sherman Jumbo VIIT26E3 Eagle 7 VIIT20 VIIT23E3 VIIIT25 Pilot Number 1 VIIITL-1 LPC VIIIT42 VIIIASTRON Rex 105 mm VIIIAMBT VIIIM46 Patton KR VIIIM26 Pershing VIIIT26E4 SuperPershing VIIIT69 VIIIT95E2 IXM46 Patton XM48A5 Patton XM60 XT95E6
Heavy Tanks VT14 VT1 Heavy Tank VIPawlack Tank VIM6 VIIKing Tiger (Captured) VIIM-II-Y VIIT29 VIIIChrysler K VIIIChrysler K GF VIIIT26E5 VIIIT26E5 Patriot VIIIM54 Renegade VIIIT77 VIIIM-III-Y VIIIM-IV-Y VIIIM6A2E1 VIIIT32 VIIIT34 VIIIT34 B IXAE Phase I IXConcept 1B IXM-VI-Y IXM103 IXT54E1 XM-V-Y XT110E5 XT57 Heavy Tank
Tank Destroyers IIT3 HMC IIIT56 GMC IVM8A1 IVT40 VM10 Wolverine VT67 VIT78 VIM18 Hellcat VIM36 Jackson VIIM56 Scorpion VIIT28 Concept VIISuper Hellcat VIIT25/2 VIIT25 AT VIIITS-5 VIIIT28 VIIIT28 Prototype IXT30 IXT95 XT110E3 XT110E4
Self-Propelled Artillery IIT1 HMC IIIT18 HMC IIIM7 Priest IVT82 HMC IVM37 VM41 HMC VIM44 VIIM12 VIIIM40/M43 IXM53/M55 XT92 HMC
Medium Tanks
USA IIT2 Medium Tank IIIConvert. Medium Tank T3 IIIM2 Medium Tank IVT6 Medium IVM3 Lee VM4 Improved VM4A2E4 Sherman VM4A1 Sherman VRam II VIM4A3E8 Fury VIM4A3E8 Thunderbolt VII VIM4A3E8 Sherman VIM4A3E2 Sherman Jumbo VIIT26E3 Eagle 7 VIIT20 VIIT23E3 VIIIT25 Pilot Number 1 VIIITL-1 LPC VIIIT42 VIIIASTRON Rex 105 mm VIIIAMBT VIIIM46 Patton KR VIIIM26 Pershing VIIIT26E4 SuperPershing VIIIT69 VIIIT95E2 IXM46 Patton XM48A5 Patton XM60 XT95E6
UK IVickers Medium Mk. I IIVickers Medium Mk. II IIIVickers Medium Mk. III IVMatilda IVMatilda LVT IVGrant IVAC 1 Sentinel VCavalier VValiant VSherman III VMatilda Black Prince VISherman Firefly VICromwell VIAC 4 Experimental VICromwell B VISherman VC Firefly VIIComet VIIICenturion Mk. I VIIIFV4202 VIIIChieftain/T95 VIIICenturion Mk. 5/1 RAAC VIIIChimera IXCobra IXCenturion Mk. 7/1 XCenturion Action X
Germany IIIGroßtraktor - Krupp IIIPz.Kpfw. IV Ausf. A IIIPz.Kpfw. S35 739 (f) IVPz.Kpfw. III Ausf. J IVPz.Kpfw. IV Ausf. D IVVK 20.01 (D) VPz.Kpfw. III Ausf. K VTurán III prototípus VPz.Kpfw. IV Ausf. H Ankou VPz.Kpfw. III/IV VPz.Kpfw. IV hydrostat. VPz.Kpfw. V/IV VPz.Kpfw. V/IV Alpha VPz.Kpfw. IV Ausf. H VPz.Kpfw. T 25 VVK 30.01 (H) VIPz.Kpfw. IV Schmalturm VIVK 30.01 (D) VIVK 30.02 (M) VIIPanther/M10 VIIPanther VIIVK 30.02 (D) VIIIPanther mit 8,8 cm L/71 VIIIPanzer 58 VIIISchwarzpanzer 58 VIIIPanzer 58 Mutz VIIIM48A2 Räumpanzer VIIIKampfpanzer 07 RH VIIIIndien-Panzer VIIIPanther II IXE 50 IXT 55A IXKampfpanzer 50 t IXKunze Panzer IXLeopard Prototyp A XE 50 Ausf. M XLeopard 1
France IIID2 IIISomua S35 IVSARL 42 VRenault G1 VIBretagne Panther VIM4A1 FL 10 VIIIBat.-Châtillon Bourrasque VIIIAltProto AMX 30 VIIILorraine 40 t VIIIAMX Chasseur de chars VIIIM4A1 Revalorisé IXAMX 30 1er prototype IXChar Futur 4 IXBat.-Châtillon 25 t AP XBat.-Châtillon 25 t XAMX 30 B
USSR IIIT-29 IVA-32 IVT-28E with F-30 IVT-34 with L-11 IVT-28 VMatilda IV VT-34 shielded VM4-85 VT-34 VIA-43 VIT-34-85M VIT-34-85 Rudy VILoza's M4-A2 Sherman VIT-34-85 VIIA-44 VIIKV-13 VIIT-43 VIIT-44-122 VIIIObject 416 VIIIT-54 first prototype VIIIT-44-100 Igrovoy VIIIT-44-100 (R) VIIISTG VIIISTG Guard VIIIObject 274a VIIIT-44 IXObject 430 Version II IXObject 430 IXT-54 XObject 140 XObject 907 XT-22 medium XK-91 XObject 430U XT-62A
China VType T-34 VIType 58 VIIT-34-1 VIIIType 59 VIIIT-34-2 VIIIT-34-3 VIII59-Patton VIII122 TM VIIIType 59 G IXWZ-120 X121 X121B
Japan IIChi-Ni IIType 89 I-Go/Chi-Ro IVType 1 Chi-He VType 3 Chi-Nu VType 3 Chi-Nu Kai VIType 4 Chi-To VIIType 5 Chi-Ri VIIISTA-1 VIIISTA-2 IXType 61 XSTB-1
Czechoslovakia IVST vz. 39 VŠkoda T 24 VIŠkoda T 40 VIŠkoda T 25 VIIKonštrukta T-34/100 VIIITVP VTU Koncept VIIIŠkoda T 27 IXŠkoda T 50 XTVP T 50/51
Sweden IVLago VStrv m/42 VIStrv m/42-57 Alt A.2 VIStrv 74 VIILeo VIIIStrv 81 VIIIPrimo Victoria VIIILansen C VIIIUDES 14 Alt 5 IXUDES 16 XUDES 15/16
Italy IIM14/41 IIIM15/42 IVP26/40 VP.43 VIP.43 bis VIIP.43 ter VIIIProgetto M35 mod. 46 VIIIP.44 Pantera IXPrototipo Standard B XProgetto M40 mod. 65 XCarro da Combattimento 45 t
Poland V25TP KSUST II VDS PZInż VIPudel VI40TP Habicha VIT-34-85 Rudy VIB.U.G.I. VIICS-44 VIIICS-52 LIS VIIICS-53 IXCS-59 XCS-63
ja:Tank:A129 T6 medium