113
| Revision as of 23:19, 23 April 2020 | Revision as of 12:13, 6 May 2020 | |||
| Line 6: | Line 6: | |||
| |InTheGame_pros= | |InTheGame_pros= | |||
| ? | + | - Gun is reasonably accurate with good DPM | ||
| ? | + | |||
| ? | + | - Very strong turret armor and extremely sloped upper glacis, side armor is usable for effective sidescraping | ||
| ? | + | |||
| ? | + | - Rather low (albeit wide) profile for a heavy tank; decent camoflage values | ||
| + | ||||
| + | - Decent healthpool for a "pocket heavy" | |||
| + | ||||
| + | - Excellent top speed and good acceleration for a heavy tank, fast hull traverse allowing it to adjust it's position quickly | |||
| |InTheGame_cons= | |InTheGame_cons= | |||
| ? | + | - Large, weak lower glacis is a prominent weakspot | ||
| ? | + | |||
| ? | + | - Subpar aim time and standard (AP) penetration | ||
| ? | + | |||
| ? | + | - Bad gun depression (gets a bit better when aiming at the sides) | ||
| + | ||||
| + | - Low ammo capacity of only 34 rounds total | |||
| + | ||||
| + | - Wide profile and thin roof armor, vulnerable against SPGs | |||
| + | ||||
| + | - Vulnerable ammo rack and fuel tank modules | |||
| |InTheGame_performance= | |InTheGame_performance= | |||
| ? | The 113 differs dramatically from its heavy predecessors, mainly in that it plays more like a very large medium tank, though not being the best at either role. Its lack of reliable armor coupled with its | + | The 113 differs dramatically from its heavy predecessors, mainly in that it plays more like a very large medium tank, though not being the best at either role. Its lack of reliable armor coupled with its somewhat average gun can lead to major frustration when attempting to utilize traditional heavy tactics. Being truly unique among tier 10 heavy tanks, having a reliable support team is crucial for taking full advantage of the 113. | |
| ? | The 113 | + | The odd gun depression and mediocre penetration can be difficult to adapt to, limiting the 113's effectiveness dramatically on maps with hills and uneven terrain, often necessitating exposure of the hull sides in order to access enemy weakspots unless an exceptional hull-down position can be attained. Maintaining a hull down position is ideal for the 113, as it allows the driver to take full advantage of its narrow and well armored turret. If this is not possible, one can also use terrain to cover the weak lower glacis and still retain a decent chance to bounce incoming shells from a distance. | |
| ? | + | None of this will matter if enemy artillery is present, however, as the 113 is highly susceptible to incoming volleys thanks to its very wide, flat profile, and thinly armored engine deck. The turret and front half of hull roof armor is also just 40mm, guaranteeing it will be overmatched by shells exceeding 120mm in diameter. The 113 is also one of the lightest of all tier 10 heavy tanks (weighing in at a measly 45 tons), and will always take damage from rams dealt by other heavy tanks, and even some mediums. | ||
| + | ||||
| + | One of the most unique things about this tank is that its upper glacis is a mere 2 degrees from auto-bouncing AP rounds, although this effect is largely negated in close quarters due to its low height, and even from a distance by the use of premium ammunition. It should be noted, however, that taller tanks than the 113 can negate the hull's slope by shooting down on it in close quarters, reducing its survivability in brawls dramatically. The 113 is, however, able to sidescrape with reliability. But, you must be careful to not angling the hull too much, as it will negated the autobounce angle and turned the half of your sides into one big weakspot, in which your fragile ammo rack resides there. Thus requires some partice to master it. | |||
| This tank is often compared to the Soviet [[IS-7]] but they are entirely different tanks. The overall armor scheme of the IS-7 is one of the best in its class, while that of the 113 often leaves all too much to be desired. Also, the IS-7's gun boasts an extra 50 alpha and 1mm more penetration while the 113's yields a higher rate of fire and better dispersion. | This tank is often compared to the Soviet [[IS-7]] but they are entirely different tanks. The overall armor scheme of the IS-7 is one of the best in its class, while that of the 113 often leaves all too much to be desired. Also, the IS-7's gun boasts an extra 50 alpha and 1mm more penetration while the 113's yields a higher rate of fire and better dispersion. | |||
| + | ||||
| + | The key of success of playing the 113 is by exploiting the advantages of its "hybrid" stats. As a "heavy" role, you can quickly positioning yourself at the choke points in the beginning of the game, and then finding a cover to eiter hide your subpar hull. Sidescraping strategy might be quite risky if you have not mastered it, but when you combined it with "peek-a-boo" tactics, you will certainly make your enemy scratch their head while trying to penetrate your "supposed-to-be-weak" frontal sides while you reliably snap shot at your enemies and hold them long enough before your support arrives. As a "medium" role, you can quickly repositioning to the other choke points when your team arrived and take care of your choke points for you, and (if possible) flanking at the enemies to help your teammates cripple them and allowed them to advance. Alternatively, you can go with friendly medium wolfpacks (though it will suffer like any other heavy when traveling uphill, or over bad terrain) and acts as a vanguard by tanking shot by utilizing your fast traverse speed to angling your hull and utilizing either your autobounce frontal or side armor, at close range against mediums, its sub-par penetration is enough to punch a hole into the enemy mediums while you also bring higher firepower shots at them. | |||
| |InTheGame_research= | |InTheGame_research= | |||
Revision as of 12:13, 6 May 2020
113
Mouse over "
[Client Values; Actual values in
| 6,100,000 |
| 2300460 HP Hit Points |
| 45/4826.14/48 t Weight Limit |
- Commander
- Gunner
- Driver
- Loader (Radio Operator)
| 750750 hp Engine Power |
| 50/15 km/h Speed Limit |
| 3636 deg/s Traverse |
| 16.6728.69 hp/t Power/Wt Ratio |
| NoNo Pivot |
| // mm Hull Armor |
| 290/180/80290/180/80 mm Turret Armor |
AP/HEAT/HE
AP/HEAT/HE Shells |
1065/4800/630
1065/4800/630 Shell Cost |
| 440/440/530440/440/530 HP Damage |
| 249/340/68249/340/68 mm Penetration |
|
6 r/m ▲
6 r/m Standard Gun ▲ Rate of Fire Standard Gun |
|
2640 ▲
Standard Gun
▼
Standard Gun
▲
2640 Standard Gun ▲
Standard Gun
▼
Standard Gun
▲ Damage Per Minute Standard Gun |
|
0.37 m ▲
0.37 m With 50% Crew: 0.458 m ▲ Accuracy With 50% Crew: 0.458 m |
| 2.8 s 2.8 s Aim time |
| 2626 deg/s Turret Traverse |
| 360° Gun Arc |
| -7°/+18°-7°/+18° Elevation Arc |
| 3434 rounds Ammo Capacity |
| 1212 % Chance of Fire |
| 400 m 400 m View Range |
| 750 m 750 m Signal Range |
Additional Statistics
(Top Configuration)
Camouflage
- Stationary: 6.6%
- When Moving: 3.4%
- When Firing: 1.4%
Terrain Resistance
- On Hard Ground: 1.25
- On Medium Ground: 1.34
- On Soft Ground: 2.59
Dispersion Change Values
- Turret Contribution
- Rotation: 0.08
- Shot Recoil: 3.84
- Suspension Contribution
- Acceleration: 0.18
- Turning: 0.18
With 100% Crew
X
6100000
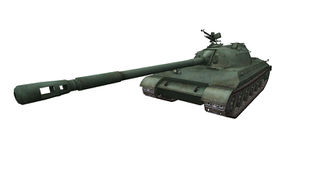
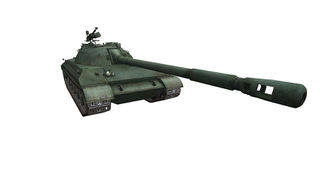
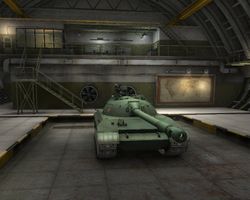
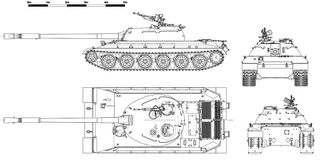
The 113 is a Chinese tier 10 heavy tank.
Development on model 113 was started in 1963. The vehicle was conceived as an alternative to the WZ-111 and used parts and components of medium tanks. However, the project was canceled due to the development of main battle tanks.
Initially introduced as the sole final tank in Chinese havy tank line. The 113 is an odd continuation from the WZ-111-14. It has a gun caliber downgrade from a 130mm to a 122mm and can be a huge turn off for player looking forward to a hard hitting heavy tank similar to the IS-7. Other hard stats such as only having 120mm of frontal hull armour, a 122mm gun that is fitted on the tier IX WZ-120 medium tank makes this tank seem mediocre, however, the 113 is a beast in its own right. It is one of the few "Heavy-Medium" tanks in the game, combining the best of both worlds, with decent sloped armor protection and a hard hitting gun, while still featuring medium tank like mobility. The 113 can easily keep up with allied medium tank and provide high alpha damage and armour for you less well-armoured medium allies and can act like a medium tank, flanking enemy tanks and engaging in close range brawling. This heavy tank is definitely familiar feel for medium tank drivers and is a blast to play.
The 113 was removed from the tech tree and received collector's vehicle status, and will be unlocked and available for purchase when player has researched any tier 10 Chinese tanks in tech tree.
The 113 marks the end of its Chinese heavy line.
Modules / Available Equipment and Consumables
Modules
| Tier | Gun | Penetration (mm) |
Damage (HP) |
Rate of fire (rounds/minute) |
Dispersion (m/100m) |
Aiming time (s) |
Weight (kg) |
Price (
| |
|---|---|---|---|---|---|---|---|---|---|
| X | 122 mm 60-122T | 249/340/68 | 440/440/530 | 6 | 0.37 | 2.8 | 2757 | 300000 |
| Tier | Engine | Engine Power (hp) |
Chance of Fire on Impact (%) |
Weight (kg) |
Price (
| |
|---|---|---|---|---|---|---|
| X | V-2-54SC | 750 | 12 | 1045 | 25000 |
| Tier | Suspension | Load Limit (т) |
Traverse Speed (gr/sec) |
Rmin | Weight (kg) |
Price (
| |
|---|---|---|---|---|---|---|---|
| X | 113 | 48 | 36 | B/2 | 10000 | 61350 |
Compatible Equipment
Compatible Consumables
Player Opinion
Pros and Cons
Pros:
- Gun is reasonably accurate with good DPM
- Very strong turret armor and extremely sloped upper glacis, side armor is usable for effective sidescraping
- Rather low (albeit wide) profile for a heavy tank; decent camoflage values
- Decent healthpool for a "pocket heavy"
- Excellent top speed and good acceleration for a heavy tank, fast hull traverse allowing it to adjust it's position quickly
Cons:
- Large, weak lower glacis is a prominent weakspot
- Subpar aim time and standard (AP) penetration
- Bad gun depression (gets a bit better when aiming at the sides)
- Low ammo capacity of only 34 rounds total
- Wide profile and thin roof armor, vulnerable against SPGs
- Vulnerable ammo rack and fuel tank modules
Performance
The 113 differs dramatically from its heavy predecessors, mainly in that it plays more like a very large medium tank, though not being the best at either role. Its lack of reliable armor coupled with its somewhat average gun can lead to major frustration when attempting to utilize traditional heavy tactics. Being truly unique among tier 10 heavy tanks, having a reliable support team is crucial for taking full advantage of the 113.
The odd gun depression and mediocre penetration can be difficult to adapt to, limiting the 113's effectiveness dramatically on maps with hills and uneven terrain, often necessitating exposure of the hull sides in order to access enemy weakspots unless an exceptional hull-down position can be attained. Maintaining a hull down position is ideal for the 113, as it allows the driver to take full advantage of its narrow and well armored turret. If this is not possible, one can also use terrain to cover the weak lower glacis and still retain a decent chance to bounce incoming shells from a distance.
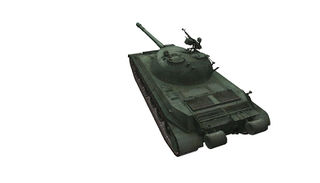
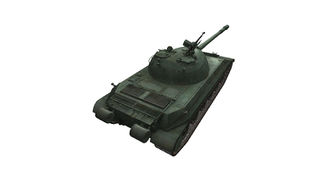
None of this will matter if enemy artillery is present, however, as the 113 is highly susceptible to incoming volleys thanks to its very wide, flat profile, and thinly armored engine deck. The turret and front half of hull roof armor is also just 40mm, guaranteeing it will be overmatched by shells exceeding 120mm in diameter. The 113 is also one of the lightest of all tier 10 heavy tanks (weighing in at a measly 45 tons), and will always take damage from rams dealt by other heavy tanks, and even some mediums.
One of the most unique things about this tank is that its upper glacis is a mere 2 degrees from auto-bouncing AP rounds, although this effect is largely negated in close quarters due to its low height, and even from a distance by the use of premium ammunition. It should be noted, however, that taller tanks than the 113 can negate the hull's slope by shooting down on it in close quarters, reducing its survivability in brawls dramatically. The 113 is, however, able to sidescrape with reliability. But, you must be careful to not angling the hull too much, as it will negated the autobounce angle and turned the half of your sides into one big weakspot, in which your fragile ammo rack resides there. Thus requires some partice to master it.
This tank is often compared to the Soviet IS-7 but they are entirely different tanks. The overall armor scheme of the IS-7 is one of the best in its class, while that of the 113 often leaves all too much to be desired. Also, the IS-7's gun boasts an extra 50 alpha and 1mm more penetration while the 113's yields a higher rate of fire and better dispersion.
The key of success of playing the 113 is by exploiting the advantages of its "hybrid" stats. As a "heavy" role, you can quickly positioning yourself at the choke points in the beginning of the game, and then finding a cover to eiter hide your subpar hull. Sidescraping strategy might be quite risky if you have not mastered it, but when you combined it with "peek-a-boo" tactics, you will certainly make your enemy scratch their head while trying to penetrate your "supposed-to-be-weak" frontal sides while you reliably snap shot at your enemies and hold them long enough before your support arrives. As a "medium" role, you can quickly repositioning to the other choke points when your team arrived and take care of your choke points for you, and (if possible) flanking at the enemies to help your teammates cripple them and allowed them to advance. Alternatively, you can go with friendly medium wolfpacks (though it will suffer like any other heavy when traveling uphill, or over bad terrain) and acts as a vanguard by tanking shot by utilizing your fast traverse speed to angling your hull and utilizing either your autobounce frontal or side armor, at close range against mediums, its sub-par penetration is enough to punch a hole into the enemy mediums while you also bring higher firepower shots at them.
Suggested Equipment
External Reviews and Opinions
Gallery
Historical Info
Historical Gallery
| Light Tanks | IIVickers Mk. E Type B • IIIType 2597 Chi-Ha • IVM5A1 Stuart • VI59-16 • VIType 64 • VIIType 62 • VIIWZ-131 • VIIIWZ-132 • VIIIM41D • IXWZ-132A • XWZ-132-1 |
| Medium Tanks | VType T-34 • VIType 58 • VIIT-34-1 • VIIIType 59 • VIIIT-34-2 • VIIIT-34-3 • VIII59-Patton • VIII122 TM • VIIIType 59 G • IXWZ-120 • X121 • X121B |
| Heavy Tanks | VIIIS-2 • VIIIWZ-111 • VIIIWZ-111 Alpine Tiger • VIII110 • VIII112 • IXWZ-111 model 1-4 • IXWZ-114 • X113 • X113 Beijing Opera • XWZ-111 model 5A • XWZ-111 Qilin |
| Tank Destroyers | IIT-26G FT • IIIM3G FT • IVSU-76G FT • V60G FT • VIWZ-131G FT • VIIT-34-2G FT • VIIIWZ-111-1G FT • VIIIWZ-120-1G FT • IXWZ-111G FT • IXWZ-120G FT • XWZ-113G FT • X114 SP2 |
| Self-Propelled Artillery |


