Type 5 Heavy
| Revision as of 12:55, 22 June 2021 | Revision as of 02:56, 27 June 2021 | |||
| Line 118: | Line 118: | |||
| *The shape of the turret is slightly erroneous. As seen on both the drawing and the picture of the bunker turret, the front section of the in-game Type 5 turret is too short, while the rear section is too long. In addition, the in-game Type 5 turret lacks the elevated section at top of the turret, which is most presumably an armor plate. | *The shape of the turret is slightly erroneous. As seen on both the drawing and the picture of the bunker turret, the front section of the in-game Type 5 turret is too short, while the rear section is too long. In addition, the in-game Type 5 turret lacks the elevated section at top of the turret, which is most presumably an armor plate. | |||
| *The Type 5 didn't have the 15.2 cm gun it has in the game. While the exact gun model is unknown (most commonly assumed to be a 14 cm naval gun), the 15.2 cm/45 41st year type gun is clearly different to the gun of the sketch and picture of the bunker turret. | *The Type 5 didn't have the 15.2 cm gun it has in the game. While the exact gun model is unknown (most commonly assumed to be a 14 cm naval gun), the 15.2 cm/45 41st year type gun is clearly different to the gun of the sketch and picture of the bunker turret. | |||
| ? | ** The 15.2 cm/45 41st year type gun had AP shells and no HESH shells, unlike the model in the game. | + | ** The 15.2 cm/45 41st year type gun had AP shells and no HESH shells, unlike the model in the game.( it was rectified with the Update 1.13, when an AP shell was added) | |
| |Ref_references= | |Ref_references= | |||
Revision as of 02:56, 27 June 2021
- For the Japanese Tier VII Medium tank, see Type 5 Chi-Ri.
- For the Japanese Tier IV Light tank, see Type 5 Ke-Ho.
Type 5 Heavy
Mouse over "
[Client Values; Actual values in
| 6,100,000 |
| 2900580 HP Hit Points |
| 151.1/16083.48/160 t Weight Limit |
- Commander
- Gunner
- Driver
- Radio Operator
- Loader
- Loader
| 13701370 hp Engine Power |
| 25/15 km/h Speed Limit |
| 2020 deg/s Traverse |
| 9.0716.41 hp/t Power/Wt Ratio |
| NoNo Pivot |
| // mm Hull Armor |
| 280/210/200280/210/200 mm Turret Armor |
HE/HE
AP//HE Shells |
0/6400/1200
0/0/905 Shell Cost |
| 900/900/680600/600/770 HP Damage |
| 75/192/252257/290/70 mm Penetration |
|
3 r/m ▲
3.51 r/m Standard Gun ▲ Rate of Fire Standard Gun |
|
2700 ▲
Standard Gun ▼
Standard Gun ▲
2106 Standard Gun
▲
Standard Gun
▼
Standard Gun
▲ Damage Per Minute Standard Gun |
|
0.47 m ▲
0.38 m With 50% Crew: 0.582 m ▲ Accuracy With 50% Crew: 0.471 m |
| 2.9 s 2.5 s Aim time |
| 1818 deg/s Turret Traverse |
| 360° Gun Arc |
| -10°/+20°-10°/+20° Elevation Arc |
| 4060 rounds Ammo Capacity |
| 2020 % Chance of Fire |
| 400 m 400 m View Range |
| 750 m 750 m Signal Range |
X
6100000
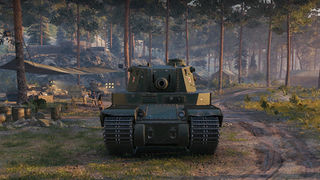
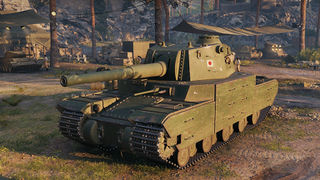
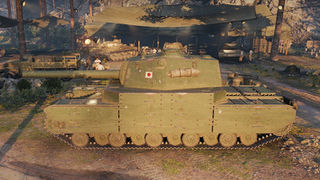
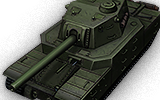
The Type 5 Heavy is a Japanese tier 10 heavy tank.
The Type 5, also known as the Type 2605, was one of the variants of the O-I superheavy tank, developed during WWII. The vehicle was planned to be used for breaking through fortified enemy lines and for coastal defense.
Sometimes known as "Godzilla" or just Type 5, the Type 5 Heavy holds the title as one of the most frequently changed Tier X vehicles in the game. Initially very underwhelming, the Type 5 Heavy has since received multiple buffs to its performance in various later patches. While the first round of buffs did not significantly improve its performance, the second round, received in patch 9.17.1, brought forth major changes to the way this tank played. With its much stronger armor and a massive new 15.2 cm howitzer gun with lethal HE shells, each dealing 1400 damage per shot if penetrating the target's armor or 500-600 damage if not, the Type 5 Heavy would consistently inflict serious damage against even the most heavily armored tanks in the game. Because of this, the tank quickly became a far more formidable and popular vehicle, having enough firepower to impact the whole of the meta game and gaining the reputation as one of the most loathed Tier X vehicles from players that were forced to square off against it.
After a while, the Type 5 Heavy's over-performing 15.2 cm was eventually and, according to most, rightfully nerfed, making its performance much less effective. To balance this nerf, however, the 14 cm gun received an additional buff to its own performance, making it a more viable alternative. In addition, the tanks mobility was also improved. These changes had, once again, significantly altered the way the Type 5 Heavy plays, making it more in line with the old Type 5 Heavy, but performing better than its old self due to the aforementioned improvements. This finally made the tank feel somewhat balanced as opposed to its past tendencies of being either extremely under- or over-performing, which definitively characterized the Type 5 Heavy in the past.
As the final development of its respective Japanese Heavy Tank line, the Type 5 Heavy shares similar features to the tanks that came before it. With its thick armor, huge size, poor mobility, high alpha damage and good gun depression it also comes with a few notable features, which were lacked by the tanks predecessors. Specifically, the Type 5 Heavy has much stronger hull cheeks, terminating one of the most well-known weak points of the previous Type 4 Heavy. This, combined with its very thick side armor, makes this tank surprisingly efficient at sidescraping, something the previous Japanese heavies couldn't do. In addition, the Type 5 Heavy has excellent reverse speed of -15 km/h, which is 50% better than the poor -10 km/h that the previous vehicles in the line had. Finally, the Type 5 Heavy has surprisingly good gun handling, something that also was lacking on the previous vehicles.
The Type 5 Heavy marks the end of its Japanese heavy line.
Modules / Available Equipment and Consumables
Modules
| Tier | Engine | Engine Power (hp) |
Chance of Fire on Impact (%) |
Weight (kg) |
Price (
| |
|---|---|---|---|---|---|---|
| X | 2x Kawasaki Type 98 V-12 Kai (600) | 1370 | 20 | 1020 | 132000 |
| Tier | Suspension | Load Limit (т) |
Traverse Speed (gr/sec) |
Rmin | Weight (kg) |
Price (
| |
|---|---|---|---|---|---|---|---|
| X | Type 5 Heavy | 160 | 20 | B/2 | 40000 | 82500 |
Compatible Equipment
Compatible Consumables
Player Opinion
Pros and Cons
Pros:
- Very frontal armor with rather small weakspots that are resistant against most low tier vehicles. Even when unangled, Type 5 Heavy is almost immune to every standard AP ammunition (except tier 10 TDs)!
- Gargantuan HP pool of 2900, 2nd highest in the entire game.
- Has very tough side armor, making it much more effective at sidescraping compared to other Japanese heavies.
- Unlike Type 4 Heavy, hull cheeks are no longer a weakspot, which further improves Type 5's ability to angle its armor, especially when combined with it's very good side armor.
- Good alpha damage and exceptionally good gun handling with the 14 cm gun, able to snap shots very effectively.
- Great gun depression (-10).
- Excellent reverse speed, something that was lacking on previous tanks.
- Huge size and mass means that Type 5 can easily push other tanks and their wrecks around, facehug effectively and is so large that it can act as cover for smaller tanks and when destroyed as effective roadblock.
- Huge ammo capacity on both guns, will never run out of ammo on battle.
Cons:
- Biggest tier 10 in the game; easy to hit even at long range and vulnerable to SPGs.
- Poor overall mobility.
- The 14 cm gun has underwhelming fully aimed dispersion, poor DPM and below-average penetration with premium rounds. It also suffers from high penetration dropoff over the distance, making it very unwieldy at long distances.
- Has an option to use the 15.2 cm; however, after the nerfs, its almost completely useless. It deals less damage than the HE shells of the 60TP and E 100, while having much worse accuracy, gun handling and more notably no AP and HEAT shells whatsoever.
- Armor is quite flat, which makes it vulnerable to tier 10 TDs and premium ammo when not angled; high armor thickness with lack of weakspots encourages usage of premium ammo.
- Huge ammorack is easily damaged from side.
- Suffers from frontal transmission - can receive engine damage from the front.
Performance
Type 5 Heavy looks very similar to Type 4 Heavy, but in reality, it is notable improvement over it. Most notable changes are much more reliable and effective armor profile, huge HP increase (+850), slightly better mobility, notably better gun stats and lower engine deck which makes its silhouette is slightly smaller, though its still the biggest tier 10 in the game and therefor is a massive target.
Type 5 Heavy is one of only few tier 10 tanks with two alternative gun choices. Previously, the 15.2 cm was considered outright the superior option to the point where the 14 cm gun was redeemed completely obsolete; however, after the patch 1.5, this was humorously reverted, with the 15.2 cm receiving huge nerfs while 14 cm receiving some buffs. The 15.2 cm carries only two shells - a HE and HESH shells with alpha damage of 900, with only difference being the higher penetration of the HESH shells (192 mm vs 75 mm). The gun suffers from poor accuracy and rate of fire, but it does have surprisingly good shell velocity and accuracy when moving. The damage output of the gun is outright pathetic for a tier 10 vehicle - it has the same rate of fire with 10 less alpha than the Sheridan with 15 cm, a light tank! In addition, it's also outclassed by the other 15 cm wielding heavies, the 60TP and E 100, when exclusively firing HE, while those tanks also have an option to fire AP and HEAT shells as well as having much better accuracy. The only appeal of the 15.2 cm gun is it's ridiculously expensive HESH shells that can penetrate some medium tanks and maybe tier 8 heavy tanks from weakspots; however, its penetration is still too low to do much against most heavies, resulting in very low damage output, while also having to pay massive amounts of credits as the shell cost remains unchanged from the days when it had 1400 alpha damage. With all this in the mind, it is heavily recommended not to use the 15.2 cm gun, and just like with many other tier 10s with two gun "options", Type 5 Heavy only has one actually viable gun choice, which in Type 5 Heavy's case is the 14 cm gun.
The 14 cm gun, on other hand, isn't nearly as hopeless. While the gun isn't particularly special or impressive either, it is by no means awful like the 15.2 cm. It retains the same alpha damage and penetration from the Type 4 Heavy. It no longer packs the highest alpha damage in the tier, though 600 is still pretty impressive at tier 10. It packs two AP shells with 257 and 290 mm penetration, respectively. The premium penetration is rather underwhelming, but after the buffs, it is workable - the extra 8 mm difference is noticeably, which allows Type 5 Heavy to fight other super-heavies like E 100, Maus and other Type 5 Heavies more effectively. The most peculiar feature, alongside it's AP shells as premium, is its notably good dispersion when moving. Combined its rather solid aim time of 2.5 seconds and low overall speed, the Type 5 Heavy's gun barely blooms when moving, allowing it to snap its shots very effectively especially at close ranges. Even when the gun has to be fully aimed, its fast aim time, being more in line with 122-130 mm guns (or even better in some cases), allows it to aim for weakspots rather quickly. Bear in mind that although it has a good gun handling, the damage per minute and fully aimed dispersion are both still poor, so it is recommended to fully aim your shots against heavily armored targets to make the best use of its high HP pool and alpha damage.
Like all the Japanese heavies, Type 5 Heavy lacks a true frontal weak point. If it faces tier 8s, tier 9s with lower penetration or tier 10s that are firing standard ammo, Type 5 Heavy can pretty much laugh at them. While peeking from corner is still reliable and easy way due to lack of lower plate weakpoint, Type 5 can now also sidescrape very effectively due to much better side armor compared to Type 4 Heavy and hull cheeks. The Type 5 Heavy also can angle its turret when it is reloading, like Maus and E 100, although it is not recommended to angle the turret too much due to pre-angled turret sides. Type 5 Heavy can go hulldown due to its tall profile and -10 degrees of gun depression, but the turret is huge and flat and may be an easy target if sat on a ridge, so it is often recommended to stick to corners instead if possible.
Despite the armor being extremely thick, its also very flat, so some HEAT shells and tier 10 TDs can still penetrate it without much issues. Because of this, the Type 5 Heavy driver shouldn't get too confident with the tank's armor, and instead use it accordingly against right targets. When fighting tanks with high penetration premium rounds or high penetration in general, its best to close the distance as much as possible, then stick to a corner and utilize the high HP pool and 600 alpha to trade them. The combination of this high HP pool and 600 alpha means that Type 5 Heavy can win trades against almost every tank in the game, assuming it is able to penetrate its every shot, with only the E 100 and 60TP being able to challenge it. Avoid long range engagaments as much as possible, especially against tanks with HEAT and good armor - HEAT doesn't lose penetration over distance, while the Type 5 Heavy's own gun struggles hard at range, due to its poor accuracy, high penetration dropoff at long distances and low DPM. Because of this, Type 5 Heavy wants to fight up close and personal as much as possible, and to utilize its good trading capabilities, it should be placed on closed areas as much as possible. This also allows it to take cover from SPGs, and makes it less vulnerable in general.
The way Type 5 Heavy plays also depends on the map and matchup. If top tier against tier 8s and 9s, the Type 5 Heavy is a monster and is very hard to defeat. Learn the penetration values of each tank, and then prioritize the targets accordingly. Any tank with less than 290 mm penetration with premium rounds will have very hard time against the Type 5 Heavy. Observe what shells the enemy tanks are using as well. Any tank with access to shells with over 300 mm penetration are the biggest threat, and should be your priority target. As said, any vehicle with less than 290 mm penetration with premium shells is not a major threat, and can be ignored until the actual threats are taken out. When top tier, the Type 5 Heavy can play aggressively and just roll forward. In this kind of matchup, you don't necessarily have to stick on a hard cover, but generally if possible, it's still better to stick on urban areas with hard cover. Pick a flank you think you can push the most effectively, and just roll forward. The Type 5 Heavy is very hard to penetrate with lower tier vehicles, and even if they can penetrate it, they have to burn through it's huge HP pool to actually take it down. Even if the Type 5 Heavy is taken down, chances are that it has already influenced the battle enough to win it.
When facing only tier 10s, the Type 5 Heavy has to be more careful. Positioning is extremely important - getting caught in the open against tier 10 premium rounds, TDs and SPGs is a deathwish. Try to find a place with hard cover. Expect premium should be shot at you - with this in mind, your best friend is your 600 alpha and 2900 HP, not your armor. The HP is precious - try to save it as much as you can! Don't carelessly peek corners - if there's a hulldown T110E3 in front of you, its pointless to peek, as you are most likely going to lose HP for nothing. Play cautiously and wait for a good opportunity to peek. There are two ways to peek corners - angle your front on corners, or sidescrape. As Type 5 Heavy doesn't have a lower plate weakspot, it can angle it's front around 45 degrees on corners. Sometimes, you can angle even more and expose only your front - when angled correctly, it can bounce any shell in the game. Baiting shots is crucial, and it can be surprisingly effective due to Type 5 Heavy's armor layout. Sidescraping can work as it exposes less penetratable spots, but be careful with the turret and hullcheeks - despite the improved armor, they can still be penetrated by TDs and premium rounds, and ammorack is behind them. Because of this, its often better to just peek corners, take a shot, fire, and then utilize the good reverse speed to get back to the cover. Type 5 Heavy's side armor is very thick, and additionally is covered by extreme spaced armor. If you're caught in the open against a tank firing HEAT, you can intentionally overangle the Type 5 Heavy as a last effort move to the point where you have your entire side exposed. If your opponent doesn't respect your side armor enough, they might carelessly shoot HEAT at Type 5 Heavy's side - the spaced armor is so strong that it can bounce HEAT shells almost flat on, which can trick many players. Keep in mind that not the entire side armor is spaced; however, the area where the spaced armor begins is somewhat obscured, making it not too obvious where the spaced armor is and where it's not. Keep in mind that this doesn't work at all against AP and APCR shells, so its somewhat risky. It is important to note that despite all the things you can do, there will be matchup where the Type 5 Heavy will struggle hard. This results in rather inconsistent performance - sometimes you feel pretty helpless. However, this is natural for a super-heavy tank, and it is balanced with the fact that how powerful the Type 5 Heavy is inside a good matchup, so don't be too disappointed if you happen to perform poorly in some games.
Finally, Type 5 Heavy's massive size (even bigger than the Maus!) has its own unique advantages and disadvantages. With its size and speed combined, the Type 5 Heavy is a juicy target for artillery. If there is artillery in the game, try to stay in cover as much as possible. Also, try to avoid going anywhere without allies. Type 5 Heavy which is left alone is easy target for more mobile tanks. Its poor reload and DPM makes it further more vulnerable when isolated. Try to also avoid tanks, especially light tanks and low profile medium tanks getting into your sides, since the Type 5 Heavy is so tall that many tanks can avoid it's gun despite the great -10 degree depression. Even 1 tank with you is better than nothing and generally should be enough to save you from that kind of trouble. Try to keep yourself close to buildings and other obstacles, so sidehugging is harder. On other hand, the huge size has some unique benefits - Type 5 Heavy is so massive that it can act as mobile cover for its allies, as even an E 100 is able to hide behind it! In addition, it can block streets and flanks even when destroyed. Only a Maus is able to push it due to Type 5 Heavy being the 2nd heaviest tier 10 in the entire game. Combined with the Type 5 Heavy's height, good gun depression and large caliber, it is able to hit roofs of many tanks and overmatch them effectively. For example, Type 5 Heavy is able to hit IS-7's roof if it gets facehugged by one - rendering the tactic ineffective against the Type 5 Heavy.
All in all, while the Type 5 Heavy is still relatively easy to play, it has some quirks and important facts to keep in mind in order to play it effectively. Utilize your HP pool to close the distance against your enemies, then use the combination of that HP, armor, and 600 alpha to outtrade your opponents. It doesn't quite have the armor of the Maus or the punch of the E 100, but it combines some features from both, while bringing its own unique quirks, such as the size, armor layout, gun depression and gun handling to the table. The Type 5 Heavy is no longer a powerful meta tank as it used to be, and while its reputation has gone down with its derp gun becoming practically useless, it is still able to put in work with the 14 cm gun, especially in a good matchup. (Note: As of Update 1.13, June 22 2021, the 15cm gun of Type 4 and 5 Heavy was buffed a bit. The 15cm gun gets an AP shell of 252mm and 700 damage. Dispersion is also reduced by 0.03%)
Early Research
Unlike most other tier 10s, Type 5 Heavy doesn't come out as elited if you for some reason haven't researched 14cm gun on Type 4 Heavy (after update 1.5). Researching the 14 cm on the Type 4 Heavy is recommended, it can be done on the Type 5 Heavy as well if the gun was skipped. While the 15.2 cm gun can still be used on the Type 5 Heavy, it is heavily recommended not to use it.
Suggested Equipment
Gallery
Historical Info
According to a vague report found from Soviet archives, the Type 5 had 35 percent smaller engine compartment compared to the Type 4, but retains the same type of engine, resulting in a very cramped cooler design. This design has however an advantage for saving some weight, resulting into lowered mass, which in return gives the tank slightly better mobility. Additionally, the reduced weight could possibly allow the armor of the vehicle to be increased even further without increasing the total mass of the original Type 4. Four radiator blocks are shifted towards the rear, and, along with the separate oil cooler, are cooled with one many-bladed fan, connected to the main reductor by a crankshaft, passing between engines. Air is gathered through vertical grilles in the engine compartment, passes through vertical radiators, and is released behind the tank. If the fan breaks, the air will be partially circulated with exhaust fumes, achieved by a nozzle collector on each engine.
Not much is known about the Type 5. It presumably had the same armament as the Type 4, believed to be a 14 cm naval gun. Just like it, many details like armor, speed, engine type and so on are unknown. Even if the Type 5 existed as a project, it presumably remained on papers due to Japan losing the war.
It is important to note that Japanese sources have absolutely no information of another super-heavy tank project aside from the O-I being developed. It is also important to keep in mind that a lot of Japanese tank-related documents were lost after the war, however. The available information regarding the Type 4/5 super-heavy tanks are far too limited, and whether the tanks actually existed or not remains debatable.
Historical Gallery
Historical Accuracy Errata
Type 5 super-heavy tank is a speculated 2nd Japanese super-heavy tank design that succeeded the O-I. It's existence is debatable, as the only available information of the tank comes from some vague Soviet report of Japanese tanks. Because of this, it is possible that the Type 5 Heavy never even existed.
However, due to the very limited information, some parameters of the Type 5 Heavy are guaranteed to be inaccurate in-game:
- The hull shape differs from the vague sketch drawn by Soviets. For instance, the drawing doesn't show hull cheeks, the upper front plate is completely unsloped, doesn't extend beyond the turret front, and the lower front section is also different, being more similar to that of the O-I. The general design of the in-game Type 5 Heavy is closer to that of the Chi-Ri.
- Due to very limited information, many specifics like top speed, weight and armor are all speculation. Armor in especial is most likely thicker in-game than what it actually was, done mostly due to balance purposes.
- In-game description is somewhat inaccurate - the Type 5 Heavy's design is far too different for it to be a modification of the O-I. While somewhat similar, the suspension design, hull shape, turret and gun are all significantly different, and the tank has only one turret as opposed to the O-I's 4.
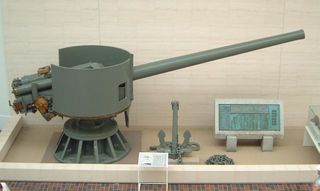
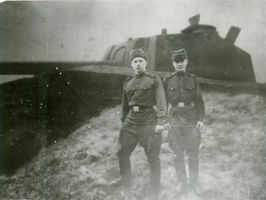
- The shape of the turret is slightly erroneous. As seen on both the drawing and the picture of the bunker turret, the front section of the in-game Type 5 turret is too short, while the rear section is too long. In addition, the in-game Type 5 turret lacks the elevated section at top of the turret, which is most presumably an armor plate.
- The Type 5 didn't have the 15.2 cm gun it has in the game. While the exact gun model is unknown (most commonly assumed to be a 14 cm naval gun), the 15.2 cm/45 41st year type gun is clearly different to the gun of the sketch and picture of the bunker turret.
- The 15.2 cm/45 41st year type gun had AP shells and no HESH shells, unlike the model in the game.( it was rectified with the Update 1.13, when an AP shell was added)
Sources and External Links
| Light Tanks | IRenault Otsu • IIType 95 Ha-Go • IIType 97 Te-Ke • IIIType 97 Chi-Ha • IIIType 98 Ke-Ni • IVType 5 Ke-Ho |
| Medium Tanks | IIChi-Ni • IIType 89 I-Go/Chi-Ro • IVType 1 Chi-He • VType 3 Chi-Nu • VType 3 Chi-Nu Kai • VIType 4 Chi-To • VIIType 5 Chi-Ri • VIIISTA-1 • VIIISTA-2 • IXType 61 • XSTB-1 |
| Heavy Tanks | IIIType 91 Heavy • IVType 95 Heavy • VO-I Experimental • VIHeavy Tank No. VI • VIO-I • VIIO-Ni • VIIIO-Ho • IXType 4 Heavy • XType 5 Heavy |
| Tank Destroyers | |
| Self-Propelled Artillery |


