Type 95 Heavy
| Revision as of 04:48, 5 February 2017 | Revision as of 12:15, 8 March 2017 | |||
| Line 12: | Line 12: | |||
| - Highest HP pool of Tier 4 tanks (440) | - Highest HP pool of Tier 4 tanks (440) | |||
| ? | - Top gun has | + | - Top gun has very good alpha damage and rate of fire | |
| ? | - Mini-turrets and oddly angled armour on the hull may provide a lot of lucky bounces | + | - Mini-turrets and oddly angled armour on the hull may provide a lot of lucky bounces, but never rely on armor | |
| ? | - | + | - Prefential matchmaking; never sees tier 6s | |
| ? | - It has small and | + | - It has small and well angled turret with great gun depression | |
| ? | + | |||
| ? | + | |||
| Line 26: | Line 24: | |||
| - Very thin and unsloped all round armour, 35mm at most on the front | - Very thin and unsloped all round armour, 35mm at most on the front | |||
| ? | - Limited gun depression over mini-turret on the front left hull | + | - Limited gun depression over mini-turret on the front left hull | |
| - Tall, fat, large, and a huge target that gets easily spotted | - Tall, fat, large, and a huge target that gets easily spotted | |||
| ? | - Both guns have arching trajectories, relatively poor penetration, below average gun handling, and bad shell velocities | + | - Both guns have arching trajectories, relatively poor penetration, below average gun handling, and bad shell velocities and terrible accuracy | |
| - Poor mobility, with horrible top speed and hp/ton ratio, and mediocre terrain resistances | - Poor mobility, with horrible top speed and hp/ton ratio, and mediocre terrain resistances | |||
| |InTheGame_performance= | |InTheGame_performance= | |||
| ? | This tank, | + | This tank is often considered as terrible tank and generally hated by playerbase, but it can still do surprisingly good work. While it has a low top speed and poor hp/ton ratio, it has excellent hull and turret traverse speed for a heavy tank. The 7.5 cm gun is also very good for brawling, especially in bottleneck situations such as "Tank Alley" in Himmelsdorf due to its high rate of fire, good penetration, and great damage when using the High Explosive round. | |
| However, due to the paper thin armour of this tank all around, it can be easily penetrated by most tanks of its tier, and is cannon fodder for Tier 5s. Large calibre HE shells, especially from artillery and tanks mounting howitzer guns, like the [[Tank:T40|T40]] and [[Tank:Hetzer|Hetzer]], can reliably penetrate the front hull armour of this tank, given it is thin and unsloped, so long as the mini-turrets are not hit. | However, due to the paper thin armour of this tank all around, it can be easily penetrated by most tanks of its tier, and is cannon fodder for Tier 5s. Large calibre HE shells, especially from artillery and tanks mounting howitzer guns, like the [[Tank:T40|T40]] and [[Tank:Hetzer|Hetzer]], can reliably penetrate the front hull armour of this tank, given it is thin and unsloped, so long as the mini-turrets are not hit. | |||
| Line 42: | Line 40: | |||
| In a Tier 5 battle, you should always use your tank in a support role. Do not go out on your own, or attempt to take critical areas yourself, for you are slow, fat, an easy target and a free kill for any Tier 5 enemy you come across. Keep behind friendly heavy tanks or support slower mediums, guard your allies flanks, distract the enemy, pop out to take shots while the enemy is reloading, track enemy heavies you cannot penetrate, and do everything you can to help your allies. Unlike the other two Tier 4 heavy tanks in the game, the [[Tank:DW_II|Durchbruchswagen 2]] and the [[Tank:B1|B1]], you have a surprisingly good gun, with far more alpha damage, and slightly better penetration, than them. Use this to your advantage, and use peek-a-boom tactics to slowly chip away at your enemies' health, one shot at a time. | In a Tier 5 battle, you should always use your tank in a support role. Do not go out on your own, or attempt to take critical areas yourself, for you are slow, fat, an easy target and a free kill for any Tier 5 enemy you come across. Keep behind friendly heavy tanks or support slower mediums, guard your allies flanks, distract the enemy, pop out to take shots while the enemy is reloading, track enemy heavies you cannot penetrate, and do everything you can to help your allies. Unlike the other two Tier 4 heavy tanks in the game, the [[Tank:DW_II|Durchbruchswagen 2]] and the [[Tank:B1|B1]], you have a surprisingly good gun, with far more alpha damage, and slightly better penetration, than them. Use this to your advantage, and use peek-a-boom tactics to slowly chip away at your enemies' health, one shot at a time. | |||
| ? | In a Tier 4 battle, | + | In a Tier 4 battle, try to support your more heavily armored tanks like the [[Tank:GB07_Matilda|Matilda]], [[Tank:GB04_Valentine|Valentine]] and [[Tank:AMX40|AMX 40]], letting them take hits and push, while you dish out damage from behind them, supporting them while they take point. Type 95 has very unreliable and generally poor armor, but it does have very high HP pool to take hits if necessary. | |
| This tank is also rather good at hull-down positions; if you can find a big enough hole or a large enough structure to hide most of your hull, your gun depression, small and bouncy turret, and good gun will allow you to devastate any tank foolish enough to come near you. This way, you will be able to hold important choke points all by your own, dealing steady damage to enemy tanks trying to dislodge you, while being well-protected at the same time, forcing enemy tanks to stop and aim at your tiny turret, which will leave them vulnerable to your fire. An example of a good hull-down position this tank can take is on the Ruinberg map, at sector G3, where there is an important bottleneck for the south team. The Type 95 is just tall enough to fire over the small hole in the wall, exposing only its turret, making it deadly in such a position. | This tank is also rather good at hull-down positions; if you can find a big enough hole or a large enough structure to hide most of your hull, your gun depression, small and bouncy turret, and good gun will allow you to devastate any tank foolish enough to come near you. This way, you will be able to hold important choke points all by your own, dealing steady damage to enemy tanks trying to dislodge you, while being well-protected at the same time, forcing enemy tanks to stop and aim at your tiny turret, which will leave them vulnerable to your fire. An example of a good hull-down position this tank can take is on the Ruinberg map, at sector G3, where there is an important bottleneck for the south team. The Type 95 is just tall enough to fire over the small hole in the wall, exposing only its turret, making it deadly in such a position. | |||
Revision as of 12:15, 8 March 2017
| |
This article requires additional modification. The design and/or content of this article do not conform to wiki standards.
|
Type 95 Heavy
Mouse over "
[Client Values; Actual values in
| 166,000 |
| 670134 HP Hit Points |
| 29/29.69.13/32 t Weight Limit |
- Commander (Loader)
- Driver
- Gunner
- Radio Operator
- Radio Operator
| 250290 hp Engine Power |
| 22/10 km/h Speed Limit |
| 2830 deg/s Traverse |
| 8.6231.76 hp/t Power/Wt Ratio |
| NoNo Pivot |
| // mm Hull Armor |
| 30/25/2530/25/25 mm Turret Armor |
AP/HEAT/HE
AP/HEAT/HE Shells |
25/2800/45
52/2400/60 Shell Cost |
| 100/100/160110/110/175 HP Damage |
| 30/90/3571/100/38 mm Penetration |
|
18.18 r/m ▲
18.18 r/m Standard Gun ▲ Rate of Fire Standard Gun |
|
1818 ▲
Standard Gun
▼
Standard Gun
▲
1999.8 Standard Gun ▲
Standard Gun
▼
Standard Gun
▲ Damage Per Minute Standard Gun |
|
0.42 m ▲
0.4 m With 50% Crew: 0.52 m ▲ Accuracy With 50% Crew: 0.496 m |
| 2.3 s 2.3 s Aim time |
| 3232 deg/s Turret Traverse |
| 360° Gun Arc |
| -12°/+20°-12°/+20° Elevation Arc |
| 175135 rounds Ammo Capacity |
| 2020 % Chance of Fire |
| 340 m 340 m View Range |
| 300 m 425 m Signal Range |
IV
166000
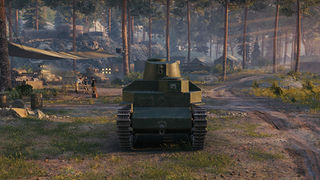
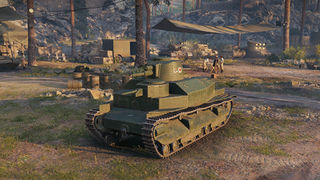
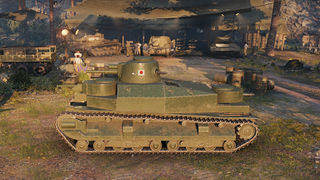
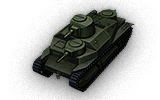
The Type 95 Heavy is a Japanese tier 4 heavy tank.
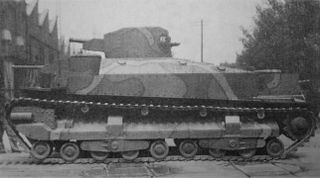
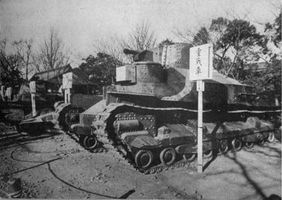
The Japanese Type 95 heavy tank was based on the Type 91. This multi-turret vehicle of the interwar period incorporated some elements of German and Italian tanks. The primary turret featured a 70-mm gun. In addition to that, the vehicle had a 37-mm gun and two 6.5-mm machineguns. Four prototypes were built.
The Type 95 Heavy marks the end of its Japanese heavy line.
Modules / Available Equipment and Consumables
Modules
| Tier | Engine | Engine Power (hp) |
Chance of Fire on Impact (%) |
Weight (kg) |
Price (
| |
|---|---|---|---|---|---|---|
| III | BMW IV Kai | 250 | 20 | 290 | 7800 | |
| IV | BMW IV Kai Ni | 290 | 20 | 290 | 10300 |
| Tier | Suspension | Load Limit (т) |
Traverse Speed (gr/sec) |
Rmin | Weight (kg) |
Price (
| |
|---|---|---|---|---|---|---|---|
| III | Type 95 | 29.6 | 28 | B/2 | 6000 | 1800 | |
| IV | Type 95 No. 2~4 | 32 | 30 | B/2 | 6000 | 4700 |
| Tier | Radio | Signal Range (m) |
Weight (kg) |
Price (
| |
|---|---|---|---|---|---|
| II | Type 94 Mk. 4 Otsu | 300 | 40 | 0 | |
| IV | Type 94 Mk. 4 Hei | 350 | 90 | 2350 | |
| VI | Type 96 Mk. 4 Bo | 425 | 50 | 14000 |
Compatible Equipment
Compatible Consumables
Player Opinion
Pros and Cons
Pros:
- Highest HP pool of Tier 4 tanks (440)
- Top gun has very good alpha damage and rate of fire
- Mini-turrets and oddly angled armour on the hull may provide a lot of lucky bounces, but never rely on armor
- Prefential matchmaking; never sees tier 6s
- It has small and well angled turret with great gun depression
Cons:
- Very thin and unsloped all round armour, 35mm at most on the front
- Limited gun depression over mini-turret on the front left hull
- Tall, fat, large, and a huge target that gets easily spotted
- Both guns have arching trajectories, relatively poor penetration, below average gun handling, and bad shell velocities and terrible accuracy
- Poor mobility, with horrible top speed and hp/ton ratio, and mediocre terrain resistances
Performance
This tank is often considered as terrible tank and generally hated by playerbase, but it can still do surprisingly good work. While it has a low top speed and poor hp/ton ratio, it has excellent hull and turret traverse speed for a heavy tank. The 7.5 cm gun is also very good for brawling, especially in bottleneck situations such as "Tank Alley" in Himmelsdorf due to its high rate of fire, good penetration, and great damage when using the High Explosive round.
However, due to the paper thin armour of this tank all around, it can be easily penetrated by most tanks of its tier, and is cannon fodder for Tier 5s. Large calibre HE shells, especially from artillery and tanks mounting howitzer guns, like the T40 and Hetzer, can reliably penetrate the front hull armour of this tank, given it is thin and unsloped, so long as the mini-turrets are not hit. For this reason, in a Tier 5 match, this tank performs rather poorly, being large, unarmoured, and having a rather poor gun, similar to other heavy tanks its tier. You can also follow and support friendly Tier 5 heavy tanks, using them as meat shields, while popping out to fire when the enemy is reloading, or protecting their flanks.
In a Tier 5 battle, you should always use your tank in a support role. Do not go out on your own, or attempt to take critical areas yourself, for you are slow, fat, an easy target and a free kill for any Tier 5 enemy you come across. Keep behind friendly heavy tanks or support slower mediums, guard your allies flanks, distract the enemy, pop out to take shots while the enemy is reloading, track enemy heavies you cannot penetrate, and do everything you can to help your allies. Unlike the other two Tier 4 heavy tanks in the game, the Durchbruchswagen 2 and the B1, you have a surprisingly good gun, with far more alpha damage, and slightly better penetration, than them. Use this to your advantage, and use peek-a-boom tactics to slowly chip away at your enemies' health, one shot at a time.
In a Tier 4 battle, try to support your more heavily armored tanks like the Matilda, Valentine and AMX 40, letting them take hits and push, while you dish out damage from behind them, supporting them while they take point. Type 95 has very unreliable and generally poor armor, but it does have very high HP pool to take hits if necessary.
This tank is also rather good at hull-down positions; if you can find a big enough hole or a large enough structure to hide most of your hull, your gun depression, small and bouncy turret, and good gun will allow you to devastate any tank foolish enough to come near you. This way, you will be able to hold important choke points all by your own, dealing steady damage to enemy tanks trying to dislodge you, while being well-protected at the same time, forcing enemy tanks to stop and aim at your tiny turret, which will leave them vulnerable to your fire. An example of a good hull-down position this tank can take is on the Ruinberg map, at sector G3, where there is an important bottleneck for the south team. The Type 95 is just tall enough to fire over the small hole in the wall, exposing only its turret, making it deadly in such a position.
It is recommended to never snipe in this tank, unless absolutely necessary, for you are a huge target and will get spotted and hit easily, and your accuracy is rather mediocre and insufficiently accurate to hit targets far away. This tank is an oddity; it plays like few other tanks, and the playstyle is heavily dependent on map, tier, and team lists. You will mainly play a support role, use your great gun and many quirks of this tank to your advantage, help your allies, and you'll come out of every battle alive, with a generous amount of experience and credits.
Early Research
The Type 96 Mk. 4 Bo carries over from the Type 91 Heavy, and should be installed immediately. Next, upgrade to the BMW IV Kai Ni to receive much better acceleration. From there, get the Type 95 No. 2~4 Suspension to increase your mobility and then finally get the 7.5 cm Tank Gun Type 99 to get a much needed boost in penetration and damage. Then begins the relatively easy grind to the O-I Exp.
Gallery
Historical Info
Historical Gallery
Historical Accuracy Errata
The 7.5 cm Tank Gun Type 99 was never equipped on the Type 95 prototype, and instead was only ever mounted on the Type 2 Ho-I medium tank, a derivative of the Chi-Ha.
| Light Tanks | IRenault Otsu • IIType 95 Ha-Go • IIType 97 Te-Ke • IIIType 97 Chi-Ha • IIIType 98 Ke-Ni • IVType 5 Ke-Ho |
| Medium Tanks | IIChi-Ni • IIType 89 I-Go/Chi-Ro • IVType 1 Chi-He • VType 3 Chi-Nu • VType 3 Chi-Nu Kai • VIType 4 Chi-To • VIIType 5 Chi-Ri • VIIISTA-1 • VIIISTA-2 • IXType 61 • XSTB-1 |
| Heavy Tanks | IIIType 91 Heavy • IVType 95 Heavy • VO-I Experimental • VIHeavy Tank No. VI • VIO-I • VIIO-Ni • VIIIO-Ho • IXType 4 Heavy • XType 5 Heavy |
| Tank Destroyers | |
| Self-Propelled Artillery |


