O-Ho
| Revision as of 10:27, 12 October 2017 | Revision as of 10:28, 12 October 2017 | |||
| Line 62: | Line 62: | |||
| |HistAcc= | |HistAcc= | |||
| ? | * O-Ho is based on the drawings from the book “Imperial Japanese Army Ground Weapon Guide 1872-1945”. Unlike the drawings of "O-I 100t", which is what the tier 7 Japanese heavy tank O-Ni is based on, the dawings of the "O-I 120t" has basically no basis on them; they are *purely* based on false information and rumors. Due to this, the O-I 120t/O-Ho | + | * O-Ho is based on the drawings from the book “Imperial Japanese Army Ground Weapon Guide 1872-1945”. Unlike the drawings of "O-I 100t", which is what the tier 7 Japanese heavy tank O-Ni is based on, the dawings of the "O-I 120t" has basically no basis on them; they are *purely* based on false information and rumors. Due to this, the O-I 120t/O-Ho '''never actually existed'''. | |
| It is however possible that the rumors of the "O-I 120t" are actually based on misleading information of the Type 4/5 super-heavy tank, similarly how the "O-I 100t" is based on the false information of the O-I. One of the false informations about the "O-I 120t" state that it was built and shipped to Manchuria in 1944 - there have been similar speculation about the Type 4 super-heavy tank (as it's turret was found in 1945 from Manchuria). However, the vehicle design of the "O-I 120t" is still inaccurate an | It is however possible that the rumors of the "O-I 120t" are actually based on misleading information of the Type 4/5 super-heavy tank, similarly how the "O-I 100t" is based on the false information of the O-I. One of the false informations about the "O-I 120t" state that it was built and shipped to Manchuria in 1944 - there have been similar speculation about the Type 4 super-heavy tank (as it's turret was found in 1945 from Manchuria). However, the vehicle design of the "O-I 120t" is still inaccurate an | |||
Revision as of 10:28, 12 October 2017
O-Ho

Mouse over "
[Client Values; Actual values in
| 2,680,000 |
| 1700340 HP Hit Points |
| 120/12255.38/130 t Weight Limit |
- Commander
- Gunner
- Driver
- Radio Operator
- Radio Operator
- Loader
| 11001200 hp Engine Power |
| 25/10 km/h Speed Limit |
| 1719 deg/s Traverse |
| 9.1721.67 hp/t Power/Wt Ratio |
| NoNo Pivot |
| // mm Hull Armor |
| 200/200/200200/200/200 mm Turret Armor |
AP//HE
AP//HE Shells |
0/3600/190
0/0/245 Shell Cost |
| 300/300/360330/330/430 HP Damage |
| 175/201/53215/253/53 mm Penetration |
|
5.71 r/m ▲
6.45 r/m Standard Gun ▲ Rate of Fire Standard Gun |
|
1713 ▲
Standard Gun
▼
Standard Gun
▲
2128.5 Standard Gun ▲
Standard Gun
▼
Standard Gun
▲ Damage Per Minute Standard Gun |
|
0.41 m ▲
0.42 m With 50% Crew: 0.508 m ▲ Accuracy With 50% Crew: 0.52 m |
| 3.1 s 3.1 s Aim time |
| 2020 deg/s Turret Traverse |
| 360° Gun Arc |
| -10°/+20°-10°/+20° Elevation Arc |
| 100100 rounds Ammo Capacity |
| 2020 % Chance of Fire |
| 380 m 380 m View Range |
| 425 m 750 m Signal Range |
VIII
2680000
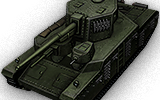
The O-Ho is a Japanese tier 8 heavy tank.
The O-Ho was a further development of the idea of a superheavy tank with improved armor protection. The vehicle had a good set of guns that allowed for all-angle fire. The project was discontinued due to the war ending. No finished prototypes were built and the vehicle never saw action.
The O-Ho continues the Japanese superheavy line from O-Ni. The most noticeable improvement is significantly better rate of fire: both of O-Ho's guns has incredibly quick reload for their calibers. O-Ho also finally has improved side armor; while its still unimpressive, it makes sidescraping bit more reliable option. Furthermore, O-Ho's cheeks and miniturrets are no longer weaker than hull.
Gaining significant advantages comes up with floppy downside which is extremely limited gun depression on front. One must learn to how to position O-Ho correctly in order to use it effectively. Furthermore, it still has same old downsides compared to its peers, such as poor mobility, gigantic size and flat armor that doesnt offer that much protection against higher tier vehicles. O-Ho can feel really akward at first and is arguably harder to play than other Japanese super-heavy tanks, but after one knows how to work around the limited gun depression on front, it can be very rewarding.
The O-Ho leads to the Type 4 Heavy.
Modules / Available Equipment and Consumables
Modules

Guns
| Tier | Gun | Penetration (mm) |
Damage (HP) |
Rate of fire (rounds/minute) |
Dispersion (m/100m) |
Aiming time (s) |
Weight (kg) |
Price (
| |
|---|---|---|---|---|---|---|---|---|---|
| VII | 10 cm Cannon Type 92 | 175/201/53 | 300/300/360 | 5.71 | 0.41 | 3.1 | 1792 | 68500 | |
| VII | 15 cm Howitzer Type 96 | 121/150/75 | 700/700/890 | 2.73 | 0.54 | 3.3 | 1432 | 71200 | |
| VIII | 10 cm Experimental Tank Gun Kai | 215/253/53 | 330/330/430 | 6.45 | 0.42 | 3.1 | 2500 | 124000 |

Engines
| Tier | Engine | Engine Power (hp) |
Chance of Fire on Impact (%) |
Weight (kg) |
Price (
| |
|---|---|---|---|---|---|---|
| VII | 2x Kawasaki Type 98 V-12 (550) | 1100 | 20 | 1020 | 51000 | |
| VIII | 2x Kawasaki Type 98 V-12 (600) | 1200 | 20 | 1020 | 77500 |

Suspensions
| Tier | Suspension | Load Limit (т) |
Traverse Speed (gr/sec) |
Rmin | Weight (kg) |
Price (
| |
|---|---|---|---|---|---|---|---|
| VII | O-Ho | 122 | 17 | B/2 | 28000 | 19000 | |
| VIII | O-Ho Kai | 130 | 19 | B/2 | 28000 | 38500 |

Radios
| Tier | Radio | Signal Range (m) |
Weight (kg) |
Price (
| |
|---|---|---|---|---|---|
| VI | Type 96 Mk. 4 Bo | 425 | 50 | 14000 | |
| VIII | Type 3 Otsu | 550 | 240 | 22000 | |
| X | Type 3 Ko | 750 | 560 | 54000 |
Compatible Equipment


![]()


![]()
![]()
![]()
![]()
![]()
![]()


![]()

![]()

Compatible Consumables
![]()
![]()
![]()
![]()
![]()
![]()
![]()
![]()
![]()
![]()
![]()
![]()
![]()
![]()
![]()
![]()
![]()
![]()
![]()
![]()
![]()
![]()
![]()
Player Opinion
Pros and Cons
Pros:
- Very thick frontal armor with many well angled parts that can create lots of troll bounces and 2nd highest HP of all tier 8 tanks after KV-5; tied with KV-4 and VK 100.01 P
- The 15 cm derp gun and top 10cm gun have very fast reload for their calibers; the derp gun reloads 9 sec faster than O-I!
- 15 cm gun has extremely good gun handling compared to similar guns and O-Ho is one of the few tanks with 15cm howitzer that gets access to VSTabs to improve gun handling even further
- Very heavy mass and engine power let you easily push others and makes O-Ho resistant to ramming
- Great gun depression over sides
- Very easy stock grind as all of the modules apart from top radio, top 10cm and tracks are researchable from earlier tanks
- Gun is located extremely high on turret which means that O-Ho can shoot over almost any allied tank and many hills that other tanks wouldnt be able to
Cons:
- Mini-turrets heavily limit forward gun depression to as little as -1°
- Both guns have below average accuracy and aim time.
- Huge profile; priority target to artillery and terrible camo values
- Armor is very flat, making it vulnerable to guns with high penetration
- Ammo rack is large and easily damaged.
Performance
O-Ho is natural evolution of O-Ni, with some major improvements. Armor is all around tougher, miniturrets and cheeks are now tough as front itself, and health is increased. Most notably, both guns have significantly quicker reload than similar guns on O-Ni.
You have two gun options: the 10cm and 15cm. The 10cm gun has very high DPM, making it very effective when top tier. 10cm allows O-Ho to be an amazing dpm rich tank, beating the Canarvon in dpm due to its higher alfa off 330. While the pen is average, it is just enough to to pen weakspots. Also the 10cm has 2 extra degrees of gun depression than the 15cm, usable to hit cupolas.
The derp gun gives O-Ho unique play style as bulky support tank. The derp has significantly better stats than O-I and O-Ni, and on top of that, can mount VStabs unlike either of them. The derp gun actually has pretty good gun handling, which allows O-Ho to snapshot effectively. The raw accuracy is still very low, however. With right skills and equipment, the reload can be decreased to 13.5 seconds. The 150mm can hurt even tier 10 heavies, if shots are aimed carefully. O-Ho's extreme height and gun location allows it to hit most roofs or engine decks of tanks, doing nice damage. While the derp gun will deal consistent damage, the 10cm is superior if played right. One of the most major issues of O-Ho is gun depression on front. Face hugging can be tricky, but with some practice by angling the tank just right amount, it's still possible. The mini-turrets are located more on left than right, so it is recommended to fight always on your right side if possible.
Early Research
Most of modules are shared with O-Ni. Mount derp gun and engine instantly. Neither of them requires tracks to be mounted. Then Research 10 cm expirimental gun. You can go ahead to Type 4 without researching tracks. But, If you want to equipping some equipment for this tank, Tracks is necessary. You can use either 15cm or 10cm by your own preference.
Suggested Equipment
![]()
![]() antifragmentation liner. Aiming Stabilizer
antifragmentation liner. Aiming Stabilizer
Gallery


Historical Info
Historical Gallery


Historical Accuracy Errata
* O-Ho is based on the drawings from the book “Imperial Japanese Army Ground Weapon Guide 1872-1945”. Unlike the drawings of "O-I 100t", which is what the tier 7 Japanese heavy tank O-Ni is based on, the dawings of the "O-I 120t" has basically no basis on them; they are *purely* based on false information and rumors. Due to this, the O-I 120t/O-Ho never actually existed.
It is however possible that the rumors of the "O-I 120t" are actually based on misleading information of the Type 4/5 super-heavy tank, similarly how the "O-I 100t" is based on the false information of the O-I. One of the false informations about the "O-I 120t" state that it was built and shipped to Manchuria in 1944 - there have been similar speculation about the Type 4 super-heavy tank (as it's turret was found in 1945 from Manchuria). However, the vehicle design of the "O-I 120t" is still inaccurate an
- In-game name is incorrect. The name "O-Ho" means "fifth (super) heavy tank". There however are no third and fourth super-heavy designs, as the O-I was the first and the Type 4/5 (O-Ro/O-Ro Kai) second design. If the O-Ho actually existed, a more realistic designation would be "O-I III" (as the both O-I 100t and O-I 120t are based on designs that were earlier designs than the O-Ro, they most likely would have been referred as "altnerate" designs to the O-I - O-I 100t and O-I 120t as O-I II and O-I III, respectively).
Sources and External Links
| Light Tanks | IRenault Otsu • IIType 95 Ha-Go • IIType 97 Te-Ke • IIIType 97 Chi-Ha • IIIType 98 Ke-Ni • IVType 5 Ke-Ho |
| Medium Tanks | IIChi-Ni • IIType 89 I-Go/Chi-Ro • IVType 1 Chi-He • VType 3 Chi-Nu • VType 3 Chi-Nu Kai • VIType 4 Chi-To • VIIType 5 Chi-Ri • VIIISTA-1 • VIIISTA-2 • IXType 61 • XSTB-1 |
| Heavy Tanks | IIIType 91 Heavy • IVType 95 Heavy • VO-I Experimental • VIHeavy Tank No. VI • VIO-I • VIIO-Ni • VIIIO-Ho • IXType 4 Heavy • XType 5 Heavy |
| Tank Destroyers | |
| Self-Propelled Artillery |