Atago

| Purchase price10 700 |
| Hit Points40 100 |
| 203 mm/50 3rd Year Type mod. E5 х 2 pcs. |
| Rate of Fire3.75 shots/min. |
| Reload Time16 sec. |
| Rotation Speed6.2 deg./sec. |
| 180 Degree Turn Time29.03 sec. |
| Firing Range15.78 km. |
| Maximum Dispersion133 m. |
| HE Shell203 mm HE Type0 |
| Maximum HE Shell Damage3300 |
| Chance of Fire on Target Caused by HE Shell17 % |
| Initial HE Shell Velocity840 m./s. |
| HE Shell Weight125.85 kg. |
| AP Shell203 mm AP Type91 |
| Maximum AP Shell Damage4700 |
| Initial AP Shell Velocity840 m./s. |
| AP Shell Weight125.85 kg. |
| 127 mm/40 Type89 A14 х 2 pcs. |
| Firing Range5.5 km. |
| Rate of Fire12 shots/min. |
| Reload Time5 sec. |
| HE Shell127 mm HE Type0 |
| Maximum HE Shell Damage2100 |
| Initial HE Shell Velocity725 m./s. |
| Chance of Fire on Target Caused by HE Shel8 % |
| 610 mm Quad4 х 4 pcs. |
| Rate of Fire0.59 shots/min. |
| Reload Time101 sec. |
| Rotation Speed25 deg./sec. |
| 180 Degree Turn Time7.2 sec. |
| TorpedoType90 mod. 1 |
| Maximum Damage17 233 |
| Torpedo Speed62 knot |
| Torpedo Range9.99 km. |
| 25 mm/60 Type96 mod. 128 х 1 pcs. |
| . . . Average Damage per Second50.4 |
| . . . Firing Range3.09 km. |
| 127 mm/40 Type89 A14 х 2 pcs. |
| . . . Average Damage per Second40.4 |
| . . . Firing Range5.01 km. |
| Maximum Speed35.5 knot |
| Turning Circle Radius790 m. |
| Rudder Shift Time8.1 sec. |
| Surface Detectability Range11.88 km. |
| Air Detectability Range8.67 km. |

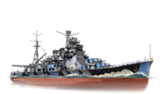
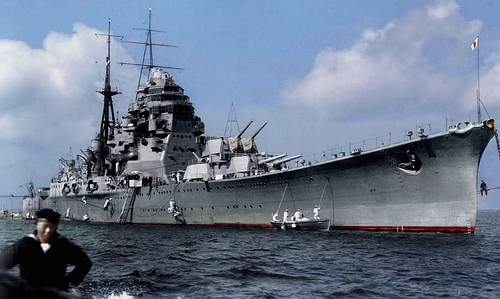
Atago — Japanese premium Tier VIII cruiser.
Developed from the Myoko-class cruisers. When commissioned, Atago was one of the most powerful heavy cruisers in the world. The ship surpassed the speed of all Japan's potential rival cruisers. For her time, Atago was well-armored with efficient AA armament, along with powerful artillery and torpedoes.
Modules
 |
Rate of Fire (shots/min) | 180 Degree Turn Time (sec) | Maximum Dispersion (m) | Maximum HE Shell Damage (HP) | Chance of Fire on Target Caused by HE Shell (%) | Maximum AP Shell Damage (HP) |
Research price (exp) |
Purchase price ( | |
|---|---|---|---|---|---|---|---|---|---|
| 203 mm/50 Tipo tercer año N.º 2 en una torreta Modelo E | 3,8 | 29 | 133 | 3300 | 17 | 4700 | 0 | 0 |
 |
Hit Points (HP) | Armor (mm) | Armor (mm) | Main Turrets (pcs.) | Secondary Gun Turrets (pcs.) | AA Mounts (pcs.) | Torpedo Tubes (pcs.) | Hangar Capacity (pcs.) |
Research price (exp) |
Purchase price ( | |
|---|---|---|---|---|---|---|---|---|---|---|---|
| Atago | 40 100 | 6 | 127 | 5 | 4 | 30/6/6/4 | 4 | 0 | 0 |
 |
Rate of Fire (shots/min) | Torpedo Tubes Reload Time (sec) | 180 Degree Turn Time (sec) | Maximum Damage (HP) | Torpedo Speed (knot) | Torpedo Range (km) |
Research price (exp) |
Purchase price ( | |
|---|---|---|---|---|---|---|---|---|---|
| Tipo 90 mod. 1 | 0,6 | 101 | 7,2 | 17 233 | 62 | 10 | 0 | 0 |
 |
Firing Range Increase (%) | Maximum Firing Range (km) |
Research price (exp) |
Purchase price ( | |
|---|---|---|---|---|---|
| Tipo 8 mod. 1 | 0 | 0 | 0 |
 |
Maximum Speed (knot) |
Research price (exp) |
Purchase price ( | |
|---|---|---|---|---|
| Propulsión: 130 000 CV | 35,5 | 0 | 0 |
Compatible Upgrades
| Slot 1 |
|||||
|---|---|---|---|---|---|
| Slot 2 |
|||||
| Slot 3 |
|||||
| Slot 4 |
|||||
| Slot 5 |
Player Opinion
Performance
Atago was the first Tier VIII premium ship released for World of Warships and replaced Kitakami at the end of the Closed Beta. Bearing the same ABC-XY turret layout of her historical predecessor Myoko, this heavy cruiser is fairly similar to her predecessor, but improves on many traits such as turret traverse and overall handling. While her main battery rate of fire is slower, her torpedoes are quadruple tube mounts (for a total of 16 instead of 12) and the forward launcher on each side fires forwards instead of backwards, making it useful against enemies in front of the ship. She also gains access to the Repair Party consumable, allowing her to recover HP, unlike most other cruisers (at Tier VIII). Her impressively low detection range means that she can engage the enemy at her terms, and if situations go awry she can sneak away (providing there are no aircraft patrolling the sky or a nearby destroyer to detect her. With a full concealment build she can even fire torpedoes from beyond her detection radius in certain situations. She does have a few drawbacks, with a very large citadel hitbox — due to the large bridge/boiler area amidships — as well as a slow rate of fire and a mediocre anti-aircraft suite, but she is overall a very powerful ship.
LittleWhiteMouse's Premium Ship Review: Atago from the NA forums
Pros:
- Very high speed.
- Has the access to the Repair Party consumable, allowing for HP recovery like battleships and higher tier cruisers.
- Much wider torpedo launch arcs than regular tech tree Japanese cruisers; having 2 front-mounted and 2 rear-mounted allows for more flexible torpedo usage.
- Low detection range; with the Concealment Expert skill, the cruiser has an astonishing 9.1km detection range.
- Lethal HE shells with excellent fire starting capabilities and damage.
- Heavy 10-gun broadside.
Cons:
- Citadel is very vulnerable.
- Modules -- notably the rudder, gun turrets and torpedo tubes -- are very easy to disable.
- Slow turret traverse; however, Expert Marksman mitigates some of this.
- Low rate of fire.
- Terrible AA suite.
Research
Optimal Configuration
Upgrades
The module in Upgrade Slot 6 really dictates how Atago plays. With Target Acquisition Mod 1 equipped, she will likely be more comfortable in the main battle line alongside other allied battleships and cruisers. Most players, however, will choose to maximize Atago’s stealth by equipping Concealment System 1. Lowering her detection range makes her more survivable in general, and better equipped to hunt destroyers when necessary.
Commander Skills
| Recommended Commander Skills | ||||||||
|---|---|---|---|---|---|---|---|---|
| Cost (points) |
Endurance | Attack | Support | Versatility | ||||
| 1 |
★★★ |
★★ |
★ |
|
★★ |
|
★ |
|
| 2 |
★ |
★★ |
★★★ |
★ |
|
|
★★ |
★ |
| 3 |
★★ |
★ |
★★ |
|
★ |
★★★ |
★★★ |
★★ |
| 4 |
|
|
|
|
★★ |
★ |
★★ |
★★★ |
| Key: ★★★ - Extremely Useful ★★ - Frequently Useful ★ - Occasionally Useful No stars - Not Useful | ||||||||
Consumables
The importance of Atago’s access to the Repair Party consumable cannot be overstated; it is highly recommended that captains spend the credits or doubloons on the premium version for the additional charge (and shorter cooldown). Given her extreme vulnerability to enemy aircraft, Defensive AA Fire is recommended instead of Hydroacaoustic Search.
Camouflage
As a premium ship, Atago comes included with Type 10 camouflage that lowers her detection radius, reduces the accuracy of incoming shells, and increases the amount of experience she earns.
Signals
Atago is far and away the fastest Tier VIII cruiser in the game; a Sierra Mike signal is recommended for captains who are interested in maximizing that speed. Zulu Hotel, Victor Lima, and India X-Ray signals are also recommended. Zulu Hotel will add additional commander XP for faster retraining for a transferred captain, and Victor Lima and India X-Ray add an additional 2% to the fire chance of her main battery high explosive shells.
Recommended Signal Flags 
| |||||
|---|---|---|---|---|---|
| Combat | |||||
 ★ |

|
 ★★ |
 ★ |
 ★★★ |

|
 ★★ |
 ★★★ |
 ★★★ |

|
 ★ |
 ★★ |
| Economic | |||||
 ★★ |
 ★ |
 ★★★ |
 ★★ |
 ★ | |
| Special | |||||
 ★★★ |
 ★★★ |
 ★★★ |
 ★★ |
 ★★ | |
| Key: ★★★ - Extremely Useful ★★ - Frequently Useful ★ - Occasionally Useful No stars - Not Useful | |||||
Gallery
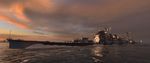
Atago's low draft means she has very good concealment, allowing her to control the engagement.
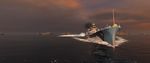
Atago's torpedoes are capable of firing forward, making them an excellent offensive weapon.
Atago's high explosive shells are great at starting fires on enemy ships.
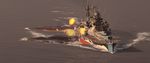
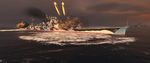
Atago fires a broadside at an enemy battleship, resulting in two fires.
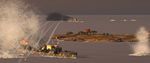
Atago engages an enemy Mutsuki, eventually scoring the kill for a First Blood achievement.


Historical Info
Historical Gallery


| Destroyers | II Tachibana |
| Cruisers | I Hashidate • II Chikuma • III Tenryū • III Katori |
| Battleships | II Mikasa |
| Aircraft Carriers | IV [[Ship:Hōshō (< 23.01.2019)|Hōshō (< 23.01.2019)]] • IV Hōshō • V [[Ship:Zuihō (< 23.01.2019)|Zuihō (< 23.01.2019)]] • VI [[Ship:Ryūjō (< 23.01.2019)|Ryūjō (< 23.01.2019)]] • VI Ryūjō • VII [[Ship:Hiryū (< 23.01.2019)|Hiryū (< 23.01.2019)]] • VII [[Ship:Kaga (< 23.01.2019)|Kaga (< 23.01.2019)]] • VIII [[Ship:Shōkaku (< 23.01.2019)|Shōkaku (< 23.01.2019)]] • VIII Shōkaku • VIII Kaga |