Myoko

| Research price72000 exp |
| Purchase price5 800 000 |
| Hit Points37 400 |
| 203 mm/50 3rd Year Type 2 GO mod. C5 х 2 pcs. |
| Rate of Fire4.29 shots/min. |
| Reload Time14 sec. |
| Rotation Speed4 deg./sec. |
| 180 Degree Turn Time45 sec. |
| Firing Range15.58 km. |
| Maximum Dispersion131 m. |
| HE Shell203 mm HE Type0 |
| Maximum HE Shell Damage3300 |
| Chance of Fire on Target Caused by HE Shell17 % |
| Initial HE Shell Velocity840 m./s. |
| HE Shell Weight125.85 kg. |
| AP Shell203 mm AP Type91 |
| Maximum AP Shell Damage4700 |
| Initial AP Shell Velocity840 m./s. |
| AP Shell Weight125.85 kg. |
| 127 mm/40 Type89 mod. A14 х 2 pcs. |
| Firing Range4.5 km. |
| Rate of Fire8 shots/min. |
| Reload Time7.5 sec. |
| HE Shell127 mm HE Type0 |
| Maximum HE Shell Damage2100 |
| Initial HE Shell Velocity725 m./s. |
| Chance of Fire on Target Caused by HE Shel8 % |
| 610 mm Triple2 х 3 pcs. |
| Rate of Fire0.86 shots/min. |
| Reload Time70 sec. |
| Rotation Speed25 deg./sec. |
| 180 Degree Turn Time7.2 sec. |
| TorpedoType8 mod. 2 |
| Maximum Damage16 267 |
| Torpedo Speed59 knot |
| Torpedo Range9.99 km. |
| 7.7 mm/80 Type922 х 1 pcs. |
| . . . Average Damage per Second3.2 |
| . . . Firing Range0.99 km. |
| 13 mm/76 Type93 Twin4 х 2 pcs. |
| . . . Average Damage per Second14 |
| . . . Firing Range1.2 km. |
| 127 mm/40 Type89 mod. A14 х 2 pcs. |
| . . . Average Damage per Second40.4 |
| . . . Firing Range5.01 km. |
| Maximum Speed35 knot |
| Turning Circle Radius780 m. |
| Rudder Shift Time9.3 sec. |
| Surface Detectability Range13.14 km. |
| Air Detectability Range8.19 km. |

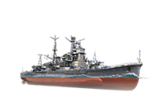
Myōkō — Japanese Tier VII cruiser.
The first Japanese cruiser built after the Washington Naval Treaty of 1922 came into force. Unlike foreign Treaty Cruisers, Myoko’s armor was good enough to withstand artillery strikes from ships of the same type. One of the features of the project was well-developed torpedo protection. Following a series of upgrades, cruisers of this class got a substantially reinforced AA and torpedo armament.
Modules
 |
Rate of Fire (shots/min) | 180 Degree Turn Time (sec) | Maximum Dispersion (m) | Maximum HE Shell Damage (HP) | Chance of Fire on Target Caused by HE Shell (%) | Maximum AP Shell Damage (HP) |
Research price (exp) |
Purchase price ( | |
|---|---|---|---|---|---|---|---|---|---|
| 203 mm/50 Tipo tercer año N.º 2 en una torreta Modelo D | 4,3 | 36 | 131 | 3300 | 17 | 4700 | 0 | 500 000 |
 |
Hit Points (HP) | Armor (mm) | Armor (mm) | Main Turrets (pcs.) | Secondary Gun Turrets (pcs.) | AA Mounts (pcs.) | Torpedo Tubes (pcs.) | Hangar Capacity (pcs.) |
Research price (exp) |
Purchase price ( | |
|---|---|---|---|---|---|---|---|---|---|---|---|
| Myōkō (A) | 37 400 | 6 | 102 | 5 | 4 | 2/6/4/4 | 4 | 0 | 530 000 | ||
| Myōkō (B) | 39 200 | 6 | 102 | 5 | 4 | 26/8 | 4 | 17 500 | 1 300 000 |
 |
Rate of Fire (shots/min) | Torpedo Tubes Reload Time (sec) | 180 Degree Turn Time (sec) | Maximum Damage (HP) | Torpedo Speed (knot) | Torpedo Range (km) |
Research price (exp) |
Purchase price ( | |
|---|---|---|---|---|---|---|---|---|---|
| Tipo 8 mod. 2 | 0,9 | 70 | 7,2 | 16 266 | 59 | 10 | 0 | 400 000 | |
| Tipo 90 mod. 1 | 0,8 | 76 | 7,2 | 17 233 | 62 | 10 | 16 400 | 1 300 000 |
 |
Firing Range Increase (%) | Maximum Firing Range (km) |
Research price (exp) |
Purchase price ( | |
|---|---|---|---|---|---|
| Tipo 7 mod. 1 | 0 | 0 | 400 000 |
 |
Maximum Speed (knot) |
Research price (exp) |
Purchase price ( | |
|---|---|---|---|---|
| Propulsión: 132 000 CV | 35 | 0 | 400 000 |
Compatible Upgrades
| Slot 1 |
|||||
|---|---|---|---|---|---|
| Slot 2 |
|||||
| Slot 3 |
|||||
| Slot 4 |
Player Opinion
Performance
For the most part, Myoko is the first proper heavy cruiser within the Japanese cruiser branch; it brings together all of the lessons captains have learned playing through Furutaka and Aoba. Her impressively low detection range will most certainly aid captains in firefights with other cruisers. Her guns load relatively slowly, and getting into a medium range firefight with a fast firing cruiser — such as Cleveland, Shchors, or Fiji — is inadvisable.
Captains should take care to remember that even as a proper heavy cruiser, Myoko is still very much prone to citadel hits, particularly from other cruisers despite having the offensive capability to do the same herself. In this aspect she can be played in two ways: an anti-cruiser and anti-destroyer escort or an aggressive raider forming ad-hoc squadrons with other cruisers or destroyers. She must take special care when engaging battleships, and hold the range open as best as possible.Pros:
- Excellent main battery guns for a cruiser of her tier. Her shell velocities allow reliable hits, and her turret layout of ABC-XY carries on to two of her successors (Mogami and Ibuki, though the forward turrets have slightly different arrangements).
- Fairly easy grind as the only modules present are hull upgrades and torpedoes.
- Good shell speed despite rather high shell arc.
- Friendly handling characteristics.
- Accurate main battery guns
- Can easily citadel other crusiers, especially Soviet ones, when they are turned broadside on, even at maximum range, due to the accurate guns.
- Very well balanced ship in all aspects
- More armor means she can take a bit more punishment.
- Additional pair of torpedo tubes from predecessor.
- The HE shells can set fires almost every salvo with the 19% fire chance combined with the quantity of guns.
- Good concealment on a cruiser. With camouflage, the ship will be detected at 12.7km, dropping all the way down to 11.2km with the Concealment Expert skill.
Cons:
- Tube location may be inconvenient some as it is located a bit further aft than the Aoba’s.
- Fairly easy to citadel, especially by high-caliber shells.
- Odd gun arrangement means the citadel has to be exposed to bring all the guns to bear.
- Anti-aircraft suite is a bit sub-par, especially in her stock configuration.
- Reload time is 14 seconds, compared to the 11 seconds of preceding ship in the line.
- Very slow turret traverse at 45 seconds; can be mitigated slightly with the Expert Marksman skill, yet still very slow.
Research
Optimal Configuration
Upgrades
As a Tier VII IJN cruiser with access to four upgrade slots, the following upgrades are recommended for Myoko:
Slot 1
- Main Armaments Modification 1 (for players focused on the main batteries) or
- Auxiliary Armaments Modification 1 (for players focused on anti-air build)
Slot 2
- Main Battery Modification 2 (if the player wishes to reduce the turret traverse further (34 seconds)) or
- AA Guns Modification 2 (for players focused on anti-air build; works well in tandem with Advanced Firing Training) or
- Aiming Systems Modification 1 (for lower main battery dispersion)
Slot 4
- Steering Gears Modification 1 (due to how fragile the rudder is)
Slot 5
- Steering Gears Modification 2 (due to the already large turning radius of the ship for a cruiser)
Commander Skills
| Recommended Commander Skills | ||||||||
|---|---|---|---|---|---|---|---|---|
| Cost (points) |
Endurance | Attack | Support | Versatility | ||||
| 1 |
★★★ |
★★ |
|
|
★★ |
|
★ |
|
| 2 |
★ |
★ |
★★★ |
★ |
|
|
★★ |
★★ |
| 3 |
★★ |
★ |
★★ |
|
★ |
★★ |
★★★ |
★★ |
| 4 |
|
|
★ |
|
★★ |
★ |
★★ |
★★★ |
| Key: ★★★ - Extremely Useful ★★ - Frequently Useful ★ - Occasionally Useful No stars - Not Useful | ||||||||
Consumables
As a Tier VII IJN cruiser, players have access to the following consumables:
Premium Damage Control Party is recommended in case the player finds their rudder knocked out in a precarious situation. Defensive Fire is recommended for players with an anti-air build and Hydroacoustic Search for those looking to counter and or hunt enemy destroyers.
Camouflage
Type 1, 2, or 5 camouflage can be equipped for credits; Types 2 or 5 are recommended at a minimum to reduce the accuracy of incoming shells.
Players who wish to spend doubloons can equip Myoko with Type 17 camouflage that lowers her detection radius, reduces the accuracy of incoming shells, reduces her repair costs, and increases the amount of experience she earns.
Signals
As with other IJN cruisers on recommended signal flags, Victor Lima, India X-Ray and Juliet Charlie are the most recommended for extra fire damage. Victor Lima & India X-Ray increase the fire chance while also increasing chances of you getting flooding and being detonated, thus Juliet Charlie is used to counter the debuff effect. Sierra Mike can also be handy for getting around to places, as this increases Myoko's speed to a fantastic 36.8 kts. Equal Speed Charlie London, Dragon Flag, and Zulu Hotel can assist the player with increased XP gain per battle and faster commander (re)training.
Recommended Signal Flags 
| |||||
|---|---|---|---|---|---|
| Combat | |||||
 ★★ |

|
 ★★★ |

|
 ★★★ |
 ★ |
 ★★ |
 ★★ |

|

|

|
 ★★★ |
| Economic | |||||
 ★ |

|
 ★★ |
 ★★ |

| |
| Special | |||||
 ★ |
 ★★★ |
 ★ |
 ★★ |
 ★★ | |
| Key: ★★★ - Extremely Useful ★★ - Frequently Useful ★ - Occasionally Useful No stars - Not Useful | |||||
Gallery
Historical Info
Historical Gallery