| Version du 30 octobre 2014 à 14:02 12 versions | | Version du 28 septembre 2018 à 10:32Contenu remplacé par « {{MapDetails |Size = 1000x1000 |Map type = Été |Battle Tier limit = IV-X }} {{To Do}} {{clear}} {{maps}} Category:Maps {{#gw_breadcrumbs:Tank}} » |
| Ligne 1 : | | Ligne 1 : |
| ? | {{MapData|map=Malinovka|template=Map Detail}} | | + | {{MapDetails |
| | | + | |Size = 1000x1000 |
| | | + | |Map type = Été |
| | | + | |Battle Tier limit = IV-X |
| | | + | }} |
| | | | | |
| | {{To Do}} | | | {{To Do}} |
| | | | | |
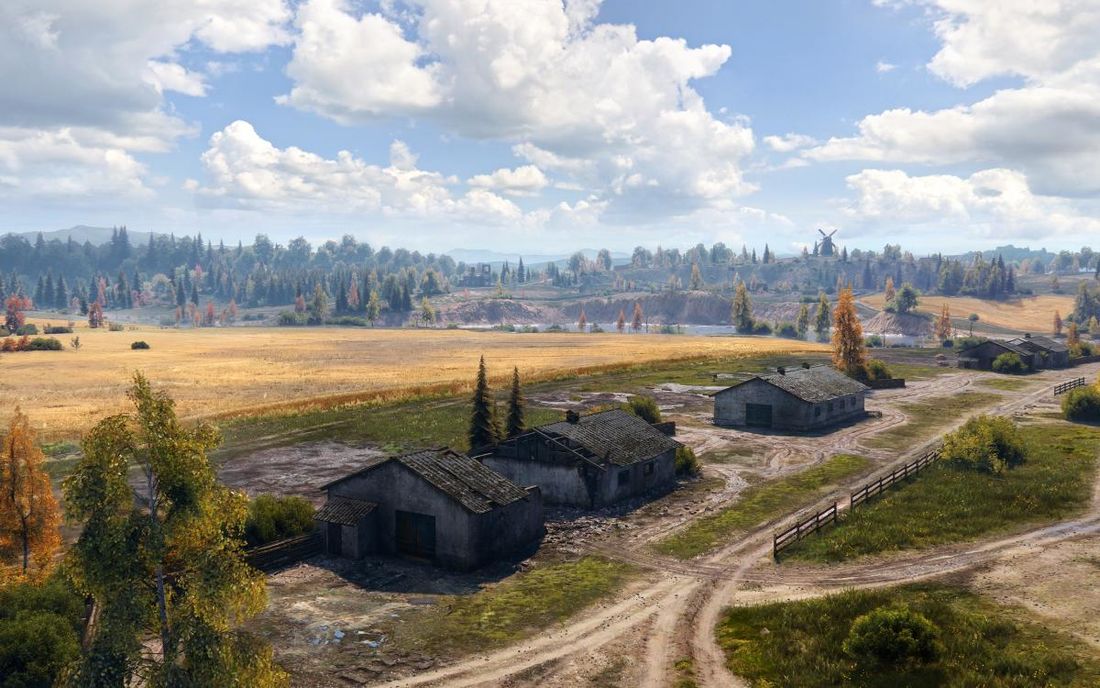
| ? | There are plenty of different theories on how to win this map. An excellent tactic is to simply hold out, with the majority of the armor on the main line with a few light, medium, heavy tanks as well as a TD to hold the east side. Tell teammates to hold out and refrain from charging. When the enemy is depleted, that is their armor is reduced to a few tanks, charge. The trick to doing well here is team work, regardless of the tactics used. While communication is often difficult in Random Battles, having just a few people talking to each other can turn the tide. Artillery has little to stand in its way if appropriately placed, less the depression on the west spawn and the buildings in the east spawn. | | + | {{clear}} |
| | | + | {{maps}} |
| | | | | |
| ? | | | + | [[Category:Maps]] |
| ? | == Standard Battle == | | + | {{#gw_breadcrumbs:Tank}} |
| ? | | | + | |
| ? | The map is very wide open, and thus sniping is key. There are two main locations of engagement: | | + | |
| ? | * Across no man's land, between both spawns. This favours sniping. | | + | |
| ? | * The hill and the area below it. This favours flanking and brawling. | | + | |
| ? | | | + | |
| ? | At the start of the battle, the first thing to do is to '''check the number of scouts and SPGs''' - how many scouts do you have and how many scouts do they have, and are there SPGs to support them? This will decide how the initial strategy plays out. | | + | |
| ? | | | + | |
| ? | '''If you have more scouts than the opponent''', send a skilled scout to light up the side of the enemy field, as the distance between the spawns is smaller than the drawing limit. Tank Destroyers and tanks with sniping capability should be prepared to shoot anything that is lit up, and SPGs should be aiming at the enemy standoff line, marked by the line of rocks on one side and the line of houses on the other. SPGs should also report any environmental changes, such as trees falling, to the team. Hopefully, this should result in substantial portions of the enemy team being lit up and damaged. | | + | |
| ? | Alternatively, lights can try flanking the enemy position via the hill side, but this may be difficult considering that they will encounter enemy forces heading for the hill. This should only be attempted by skilled drivers with high Camouflage skill. Successful breakthrough, however, will often light up the enemy SPGs, leading to their neutralisation or at least forcing them out of position for some time. | | + | |
| ? | | | + | |
| ? | It goes without saying that tanks less suited for sniping should head for the hill, as it is to their advantage. | | + | |
| ? | | | + | |
| ? | '''If your opponents have more scouts''', leave a token force to defend, with good shooters who can hit scouts. Otherwise, many tanks can be lost to enemy spotting as the field is still much wider than the average tank's spotting range. Send the full force to the hill for better odds of overwhelming the enemy position. | | + | |
| ? | | | + | |
| ? | '''If there is a lack of scouts''', the [[M18 Hellcat]] will often suffice when placed in the bushes at the Southwest side of the field. Alternatively, a tougher heavy tank can be placed there, which will draw bounced shots and expose enemies to fire. This works best when there are no enemy SPGs in play. | | + | |
| ? | | | + | |
| ? | Mid-battle, the focus shifts to the '''Hill''', where heavy tanks will often brawl with each other at mid-range. This region is often the deciding factor between victory and defeat, and standard brawling tactics apply. Do note, however, that South spawn has access to a Windmill as cover, so the other team will need to push hard to force them out. Bouncier mediums like the [[T-44]] come in handy here, and American heavies should find the terrain ideal for hull-down tactics. The region is exposed to SPG fire, so staying artillery safe is of importance (especially with 8.6 and top tier SPGs). | | + | |
| ? | | | + | |
| ? | Below the hill is a wide open area. This is very exposed to both team's forests (and sometimes even their base), so only fast tanks or tanks with very tough fronts should use this area. Mediums can conduct nasty flanking operations here and lights can slip past to the SPGs to eliminate them. This is where heavier tank destroyers like the [[T28]] and [[AT 15]] have a niche as defenders without needing to struggle up the hill and expose their sides. | | + | |
| ? | | | + | |
| ? | By end-game, the match should be decided. Field defenders from the winning team should push forward to get themselves some kills. If it goes down to the wire, good brawlers such as the [[IS-3]] will have good chances winning duels with survivors. | | + | |
| ? | | | + | |
| ? | All in all, hold the field, take the hill and sweep down for the win. | | + | |
| ? | | | + | |
| ? | == Encounter Battle == | | + | |
| ? | | | + | |
| ? | The capture circle is at the eastern side of the field, and is VERY exposed. As such, the priority is not the cap - it is again, the hill. | | + | |
| ? | | | + | |
| ? | At the beginning of the match, ALL heavy tanks should immediately proceed to the hill for a violent confrontation. Due to the high visibility of each spawn from the other side, scouts can be sent across the foot of the hill to light up the enemy position. Their chances of survival are pretty slim, so tank destroyers should be ready to act on this targeting information, and fast. | | + | |
| ? | | | + | |
| ? | However, one important thing not to neglect is to send a bunch of mediums, lights and tank destroyers to the field, where they can keep the cap secure. If there are sufficient heavies, an agile brawler like the [[IS]] will be a good tank to send to the cap area. From there, they can either hold position, or make a brazen flanking move across the far edge of the field. If either team successfully gets a flank, the SPGs will be in great danger, so ensure sufficient defense at the cap. | | + | |
| ? | | | + | |
| ? | Again, the winning team will be able to swoop down from the hill and finish off opposition. The field team should then push, as usual, to wipe out the remaining enemy tanks. | | + | |
| ? | | | + | |
| ? | Often, the Encounter battle goes to the wire. In this case, tanks should stick together and/or send out a scout. The slope of the capture zone can cover one's tank from the other side of the field at the cost of being exposed from the hill, so use that for hull-down positioning. | | + | |
| ? | | | + | |
| ? | All in all, once again, the hill is key. The cap cannot be taken without securing the hill, which must be the first and foremost objective of any team seeking to claim another victory. | | + | |
| ? | [[category:maps]] | | + | |