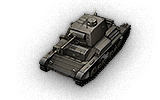
Cruiser Mk. II

|
Article requires additional modification The design and/or content of this article do not conform to wiki standards. Missing Content
|
Cruiser Mk. II

Mouse over "
| 3,100 |
| 34072 HP Hit Points |
| 14.33/14.56.56/16.7 t Weight Limit |
- 전차장
- 포수
- 조종수
- 무전수
- 장전수
| 120150 hp Engine Power |
| 40/15 km/h Speed Limit |
| 3538 deg/s Traverse |
| 8.3722.87 hp/t Power/Wt Ratio |
| NoNo Pivot |
| // mm Hull Armor |
| 30/26/3030/26/30 mm Turret Armor |
AP/APCR/HE
AP/APCR/HE Shells |
| 45/45/6045/45/60 HP Damage |
| 40/65/2349/71/23 mm Penetration |
|
20 r/m ▲
18.62 r/m Standard Gun ▲ Rate of Fire Magazine-fed Gun |
|
900 ▲
Standard Gun
▼
Standard Gun
▲
837.9 Standard Gun ▲
Magazine-fed Gun
▼
Clip-fed Gun
▲ Damage Per Minute Clip-fed Gun |
|
0.4 m ▲
0.45 m With 50% Crew: 0.496 m ▲ Accuracy With 50% Crew: 0.557 m |
| 1.9 s 2.4 s Aim time |
| 3436 deg/s Turret Traverse |
| 360° Gun Arc |
| -15°/+20°-15°/+20° Elevation Arc |
| 200240 rounds Ammo Capacity |
| 2020 % Chance of Fire |
| 290 m 300 m View Range |
| 350 m 350 m Signal Range |
II
3100
The Cruiser Mk. II is a British tier 2 light tank.
A10 Cruiser Mk. II는 John Carden이 설계한 A9 전차의 개량형으로 장갑을 강화하고 기관총 포탑을 제거하였다. 1937년 7월 시제 전차가 제작되어 중순항전차로 제식 채용되었으며, 1938년부터 1939년까지 총 175대의 생산 지시가 하달되어 1940년 9월까지 생산되었다. 프랑스(1940년), 그리스(1941년), 북아프리카(1941년)에서 실전에 투입되었다.
At first, the Cruiser Mark II is merely an up-armored version of its predecessor. Because the heavier Mk. II shares the Cruiser Mk. I's engine, it's very slow (nearly as slow as French tanks of its tier). What sets the Mk. II apart from the Mk. I and most other tanks is the available 3.7-inch Howitzer, which can deal enough damage to kill most comparable enemies with one shot.
The Cruiser Mk. II leads to the Cruiser Mk. III, and the Valentine.
Modules / Available Equipment and Consumables
Modules

주포
| 단계 | 주포 | 평균 관통력 (mm) | 연사력 | 100m에서의 분산도 | 조준 시간 | 일반 경험치 | 중량 (톤) | 가격, | |
|---|---|---|---|---|---|---|---|---|---|
| I | QF 2-pdr Mk. IX prototype | 40/65/23 | 45/45/60 | 20 | 0.4 | 1.9 | 0 | 130 | 0 |
| IV | 40 mm Pom-Pom | 49/71/23 | 45/45/60 | 18.64 | 0.45 | 2.5 | 1000 | 160 | 20000 |

엔진
| 단계 | 엔진 | 엔진 출력 (마력) | 충돌 시 화재 발생 확률 | 일반 경험치 | 중량 (톤) | 가격, |
|---|---|---|---|---|---|---|
| I | Rolls-Royce Phantom | 120 | 20 | 0 | 340 | 0 |
| II | AEC Type 179 | 150 | 20 | 80 | 360 | 1200 |

현가장치
| 단계 | 현가장치 | 한계 중량 | 회전 속도 (도/초) | 일반 경험치 | 중량 (톤) | 가격, |
|---|---|---|---|---|---|---|
| I | A10 Mk. I | 14.5 | 35 | 0 | 3000 | 330 |
| II | A10 Mk. II | 16.7 | 38 | 105 | 3000 | 610 |

무전기
| 단계 | 무전기 | 통신 범위 (m) | 일반 경험치 | 중량 (톤) | 가격, |
|---|---|---|---|---|---|
| III | WS No. 11 | 350 | 0 | 40 | 600 |
Compatible Equipment
Compatible Consumables
Player Opinion
Pros and Cons
Pros:
- Extremely good gun depression with the 2-pdr and Pom-Pom - one of the best in the game
- Can use the devastating 3.7-inch Howitzer
- At longer ranges, the howitzer can arc over small cover
- Sufficient armor for bouncing many auto-cannons, and very easy to angle.
- Surprisingly good turning values on both hull and turret, making it easy to deal with encirclements or surprises.
Cons:
- Low accuracy with Pom-Pom, and even moreso with the Howitzer
- Very slow - comparable to low-tier French tanks
- Armor doesn't hold up against most non auto-cannons.
- Gun depression with the howitzer is only -6°
- Very low shell velocity with the Howitzer
Performance
The Cruiser Mk. II is a effectively a glass cannon. It's slow moving and poorly armored, which means playing the role of a front-lines attack tank is risky. Exactly how the tank performs depends mostly on which gun the player chooses to use, and while most players opt for the howitzer, the tank can be played effectively with any of the three guns.
The 2-pdr is not nearly as dominant on the Mk. II as it is on the Mk. I, yet it still has enough penetration ability to be effective against most of the enemies a Mk. II will face. When equipped with a 2-pdr, this tank is best used as a sniper. The tank can snipe not only from a well-concealed sniping spot, but can also take advantage of it's excellent gun depression to conceal itself behind the crest of a hill. The 2-pdr also benefits greatly from using APCR rounds, which increases the gun's average penetration value to 121mm (enough to penetrate the frontal armor of tier 5 heavies).
When using the Pom-Pom, the Mk II's role changes to a close-quarters fighter. With this gun, it's best used as a flanker. Attacking the weaker sides and rears of enemy tanks will allow you to use the Pom-Pom to it's full potential, while keeping the fragile tank out of direct fire. The Pom-Pom isn't capable of shooting long range like the 2-pdr; it's inaccurate and doesn't have the penetration to be effective.
The 3.7-inch Howitzer is the gun most players chose to use. The howitzer possess devastating single-shot damage, and is comparable in its tier to only those available for fixed-gun tank destroyers such as the T82 and Valentine AT. The combination of a powerful gun and a free-rotating turret makes the Mk II. a fearsome guerrilla fighter, being able to pop out of cover and vaporize most enemies before they even get the chance to shoot back. Take great care when shooting at an enemy who's aware of you, as the gun's long reload time combined with the tank's lack of armor means a second shot isn't always possible. The howitzer-equipped Mk. II is weakest when being attacked by two enemy tanks simultaneously - it simply doesn't have the firepower or armor to defend itself against two tanks at once. The howitzer is also not good at long-range use. It's long aim time, poor accuracy, and slow shell velocity mean that it can only be used effectively against stationary targets at long ranges.
Early Research
- The 40 mm Pom Pom gun, the AEC Type 179 engine, and the WS No. 9 radio carry over from the Cruiser Mk. I. You should install the engine and radio immediately; using the Pom-Pom is optional.
- Research the upgraded suspension first.
- Next research the second turret.
- Now you can research the 3.7-inch Howitzer.
- Go from there.
Suggested Equipment
![]()
![]()
![]()
![]()
Gallery


Historical Info
Development history
The A10 was developed by Sir John Carden of Vickers in 1934 by adaptation of his A9 design. The A10 specification called for armour of up to 1 inch standard (the A9 was 14mm); a speed of 10 mph was acceptable. The two sub-turrets present on the A9 were removed, and extra armour bolted onto that already present on the front and sides of the hull, along with all faces of the turret, providing approximately twice the armour in most areas. The A10 was two tonnes heavier than the A9, but used the same 150 bhp engine, and as a consequence the tank's top speed was cut from 25 mph to 16 mph. The turret armament consisted of a QF 2-pounder (40mm) gun and a coaxial .303 Vickers machine gun. For the production version there was a 7.92mm BESA machine gun mounted in the hull in a barbette to the right of the driver. This was added to give extra firepower but at the expense of simplicity - the Vickers and the BESA using different ammunition. The tank had a total crew of five (Commander, gunner, loader, driver and hull machine gunner), and there was no separation between the driver's compartment and the fighting compartments.
The prototype ("Tank, Experimental A10E1") was completed in 1936, a few months after the A9 prototype. Carden had died in an air crash in 1935 and development was slower than expected. In 1937 the A10 was dropped as an infantry support but in 1938 it was decided to produce it as a "heavy cruiser". The A10 was accepted for service - initially as "Tank, Cruiser, Heavy Mk I" and then "Tank, Cruiser A10 Mk 1" and finally "Tank, Cruiser Mk II". Production was ordered in July 1938. Total production was 175 vehicles including the 30 CS versions (see below), 45 were built by Birmingham Railway Carriage and Wagon Company, 45 by Metropolitan-Cammell, 10 byVickers. In late 1939 another order was placed with Birmingham Railway Carriage and Wagon Company, this time it was a larger order of 75 vehicles. - entering service in December 1939, but was something of an oddity - it had been intended to sacrifice speed for armour like an Infantry tank, but was still relatively poorly armoured, and was, as a result, not effective.
Combat history
A number of Mark IIs were part of the British Expeditionary Force (BEF) sent to France in the early stages of World War II. Their cross country performance was recorded as poor, but they were still used later in North Africa at the defence ofTobruk in 1941, where reliability and suspension performance in the desert conditions was praised. Sixty worn out examples were taken to Greece by the 3rd Royal Tank Regiment and, although they performed well against the German tanks, over 90% were lost due to mechanical breakdowns as opposed to enemy action (mainly tracks).
Variants
Cruiser Mk II (A10 Mk I)
Classified as a 'heavy cruiser' and 31 were sent to France with the 1st Armoured Division, but performed poorly in the following campaign. Also served in the North African Campaignuntil late in 1941.
Tank, Cruiser, Mk IIA (A10 Mk IA)
The coaxial Vickers machine guns were replaced with BESA machine guns. Armoured radio housing added.
Tank, Cruiser, Mk IIA CS (A10 Mk IA CS)
Had a 3.7" (94 mm) howitzer in the turret instead of the 2 pdr. The standard ammunition load was 40 rounds smoke, and a few HE shells. The CS denotes Close Support. This weapon was derived from a World War I field howitzer. It was not related to the 3in howitzer used in later British tanks in World War II, which was itself replaced by a 95mm howitzer in the later versions of the Churchill infantry tanks and all CS versions of the Centaur and Cromwell cruiser tanks. British doctrine was that the CS tank was to provide smoke cover in advances or retreats and hence many more smoke rounds were carried than HE.
Historical Gallery


.jpg)
.jpg)
_in_Greece,_1941.jpg)