炮術與穿甲原理(戰艦世界):修訂版本之間的差異
| 2018年3月23日 (五) 12:53的修訂版本 | 2018年3月23日 (五) 13:17的修訂版本 高爆彈 (HE) 高爆彈根據萌雪所述,似乎不是單純的/6 或/4 | |||
| 第 58 行: | 第 58 行: | |||
| === 高爆彈 (HE) === | === 高爆彈 (HE) === | |||
| ? | 這種砲彈有著觸碰引信,撞擊到目標便會爆炸。 如同 AP 彈,他們在碎彈時是 0 傷,普通擊穿時造成 1/3 傷害,而擊穿裝甲區時造成 100% | + | 這種砲彈有著觸碰引信,撞擊到目標便會爆炸。 如同 AP 彈,他們在碎彈時是 0 傷,普通擊穿時造成 1/3 傷害,而擊穿裝甲區時造成 100% 傷害。除了以上的直接傷害,HE 彈也可以輕易地擊傷艦艇配件,特別是防空炮組,並有機率造成[[Ship:Fire|火災]],進而造成大量傷害(疊 DOT)。 | |
| ==== HE 彈的穿透機制 ==== | ==== HE 彈的穿透機制 ==== | |||
| ? | + | 與 AP 彈不同的是,HE 彈的穿透不是基於入射角或是砲彈速度,而是每顆砲彈有著固定的穿深值用來與船艦的裝甲比較。多數船艦的砲彈穿深約是口徑/6,但是在英國戰艦、德國戰艦及德國巡洋艦上則是口徑/4。這個穿深值可以用[[Ship:Commander#Inertia_Fuse_for_HE_Shells|IFHE 高爆彈的慣信引信]](指揮官技能) 提高30%。加成後的結果會被四捨五入到mm單位。如果裝甲厚度大於等於穿深值,則判定為碎彈;如果裝甲遠薄於穿深,則視為穿透。 | ||
| + | ||||
| + | 以下是總結: | |||
| {|class = "wikitable" | {|class = "wikitable" | |||
| ? | |+ | + | |+ 要使 HE 碎彈的裝甲厚度|- align="center" | |
| ? | |- align="center" | + | ! width="150pt" | Ships !! width="150pt" | 沒有 IFHE !! width="150pt" | 有 IFHE | |
| ? | ! width="150pt" | Ships !! width="150pt" | | + | ||
| |- align="center" | |- align="center" | |||
| ! Default | ! Default | |||
| ? | | | + | | 約(口徑 / 6) || 約(口徑 * 1.3 / 6) | |
| |- align="center" | |- align="center" | |||
| ? | ! | + | ! 英國戰艦<br/>德國巡洋艦<br/>德國戰艦 | |
| ? | | <br/> | + | | <br/>約(口徑 / 4 ) || <br/>約(口徑 * 1.3 / 4) | |
| |} | |} | |||
| ? | ''' | + | '''舉例:''' ''[[Cleveland]]'' 口徑為 152mm. This gives her a HE penetration of 25.33 mm, which is rounded to 25 mm. Thus, any armor plate of 25 mm or greater will shatter her shells, while armor of 24 mm or lower will be penetrated. With IFHE, the HE penetration increases to 32.93, which is rounded to 33 mm. Thus, with IFHE it would take at least a 33 mm plate to shatter her shells, while armor of 32 mm or lower would be penetrated. | |
| {|class = "wikitable" | {|class = "wikitable" | |||
2018年3月23日 (五) 13:17的修訂版本
目錄
裝甲與艙間規劃
裝甲
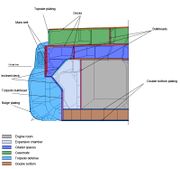
艦艇的裝甲並非一致不變的作為阻擋穿透的障礙(像WOT那樣),而是像多層「蛋糕」般包覆住許多內部建築及機械,因此每個部位是有著不同的裝甲。一發射入船體的砲彈可能會面對四到五層的裝甲帶,且在每一層都可能停下或是被彈開。 就這點上,開發者試圖去保持史實和模擬出每一層較重要的裝甲帶。 但裝甲往往很沉重: 在一艘典型的戰艦上,裝甲通常就占據了艦艇總排水量的 40% 以上。 因此,一些後期的戰艦設計師試圖藉由只在重要艙間如:彈藥庫(magazine)、動力艙間(鍋爐)、火控(control-firing)、指揮(command)以及通訊部門設置厚重裝甲以節省重量。而其他部位如:乾舷,則幾乎沒有裝甲。這種不是全面防護就是沒有保護的方法被稱為「全有全無(all or nothing)」。實務上,這種方案可以承受中口徑及高爆彈對船體無保護部位的打擊,以提高重型穿甲彈的抵抗能力,還允許在裝配重武裝的同時保持高機動性和續航力。
船艦的重要艙間是被裝甲區(citadel)包覆著的,期可以被視為一個頂部封閉,底部開放,斜邊位於船體內的一塊鐵盒。雖然裝甲區越小越好,但這些空間是艦艇作為預備浮力的重要來源,且有助於在其他部分進水時防止沉沒。 在遊戲中,使一艘船的裝甲區血量歸零會直接判定為擊沉,即使其他部位完好如初。
From the citadel box, shafts known as barbettes lead upwards to the ship's main gun turrets and conning tower. 船艦的彈藥庫位於砲座內或周圍,儲放著主口徑彈藥,包括發射藥包。 擊穿彈藥庫周圍的裝甲區通常會造成彈藥殉爆(一發入魂)。
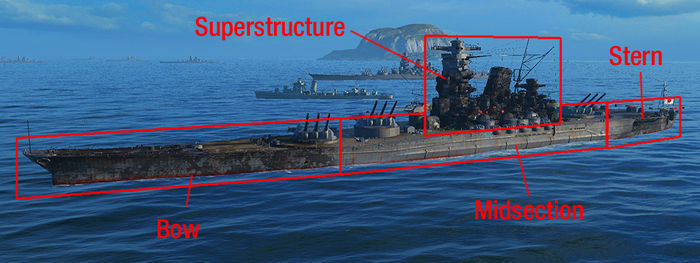
那麼當玩家遇見一艘陌生的船艦,要如何得知其重要艙間的位置呢? 無須查閱藍圖,一個受過教育的猜測就足夠了。裝甲區通常位在船身中段,大約艦長的一半。如同經驗法則般,當你可以準確地射擊船側,瞄準船身中間(煙囪下方),接近水線。 當敵方以船艏或船艉朝向你(擺角),射擊其船艏(bow)、船艉(stern)或者上層建築(superstructures),依據情況而定。請注意! 由於彈藥庫裝甲通常就位於主砲塔下方,射擊船艏往往會被彈開。
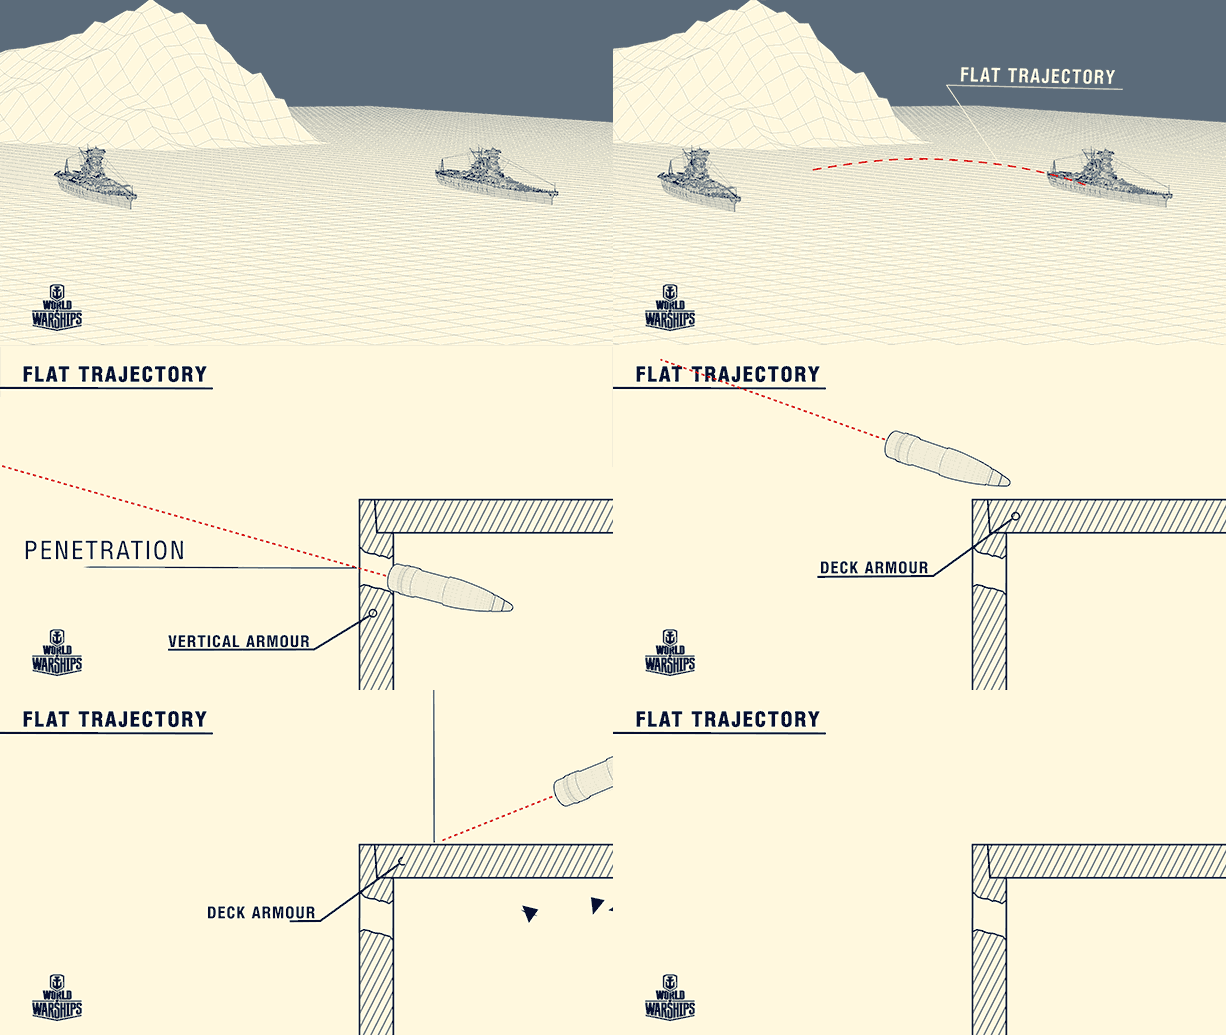
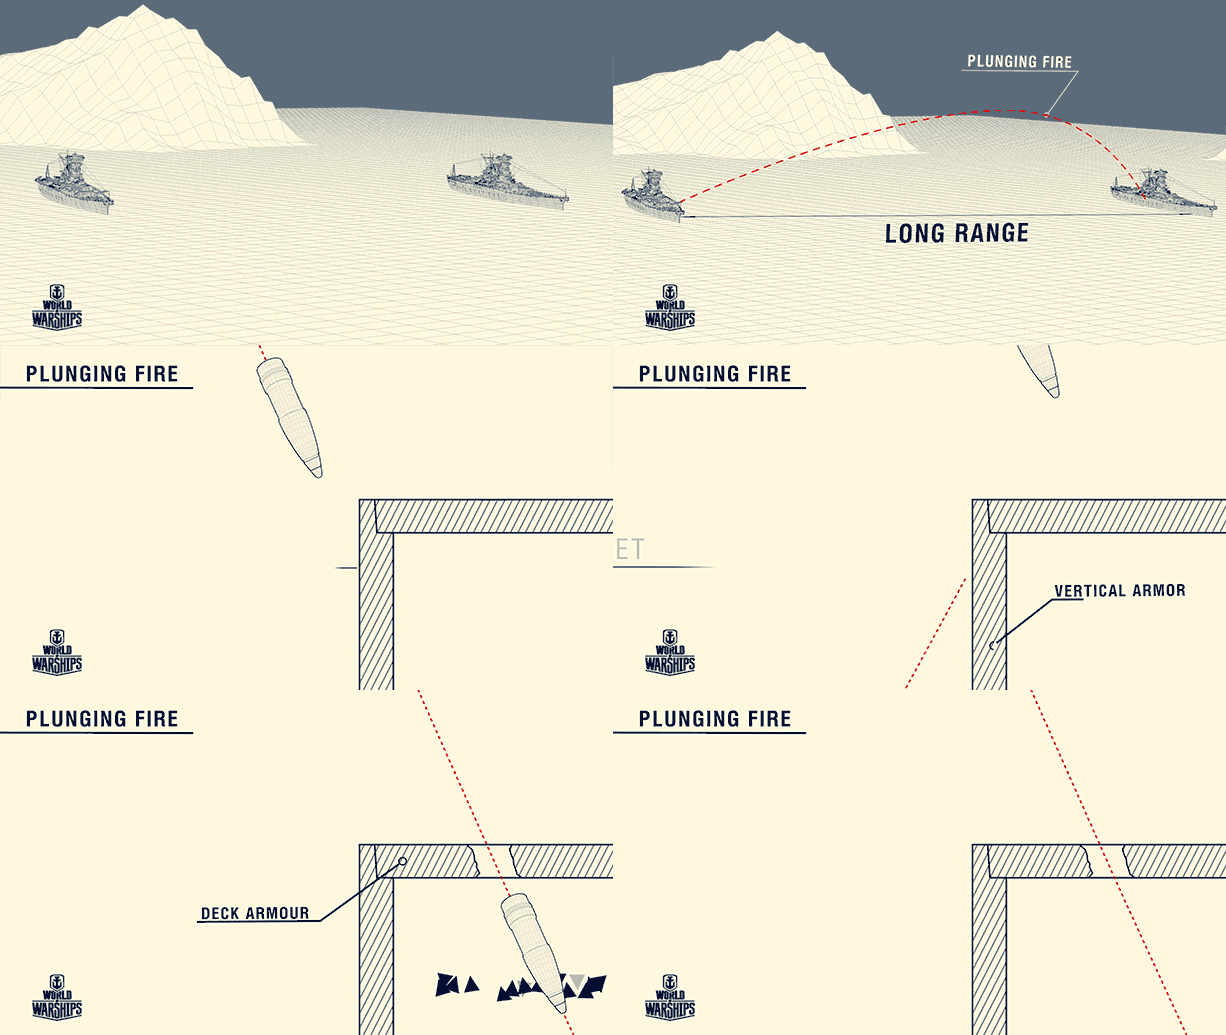
艦艇除了有用來防禦直射火力(水平攻擊)的垂直裝甲帶(belt),還有用來防禦曲射火力(垂直攻擊)的甲板裝甲(deck armor)--砲彈在攻擊遠距離目標時往往是從頂部射入。然而,因為有著大區域要保護,甲板裝甲要比垂直裝甲帶來的薄。這就是為何當砲彈不能有效擊穿一艘船艦的垂直裝甲帶時,攻擊其甲板卻可以的原因了。
船艦的模組血條規劃
由於船艦是被設計來進行長時間的獨立行動,她們就像是一個軍事基地和戰鬥車輛。因此,船艦內部有很大一部分是無關戰鬥,但對每日生活是至關重要的。 一發在砲戰中摧毀洗衣間或是畫廊的砲彈相比命中彈藥庫或者引擎部的來說,影響微乎其微。
That is why, unlike the vehicles of World of Tanks, ships in World of Warships are divided into multiple compartments, each with a different value of hit points (HP). Roughly, the compartments are as follows: bow, stern, citadel, casemate (center part minus the citadel), and the superstructure. The total value of HP for all the compartments is roughly twice the ship's total hit point value ( fighting efficiency): in real life, the ship would be out of battle long before every last portion of it is destroyed.
Each section (except the citadel) has two thresholds, where after each one is reached the damage it receives is reduced. The threshold levels for each section of each ship varies.
- In the initial state, the ship will receive damage normally (x0.33 for shell penetration). The section starts off clean and gets darker as it takes more damage.
- After the first threshold is reached, the damage received is halved (x0.165 dmg for shell penetration). At this stage, the section of the ship is visually blackened.
- Finally, once the second threshold is reached the section stops receiving damage, an effect known as damage saturation. There is no visual difference to the first threshold, you'll only notice that your shells stop doing damage to the section.
- Regardless of the state of the section, over-penetration will always deal x0.1 dmg and citadel hits will always deal x1.0 damage, even after the section's HP pool is completely depleted.
- If the midsection's second threshold has been reached, all other sections will take damage as if it had passed the first threshold even if it hasn't taken any damage yet. Damage from fire, flooding, over-penetration and citadel hits will not reduce any section's HP pool (but they will still reduce the ship's total HP as normal). A section with no HP left may still burn or flood normally and continue dealing damage to the ship.
Modules
There are multiple modules in-game: engine (propulsion), rudder, anti-air emplacements, torpedo tubes, gun turrets, etc. The modules have three states: functioning, damaged, and destroyed. A damaged module loses function until it is repaired, a destroyed module cannot regain function. Some modules can only be damaged but not destroyed (e.g. propeller), other modules can only be destroyed but not damaged (e.g. AA emplacements).
Each module has a certain amount of HP. Every time that module is damaged, the game calculates a probability of it being damaged (that probability can be lowered by 34% with a tier 5 commander skill). The probability of a critical hit that leads to damage increases for lower module HP values. Once the module reaches zero HP, it is destroyed.
Shell Types
戰艦世界目前有兩個彈種:
- 高爆彈 (HE)
- 穿甲彈 (AP)
AP 與 HE 的彈道模型是相同的; 但是,有些船艦他們的 AP 與 HE 的炮口初速是不同的。 為了更好的觀看射擊過程,遊戲內的跟隨砲彈視角(預設 Z 鍵)可能不會與現實吻合。
高爆彈 (HE)
這種砲彈有著觸碰引信,撞擊到目標便會爆炸。 如同 AP 彈,他們在碎彈時是 0 傷,普通擊穿時造成 1/3 傷害,而擊穿裝甲區時造成 100% 傷害。除了以上的直接傷害,HE 彈也可以輕易地擊傷艦艇配件,特別是防空炮組,並有機率造成火災,進而造成大量傷害(疊 DOT)。
HE 彈的穿透機制
與 AP 彈不同的是,HE 彈的穿透不是基於入射角或是砲彈速度,而是每顆砲彈有著固定的穿深值用來與船艦的裝甲比較。多數船艦的砲彈穿深約是口徑/6,但是在英國戰艦、德國戰艦及德國巡洋艦上則是口徑/4。這個穿深值可以用IFHE 高爆彈的慣信引信(指揮官技能) 提高30%。加成後的結果會被四捨五入到mm單位。如果裝甲厚度大於等於穿深值,則判定為碎彈;如果裝甲遠薄於穿深,則視為穿透。
以下是總結:
| Ships | 沒有 IFHE | 有 IFHE |
|---|---|---|
| Default | 約(口徑 / 6) | 約(口徑 * 1.3 / 6) |
| 英國戰艦 德國巡洋艦 德國戰艦 |
約(口徑 / 4 ) |
約(口徑 * 1.3 / 4) |
舉例: Cleveland 口徑為 152mm. This gives her a HE penetration of 25.33 mm, which is rounded to 25 mm. Thus, any armor plate of 25 mm or greater will shatter her shells, while armor of 24 mm or lower will be penetrated. With IFHE, the HE penetration increases to 32.93, which is rounded to 33 mm. Thus, with IFHE it would take at least a 33 mm plate to shatter her shells, while armor of 32 mm or lower would be penetrated.
| Ships | Without IFHE | With IFHE |
|---|---|---|
| Default | (armor + 0.5) * 6 | (armor + 0.5) * 6 / 1.3 |
| British battleships German cruisers German battleships |
(armor + 0.5) * 4 |
(armor + 0.5) * 4 / 1.3 |
Example: Shchors has 75 mm of citadel armor. Therefore it would take at least (75 + 0.5) * 6 = 453 mm shell diameter to citadel her with HE. With IFHE this decreases to (75 + 0.5) * 6 / 1.3 = 348.46 mm, or 349 mm since all shell diameters are integers. British battleships, German cruisers, and German battleships without IFHE can citadel Shchors with 302 mm shells or greater. With the addition of IFHE, such ships can citadel her with shells of at least 233 mm diameter.
AP 彈的穿透機制
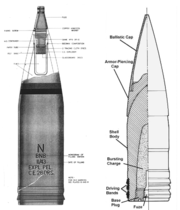
Unlike HE, the AP shell does damage only if it penetrates the armor. The fuze of the AP shell is initiated after it passes through armor, and historically the fuze times were calculated in a way that would allow the shell to explode after traveling about ten or so meters after passing through the armor; that way the shell exploded around the middle of the battleship. That means that when AP shells are fired at lightly armored and relatively small target, they might over-penetrate -- explode once they passed through the entire ship, or not even explode, if the shell doesn't encounter enough armor to activate the fuze. Let's illustrate the fuzing concept with the Iowa's AP Mark 8 16 inch projectile. Its Mark 21 Base Detonating Fuze (BDF) had a delay of 0.033 seconds. Fuze activation requires a resistance equal to 1.5 inches (3.8 cm) of armor at 0 degrees obliquity or 0.375 inches (1 cm) at 65 degrees obliquity. The muzzle velocity for a new gun and a full charge is 762 meters per second. Therefore, if the shell were to immediately hit an armor plate 1.5 inches thick after exiting the barrel, it would explode 762*0.033 = 25 meters after passing through that armor plate. Most AP shells in game have a fuzing time of 0.033 seconds, but there are shells with as much as 0.1 second fuzing time. As of patch 0.3.1, the armor thickness necessary for AP shell fuzing was as follows (caliber - armor): 410mm - 68mm, 356mm - 59mm, 203mm - 34mm, 155mm - 26mm.
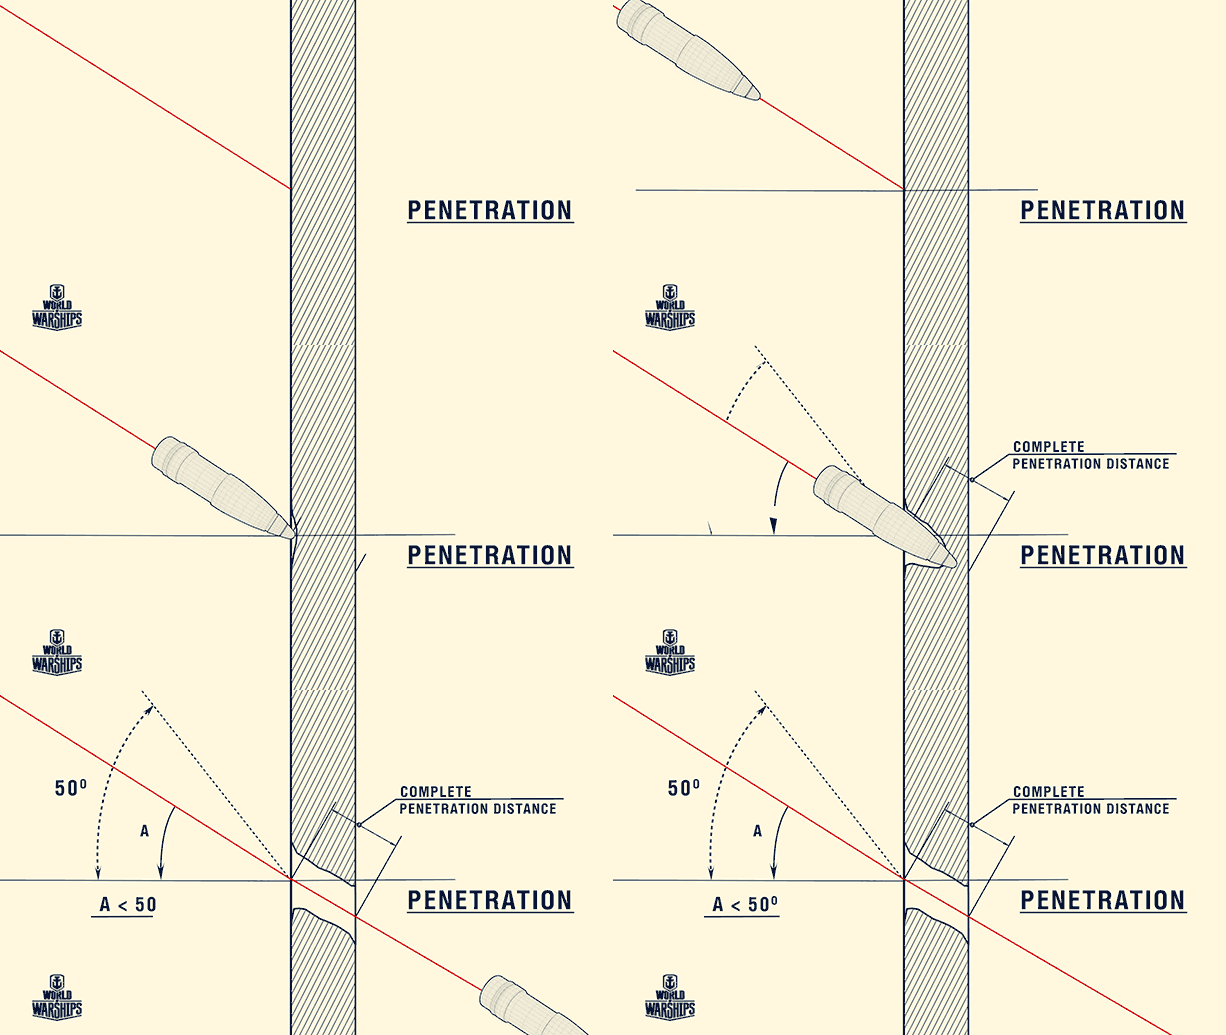
Non-penetrations (bounce/ricochet) will always deal 0 damage, regardless of AP or HE (the latter cannot ricochet). However, HE shells still has a chance to start fires or break modules with its splash damage). The angles for AP ricochets are as follows:
- 0-30 degrees -> auto ricochet (0-22.5 for USN 8" shells)
- 30-45 degrees -> chance to ricochet (22.5-30 for USN 8" shells)
- 45-90 degrees -> ricochet doesn't occur (30-90 for USN 8" shells)
Penetrations deal x0.33 of the shell's listed damage. Whether AP or HE, it must penetrate the armor and detonate inside the ship. Over-penetrations deal x0.10 of the shell's listed damage. Over-penetration is when a shell penetrates the ship through-and-through, before it has a chance to detonate inside the ship. Theoretically HE will never over-penetrate due to its low detonator threshold and shorter fuze. Citadel hits will always deal x1.0 of the shell's listed damage (though citadel over-penetration is still possible, and will only deal x0.10 damage). It is impossible to get a citadel hit on a destroyer, as they no longer have them per se (it was removed in 0.2.4/0.3.0). Prior to 0.4.1, penetrations on a destroyer's midsection will deal x0.5 of the shell's listed damage (in lieu of the absence of citadels), however this is no longer the case and penetrations to it will deal the standard x0.33 of the shell's listed damage.
Properly angling the ship matters a great deal when the enemy is shooting AP shells: when an AP shell encounters armor at an angle, it has to pass a greater amount of armor for penetration. Additionally, at certain critical angle (below ~20-40°), the shell will simply ricochet, even if it might have ad enough armor penetration. A shell may still cause damage after the ricochet, but only to the same ship. If the armor thickness is less than 1/14.3 of shell's caliber, a ricochet does not occur regardless of armor encounter angle.
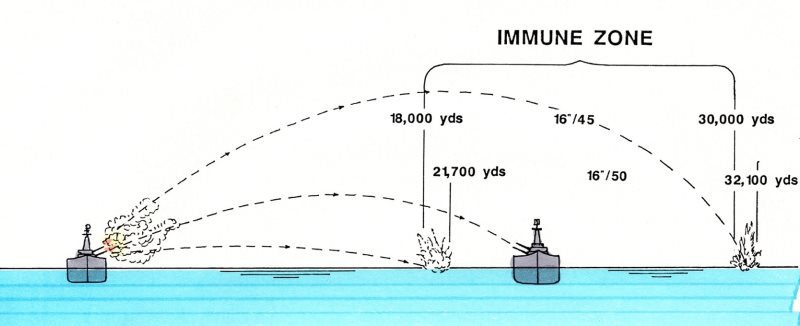
There are certain engagement ranges when AP shells will encounter both the belt and the deck armor at fairly large angles, and will have a high probability of either non-penetration or ricochets. The distance at which both plunging fire and direct enemy fire is less effective is called the immunity zone (IZ). Despite the absolutist nature of its name, the immunity zone concept does not imply any sort of invulnerability. A ship fighting within its IZ will still probably suffer when hit, but it is theoretically proof against singularly catastrophic hits to the citadel. (plunging-fire still need more testing, the issue with the capped ranges causing the shells were benefit from it being "auto-bounce" against deck armor)
AP shells can penetrate ship's armor even below the waterline, after traveling through water. The illustration to the right depicts a typical underwater trajectory of an AP shell: (1) - shell enters the water and is fuzed due to rapid deceleration (2) - trajectory angle changed (this happens every time an AP shell hits water) (3) - after a short delay, the fuze explodes the shell. The image also demonstrates two outcomes of an underwater hit: armor penetration, and a ricochet. As of 0.4.1 the underwater hits do not cause flooding.
副砲
As a general rule, secondary guns fire HE. Ones that fire AP do exist, eg. 120mm/50 on Giulio Cesare, 140mm/50 on mid-tier Japanese battleships, 150mm/45 on low-tier German battleships, 152mm/50 on Ishizuchi, 152mm/50 on Nelson, 155mm/60 on Izumo and Yamato, 200mm/50 on Kaga, etc. Refer to the particular ship's specifications for the exact shell type.
Secondaries aim at enemy ship's mid-ship waterline. At comparatively long ranges, dispersion causes shells to scatter onto other parts of the enemy ship. However at close ranges, secondaries will likely hit the main belt of the enemy ship. In this case, unless the enemy ship has no belt armor, HE secondaries would usually shatter, while AP secondaries can score penetrations or citadels.
Choosing Between AP and HE Shells
Some general guidelines for each of the three ship classes:
As a Battleship
Shooting other battleships with AP is most effective with direct fire at point-blank and medium ranges, roughly up to ~10-12 kilometers. The enemy battleship shouldn't be at too great of an angle; ideally, it should be perpendicular to your line of fire. You might also get some citadel hits with plunging fire at maximum fire ranges. If you aren't positive that you have a good chance of penetrating the citadel, HE shells are a better choice.
AP shells should be used against well-armored cruisers and carriers as well, when you are certain that a volley at the waterline will penetrate the citadel. Since their armor thickness will be nowhere near that of a battleship, angling will affect your AP shells to a lesser degree. It might be a good idea to light a carrier on fire first, though, to prevent it from launching aircraft
Against lightly-armored cruisers and carriers, you should be using HE shells -- they have enough armor penetration to damage citadels. However, some carriers have enough armor to resist HE, and AP should be shot at them. It must also be noted that an AP shell can deal much more damage against a citadel. You should also use HE against destroyers -- AP shells will almost always over-penetrate; and HE shells will knock out multiple modules on a DD, making it easy prey after a few hits.
One last thing: it's better to use the shell of the wrong type (e.g. AP against a destroyer that suddenly materialized near your ship) than to start a long half-minute reload. Sub-optimal damage is better than no damage at all.
Cruisers
Against battleships your best bet is HE shells. Consistent HE hits and nonstop fires are a bane of many battleship drivers' existence. However, don't try to fight a battleship single-handedly; a skilled BB driver can dispatch you in a few well-aimed AP salvos. At point-blank ranges and favorable angles you can also try to penetrate the battleship's citadel with AP shells, though it's generally not a good idea to be that close to a battleship in the first place.
Against other cruisers and carriers use AP shells at close and medium ranges, when you can reliably hit the citadel: a well-aimed salvo remove as much as half of the other cruiser's HP. If the cruiser is far away, or is angling too much, use HE; HE should also be used against the destroyers in practically all situations.
Destroyers
When driving most destroyers, your main weapons should be your torpedoes (especially so if you're driving an IJN DD). However, HE shells can still be very useful when fighting other destroyers, or providing additional fire against enemy capital ships -- in the latter case, your shells won't be doing much damage, but you can make up for that with the sheer number of shells, and fires.
AP shells can sometimes be used against lightly armored enemy cruisers and carriers, since you have just enough armor penetration to defeat their citadel armor, and can also sometimes be used against other Destroyers because of their higher damage (although they will not destroy modules like HE shells do).
Shell Dispersion
However perfectly a naval gun on a stationary ship may be laying, successive rounds will not impact on a single point but will fall in a pattern scattered both in deflection and in range. This phenomenon is called dispersion and, irrespective of human and constant error, it is caused by multiple inherent factors: minor variations in the weight of the projectile, differences in the rate of ignition of the propellant, variations in the temperature of the bore from round to round, physical limitations of precision in setting values of deflection and quadrant elevation on the respective scales, minor variations in wind, air density or air pressure, and so on.
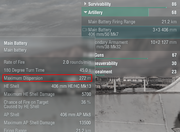
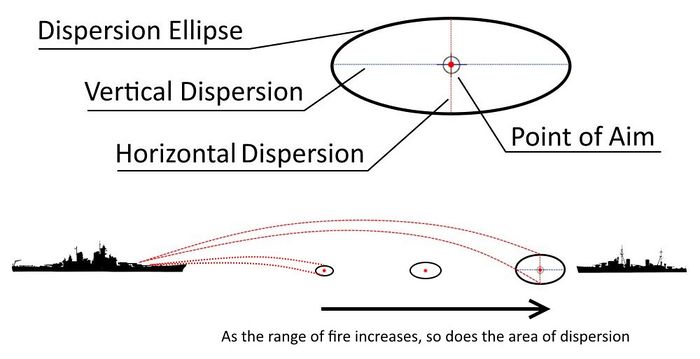
Observing the position of the surface bursts around our point of aim, we find that they fall into a roughly elliptical area in relation to the line of fire. An ellipse constructed around the dispersion area is called the dispersion ellipse. Every time a player orders his main caliber guns to fire, the game engine constructs a 2-D ellipse around the point of aim, and does so independently for each salvo fired. A double-click will fire all guns in one salvo with one dispersion ellipse, sequential fire will construct dispersion ellipse for each turret salvo separately. This ellipse has a certain length and width values, which are dependent on the characteristics of the gun. The dispersion value displayed in port is the horizontal length of the dispersion ellipse at the maximum fire range, i.e. a value that describes the lateral distribution of the shells relative to the player's ship.
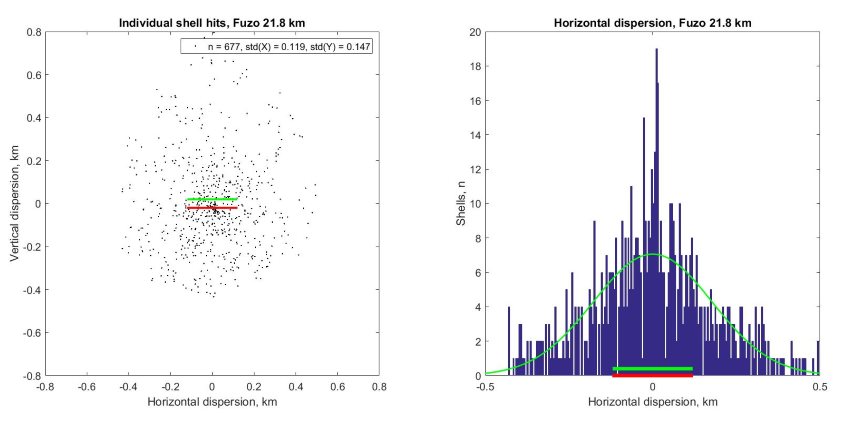
Shell impacts within the dispersion ellipse are not uniformly distributed over the surface, but lie more thickly towards the center of aim. The intensity with which the shells fall in different points of the area of dispersion, can be described by a Gaussian (normal) distribution. The in-port value describes dispersion in terms of one probable error, i.e. it gives a value where 50% of the fired shells will land around the point of aim. This has been confirmed by experiments conducted by the players. Port dispersion value (red bar in the graph below) is the standard deviation (green bar) of shell hits across the horizontal axis of the dispersion ellipse:
If the shooting distance is below the maximum range, the horizontal dispersion value decreases accordingly. Horizontal dispersion values at distances other than maximum firing range, as well as the vertical dispersion values have not been made public by WarGaming. However, based on the user collected data for some ship they are as follows:
data will be added later
Dispersion values are same for HE and AP shells of the same gun. The player's gun dispersion value can be modified by player's equipment and by enemy's camouflage. Gun Fire Control System Modification 2 decreases the area of the shell dispersion ellipse by 7%. Additionally, WarGaming has indicated that not acquiring the target with the X button increases dispersion by an unspecified amount.
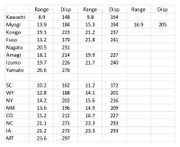
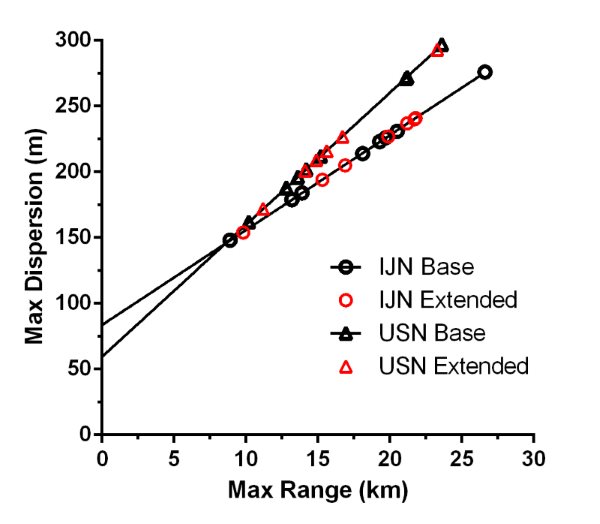
If all base and maximum dispersion values for battleships are plotted, two distinct linear trends emerge: one for IJN, and another for the USN tree:
Curiously, one could hypothesize that battleship dispersion at ranges below maximum also follows this linear pattern. For example, even though WG does not disclose Iowa's dispersion at 10 kilometers, by looking at this graph we can estimate it to be around 150 meters, etc. If that is correct, then all IJN battleships have superior accuracy to their USN brethren at ranges above ~10 kilometers, and vice versa.
For patch 0.4.1, WG has decreased the close-range (i.e. below 4km) dispersion values for all ships.
