Gunnery & Armor Penetration (WoT)
Sommaire
Visée

Tout savoir sur comment pointer votre canon sur l'ennemi et le toucher. Assurez-vous de lire également la section sur Précision et Dispersion.
Visée automatique
La visée automatique, ou auto-aim, vise légèrement en dessous du centre du char: souvent la partie la plus blindée. Cela ne mène pas du tout votre cible. Ce n'est utile que pour viser des chars blindés plus faibles très loin de vous ou pour vous bagarrer lorsque vous êtes à courte distance l'un de l'autre et que vous devez vous concentrer sur l'esquive des tirs plutôt que sur votre ennemi, mais si vous souhaitez engager le feu en surprennant votre ennemi ou vous sortir d'une situation compliquée. En ces occasions, la visée automatique peut vous éviter certains soucis. Par défaut, la visée automatique est activée en cliquant avec le bouton droit de la souris sur une cible et désactivée en appuyant sur E ou en cliquant avec le bouton droit de la souris.
Notez que la visée automatique continuera de viser la cible tant qu'elle restera visible, même si elle se trouve derrière un rocher, une maison ou un char allié. Cela ne signifie pas que vous devriez vraiment tirer dessus dans ces situations - cela semble être évident, mais cela se produit très souvent, en particulier avec les nouveaux joueurs.
Visée manuelle
Dans la plupart des cas, il est préférable de viser manuellement avec votre canon plutôt que de vous fier à la visée automatique, mais vous devez tenir compte de quelques facteurs. Chaque obus du jeu a sa propre trajectoire et sa propre vitesse de croisière. Vous devez souvent les prendre en compte manuellement, mais comme le jeu ne vous indique pas ces paramètres, ils sont mieux appris par expérience.
Visée arcade
La vue d'arcade est le mode d'affichage par défaut avec lequel vous commencez chaque partie. C'est un mode de vue à la troisième personne qui place la caméra au-dessus et derrière votre tourelle. Votre point de visée suit votre point de vue. Cela peut être déroutant pour les joueurs, en particulier à côté des bâtiments, car un point de vue élevé fait en sorte que le canon pointe l'obstacle, et donc change de trajectoire.
Cela peut être atténué en verrouillant votre canon en place. Par défaut, cela se fait en maintenant le bouton droit de la souris enfoncé. Cela permet de regarder à l'aide de la souris vos alentours sans bouger votre tourelle ni votre canon sans perdre votre objectif. Notez que par défaut, le bouton droit de la souris active également la visée automatique. Il est donc recommandé d'attribuer un bouton ou une touche de souris différent à la visée automatique.
La visée sniper
La visée sniper vous donne une vue à la première personne essentiellement à travers votre canon. Par défaut, il est accessible en appuyant sur la touche Maj gauche ou en effectuant un zoom avant sur la cible à l'aide de la molette de la souris. En raison du point de vue différent, ce mode de vue ne pose aucun problème de visée à proximité de bâtiments ou d’autres altitudes.
L’autre avantage de ce mode de visualisation est le grossissement de la zone cible, qui permet une visée plus précise. Attention toutefois à la "vision en tunnel" et gardez un œil attentif sur votre carte afin que vous ne soyez pas surpris par les chars qui se faufilent par derrière pendant que vous êtes en train de tirer.
Indicateur de pénétration
L’indicateur de pénétration est une option du marqueur d’arme dans votre réticule de visée, activé par défaut, il utilise un code de couleur simple pour vous aider à déterminer si vous serez en mesure de pénétrer le blindage de votre cible à l’emplacement que vous visez avec votre obus. Vous avez chargé, si l'indicateur est rouge, il vous indique que vous ne pourrez pas pénétrer dans le char ciblé à cet endroit, un indicateur jaune indique que l'épaisseur du blindage de la cible se situe dans la plage de - / + 25% de votre indice de pénétration, tandis qu'un indicateur vert signifie que votre l'indice de pénétration dépassera l'épaisseur de du blindage de la cible dans tous les cas. Donc vous aurez 100% de chance de pénétrer votre cible à cet endroit là.
Bien que l'indicateur de pénétration soit un outil précieux pour découvrir les points faibles d'une cible, soyez toujours conscient de ses limites. C'est une simple comparaison de votre indice de pénétration par rapport à l'épaisseur d'armure de la cible le long de la normale du point cible et ne prend pas en compte le angle d'impact. Ainsi, même avec un indicateur de pénétration vert, votre tir peut toujours ricochet ou ne parviennent pas à pénétrer l'épaisseur effective du blindage de la cible. De plus, à cause de dispersion affectant chaque coup que vous prenez, vous ne pouvez pas réellement atteindre le point faible que vous visiez.
Prévoir sa cible
Si votre cible se déplace perpendiculairement à vous, vous devez toujours ajuster votre visée manuellement. Ceci est aussi appelé la prédiction de cible. En prenant en compte la vitesse de vol de votre obus, vous devez viser l'endroit où vous estimez la cible que la trajectoire de votre obus intersecte avec le mouvement de la cible. Par exemple, si votre obus vole à 1 000 m / s sur une trajectoire plane (par exemple, des obus AP tirés à partir du 8,8 cm KwK 43 L / 71 "long 88" du Pz.Kpfw. VI Tiger), et votre cible est à 500 mètres, votre obus mettra un peu plus d'une demi-seconde pour l'atteindre. Si votre cible est un M18 Hellcat se déplaçant perpendiculairement à vous à 72 km / h, soit 20 m / s, vous devez théoriquement viser 10 m devant pour l'atteindre.
Cependant, comme il s’agit d’un jeu en ligne et non de la réalité, vous devez également prendre en compte la latence du réseau, c’est-à-dire votre "ping". Si vous jouiez avec un ping de 500 ms (un ping extrêmement élevé), vous devrez alors diriger la cible de 0,5 seconde supplémentaire de mouvement. Dans l'exemple, cela signifie que vous devez doubler votre avance et viser 20 m devant la cible (voir aussi Latency Correction ci-dessous).
Alors que tout cela est assez facile avec un canon à haute vitesse, il devient beaucoup plus difficile avec un canon à basse vitesse comme le 105 mm AT Howitzer M3 du T82 susmentionné. Il tire des obus HE qui volent à une vitesse de 311 m / s sur une trajectoire très haute, c’est-à-dire qu’ils peuvent prendre plusieurs secondes pour atteindre une cible éloignée. La quantité dont vous avez besoin pour diriger votre cible avec une telle arme augmente en conséquence. Naturellement, plus vous aurez besoin de diriger plus votre objectif sera compromis si votre cible change de cap, même légèrement. C’est quelque chose à garder à l’esprit lorsque vous essayez d’éviter les tirs imminents: ne soyez jamais prévisible.
Trajectoire balistique
Le réticule prend en compte la trajectoire balistique. Il vise donc automatiquement un peu plus haut lorsque vous survolez une cible visible (contour rouge). Cependant, dès que votre objectif est éloigné de la cible, cette correction automatique disparaît. Ceci est important à prendre en compte lorsque vous dirigez une cible en mouvement, comme décrit ci-dessus, car vous devrez alors corriger vous-même votre objectif de trajectoire. Un moyen facile de savoir de combien il faut corriger consiste à faire d'abord passer le réticule au-dessus de la cible, à noter sa hauteur, puis à viser la même altitude pendant que vous menez. En faisant cela, le réticule peut s’adapter au terrain ou aux objets visés par votre objectif, vous devrez donc peut-être également compenser cela si la situation se présente.
Visée et ligne de visée
Malgré le fait que les obus suivent une trajectoire balistique, la visée est strictement visible. Cela peut conduire à des situations dans lesquelles vous ne pouvez pas placer votre réticule sur une cible, car elle est masquée par une caractéristique de terrain, bien que la trajectoire balistique de votre arme vous permette en réalité de toucher la cible. Ceci est particulièrement prononcé pour les obusiers à trajectoires d'arc élevées, par exemple sur le T82. En raison de la correction automatique de votre objectif, il peut être assez difficile de tirer sur la cible dans de telles situations, mais quelques considérations peuvent vous aider:
- La vue sniper a le point de vue le plus bas (là où est monté votre canon). Ne l'utilisez donc pas si votre cible se trouve derrière une élévation et que vous rencontrez des difficultés pour placer votre réticule dessus.
- La vue d'arcade a un point de vue plus élevé pour la visée (coupole du commandant), vous pouvez donc viser la cible dans ce mode.
- La visée automatique ne dépend pas réellement de la ligne de mire. Par conséquent, dans les situations où la visée manuelle échoue, vous pouvez essayer de cliquer avec le bouton droit de la souris sur la cible en mode arcade et de voir votre réticule se soulever un peu plus loin, éventuellement juste assez.
- Si tout cela échoue et si la cible est suffisamment éloignée, vous pouvez simplement viser au-dessus de l’altitude et espérer que tout ira pour le mieux. Cependant, il faut beaucoup d'expérience pour réussir ces tirs d'obusiers entièrement manuels.
Quelle que soit l'altitude, il peut également arriver que vous ayez une ligne de mire sur la cible et que vous puissiez placer un tir, sans que vous puissiez voir le contour rouge de la cible. Cela se produit généralement si un autre objet est plus proche de vous que la cible et que votre réticule donne la priorité à l'autre cible au lieu du tank que vous voyez clairement et que vous souhaitez viser. Vous pouvez quand même essayer de tirer, mais viser peut être difficile si votre réticule essaie également de régler la visée sur l’objet le plus proche. Soyez particulièrement prudent si l'objet le plus proche est un tank ami - beaucoup ont été accidentellement touchés par le dos par leurs coéquipiers dans de telles situations.
Visée stratégique (Artillerie)

Si votre véhicule est un Canons automoteurs, alors la visée sniper n'est pas disponible, mais vous disposez d'un mode de visée spécifique à ce type de char appelé Vue stratégique. On y accède de la même manière que la visée sniper. Cela vous donne une vue de dessus sur une partie du champ de bataille. Vous pouvez utiliser votre souris ou les touches du curseur pour déplacer la vue. Vous pouvez également placer la vue stratégique directement sur une certaine zone du champ de bataille en maintenant la touche Ctrl enfoncée et en cliquant avec le bouton droit de la souris sur l'emplacement souhaité sur la mini-carte.
Contrairement aux autres modes d'affichage, en mode stratégique, le cercle de visée s'adapte à l'altitude du terrain et à la trajectoire balistique. Ainsi, ce ne sera généralement pas un cercle parfait, mais une forme ovale. Cela vous aide à juger à la fois de l'angle du terrain sur lequel votre cible est positionnée et de la trajectoire de votre coquille vers la cible. Le petit point dans le cercle de visée / ovale représente le centre de votre objectif ajusté en hauteur.
Il faut un peu de temps pour s'habituer à perfectionner la visée avec des canons automoteurs, voir l'illustration à droite pour connaître les bases pour bien commencer.
Client de jeu vs Serveur
Les tirs qui sortent de votre objectif ou vont dans une direction complètement différente sont généralement causés par un décalage du réseau ou du serveur. Cela peut arriver parce que chaque mouvement de votre objectif sur votre client doit d'abord être transmis au serveur et y être exécuté. Ainsi, quel que soit votre temps de latence, l'objectif du serveur sera toujours légèrement inférieur à votre objectif sur le client. Si vous appuyez sur CapsLock + 0 pendant une bataille, votre client affichera un réticule bleu supplémentaire indiquant les dernières informations reçues par le client sur l'emplacement actuel du serveur, ainsi que la taille du cercle de visée sur le serveur. Étant donné que cela est également sujet à la latence, ce n’est pas tout à fait exact, mais si vous rencontrez des problèmes liés à la latence, il peut être judicieux d’utiliser le réticule du serveur et d’attendre que les réticules du serveur et du client correspondent avant de tirer. Le réticule du serveur ne s'affiche pas lorsque la visée automatique est activée.
Où viser
Lorsque vous tirez sur un char ennemi, il est toujours utile de viser des zones avec moins de Blindage. Tous les chars ont le blindage le plus solide à l'avant, l'arrière étant le plus faible. De plus, le blindage d'un char n'est pas uniforme. Utilisez L'indicateur de pénétration pour découvrir les points faiblement blindés, appelés points faibles (généralement des hachures, des montures de mitrailleuse, etc.).
Souvent, il peut également être utile d'infliger des Dégâts critiques, par ex. en détruisant les chenilles du char ennemi et en l'immobilisant, en tirant sur le réservoir d'essence pour le mettre au feu, etc. Suivez les liens pour plus de détails.
Précision et Dispersion
[[image: BattleMechanicsIcon.png | 90px | left | {name} | link =]

Chaque coup que vous prenez est dispersé au hasard autour du centre de votre réticule de visée, c’est-à-dire que vous ne frapperez pas nécessairement exactement où vous avez visé. La quantité de dispersion réelle est basée sur une courbe de distribution gaussienne (normale) et dépend de votre canon et de la tourelle sur laquelle elle est montée.
Précision du canon
La valeur de précision pour un canon est donnée en mètres à une distance de 100 m. Plus la valeur est basse, plus votre arme est précise. La valeur décrit 2 écarts types σ à partir du centre de votre objectif. En d'autres termes, pour une arme à feu de 0,32 m précision effective à 100 m, 95,45% de tous les tirs vont atterrir à moins de 0,32 m du centre de votre objectif à cette distance. La quantité de dispersion augmente linéairement avec la distance, c’est-à-dire que la précision effective à 100m se traduit par 0,64m à 200m et 1,28m à 400m
Cercle de visée
Le cercle de visée, également appelé cercle de dispersion, indicateur de dispersion ou réticule, décrit la zone de 2 écarts types σ à partir du point de visée. Basé sur une distribution purement normale, cela signifierait que 4,2% de vos tirs tomberaient en dehors du cercle de visée. Ils sont déplacés au bord du cercle, ils ne tombent donc pas à l'extérieur. Cependant, il y a une quantité mineure de 0,2% de tirs qui tombent en dehors du cercle.
Accuracy Penalties
The accuracy discussed above applies is the best case scenario. During actual game play several factors can come into play that result in a penalty to your accuracy:
- Dead Gunner: If your Gunner gets knocked out the Gunner's skill will be set to 0% for the purposes of calculating the accuracy stat. The effect is mitigated if the Commander has the Jack of All Trades skill. The effect is removed if the Gunner receives first aid via a consumable. See the Crew page for more information.
- Gun Damage: A damaged ("yellow") gun typically fires with halved accuracy for as long as it remains damaged.
- Shooting: With each shot you take your accuracy temporarily gets reduced dramatically depending on the vehicle type, but your Gunner will immediately start aiming again.
- Turret Rotation: Rotating the turret results in a temporary accuracy penalty. The exact amount depends on the installed gun and the speed you rotate the turret at.
- Vehicle Movement: Moving your vehicle forwards or backwards temporarily reduces accuracy. The exact amount depends on the installed suspension and the speed you are moving at.
- Vehicle Rotation: Rotating your vehicle left or right temporarily reduces accuracy. The exact amount depends on the installed suspension and the speed you are rotating at.
With game version 0.7.2 several crew skills and perks have become available to reduce most of these penalties.
Aiming Time
The aiming time listed for each gun (in a specific turret) describes the time it takes for the aiming circle to shrink to a third of its size. However, most of the penalties described above increasee the aiming circle by a factor bigger than three, which is why fully aiming the gun typically takes longer than the listed amount of time.
Client vs Server
When you fire a shot, your shell trajectory is first calculated based on the data the client has. It is later updated with the data confirmed by the server. If the difference was big, then you may see shell tracers leave your barrel at an angle or change flight path mid-trajectory.
It is unclear whether only the aiming point or also the dispersion of the trajectory around this center point is corrected based on server data. At least in v0.7.1, if you watch a replay, you can notice that each time you play it, your trajectory will be slightly different. This indicates that either dispersion is not synchronized between client and server, or that it is during a battle but that data is missing in the replay files. In any case, currently replays cannot be used to find out where your shot went exactly.
Penetration Mechanics
Aiming properly and hitting the enemy tank are only the means to an end, and that is actually damaging and eventually disabling it. And that is not automatic. Once you have hit an enemy vehicle, the game then calculates where the shot hit the enemy, at what angle you struck the armour, the effective thickness of the armour (based on the impact angle), and thus ultimately whether your shell penetrates the armour.
Impact Angle
The angle at which an Armour Piercing (AP), Armour Piercing Composite Rigid (APCR), High Explosive Anti Tank (HEAT) or High Explosive (HE) shell hits the target's armour is crucial for penetrating it. The ideal impact angle is along the normal, i.e. perpendicular to the armour plate. The actual impact angle is calculated as the deviation from the normal. For this, the ballistic flight path of the shell is taken into account, which can be particularly important for artillery guns and their high arcing trajectories if you fire AP or HEAT shells with them.
If the shell hits an external module (e.g. tracks, observation device, turret rotator), impact angle is not taken into account. The exception to this rule is the gun.
Shell Normalization
The impact angle of AP and APCR shells onto a vehicles armour is normalized, i.e. adjusted towards the armour's normal axis at the point of impact.
In case of spaced armour, shells are normalized at the point of impact on the spaced armour, and if they penetrate, continue along their normalized flight path into the vehicle. Once it impacts the hull armour, normalization occurs again and the remaining penetration potential (i.e. the original penetration potential minus the effective armour thickness of the spaced armour) is used to calculate whether the shell penetrates the hull proper.
As of update 8.6, APCR shells are normalized at 2°. The normalization amount is a constant value depending on the shell; there is no randomization.
The impact angle of HEAT and HE shells is not normalized at all. Angle is used for armor line-of-sight thickness calculations, as normal.
Ricochet
If the normalized impact angle of an AP or APCR shell on the target's armour exceeds 70° (80° for HEAT), a ricochet (a specific variant of a bounce) occurs regardless of its penetration value and the shell is deflected off the target without causing any damage. You may ricochet off of spaced armour as well, and even if you penetrate that your shell may still ricochet off the underlying hull armour.
As mentioned above, impact angle is not taken into account when hitting external modules except the gun, so a ricochet off those is impossible.
A ricochet off terrain features, buildings or wrecks is impossible.
Overmatch
If the AP or APCR shell's caliber is 2 times or more than the nominal thickness of the armour (Such as a 120mm shell hitting a 60mm thick plate), projectile shell normalization is increased by the following formula: basic normalization * 1.4 * shell caliber / nominal armour thickness. Note that the shell is still capable of bouncing if it strikes the armor at an angle of 70° or more from normal.
If the AP or APCR shell caliber is 3 times or more than the nominal thickness of the armour (such as a 120mm shell hitting a 40mm thick plate), no ricochet will happen even if the impact angle is more than 70° from normal. The increased shell normalization described above will also occur.
In cases involving HE shells or external module hits, overmatch does not occur.
Effective Armour Thickness
Your tank is armoured with plates of varying thicknesses. The game only provides you with the nominal armour strength of the three main armour plates of your tank's hull and turret, respectively. However, the tanks are actually modeled in much greater detail. The penetration indicator can help you discover the actual nominal armour thickness of your target.
However, the nominal thickness of an armour plate is just the minimal amount of armour a shell impacting it must penetrate. As soon as the impact angle deviates from the normal, i.e. is not perfectly perpendicular to the armour plate's surface, the effective armour thickness that the shell needs to penetrate will be higher than the nominal armour thickness:
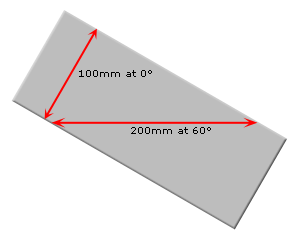
The effective armour thickness is calculated by dividing the nominal armour thickness with the cosine of the nominal impact angle. For example, in the diagram above we have a nominal armour thickness of 100mm and an impact angle of 30°, thus we have an effective armour thickness of 100mm/cos(30°) = 115.47mm that the shell needs to be able to penetrate. In other words, at an impact angle of 30° the armour is effectively 15.47% stronger than its nominal value.
The following table provides the coefficients for a number of normalized impact angles:
| Impact Angle | Effective Armour Thickness |
|---|---|
| 0° | 100% |
| 10° | 101.54% |
| 20° | 106.42% |
| 30° | 115.47% |
| 40° | 130.54% |
| 50° | 155.57% |
| 60° | 200% |
| 70° | 292.38% |
| > 70° | Ricochet |
As you can see, the effective armour thickness increases exponentially with the impact angle. For shells impacting you at 60° your armour is effectively twice as thick and at 70° nearly three times as thick. As explained above, for angles higher than 70° all AP and APCR shells will ricochet regardless of armour thickness.
As of 8.6, HEAT shells will start to ricochet if the impact angle equals or is greater than 80 degrees. The armor penetration after ricochet will remain the same.
The same applies to your targets, of course, so always take that into account when deciding if and where to shoot them. Reducing the impact angle to your target only slightly will exponentially reduce its effective armour thickness and a target that was previously impossible for you to penetrate may suddenly become easy prey. This is also the reason why you should always attack from two different angles at once. A target can only maximize their effective armour in one direction, as soon as they try to accommodate two possible impact angles they suffer an exponential loss in effective armour thickness towards both of them (thus if you are the one getting flanked while in a strongly armoured tank it is best to maximize your effective armour towards one opponent while shooting the other one).
Penetration Randomization
Penetration values displayed for a gun/shell combination are average values. The actual penetration value is randomized by up to +/- 25% around the average value. Randomization occurs on impact with the target, separately for each new shell you fire.
Penetration Loss over Distance
Since shell speed decreases the longer a shell flies, the game models linear penetration loss over distance depending on the gun and shell type used:
- Armour Piercing (AP) shells experience low penetration loss over distance.
- Armour Piercing Composite Rigid (APCR) shells generally experience high penetration loss over distance (the exception are the APCR shells used by tier 10 mediums)
- High-Explosive (HE) and High-Explosive Anti-Tank shells (HEAT) shells experience no penetration loss at all.
The penetration values displayed in game indicate average penetration values at 0-100m distance (no penetration loss occurs within this range). Penetration values at higher distances are not displayed. As a rule of thumb, the higher the tier of the gun used, the lower the penetration loss over distance. For example, a Leichttraktor loses up to 17.5% penetration firing AP shells and 51.4% firing APCR shells with its default gun, whereas a Maus only loses about 2% with AP and 15.4% with APCR.
This Spreadsheet provides Maximum/minimum values for penetration and shell velocity; per gun per ammo type.
Double Penetration
A shell can continue its flight path after the initial impact, either on the outside of the tank in case of ricochet or inside of the tank following penetration of spaced armour, hull armour or external modules. A shell will continue flying for ten times its caliber (a 100mm shell will continue for 1 meter). The remaining penetration potential is the initial penetration value, randomized at the point of impact +/- 25%, minus whatever effective armour thickness that was penetrated. This remaining penetration potential is then used to calculate whether any other armour plates that are hit can be penetrated. Internal modules or crew members have no armour and thus will always get hit if any penetration potential is left in the shell.
Note that the penetration model is simplified and after initially impacting a vehicle a shell is "bound" to this vehicle and cannot hit any other tank anymore. That means that a shell can neither ricochet off a tank to hit another tank within its deflected flight path, nor can a shell pass through a tank to hit another tank behind it. A shell's flight path also ends after impacting the ground or buildings.
Damage Mechanics
If your shell penetrates the enemy tank's armour, its journey is not over, the enemy tank does not automatically take damage. It all depends on the path of your shell after penetrating the armour and what parts of the enemy tank it hits on that path. A shell can indeed pass clean through a tank without causing any damage.
Shell Damage
Each shell has a specific damage potential. The game mechanics differentiate between armour damage and module and crew damage, but only the potential armour damage of a shell is actually displayed in game. The potential for module and crew damage exists in addition to the armour damage potential and is not shown in game.
The potential for module and crew damage is balanced individually for each shell - generally speaking low tier guns can cause more critical damage than armour damage, whereas the inverse is true for high tier guns. The reason is that low tier tanks have considerably more module hitpoints - another hidden property of your tank - than they have armour hitpoints. At high tiers the opposite is true.
Damage Randomization
Just like shell penetration, all shell damage is randomized by up to +/- 25%, regardless of shell type. The gun properties display the average value. The shell properties display the damage range. Note, however, that the shell values are rounded to the nearest integer, whereas the damage amounts shown in game are truncated. This is a display issue, and both are incorrect: The server uses the exact values.
Armour Damage
Each vehicle has hitpoints, displayed in the garage. Each vehicle enters the battle with 100% hitpoints because you must repair any damage taken by your vehicle in a previous battle before you are allowed to join the fight in it again. Each time the vehicle takes armour damage, its hitpoints get reduced. Once a vehicle's hitpoints reach zero, the vehicle is destroyed. During a battle, the remaining hitpoints of a vehicle are represented by the progress bars displayed over the targets you aim at.
Spaced armour is a special type of armour that exists to deflect a shell's flight path and to protect against the explosion blast from high-explosive (HE) shells. Spaced armour is special in that it is separate from the hull armour. Damage applied to spaced armour does not reduce the hitpoins of the vehicle itself.
AP, APCR and HEAT Shells
AP, APCR and HEAT shells cause damage only if they manage to penetrate the target's hull armour. Once the hull armour is penetrated the target will take the full listed damage, +/- 25%. Other factors play no role to the damage calculation. For example, it makes no difference whether you barely penetrated or easily penetrated the target.
HE Shells
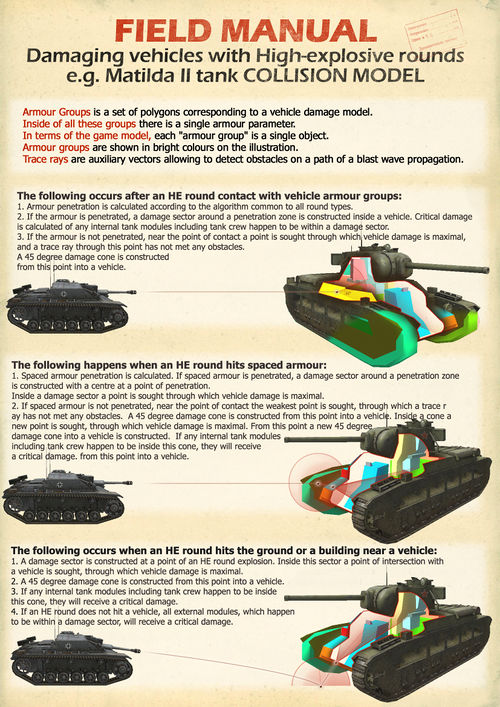
The situation is more complex for HE shells because both penetrating and non-penetrating hits and even misses can cause damage.
If this type of shell penetrates the hull armour, the situation is identical to the one just described for the other types of shells, damage is done to the full listed potential, +/- 25%. Since the shell, as high-explosive ammunition, explodes inside of the vehicle after it passes through the armour, any internal modules or crew caught within the explosion radius risk taking damage/getting knocked out (see Module and Crew Damage below).
However, HE shells typically have low penetration values, so unless you aim carefully at a weakly armoured area of your target, you will not penetrate and the shell explodes on the outside of the target vehicle at the point of impact. This also applies if a HE shell penetrates spaced armour, which causes it to explode before hitting the hull armour. Finally, even if you miss the target, the shell will implode on impact and may still cause damage to the target if that lies within the explosion radius, which depends on the shell used. In all these cases where hull armour is not penetrated by the shell itself, the amount of damage is lower and calculated according to the following formula:
![]()
SpallCoefficient may be 1.2, 1.25, 1.3, or 1.5 if a spall liner is installed and you calculate armour damage, otherwise 1 (i.e. a spall liner does not protect external modules). actualDamage results of zero or below mean you cause no damage.
ImpactDistance is the distance between the point of impact of the shell and the point of impact between the explosion's blast and the target along a straight, unobstructed line. Since the blast will cover an area of the target's surface, the game selects the spot that leads to maximum damage according to the above formula, i.e. it will be a trade-off between the spot with the lowest nominalArmorThickness and the closest spot that can be hit. Ideally your blast wave reaches an unarmoured area of your target, e.g. the open top and rear on certain tank destroyers or self-propelled guns.
Once the exact point of impact has been determined this way, the actual damage amount is determined as well as is the actual damage potential that the shell can now cause to the target. Whether this actual damage potential causes any damage to the vehicle follows the normal rules, but with the following limitation regarding internal modules and crew:
- If the shell exploded on the vehicle itself, then the propagation of the blast wave into the tank is simulated by calculating a cone-shaped area 45° wide originating from the point of impact of the shell along the normalized impact vector. Damage to internal modules and crew is possible within this area.
- If the shell exploded elsewhere and only the external blast wave impacted the vehicle, then no propagation of the blast into the vehicle itself takes place. Because of this no damage to internal modules and crew can occur.
If spaced armour is impacted by the blast wave first, the calculation above is conducted a second time for the underlying hull armour. Since this second calculation is based on the remaining reduced damage potential, its result is typically zero, i.e. no damage.
Module and Crew Damage
As mentioned above, you can not only damage a vehicle's armour, but also its modules and crew. Armour damage and module/crew damage are distinct. That means hitting a module only affects that module, not the hitpoints of the tank, just like hitting the armour does not affect a module. However, the same shell can damage both hull armour and module(s) or crew since it travels through the tank after penetrating the hull armour.
Damage States
Just like the vehicle's hull, also each of its modules and crew have hitpoints. During a battle, you only see a simplified display of the amount of hitpoints remaining on your modules and crew represented by one of three colour states in the damage panel at the bottom left of your screen. These states are:
- Default (i.e. no colour shading): Enough hitpoints for module and crew to be fully operational.
- Yellow: This state signifies that a module has taken considerable damage but is still operational. Tracks remain fully operational in this state, whereas every other module works at 50% efficiency. Crew members have no yellow state.
- Red: This state signifies that a module is in-operational/a crew member is knocked out. Crew members remain in this state unless a consumable is used to restore them to full health, whereas modules will automatically be repaired over time by your crew up to the "Yellow" state of being operational.
All module and crew state changes are accompanied by a voice message.
Saving Throw
When a module or crew member is hit, they do not necessarily take damage from the hit. Instead, most modules have a specific chance not to take damage. This is also referred to as a saving throw. The base chances of damaging a specific module or crew member when hitting it are as follows:
- Suspension: 100%
- Engine: 45%
- Fuel Tank: 45%
- Observation Device: 45%
- Radio: 45%
- Turret Ring: 45%
- Gun: 33%
- Ammunition Rack: 27%
All crew members have the same chance to get knocked out when hit, however starting with game version 0.7.4 this chance depends on the damage type:
- Crew hit by AP/APCR/HEAT shell: 33%
- Crew hit by (internal) explosion: 10%
Each of these base chances to damage a module or knock out a crew member can be increased by 3% if the Deadeye perk is active for your Gunner at the time of a shot with an AP, APCR or HEAT shell.
No other factors influence these chances. The amount of ammunition you are carrying does not affect the chance of your ammunition rack taking damage.
Complete Crew Death
Note that as soon as all crew members are knocked out, the tank becomes inoperable. Consumables to restore a crew member's health cannot be applied anymore at this point, i.e. there is no way to restore the tank to operating condition. It counts as destroyed, even though its hull stays on the battlefield with all its remaining hitpoints.
Ammunition Rack Explosion
If the ammunition rack's hitpoints reach zero, it explodes, destroying the tank and its crew completely regardless of the remaining hitpoints on either of them. The only case the tank does not explode with a "red" ammo rack, is when the rack is empty.You can increase your ammo rack's hitpoints by installing "Wet" Ammo Rack equipment or by training the Safe Stowage perk on a crew member with the role of loader.
Fire Damage
There are two ways the enemy can set your tank on fire.
- If your fuel tank's hitpoints reach zero, your tank automatically catches fire.
- Each time your engine gets hit, there is a chance that your tank catches fire. This chance depends on the engine and is displayed on the engine module's properties in game or here on the wiki. Note that the transmission counts as part of the engine.
While your tank is on fire, it constantly takes both hull as well as module and crew damage. The exact damage rate depends on the tank but is not displayed in game. The duration of the fire also depends on the tank, on your crew's effective Firefighting skill level, and whether your Driver has the Preventative Maintenance perk active and whether you use Automatic Fire Extinguishers consumable. You can also extinguish a fire manually by using Manual Fire Extinguishers consumable.
Ramming Damage
You can also damage a target by ramming it. The collision creates an explosion at the point of impact similar to that of a high-explosive shell. The strength of the explosion, i.e. the damage potential, depends on the kinetic energy applied in the collision (0.5 * combined weight * relative speed^2), or in other words the combined weight of you and your target as well as your relative speed. That means that the heavier both you and your target are and the faster you collide, the stronger the explosion caused by the collision will be.
However, that damage potential is distributed according to the weight of each of the two colliding vehicles relative to their combined weight (1 - individual weight / combined weight). For example, if you weigh 75 tons and you ram a target weighing 25 tons, only 25% of the explosion will affect you.
Actual damage calculation then follows the same rules as for high-explosive shell explosions, thus ramming lightly armoured targets/areas of the target will cause more damage than strongly armoured parts. Damage taken can be reduced by having a Spall Liner equipped. You can further reduce damage taken and at the same time increase the damage inflicted to the target by having your vehicle's Driver trained in the Controlled Impact skill.
If you are about to be rammed, you can reduce the damage you will take by moving away from the approaching enemy, thus reducing your relative speed, and pointing your strongest armour at them. If your Driver has the Controlled Impact skill, you need to be moving to activate it, anyway.
Zero Damage Hits
Hits that cause no damage, also called zero damage hits, are notorious among the player base, and various conspiracy theories abound in their respect. However, in most cases they are simply the result of the above described game mechanics in conjunction with poor and sometimes incorrect visual and audible feedback given to the player about what happened with their shell. Bounces and ricochets, hits to spaced armour or to external modules are difficult to distinguish for the player, yet they all have a chance of not resulting in any visible armour damage to the enemy tank (they might still cause module or crew damage, but that is not always immediately visible to the attacking player and thus dismissed).
Everybody experiences zero damage hits, just like everybody experiences misses. However, a thorough understanding of the game mechanics described above will help you minimize them. There is randomization in the game, but you will always hit what you aim for, namely the area covered by your dispersion circle, so aim wisely to maximize the chances of your shots to damage your target.
Ghost Shells
Players also like to claim ghost shells, i.e. shells that either disappear straight out of the barrel or pass straight through a target as if it wasn't there.
The first type is typically due to the player missing the visual tracer effect - watching the battle's replay from a different angle will reveal it to you.
The second type can in rare cases be caused by heavy lag in the client/server connection that causes a synchronization loss - what you are seeing on the client is not actually what is happening on the server, and what's happening on the server is what counts. It may also be caused by a mistake in the collision model of the opponent's vehicle. The collision model is a simplified version of the visual model of the target vehicle, but separated into various hitboxes. If two hitboxes are not perfectly aligned, they may create a void between them that a shell can pass through if it flies through at just the right angle. Finally, for some vehicles there are parts of the visual vehicle model that are intentionally not reflected in the collision model and a shell can pass straight through them. This is often the case for elements fastened to a tank's external hull, e.g. boxes or fuel tanks. In many cases these are just decoration.
Repair
If you take module damage during battle, your crew will instantly start repairing it by restoring a specific amount of hitpoints to the module every second. The actual amount that gets repaired every second depends on the specific module itself (not just its type) and the effective repair skill of your crew.
Your crew will only repair a damaged module just enough to make it operational again, i.e. it will remain in "yellow" or damaged state. The exact amount of hitpoints this state represents depends on the specific module as well.
To get a module fully operational again and restore all of its hitpoints to it during battle you must use a consumable. The Small Repair Kit is bought for credits and allows you to repair one module during the battle (starting from patch 0.7.4 both tracks can be repaired at once if they are both damaged). The Large Repair Kit costs either gold, or, starting from patch 085, credits, and fully repairs all modules that are damaged at the time you use it. It will also provide a bonus of 10% to the crew's repair speed unless consumed.