¡Bienvenido a la Wiki de Wargaming.net!
Variantes
Otros idiomas

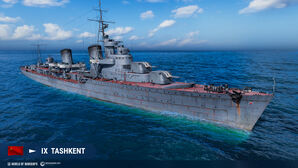
Tashkent

Saltar a: navegación, buscar
Tashkent
Ташкент_wows_main.jpg
Destroyer | U.S.S.R. | Tier IX
Tech Tree Position
stock
 top
General
Research price160000 exp
Purchase price13 200 000 Creditos
Hit Points16 700 
Aircraft
Main Battery
130 mm/50 B-2LM3 х 2 pcs.
Rate of Fire12 shots/min.
Reload Timesec.
Rotation Speed9.7 deg./sec.
180 Degree Turn Time18.56 sec.
Firing Range11.53 km.
Maximum Dispersion110 m.
HE ShellHE-46 
Maximum HE Shell Damage1900 
Chance of Fire on Target Caused by HE Shell%
Initial HE Shell Velocity870 m./s.
HE Shell Weight33.4 kg.
AP ShellSAP-46 
Maximum AP Shell Damage2500 
Initial AP Shell Velocity870 m./s.
AP Shell Weight33.5 kg.
Torpedo Tubes
533 mm Triple 1-N3 х 3 pcs.
Rate of Fire0.86 shots/min.
Reload Time70 sec.
Rotation Speed25 deg./sec.
180 Degree Turn Time7.2 sec.
Torpedo53-36 mod. 2 
Maximum Damage14 400 
Torpedo Speed55 knot
Torpedo Range8.01 km.
AA Defense
12.7 mm DShK6 х 1 pcs.
. . . Average Damage per Second21.6 
. . . Firing Range1.2 km.
37 mm 70-K6 х 1 pcs.
. . . Average Damage per Second34.2 
. . . Firing Range3.21 km.
76 mm 39-K1 х 2 pcs.
. . . Average Damage per Second3.1 
. . . Firing Range3.51 km.
Maneuverability
Maximum Speed42.5 knot
Turning Circle Radius730 m.
Rudder Shift Time8.5 sec.
Concealment
Surface Detectability Range9.4 km.
Air Detectability Range4.95 km.
Battle Levels
12345678910
Wows_anno_flag_ussr.png
IX
Ship_PRSD409_Pr_20i_Tashkent.png
13 200 000

Tashkent — Soviet Tier IX destroyer.

Un destructor líder de flotilla con el que se trataba de realizar patrullas de reconocimiento de larga distancia para ataques de escuadrones y destructores de apoyo con torpedos. Fabricado en Italia para la marina de la URSS (Proyecto 20I). Durante la II GM, el Tashkent era uno de los barcos de combate más rápidos del mundo y el mayor barco de su tipo.

Modules

link=Ship: Rate of Fire
(shots/min)
180 Degree Turn Time
(sec)
Maximum Dispersion
(m)
Maximum HE Shell Damage
(HP)
Chance of Fire on Target Caused by HE Shell
(%)
Maximum AP Shell Damage
(HP)
Research price
(exp)
Purchase price
(Creditos)
130 mm/50 Modelo 1936 en una montura B-2LM1218,56110190082500 01 000 000
130 mm/55 en una montura B-2-U129110190082600 23 5001 800 000
link=Ship: Hit Points
(HP)
Armor
(mm)
Armor
(mm)
Main Turrets
(pcs.)
Secondary Gun Turrets
(pcs.)
AA Mounts
(pcs.)
Torpedo Tubes
(pcs.)
Hangar Capacity
(pcs.)
Research price
(exp)
Purchase price
(Creditos)
Tashkent (A)16 70062035/1/63 01 400 000
Tashkent (B)21 80062036/63 40 0003 200 000
link=Ship: Rate of Fire
(shots/min)
Torpedo Tubes Reload Time
(sec)
180 Degree Turn Time
(sec)
Maximum Damage
(HP)
Torpedo Speed
(knot)
Torpedo Range
(km)
Research price
(exp)
Purchase price
(Creditos)
53-36 mod. 20,9707,214 400558 01 300 000
53-39 mod.20,9697,215 100608 20 0001 500 000
link=Ship: Firing Range Increase
(%)
Maximum Firing Range
(km)
Research price
(exp)
Purchase price
(Creditos)
GFCS IX mod. 1011,5 0900 000
GFCS IX mod. 21012,7 25 0001 900 000
link=Ship: Maximum Speed
(knot)
Research price
(exp)
Purchase price
(Creditos)
Propulsión: 125 500 CV42,5 01 100 000

Compatible Upgrades

 Slot 1  [[File:wows icon_modernization_PCM030_MainWeapon_Mod_I_bb1e79efbcc73dfa03a6dd5ae173566ee691b77e3a6587389d6f7ea07eb03588.png", "local": "{\"default\": \"gui|44px|Modificación 1 del armamento principal|link=Ship:Upgrades#Modificaci.C3.B3n.C2.A01_del.C2.A0armamento_principal]] [[File:wows icon_modernization_PCM031_SecondaryWeapon_Mod_I_5369d8b071df59a515906433ea1fff10a55841495258bcd04d3365467e61e4af.png", "local": "{\"default\": \"gui|44px|Modificación 1 del armamento auxiliar|link=Ship:Upgrades#Modificaci.C3.B3n.C2.A01_del.C2.A0armamento_auxiliar]] [[File:wows icon_modernization_PCM032_PowderMagazine_Mod_I_9607d8ec91ddcca4a95443845b888fbd9de4cd81df5a30a199d400657a552017.png", "local": "{\"default\": \"gui|44px|Modificación 1 de la santabárbara|link=Ship:Upgrades#Modificaci.C3.B3n.C2.A01_de_la.C2.A0santab.C3.A1rbara]]
 Slot 2  [[File:wows icon_modernization_PCM006_MainGun_Mod_II_bffc35efc4e090487fd6110a10a2be1f5d51b7918303f724194817e698055412.png", "local": "{\"default\": \"gui|44px|Modificación 2 de la batería principal|link=Ship:Upgrades#Modificaci.C3.B3n.C2.A02_de_la.C2.A0bater.C3.ADa_principal]] [[File:wows icon_modernization_PCM018_AirDefense_Mod_III_d3f357c6dc4e5e627a86e17a16432cb38da32bb1b7999b4a7852371491511770.png", "local": "{\"default\": \"gui|44px|Modificación 1 de los cañones AA|link=Ship:Upgrades#Modificaci.C3.B3n.C2.A01_de_los.C2.A0ca.C3.B1ones_AA]] [[File:wows icon_modernization_PCM033_Guidance_Mod_I_10c7521afe2d577c42618dd04cf6834f2be78cf6b64503844cf87793a5816484.png", "local": "{\"default\": \"gui|44px|Modificación 1 de los sistemas de tiro|link=Ship:Upgrades#Modificaci.C3.B3n.C2.A01_de_los.C2.A0sistemas_de_tiro]] [[File:wows icon_modernization_PCM070_Torpedo_Mod_IV_9e34ebc4f1a15656201b4148e32870eb1c67ddb2fb1a0bc410406236b472d1dd.png", "local": "{\"default\": \"gui|44px|Modificación 1 de los tubos de torpedo|link=Ship:Upgrades#Modificaci.C3.B3n.C2.A01_de_los.C2.A0tubos_de_torpedo]]
 Slot 3  [[File:wows icon_modernization_PCM013_MainGun_Mod_III_c6e20a5a027888820aca2cd031ba5959d38bc828202d8066ece4030712df8bd8.png", "local": "{\"default\": \"gui|44px|Modificación 3 de la batería principal|link=Ship:Upgrades#Modificaci.C3.B3n.C2.A03_de_la.C2.A0bater.C3.ADa_principal]] [[File:wows icon_modernization_PCM014_Torpedo_Mod_III_460876b51f5b3133f939c6ca7b0ec3be146a5ea6776695388f5cc3365de8a56f.png", "local": "{\"default\": \"gui|44px|Modificación 2 de los tubos de torpedo|link=Ship:Upgrades#Modificaci.C3.B3n.C2.A02_de_los.C2.A0tubos_de_torpedo]] [[File:wows icon_modernization_PCM074_AuxiliaryArmament_Mod_I_6c88e35c308f597529e7bd744826e39242fdb3a3f0429b0a3b2fb7a219480498.png", "local": "{\"default\": \"gui|44px|Modificación 2 del armamento auxiliar|link=Ship:Upgrades#Modificaci.C3.B3n.C2.A02_del_armamento_auxiliar]]
 Slot 4  [[File:wows icon_modernization_PCM020_DamageControl_Mod_I_bbc708467bc8f1e6264ac88fb8999ea40660e4b0b94b59ab7b3f1a8b60539ed8.png", "local": "{\"default\": \"gui|44px|Modificación 1 del sistema de control de daños|link=Ship:Upgrades#Modificaci.C3.B3n.C2.A01_del.C2.A0sistema_de_control_de_da.C3.B1os]] [[File:wows icon_modernization_PCM069_Movement_Mod_I_ca8429dcc45fdad36cdd474a13e5a289d6f7cf27ae32c9f30d42b72b9db493af.png", "local": "{\"default\": \"gui|44px|Protección de la sala de máquinas|link=Ship:Upgrades#Protecci.C3.B3n_de_la_sala_de_m.C3.A1quinas]]
 Slot 5  [[File:wows icon_modernization_PCM023_DamageControl_Mod_II_3c6aea0c5bccc94f1d8f1fa52662232afa007d784638ce6e981c8ad3457c63fa.png", "local": "{\"default\": \"gui|44px|Modificación 2 del sistema de control de daños|link=Ship:Upgrades#Modificaci.C3.B3n.C2.A02_del.C2.A0sistema_de_control_de_da.C3.B1os]] [[File:wows icon_modernization_PCM024_Engine_Mod_II_4b4f4c217cf5cf580f47ccbbf76ecede110c5143055c55ab45a82d19e87423fb.png", "local": "{\"default\": \"gui|44px|Modificación 1 de la propulsión|link=Ship:Upgrades#Modificaci.C3.B3n.C2.A01_de_la.C2.A0propulsi.C3.B3n]] [[File:wows icon_modernization_PCM025_SteeringGear_Mod_II_523c86ce4c7d228e73ee3d2cb406f4d78a205aa2453fec45b0925dec519bf7c5.png", "local": "{\"default\": \"gui|44px|Modificación 1 del aparato de gobierno|link=Ship:Upgrades#Modificaci.C3.B3n.C2.A01_del.C2.A0aparato_de_gobierno]] [[File:wows icon_modernization_PCM089_DepthCharges_Mod_I_734ed2711a1c6aa8227fa258f81054dcc2db8aecf66e4baaf0006589181ceb33.png", "local": "{\"default\": \"gui|44px|Modificación 1 de las cargas de profundidad|link=Ship:Upgrades#Modificaci.C3.B3n.C2.A01_de_las_cargas_de_profundidad]]
 Slot 6  [[File:wows icon_modernization_PCM026_LookoutStation_Mod_I_9bdab08af77f5c612cec2a357353f7b60d37118aaab4763721dd53230f68943b.png", "local": "{\"default\": \"gui|44px|Sistema de vigilancia de torpedos|link=Ship:Upgrades#Sistema_de_vigilancia_de_torpedos]] [[File:wows icon_modernization_PCM027_ConcealmentMeasures_Mod_I_bda1386ab237032301b6273e655a1998de5bfb50e2c8e59124c8a93d73093f0a.png", "local": "{\"default\": \"gui|44px|Modificación 1 del sistema de ocultación|link=Ship:Upgrades#Modificaci.C3.B3n.C2.A01_del.C2.A0sistema_de_ocultaci.C3.B3n]] [[File:wows icon_modernization_PCM035_SteeringGear_Mod_III_9bbaf379d4027413eb48f3407a4374e40151f55611d71fac0a66d12a5d4e4434.png", "local": "{\"default\": \"gui|44px|Modificación 2 del aparato de gobierno|link=Ship:Upgrades#Modificaci.C3.B3n.C2.A02_del.C2.A0aparato_de_gobierno]] [[File:wows icon_modernization_PCM072_AbilityWorktimeBoost_Mod_I_e6323cc6cf2a0c16e8a3a3ca4db0ceaebbdb868447435dbafea6f580b66ff101.png", "local": "{\"default\": \"gui|44px|Modificación 1 de los consumibles del barco|link=Ship:Upgrades#Modificaci.C3.B3n.C2.A01_de_los_consumibles_del_barco]]

Player Opinion

Performance

Nicknamed "The Blue Cruiser" despite being a destroyer due to her being larger than a contemporary destroyer and alluding to her historical paint being Cobalt Blue, the Tashkent was much maligned in her previous Tier VIII incarnation, earning a series of increasingly derisive appellations: "Trashkent", "Trashcan", "Trashcan't". Fortunately, the Tashkent received a package of buffs resulting in a quite serviceable ship even at her new home at Tier IX.

Tashkent retains the excellent guns and speed of Kiev, and, while significantly larger and less maneuverable than Kiev, her generous hit point pool and edge in range (up to 15.2 km with module and Advanced Firing Training) goes a long way towards making up for it. On the offensive side, fast-reloading torpedoes and access to the last upgrade slot are welcome advantages.

Finally, the Tashkent also introduces the intriguing option of replacing her Smoke Generator consumable with Repair Party. Both are viable; while the value of smoke in getting out of bad situations and supporting the team is obvious, the sheer longevity provided by Repair Party cannot be denied either.

In contrast to the traditional destroyer role, Tashkent should primarily be played at long range, where enemies will have trouble hitting it despite its large size, while the Tashkent's high-velocity guns can still hit the enemy. That said, Tashkent will still often find herself pressed into more traditional destroyerly duties such as screening, baiting, and capturing points when there are no better ships available for the job. Here her torpedoes should not be ignored; while they are merely mediocre, they reload quickly, making them a good option for preemptively firing into chokepoints or smoke whenever an opportunity presents itself.

Pros:

  • Has lethal HE shells that can burn accompanied by capable AP shells.
  • Very fast speed.
  • Large amount of hit points for a destroyer.
  • Torpedoes reload quickly compared to other high-tier destroyers.
  • Gains access to the Repair Party consumable (by giving up Smoke Generator).

Cons:

  • Terrible camouflage values for a destroyer, making scouting a risky proposition.
  • Large size, almost the same size as a light cruiser, making you easier to hit and as a result take increased damage from all sources.
  • Torpedoes have the same range as the Kiev torpedoes, but with 1 less torpedo per salvo.
  • Main battery-wise, the only upgrade from the Kiev to the Tashkent is marginally better firing range.

Research

The Tashkent has only three modules to research. The hull should be researched first, as the un-upgraded rudder shift is even more painful than missing the last 10% of range, not to mention the other benefits of the hull upgrade. The range should be researched next, and then finally the torpedoes.

Optimal Configuration

Upgrades

As a Tier IX destroyer with access to all six upgrade slots, it's best to mount the following consumables: Main Armaments Modification 1, Aiming Systems Modification 1, Main Battery Modification 3 (as it relies heavily on its main batteries), Propulsion Modification 1 (as it relies heavily on its speed as a secondary defense to incoming enemy shells), Steering Gears Modification 2 (when stacked with Steering Gears Modification 3, allows for having rudder shift much like a USN destroyer), and Steering Gears Modification 3 (as the concealment is already poor even while firing and as aforementioned, this allows you to evade shells even better by having rudder shift similar to a USN destroyer).

If the player has one of the rare Engine Boost Modification upgrades and has the Sierra Mike signal equipped, it is worthwhile to replace the Propulsion Modification 1 upgrade, as it extends your Engine Boost consumable duration 50%, thereby allowing you to maintain a max speed of 48.2 kts for three minutes.

Commander Skills

Camouflage

Type 1, 2, or 5 camouflage can be equipped for credits; Types 2 or 5 are recommended at a minimum to reduce the accuracy of incoming shells.

Players who wish to spend doubloons can equip Tashkent with Type 19 camouflage that lowers her detection radius, reduces the accuracy of incoming shells, reduces her repair costs, and increases the amount of experience she earns.

Signals

Gallery

Historical Info

Historical Gallery


Ships of U.S.S.R.
Destroyers  II Storozhevoi • III Derzki • IV Izyaslav • V GremyashchyDoblones • V Podvoisky • V OkhotnikDoblones • VI Gnevny • VII Minsk • VII LeningradDoblones • VIII Ognevoi • VIII Kiev • IX Udaloi • IX Tashkent • IX Neustrashimy • X Khabarovsk • X Grozovoi • X Delny •  Zorkiy 
Cruisers  I Orlan • II DianaDoblones • II Diana LimaDoblones • II Novik • III AuroraDoblones • III Bogatyr • III OlegDoblones • III VaryagDoblones • III AL AvroraDoblones • IV Svietlana • V MurmanskDoblones • V Kotovsky • V Krasny KrymDoblones • V MikoyanDoblones • V KirovDoblones • VI Budyonny • VI MolotovDoblones • VI Admiral MakarovDoblones • VII Shchors • VII LazoDoblones • VIII Chapayev • VIII Tallinn • VIII Mikhail KutuzovDoblones • VIII OchakovDoblones • VIII Pyotr BagrationDoblones • VIII Bagration • IX Dmitri Donskoi • IX Riga • IX Kronshtadt • X Moskva • X Alexander Nevsky • X Petropavlovsk • X Stalingrad • X Smolensk • X Sevastopol 
Battleships  III Knyaz Suvorov • IV Imperator Nikolai IDoblones • IV Gangut • V Pyotr Velikiy • V Oktyabrskaya RevolutsiyaDoblones • VI Izmail • VI NovorossiyskDoblones • VII Sinop • VII PoltavaDoblones • VIII Vladivostok • VIII LeninDoblones • VIII BorodinoDoblones • VIII V. I. Lenin • IX Sovetsky Soyuz • IX AL Sov. RossiyaDoblones • X Kremlin • X Slava •  Admiral Ushakov 
Aircraft Carriers  IV Komsomolets • VI Serov • VIII Pobeda • VIII ChkalovDoblones • X Admiral Nakhimov
Destroyers
Japan  II TachibanaDoblones • II Umikaze • II Tachibana LimaDoblones • III Wakatake • IV Isokaze • V Minekaze • V FūjinDoblones • V KamikazeDoblones • V Kamikaze RDoblones • V Mutsuki • VI Fubuki • VI Hatsuharu • VI ShinonomeDoblones • VII Akatsuki • VII Shiratsuyu • VII YūdachiDoblones • VIII Akizuki • VIII Kagerō • VIII AsashioDoblones • VIII HSF Harekaze IIDoblones • VIII Asashio BDoblones • VIII HSF HarekazeDoblones • VIII AL YukikazeDoblones • IX Yūgumo • IX Kitakaze • X Shimakaze • X Harugumo • X Hayate •  Yamagiri 
U.S.A.  II Sampson • II SmithDoblones • III Wickes • IV Clemson • V Nicholas • V HillDoblones • VI Farragut • VI MonaghanDoblones • VII Mahan • VII SimsDoblones • VII Sims BDoblones • VIII Benson • VIII KiddDoblones • IX Fletcher • IX BenhamDoblones • IX BlackDoblones • X Gearing • X Somers • X Forrest Sherman 
Pan-Asia  II Longjiang • III Phra Ruang • IV Shenyang • V Jianwei • VI Fushun • VI AnshanDoblones • VII Gadjah Mada • VIII Hsienyang • VIII SiliwangiDoblones • VIII LoyangDoblones • VIII FenyangDoblones • VIII Loyang BDoblones • VIII Ship SmashaDoblones • IX Chung Mu • X Yueyang 
Germany  II V-25 • III G-101 • IV V-170 • V T-22 • VI Ernst Gaede • VI T-61Doblones • VI Karl von SchönbergDoblones • VII Leberecht Maass • VII Z-31 • VII Z-39Doblones • VIII Z-23 • VIII Gustav-Julius Maerker • VIII Z-35Doblones • IX Z-46 • IX Felix Schultz • IX Z-44Doblones • IX ZF-6Doblones • X Z-52 • X Elbing 
N/A  II Tátra • III Romulus • IV Klas Horn • V Visby • VI Västerås • VII Skåne • VII BłyskawicaDoblones • VIII Öland • VIII OrkanDoblones • IX Östergötland • IX VelosDoblones • IX Friesland • X Halland • X Småland • X Ragnar •  Dalarna 
U.S.S.R.  II Storozhevoi • III Derzki • IV Izyaslav • V GremyashchyDoblones • V Podvoisky • V OkhotnikDoblones • VI Gnevny • VII Minsk • VII LeningradDoblones • VIII Ognevoi • VIII Kiev • IX Udaloi • IX Tashkent • IX Neustrashimy • X Khabarovsk • X Grozovoi • X Delny •  Zorkiy 
U.K.  II Medea • III Valkyrie • III CampbeltownDoblones • IV Wakeful • V Acasta • VI Icarus • VI GallantDoblones • VII Jervis • VIII Lightning • VIII CossackDoblones • VIII Cossack BDoblones • IX Jutland • X Daring • X Druid 
Italy  II Curtatone • III Nazario Sauro • IV Turbine • V Maestrale • VI Aviere • VI LeoneDoblones • VII Luca Tarigo • VII FR25Doblones • VIII Vittorio Cuniberti • IX Adriatico • IX Paolo Emilio • X Attilio Regolo 
N/A  IX Groningen • X Tromp 
France  II Enseigne Gabolde • III Fusilier • IV Bourrasque • V Jaguar • V SirocoDoblones • VI Guépard • VI AigleDoblones • VII Vauquelin • VIII Le Fantasque • VIII Le TerribleDoblones • IX Mogador • X Kléber • X Marceau 
Commonwealth  III VampireDoblones • VII HaidaDoblones • VII HuronDoblones • X Vampire II 
N/A  X Álvaro de Bazán 
N/A  VI JuruáDoblones