Operation Killer Whale
| Revision as of 19:09, 25 November 2019 → Walkthrough Second part: reinforcements | Revision as of 20:30, 25 November 2019 Walkthrough Part three: Getting out | |||
| Line 100: | Line 100: | |||
| ====Reinforcements arrive==== | ====Reinforcements arrive==== | |||
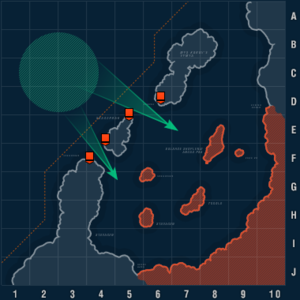
| ? | With 12:00 left on the clock, enemy reinforcements will arrive. By this time the team should have destroyed all hard targets and be mopping up the last of the Cimarron transports and the onshore facilities, or better still, be moving into position to fight the reinforcements. Two more secondary tasks become available: “Destroy battleships Furi and Dono” and “Destroy the enemy's first and second reinforcements groups”. Again, the targets for these tasks will be marked with a red circle above their name. Most of these ships will spawn outside the harbor near the north-west map border, but two of them will spawn in the north at A8/9. The two ships in the north will usually make their way south on the inside of the harbor, east of the large island. | + | With 12:00 left on the clock, enemy reinforcements will arrive. By this time the team should have destroyed all hard targets and be mopping up the last of the Cimarron transports and the onshore facilities, or better still, be moving into position to fight the reinforcements. Two more secondary tasks become available: “Destroy battleships Furi and Dono” and “Destroy the enemy's first and second reinforcements groups”. Again, the targets for these tasks will be marked with a red circle above their name. Most of these ships will spawn outside the harbor near the north-west map border, but two of them will spawn in the north at A8/9. The two ships in the north will usually make their way south on the inside of the harbor, east of the large island. The other enemy ships will normally move at full speed from their spawn point diagonally towards the harbor. As soon as they encounter opposition they will turn around and fight using the usual bot patterns. | |
| With 11:30 left on the clock the final secondary task is added: “Do not let enemy reinforcements enter the haven” | With 11:30 left on the clock the final secondary task is added: “Do not let enemy reinforcements enter the haven” | |||
| Line 148: | Line 148: | |||
| Note that after destroying the target ships for the secondary tasks there is no reason for players to stick around. The main priority will be getting enough ships into the exit zone. The more time the team takes to destroy the main targets, the bigger the risk they will be overwhelmed by the waves of stronger and stronger reinforcements, and fail the primary task. Note that some reinforcements spawn quite close to the exit point, and might destroy player ships already in the exit circle. If things go bad, it is wise to no longer persue any secondary tasks but focus on the primary: get to the exit. | Note that after destroying the target ships for the secondary tasks there is no reason for players to stick around. The main priority will be getting enough ships into the exit zone. The more time the team takes to destroy the main targets, the bigger the risk they will be overwhelmed by the waves of stronger and stronger reinforcements, and fail the primary task. Note that some reinforcements spawn quite close to the exit point, and might destroy player ships already in the exit circle. If things go bad, it is wise to no longer persue any secondary tasks but focus on the primary: get to the exit. | |||
| + | ||||
| + | ====Getting out==== | |||
| + | For the operation to succeed (and get ''any'' stars from secondary tasks) the primary task must be fulfilled: getting enough ships to the exit point. | |||
| + | After the first primary is completed by destroying the six fighting ships in the harbor, the main primary becomes available and the exit point is marked on the map with an anchor. | |||
| + | It is most often at F1 (in the west), but sometimes at A8 (in the north). | |||
| + | Around the exit point will be a green circle. | |||
| + | Ships must be inside this circle to count for the primary task condition. | |||
| + | For a ship to count as inside the circle, the centre of the ship must be inside the circle. | |||
| + | ||||
| + | The operation ends with a succes if: | |||
| + | * At least half the player ships that are still afloat are inside the exit circle. | |||
| + | The operation fails if: | |||
| + | * The clock runs out. | |||
| + | * All player ships are destroyed | |||
| + | ||||
| + | The phrase "with at least half of the operational ships" has confused many a player. | |||
| + | To clarify: if you still have all 7 players alive, then you need at lease 4 ships in the exit circle. | |||
| + | Three ships is not enough, because 3 is less than half of 7. | |||
| + | If you have 6 players alive, you only need at least 3 ships in the exit circle, because that is exactly half of the ships alive, which satisfies "at least half". | |||
| + | If you have 5 players alive, you still need at least 3 ships in the circle, because 2 ships is less than half. | |||
| + | With 4 or 3 players alive, you need at least 2 ships in the circle. | |||
| + | If you have 2 or 1 players alive, then 1 ship is enough. | |||
| + | ||||
| + | The most difficult part of this condition is to reach it before the clock runs out. | |||
| + | If the team is slow in entering the harbor, destroying targets inside the harbor, or late in getting out of the harbor again, or spends too much time chasing the targets for the secondary tasks, it may happen that only one or two, or even none of the player ships reach the exit circle before the clock reaches 00:00. | |||
| + | ||||
| + | Sometimes it may be necessary for a player ship to be destroyed to complete the mission. | |||
| + | For example: suppose there are 5 ships left. | |||
| + | Two are already in the circle, two are on their way but probably won't make it in time, and one is far away and will never make it. | |||
| + | With 2 out of 5 ships in the circle, the condition for success is not met. | |||
| + | But when one of the ships outside the circle is destroyed, there will be 2 out of 4 ships in the circle, which means the game immediately ends with a success. | |||
| + | That, in turn, means it is the duty of those ships to commit suicide. | |||
| + | ||||
| + | Usually the best way to get killed is to be near enemies, turn your broadside towards them and slow to a stop. | |||
| + | Don't fire at the enemy, you might destroy one before they have the chance to destroy you. | |||
| + | Pretty soon you will be hit by multiple shells in the citadel and multiple torpedoes to send you to Davy Jones' Locker. | |||
| + | The team (and you) will have succeeded the mission. | |||
| + | If you fail to die, the team will have failed the mission. | |||
| + | No stars for anyone, including you. | |||
| + | ||||
| + | Things may even get worse, when one of the ships ''inside'' the circle gets destroyed. | |||
| + | Then you have only 1 of 4 in the circle left. | |||
| + | In that case ''two'' of the ships outside the circle need to die. | |||
| + | ||||
| + | It is recommended that, when you have reached the circle, to move to the extreme end, away from the enemy, give a good defensive angle towards the enemy, and ''stop firing your guns''. | |||
| + | The aim is to not be targeted by the enemy, lowering the chance of being destroyed. | |||
| + | In some cases you may want to fire at the last remaining secondary targets. | |||
| + | Or try to destroy that destroyer that just spawned nearby, and maneuver to avoid its torpedoes. | |||
| + | Use your best judgement. | |||
| + | ||||
| + | One situation where it might be wise to delay the end of the game is when the team has nearly completed the secondary tasks, but needs one more minute or so to destroy that last target ship. | |||
| + | But beware of that 5th reinforcement group of tier VI ships that spawn near the exit points. | |||
| + | One minute you might be ''this'' close to a 5-star success, the next some of the ships in the exit circle are destroyed and you have no hope of winning. | |||
| + | ||||
| </div></div></div> | </div></div></div> | |||
Revision as of 20:30, 25 November 2019
Summary
Operation Killer Whale is a PVE Scenario which has the friendly task force raid an enemy base. Players are tasked with destroying enemy ships and base structures, such as forts, and may take only Tier VI ships into the operation. The allied force consists of 7 player ships.
Rewards & Achievements
| Requirement | Reward |
|---|---|
| 5 x India Delta flags ( 5 x Juliet Charlie flags ( 5 x Mike Yankee Soxisix flags ( | |
| 5 x Sierra Mike flags ( 5 x India X-Ray flags ( 5 x Juliet Whiskey Unaone flags ( | |
| 5 x Restless Fire camouflage ( | |
| 1 x German Commander ( with 10 Skill Points & Reserve Slot | |
| 24 Hours Premium Account Time |
Details
Gallery & Video
Category:


