歡迎來到 Wargaming.net Wiki!
變換
/
/
Churchill Gun Carrier

Churchill Gun Carrier

跳轉到: 導覽搜尋


newfile.png Article requires additional modification
The design and/or content of this article do not conform to wiki standards.
Missing Content
  • Sources and External Links


,,


Churchill Gun Carrier

Icon
nation | TD | Tier VI
Battle Tier
1234567891011
Overview
Mouse over "
Well, the ones further down, of course.
" for more information
965,000  Credits Cost
730146 HP Hit Points
38.19/4013.14/43 t Weight Limit
Crew
  1. 車長 (通訊員)
  2. 炮手
  3. 駕駛
  4. 裝填手
Mobility
300350 hp Engine Power
25.7/12 km/h Speed Limit
2428 deg/s Traverse
7.8626.64 hp/t Power/Wt Ratio
YesYes Pivot
Armor
// mm Hull Armor
Armament


{{#ifeq:ARMOR_PIERCING_CR|ARMOR_PIERCING||


{{#ifeq:HIGH_EXPLOSIVE|ARMOR_PIERCING||


AP/APCR/HE


{{#ifeq:ARMOR_PIERCING_CR|ARMOR_PIERCING||


{{#ifeq:HIGH_EXPLOSIVE|ARMOR_PIERCING||


AP/APCR/HE
Shells
140/140/190280/280/370 HP Damage
112/140/38220/252/47 mm Penetration


|


|}}

|


|}}


15 r/m 

Standard Gun

Reload Times
Nominal: 4 s
50% Crew: 4.96 s
75% Crew: 4.33 s
100% Crew: 3.84 s
Rammer: 3.46 s
Vents: 3.76 s
Both: 3.38 s
Both and BiA: 3.31 s
Both and Max Crew %: 3.17 s

See Crew, Consumables, or Equipment for more information.


|


|}}

|


|}}


6.32 r/m 

Standard Gun

Reload Times
Nominal: 9.5 s
50% Crew: 11.77 s
75% Crew: 10.28 s
100% Crew: 9.11 s
Rammer: 8.2 s
Vents: 8.91 s
Both: 8.02 s
Both and BiA: 7.84 s
Both and Max Crew %: 7.52 s

See Crew, Consumables, or Equipment for more information.
Rate of Fire


|


|}}

|


|}}


2100

Standard Gun

Using Shell Type 1 (140 Damage):


Theoretical Damage Per Minute
Nominal DPM: 2100
50% Crew: 1695.4
75% Crew: 1941.8
100% Crew: 2189.6
100% Crew
Vents: 2238.6
Rammer: 2433.2
Both: 2487.8
Both and BiA: 2542.4
Both and Max Crew %: 2653

Advantageous Damage Per Minute
First-shot DPM: 2240
50% Crew: 1835.4
75% Crew: 2081.8
100% Crew: 2329.6
100% Crew
Rammer: 2573.2
Vents: 2378.6
Both: 2627.8
Both and BiA: 2682.4
Both and Max Crew %: 2793

See here, here, or here for more information.

Standard Gun

Using Shell Type 2 (140 Damage):


Theoretical Damage Per Minute
Nominal DPM: 2100
50% Crew: 1695.4
75% Crew: 1941.8
100% Crew: 2189.6
100% Crew
Vents: 2238.6
Rammer: 2433.2
Both: 2487.8
Both and BiA: 2542.4
Both and Max Crew %: 2653

Advantageous Damage Per Minute
First-shot DPM: 2240
50% Crew: 1835.4
75% Crew: 2081.8
100% Crew: 2329.6
100% Crew
Rammer: 2573.2
Vents: 2378.6
Both: 2627.8
Both and BiA: 2682.4
Both and Max Crew %: 2793

See here, here, or here for more information.

Standard Gun

Using Shell Type 3 (190 Damage):
With wholly penetrating hits

Theoretical Damage Per Minute
Nominal DPM: 2850
50% Crew: 2300.9
75% Crew: 2635.3
100% Crew: 2971.6
100% Crew
Vents: 3038.1
Rammer: 3302.2
Both: 3376.3
Both and BiA: 3450.4
Both and Max Crew %: 3600.5

Advantageous Damage Per Minute
First-shot DPM: 3040
50% Crew: 2490.9
75% Crew: 2825.3
100% Crew: 3161.6
100% Crew
Rammer: 3492.2
Vents: 3228.1
Both: 3566.3
Both and BiA: 3640.4
Both and Max Crew %: 3790.5

See here, here, or here for more information.


|


|}}

|


|}}


1769.6

Standard Gun

Using Shell Type 1 (280 Damage):


Theoretical Damage Per Minute
Nominal DPM: 1769.6
50% Crew: 1428
75% Crew: 1635.2
100% Crew: 1845.2
100% Crew
Vents: 1887.2
Rammer: 2049.6
Both: 2097.2
Both and BiA: 2142
Both and Max Crew %: 2234.4

Advantageous Damage Per Minute
First-shot DPM: 2049.6
50% Crew: 1708
75% Crew: 1915.2
100% Crew: 2125.2
100% Crew
Rammer: 2329.6
Vents: 2167.2
Both: 2377.2
Both and BiA: 2422
Both and Max Crew %: 2514.4

See here, here, or here for more information.

Standard Gun

Using Shell Type 2 (280 Damage):


Theoretical Damage Per Minute
Nominal DPM: 1769.6
50% Crew: 1428
75% Crew: 1635.2
100% Crew: 1845.2
100% Crew
Vents: 1887.2
Rammer: 2049.6
Both: 2097.2
Both and BiA: 2142
Both and Max Crew %: 2234.4

Advantageous Damage Per Minute
First-shot DPM: 2049.6
50% Crew: 1708
75% Crew: 1915.2
100% Crew: 2125.2
100% Crew
Rammer: 2329.6
Vents: 2167.2
Both: 2377.2
Both and BiA: 2422
Both and Max Crew %: 2514.4

See here, here, or here for more information.

Standard Gun

Using Shell Type 3 (370 Damage):
With wholly penetrating hits

Theoretical Damage Per Minute
Nominal DPM: 2338.4
50% Crew: 1887
75% Crew: 2160.8
100% Crew: 2438.3
100% Crew
Vents: 2493.8
Rammer: 2708.4
Both: 2771.3
Both and BiA: 2830.5
Both and Max Crew %: 2952.6

Advantageous Damage Per Minute
First-shot DPM: 2708.4
50% Crew: 2257
75% Crew: 2530.8
100% Crew: 2808.3
100% Crew
Rammer: 3078.4
Vents: 2863.8
Both: 3141.3
Both and BiA: 3200.5
Both and Max Crew %: 3322.6

See here, here, or here for more information.
Damage Per Minute


|


|}}


0.36 m 

With 50% Crew: 0.446 m
With 75% Crew: 0.389 m
With 100% Crew: 0.345 m
With BiA: 0.338 m
With BiA and Vents: 0.33 m
Maximum possible: 0.317 m

For more details, see Crew


|


|}}


0.34 m 

With 50% Crew: 0.421 m
With 75% Crew: 0.368 m
With 100% Crew: 0.326 m
With BiA: 0.319 m
With BiA and Vents: 0.312 m
Maximum possible: 0.299 m

For more details, see Crew
Accuracy


|


|}}


1.7 s 

With 50% Crew: 2.106 s
With 75% Crew: 1.839 s
With 100% Crew: 1.63 s
With GLD: 1.482 s
With BiA: 1.594 s
With BiA and Vents: 1.559 s
With both and GLD: 1.418 s
Maximum possible: 1.359 s

For more details, see Crew or Equipment


|


|}}


2.1 s 

With 50% Crew: 2.601 s
With 75% Crew: 2.271 s
With 100% Crew: 2.014 s
With GLD: 1.831 s
With BiA: 1.969 s
With BiA and Vents: 1.926 s
With both and GLD: 1.751 s
Maximum possible: 1.679 s

For more details, see Crew or Equipment
Aim time
2428 deg/s Gun Traverse Speed
10° Gun Arc
-10°/+15°-10°/+15° Elevation Arc
6546 rounds Ammo Capacity
General
2020 % Chance of Fire


340 m 

With 50% Crew: 267.1 m
With 75% Crew: 303.6 m
With 100% Crew: 340 m
With Recon and Situational Awareness: 357.2 m
With Coated Optics: 374 m
With Binocular Telescope: 425 m
Maximum possible: 486.7 m

For more details, see Skills or Equipment


340 m 

With 50% Crew: 267.1 m
With 75% Crew: 303.6 m
With 100% Crew: 340 m
With Recon and Situational Awareness: 357.2 m
With Coated Optics: 374 m
With Binocular Telescope: 425 m
Maximum possible: 486.7 m

For more details, see Skills or Equipment
View Range


|


|}}


400 m 

With 50% Crew: 322.9 m
With 75% Crew: 369.8 m
With 100% Crew: 417.2 m
With 100% Signal Boost: 480 m
When affected by 100% Relaying: 440 m
Maximum possible: 600.5 m

For more details, see Skills or Equipment


|


|}}


550 m 

With 50% Crew: 444 m
With 75% Crew: 508.5 m
With 100% Crew: 573.6 m
With 100% Signal Boost: 660 m
When affected by 100% Relaying: 605 m
Maximum possible: 825.7 m

For more details, see Skills or Equipment
Signal Range
Values are Stock - click for Top
Churchill Gun Carrier


VI

annoGB40_Gun_Carrier_Churchill.png

965000

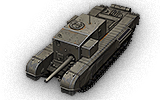
The Churchill Gun Carrier is a [[英國|]] tier 6 驅逐戰車.

此車輛是以 Churchill 戰車為基礎研發。裝有 3 吋火炮的戰鬥室被放置到前方。起初共訂購了 100 輛。後來訂單減少到了 24 輛。最後自 1941 年到 1942 年間共製造了 50 輛。然而,車輛從未參與作戰。

The Churchill Gun Carrier is a transitional Tank Destroyer that can only be researched through the Churchill I Tier V Heavy Tank, allowing players to move from the British heavy line to the British tank destroyer line. It has a very powerful 32-pounder anti-tank gun, one of the most powerful guns available in its tier, but is limited by its poor mobility and armor.

The Churchill Gun Carrier marks the end of its tank destroyer line.

Modules / Available Equipment and Consumables

Modules

炮管

炮管

等級 炮管 平均穿透力(毫米) 射擊速率 100 公尺處擴散度 瞄準時間 經驗 重量 (噸) 價格,
VI 3-inch 20 cwt AT Gun Mk. III 112/140/38 140/140/190 15 0.36 1.7 0 1021 62000
VII QF 3.7-inch AT Gun 151/189/47 230/230/300 8.57 0.35 2 15800 1783 72000
VIII OQF 32-pdr AT Gun 220/252/47 280/280/370 6.32 0.34 2.1 16200 2972 105000
引擎

引擎

等級 引擎 引擎功率(匹馬力) 碰撞時火災發生機率 經驗 重量 (噸) 價格,
IV Meadows D.A.V. 300 20 0 724 9000
IV Bedford Twin-Six 350 20 850 1531 11000
懸吊

懸吊

等級 懸吊 負載限制 迴轉速度(度/秒) 經驗 重量 (噸) 價格,
V Churchill Gun Carrier 40 24 0 8150 8600
VI Churchill Gun Carrier Mk. II 43 28 4900 8150 14500
通訊設備

通訊設備

等級 通訊設備 通訊範圍(公尺) 經驗 重量 (噸) 價格,
VI WS No. 19 Mk. I 400 0 40 15000
VII WS No. 19 Mk. II 450 3600 40 21000
VIII WS No. 19 Mk. III 550 4000 40 22000

Compatible Equipment

Compatible Consumables

Player Opinion

Pros and Cons

Pros:


  • Accurate and high-penetration guns
  • Good gun depression
  • 32-pdr can be used on the AT 15


Cons:


  • Thin and flat armor all around with low possibilities of angling it
  • Very bad mobility, struggles even on flat surfaces
  • Poor camouflage values
  • Horrible view range for it's tier
  • Extremely narrow gun arc


Performance

This thing is the definition of a "glass cannon" as the Churchill GC's fixed superstructure is only 88 mm thick, totally flat and tall allowing all tier 5 tanks and even some lower penetrate it frontally. Its narrow gun arc, slow hull traverse and long aiming time with the 32-pdr AT gun makes it ill-adapted at dealing with moving tanks. Do not engage in close quarters as tanks like the KV-1 and KV-1S will make short work of the GC with their high alpha guns. Choose your position on the map carefully as the GC is ultimately slow and will not be able to quickly relocate. Sniping from behind foliage will have almost no effect as the GC is easily detected due to its very poor camouflage rating even if it's not moving.

The 32-pdr gun is accurate and deals significant damage. However, it also has a long aiming time (2.9 seconds), which can cause it to miss if the player is not patient or is forced to fire quickly. It is strongly recommended to wait until the reticle is fully aimed to fire, as missing a shot can prove to be a costly mistake. Prioritize heavy tanks whenever possible, as the Churchill GC is one of the two tier 6 TDs that has a good chance of penetrating them frontally (the other being the ARL V39 with its 90 mm gun).

This vehicle also has surprisingly good gun depression, on par with most American tanks, which means it can crest over a hill, fire, and quickly retreat. Doing this will still expose most of the tank to enemy fire due to the low placement of the gun, but this allows it to peek and shoot far more quickly than attempting to round a corner. Peeking over a hill will also protect the tracks fairly well, preventing the GC from being tracked while it's exposed.

Overall, this vehicle can be frustrating to play, but if it manages to avoid enemy fire, the Churchill GC can quickly decimate almost any vehicle within its line of sight. NEVER let this tank get to the front line.


Early Research

  • If you elited the Churchill 1 then you should have the top engine and radio unlocked, equip them first
  • The 40.0 ton weight limit of the stock suspension allows you to mount the QF 3.7-inch AT Gun with .3 tons left to spare
  • Research the suspension
  • Research the OQF 32-pdr AT Gun
  • Go from there


Suggested Equipment


Tank Gun Rammer Enhanced Gun Laying Drive Improved VentilationBinocular Telescope Coated Optics 


Gallery

Historical Info

Coming out of a General Staff request in 1941 to investigate fitting high velocity guns tanks. Neither the Churchill or Valentine could mount a turret with anything larger than the 6-pdr but it was proposed that a fixed superstructure could carry a larger gun with limited traverse. Vauxhall were provided with 100 guns and given the task of producing the vehicle. The pilot vehicles were ready for testing in early 1942 and found to be satisfactory but progress with the 17-pdr Challenger cruiser tank and refocussing on a general purpose role (and 75mm gun) for the Churchill led to a reduced order. A fixed 88 mm (3.5 in) thick superstructure with the gun in a ball mount. The gun was an otherwise obsolete QF 3-inch 20 cwt anti-aircraft gun. Fifty were built in 1942 but none are known to have been used in combat- the 17 pounder anti-tank gun gave the British the necessary firepower. Some were adapted for experimentation and training with the "Snake" mine-clearing line charge device.


Historical Gallery

Historical Accuracy Errata

The following are consensus errors or inconsistencies which have been identified with the configuration of the vehicle in question and conflict with information available on the public record. The causes for these divergences in the game are normally not disclosed and may be rooted in game balance.

There are no historical records of either the 3.7-inch or 32-pdr guns being developed for the Churchill Gun Carrier.


英國
輕型戰車


Cruiser Mk. I • M2 • Cruiser Mk. II • Light Mk. VIC • Valentine • Stuart I-IV • Cruiser Mk. III • Cruiser Mk. IV • Covenanter • A46 • Crusader • GSR 3301 Setter • FV1066 Senlac • LHMTV • GSOR3301 AVR FS • Manticore

中型戰車


Vickers Medium Mk. I • Vickers Medium Mk. II • Vickers Medium Mk. III • Matilda • Matilda LVT • Grant • AC 1 Sentinel • Cavalier • Valiant • Sherman III • Matilda Black Prince • Sherman Firefly • Cromwell • AC 4 Experimental • Cromwell B • Sherman VC Firefly • Comet • Centurion Mk. I • FV4202 • Chieftain/T95 • Centurion Mk. 5/1 RAAC • Chimera • Cobra • Centurion Mk. 7/1 • Centurion Action X

重型戰車


Churchill I • Excelsior • Churchill VII • TOG II* • Black Prince • FV201 (A45) • Charlemagne • Caliban • Gonsalo • Caernarvon • Caernarvon Action X • FV4201 Chieftain Proto • Conqueror • FV215b • Super Conqueror • T95/FV4201 Chieftain

驅逐戰車


Universal Carrier 2-pdr • Valentine AT • Alecto • Archer • AT 2 • Churchill Gun Carrier • Achilles • AT 8 • Excalibur • Challenger • AT 15A • AT 7 • GSOR 1008 • AT 15 • Charioteer • Turtle Mk. I • Tortoise • FV4004 Conway • FV215b (183) • FV4005 Stage II • FV217 Badger

Self-Propelled Guns


Loyd Gun Carriage • Sexton II • Sexton I • Birch Gun • Bishop • FV304 • Crusader 5.5-in. SP • FV207 • FV3805 • Conqueror Gun Carriage

驅逐戰車
美國


T3 HMC • T56 GMC • M8A1 • T40 • M10 Wolverine • T67 • T78 • M18 Hellcat • M36 Jackson • M56 Scorpion • T28 Concept • Super Hellcat • T25/2 • T25 AT • TS-5 • T28 • T28 Prototype • T30 • T95 • T110E3 • T110E4

英國


Universal Carrier 2-pdr • Valentine AT • Alecto • Archer • AT 2 • Churchill Gun Carrier • Achilles • AT 8 • Excalibur • Challenger • AT 15A • AT 7 • GSOR 1008 • AT 15 • Charioteer • Turtle Mk. I • Tortoise • FV4004 Conway • FV215b (183) • FV4005 Stage II • FV217 Badger

德國


Panzerjäger I • Marder II • StuG III Ausf. B • Pz.Sfl. IC • Jagdpanzer 38(t) Hetzer • Marder 38T • StuG IV • Pz.Sfl. IVc • StuG III Ausf. G • Dicker Max • Jagdpanzer IV • Nashorn • E 25 • Krupp-Steyr Waffenträger • Jagdpanther • Sturer Emil • Ferdinand • Kanonenjagdpanzer 105 • Rheinmetall Skorpion G • Rheinmetall Skorpion • Jagdpanther II • 8,8 cm Pak 43 Jagdtiger • Rhm.-Borsig Waffenträger • Jagdtiger • Waffenträger auf Pz. IV • Grille 15 • Jagdpanzer E 100 • Waffenträger auf E 100

法國


Renault FT AC • FCM 36 Pak 40 • Renault UE 57 • Somua SAu 40 • M10 RBFM • S35 CA • ARL V39 • AMX AC mle. 46 • AMX AC mle. 48 • AMX Canon d'assaut 105 • AMX 50 Foch • AMX 50 Foch (155) • AMX 50 Foch B

蘇聯


AT-1 • SU-76I • SU-85B • SU-76M • SU-85 • SU-85I • SU-100 • SU-100Y • ISU-122S • SU-152 • SU-100M1 • SU-122-44 • ISU-152 • ISU-130 • KV-4 KTTS • T-103 • SU-130PM • ISU-152K • SU-101 • K-91-PT • Object 704 • Object 263 • Object 268 • Object 268 Version V • Object 268 Version 4

中國


T-26G FT • M3G FT • SU-76G FT • 60G FT • WZ-131G FT • T-34-2G FT • WZ-111-1G FT • WZ-120-1G FT • WZ-111G FT • WZ-120G FT • WZ-113G FT • 114 SP2

日本