Fiji

| Research price70000 exp |
| Purchase price5 500 000 |
| Hit Points27 500 |
| 152 mm/50 Mk XXIII4 х 3 pcs. |
| Rate of Fire8 shots/min. |
| Reload Time7.5 sec. |
| Rotation Speed7 deg./sec. |
| 180 Degree Turn Time25.71 sec. |
| Firing Range13.97 km. |
| Maximum Dispersion129 m. |
| Chance of Fire on Target Caused by HE Shell0 % |
| AP Shell152 mm AP 6crh Mk IV |
| Maximum AP Shell Damage3100 |
| Initial AP Shell Velocity841 m./s. |
| AP Shell Weight50.8 kg. |
| 102 mm/45 QF Mk XIX4 х 2 pcs. |
| Firing Range4.5 km. |
| Rate of Fire20 shots/min. |
| Reload Time3 sec. |
| HE Shell102 mm HE 35 lb |
| Maximum HE Shell Damage1500 |
| Initial HE Shell Velocity811 m./s. |
| Chance of Fire on Target Caused by HE Shel6 % |
| 533 mm TR Mk IV2 х 3 pcs. |
| Rate of Fire0.83 shots/min. |
| Reload Time72 sec. |
| Rotation Speed25 deg./sec. |
| 180 Degree Turn Time7.2 sec. |
| Torpedo533 mm Mk IX |
| Maximum Damage15 433 |
| Torpedo Speed61 knot |
| Torpedo Range8.01 km. |
| 20 mm Oerlikon Mk V6 х 2 pcs. |
| . . . Average Damage per Second36.6 |
| . . . Firing Range2.01 km. |
| 20 mm Oerlikon Mk IV5 х 1 pcs. |
| . . . Average Damage per Second18 |
| . . . Firing Range2.01 km. |
| 40 mm Vickers 2-pdr. Mk VIII2 х 8 pcs. |
| . . . Average Damage per Second39.6 |
| . . . Firing Range2.49 km. |
| 102 mm/45 QF Mk XIX4 х 2 pcs. |
| . . . Average Damage per Second37.6 |
| . . . Firing Range5.01 km. |
| Maximum Speed32.5 knot |
| Turning Circle Radius590 m. |
| Rudder Shift Time12.1 sec. |
| Surface Detectability Range11.52 km. |
| Air Detectability Range7.26 km. |

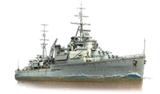
Fiji — British Tier VII cruiser.
Un desarrollo posterior de un crucero multipropósito para la Royal Navy. A pesar del hecho de que el desplazamiento del barco estaba limitado por los tratados internacionales, portaba numerosos cañones principales de fuego rápido.
Modules
 |
Rate of Fire (shots/min) | 180 Degree Turn Time (sec) | Maximum Dispersion (m) | Maximum HE Shell Damage (HP) | Chance of Fire on Target Caused by HE Shell (%) | Maximum AP Shell Damage (HP) |
Research price (exp) |
Purchase price ( | |
|---|---|---|---|---|---|---|---|---|---|
| 152 mm/50 BL Mk.XXIII en una montura Mk.XXIII | 7,5 | 25,71 | 129 | 3100 | 0 | 360 000 |
 |
Hit Points (HP) | Armor (mm) | Armor (mm) | Main Turrets (pcs.) | Secondary Gun Turrets (pcs.) | AA Mounts (pcs.) | Torpedo Tubes (pcs.) | Hangar Capacity (pcs.) |
Research price (exp) |
Purchase price ( | |
|---|---|---|---|---|---|---|---|---|---|---|---|
| Fiji (A) | 27 500 | 9 | 114 | 4 | 4 | 2/4/5/6 | 2 | 0 | 550 000 | ||
| Fiji (B) | 31 400 | 9 | 114 | 4 | 4 | 2/3/10 | 2 | 18 500 | 1 300 000 |
 |
Rate of Fire (shots/min) | Torpedo Tubes Reload Time (sec) | 180 Degree Turn Time (sec) | Maximum Damage (HP) | Torpedo Speed (knot) | Torpedo Range (km) |
Research price (exp) |
Purchase price ( | |
|---|---|---|---|---|---|---|---|---|---|
| 533 mm Mk IX | 0,8 | 72 | 7,2 | 15 433 | 61 | 8 | 0 | 500 000 | |
| 533 mm Mk IX* | 0,8 | 72 | 7,2 | 15 866 | 61 | 8 | 12 000 | 1 000 000 |
 |
Firing Range Increase (%) | Maximum Firing Range (km) |
Research price (exp) |
Purchase price ( | |
|---|---|---|---|---|---|
| Mk VII mod. 1 | 0 | 14 | 0 | 500 000 | |
| Mk VII mod. 2 | 10 | 15,4 | 12 500 | 1 200 000 |
 |
Maximum Speed (knot) |
Research price (exp) |
Purchase price ( | |
|---|---|---|---|---|
| Propulsión: 80 000 CV | 32,5 | 0 | 400 000 |
Compatible Upgrades
| Slot 1 | [[File:wows icon_modernization_PCM030_MainWeapon_Mod_I_bb1e79efbcc73dfa03a6dd5ae173566ee691b77e3a6587389d6f7ea07eb03588.png", "local": "{\"default\": \"gui|44px|Modificación 1 del armamento principal|link=Ship:Upgrades#Modificaci.C3.B3n.C2.A01_del.C2.A0armamento_principal]] | [[File:wows icon_modernization_PCM031_SecondaryWeapon_Mod_I_5369d8b071df59a515906433ea1fff10a55841495258bcd04d3365467e61e4af.png", "local": "{\"default\": \"gui|44px|Modificación 1 del armamento auxiliar|link=Ship:Upgrades#Modificaci.C3.B3n.C2.A01_del.C2.A0armamento_auxiliar]] | [[File:wows icon_modernization_PCM032_PowderMagazine_Mod_I_9607d8ec91ddcca4a95443845b888fbd9de4cd81df5a30a199d400657a552017.png", "local": "{\"default\": \"gui|44px|Modificación 1 de la santabárbara|link=Ship:Upgrades#Modificaci.C3.B3n.C2.A01_de_la.C2.A0santab.C3.A1rbara]] | ||
|---|---|---|---|---|---|
| Slot 2 | [[File:wows icon_modernization_PCM006_MainGun_Mod_II_bffc35efc4e090487fd6110a10a2be1f5d51b7918303f724194817e698055412.png", "local": "{\"default\": \"gui|44px|Modificación 2 de la batería principal|link=Ship:Upgrades#Modificaci.C3.B3n.C2.A02_de_la.C2.A0bater.C3.ADa_principal]] | [[File:wows icon_modernization_PCM012_SecondaryGun_Mod_II_c87da07dc4aebb94da59f3df3f8c2934279decb9677334a1a7e4b1f1c9f9ad04.png", "local": "{\"default\": \"gui|44px|Modificación 1 de la batería secundaria|link=Ship:Upgrades#Modificaci.C3.B3n.C2.A01_de_la.C2.A0bater.C3.ADa_secundaria]] | [[File:wows icon_modernization_PCM018_AirDefense_Mod_III_d3f357c6dc4e5e627a86e17a16432cb38da32bb1b7999b4a7852371491511770.png", "local": "{\"default\": \"gui|44px|Modificación 1 de los cañones AA|link=Ship:Upgrades#Modificaci.C3.B3n.C2.A01_de_los.C2.A0ca.C3.B1ones_AA]] | [[File:wows icon_modernization_PCM033_Guidance_Mod_I_10c7521afe2d577c42618dd04cf6834f2be78cf6b64503844cf87793a5816484.png", "local": "{\"default\": \"gui|44px|Modificación 1 de los sistemas de tiro|link=Ship:Upgrades#Modificaci.C3.B3n.C2.A01_de_los.C2.A0sistemas_de_tiro]] | [[File:wows icon_modernization_PCM070_Torpedo_Mod_IV_9e34ebc4f1a15656201b4148e32870eb1c67ddb2fb1a0bc410406236b472d1dd.png", "local": "{\"default\": \"gui|44px|Modificación 1 de los tubos de torpedo|link=Ship:Upgrades#Modificaci.C3.B3n.C2.A01_de_los.C2.A0tubos_de_torpedo]] |
| Slot 4 | [[File:wows icon_modernization_PCM020_DamageControl_Mod_I_bbc708467bc8f1e6264ac88fb8999ea40660e4b0b94b59ab7b3f1a8b60539ed8.png", "local": "{\"default\": \"gui|44px|Modificación 1 del sistema de control de daños|link=Ship:Upgrades#Modificaci.C3.B3n.C2.A01_del.C2.A0sistema_de_control_de_da.C3.B1os]] | [[File:wows icon_modernization_PCM069_Movement_Mod_I_ca8429dcc45fdad36cdd474a13e5a289d6f7cf27ae32c9f30d42b72b9db493af.png", "local": "{\"default\": \"gui|44px|Protección de la sala de máquinas|link=Ship:Upgrades#Protecci.C3.B3n_de_la_sala_de_m.C3.A1quinas]] | |||
| Slot 5 | [[File:wows icon_modernization_PCM023_DamageControl_Mod_II_3c6aea0c5bccc94f1d8f1fa52662232afa007d784638ce6e981c8ad3457c63fa.png", "local": "{\"default\": \"gui|44px|Modificación 2 del sistema de control de daños|link=Ship:Upgrades#Modificaci.C3.B3n.C2.A02_del.C2.A0sistema_de_control_de_da.C3.B1os]] | [[File:wows icon_modernization_PCM025_SteeringGear_Mod_II_523c86ce4c7d228e73ee3d2cb406f4d78a205aa2453fec45b0925dec519bf7c5.png", "local": "{\"default\": \"gui|44px|Modificación 1 del aparato de gobierno|link=Ship:Upgrades#Modificaci.C3.B3n.C2.A01_del.C2.A0aparato_de_gobierno]] | [[File:wows icon_modernization_PCM089_DepthCharges_Mod_I_734ed2711a1c6aa8227fa258f81054dcc2db8aecf66e4baaf0006589181ceb33.png", "local": "{\"default\": \"gui|44px|Modificación 1 de las cargas de profundidad|link=Ship:Upgrades#Modificaci.C3.B3n.C2.A01_de_las_cargas_de_profundidad]] |
Player Opinion
Performance
If Tier VI's Leander is considered "settling in" to the back half of the British cruiser line, then the best advice for captains embarking aboard Tier VII's Fiji for the first time is "buckle up and enjoy the ride".
Fiji maintains the branch's theme of 152mm main battery rifles, but moves up to mounting twelve of them in four triple-barrel turrets. As such, she is considerably up-gunned from Leander, and successors Edinburgh and Neptune boast identical configurations. At eight rounds per minute (a 7.5 second reload time), her main battery boasts the best rate of fire of all Tier VII cruisers, and she retains the 8.0 km maximum torpedo range of Leander’s upgraded torpedoes. Her unique mix of main battery and longer range torpedoes allow Fiji to hang in fights with equal-tier cruisers of other nations, and maintains her as a threat to enemy destroyers who wander too close.
First-time Fiji captains may think that she feels big for a light cruiser, and they're right. She has an increased beam over Leander, which allowed her designers to fit triple-barreled turrets on her hull. There's a subsequent increase to her detection radius, but she retains most of Leander’s handling characteristics; Fiji’s turning circle is tighter, and her rudder shift is — for all intents and purposes — the same. Her anti-aircraft suite is satisfactory if unremarkable, and is approximately on par with German counterpart Yorck.
Just like Leander, Fiji works best with friendly ships around. She's ideal for backing up allied destroyers, though can even cause significant damage to Battleships when given the right opportunities. Nonetheless, if kept in combat where she is able to maximize her strengths against enemy cruisers and destroyers, she is an exceptional ship in the hands of the right captain.Pros:
- Good main battery range (15.4 km fully upgraded).
- Highly effective against enemy cruisers and destroyers.
- Guns can devastate enemy battleships if stealth can be maintained.
- Retains access to then Repair Party consumable.
- Excellent main battery guns in a user-friendly layout.
- Below average detection range (i.e. good stealth).
- Excellent handling characteristics; quick rudder shift and tight turning circle.
Cons:
- Even lighter armor than Leander; captains must make intelligent use of her consumables to get the most out of Fiji. She will evaporate under concentrated enemy fire.
- Fairly ineffective against angled enemy battleships.
- Anti-aircraft suite is merely average.
- Though her maximum range is respectable, her shell velocity drops off sharply and makes landing hits difficult past medium range.
Research
Optimal Configuration
Upgrades
Most Fiji captains will equip Main Armaments Modification 1 in Upgrade Slot 1, Damage Control System Modification 1 in Upgrade Slot 4, and Steering Gear Modification 2 in Upgrade Slot 5. Only Upgrade Slot 2 offers real options: either AA Guns Modification 2 or Aiming Systems Modification 1. Either is a worthwhile upgrade, and is captain's choice.
Commander Skills
Level 1's Priority Target is a great skill for Fiji commanders, as it allows players to know when it is (theoretically) safe to expose their broadside in a turn without severe punishment. Level 2's best skill remains Expert Marksman, though Adrenaline Rush is a great place to spend points after picking up Concealment Expert. Superintendent is recommended at Level 3 given how dependent Fiji’s performance is on effective use of her consumables; Survivability Expert is also a strong choice as it buffs not only her health pool but the size of her Repair Party consumable. At Level 4, picking up Concealment Expert is first priority. Advanced Firing Training, Radio Position Finding, and Manual Fire Control for AA Armament are worthy of consideration later on; Manual Fire Control for AA Armament is a more attractive skill for subsequent ships in the line and is recommended if captains intend to move the commander to the next ship.
| Recommended Commander Skills | ||||||||
|---|---|---|---|---|---|---|---|---|
| Cost (points) |
Endurance | Attack | Support | Versatility | ||||
| 1 |
★★★ |
★ |
|
|
|
|
★ |
|
| 2 |
★ |
★★ |
★★★ |
★★ |
★★ |
|
★★★ |
★ |
| 3 |
★ |
★★ |
★ |
|
★ |
★★★ |
|
★★ |
| 4 |
|
|
|
|
★ |
★ |
★★ |
★★★ |
| Key: ★★★ - Extremely Useful ★★ - Frequently Useful ★ - Occasionally Useful No stars - Not Useful | ||||||||
Consumables
Players can equip the following consumables on this cruiser: Damage Control Party, Repair Party, Hydroacoustic Search, and a choice between Smoke Generator, Spotting Aircraft, or Catapult Fighter.
Though given the choice between Smoke Generator, Spotting Aircraft, and Catapult Fighter, Fiji captains will want to stick with Smoke Generator given how lightly armored she is. Premium consumables are highly recommended across the board. Players looking to conserve credits (or doubloons) should stick with non-premium Hydroacoustic Search I, but are encouraged to equip both Damage Control Party II and Repair Party II.
Camouflage
Type 1, 2, or 5 camouflage can be equipped for credits; Types 2 or 5 are recommended at a minimum to reduce the accuracy of incoming shells.
Players who wish to spend doubloons can equip Fiji with Type 17 camouflage that lowers her detection radius, reduces the accuracy of incoming shells, reduces her repair costs, and increases the amount of experience she earns.
Signals
Many of the enemy cruisers Fiji will run across in her games fire primarily high-explosive shells (such as Myoko and Shchors), so equipping the India Yankee signal is a good idea if it is available for use. Because she has Repair Party, it's also recommended to mount India Delta improve her survivability. Equal Speed Charlie London can be helpful in picking up useful module upgrades faster, such as the Fire Control System module (Mk VII mod. 2), which gives Fiji decent range at her tier.
Recommended Signal Flags 
| |||||
|---|---|---|---|---|---|
| Combat | |||||
 ★ |

|

|
 ★ |

|

|
 ★★ |
 ★★ |
 ★★★ |

|

|
 ★★ |
| Economic | |||||
 ★ |

|
 ★★ |
 ★ |

| |
| Special | |||||

|

|
 ★ |

|

| |
| Key: ★★★ - Extremely Useful ★★ - Frequently Useful ★ - Occasionally Useful No stars - Not Useful | |||||
Gallery
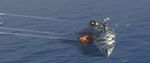
Fiji hides behind an island to stay concealed from the enemy.
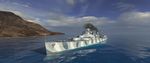
Fiji fires a long range salvo.
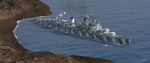
Fiji uses an island to screen its advance.
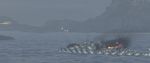
On fire but not out of action, the Fiji fires its main guns at an enemy battleship during a storm.


Historical Info
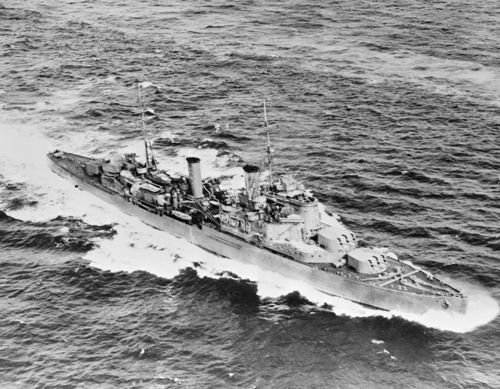
Historical Gallery


