Wargaming.net 위키에 오신 것을 환영합니다!
변수

T-34-1

이동: 둘러보기, 검색


newfile.png Article requires additional modification
The design and/or content of this article do not conform to wiki standards.
Missing Content
  • History
  • Historical Gallery
  • Sources and External Links


,,


T-34-1

Icon
China | Medium Tank | Tier VII
Battle Tier
1234567891011
Overview
Mouse over "
Well, the ones further down, of course.
" for more information
1,400,000  Credits Cost
1050230 HP Hit Points
29.5/3220.4/35 t Weight Limit
Crew
  1. 전차장
  2. 포수
  3. 조종수
  4. 장전수 (무전수)
Mobility
480520 hp Engine Power
50/20 km/h Speed Limit
4042 deg/s Traverse
16.2725.49 hp/t Power/Wt Ratio
NoNo Pivot
Armor
// mm Hull Armor
90/75/52170/120/60 mm Turret Armor
Armament


{{#ifeq:ARMOR_PIERCING_CR|ARMOR_PIERCING||


{{#ifeq:HIGH_EXPLOSIVE|ARMOR_PIERCING||


AP/APCR/HE


{{#ifeq:ARMOR_PIERCING_CR|ARMOR_PIERCING||


{{#ifeq:HIGH_EXPLOSIVE|ARMOR_PIERCING||


AP/APCR/HE
Shells
160/160/280250/250/330 HP Damage
126/167/43175/235/50 mm Penetration


|


|}}

|


|}}


12 r/m 

Standard Gun

Reload Times
Nominal: 5 s
50% Crew: 6.19 s
75% Crew: 5.41 s
100% Crew: 4.79 s
Rammer: 4.31 s
Vents: 4.68 s
Both: 4.22 s
Both and BiA: 4.12 s
Both and Max Crew %: 3.95 s

See Crew, Consumables, or Equipment for more information.


|


|}}

|


|}}


6.45 r/m 

Standard Gun

Reload Times
Nominal: 9.3 s
50% Crew: 11.52 s
75% Crew: 10.06 s
100% Crew: 8.92 s
Rammer: 8.03 s
Vents: 8.72 s
Both: 7.85 s
Both and BiA: 7.68 s
Both and Max Crew %: 7.36 s

See Crew, Consumables, or Equipment for more information.
Rate of Fire


|


|}}

|


|}}


1920

Standard Gun

Using Shell Type 1 (160 Damage):


Theoretical Damage Per Minute
Nominal DPM: 1920
50% Crew: 1550.4
75% Crew: 1774.4
100% Crew: 2003.2
100% Crew
Vents: 2048
Rammer: 2225.6
Both: 2275.2
Both and BiA: 2326.4
Both and Max Crew %: 2427.2

Advantageous Damage Per Minute
First-shot DPM: 2080
50% Crew: 1710.4
75% Crew: 1934.4
100% Crew: 2163.2
100% Crew
Rammer: 2385.6
Vents: 2208
Both: 2435.2
Both and BiA: 2486.4
Both and Max Crew %: 2587.2

See here, here, or here for more information.

Standard Gun

Using Shell Type 2 (160 Damage):


Theoretical Damage Per Minute
Nominal DPM: 1920
50% Crew: 1550.4
75% Crew: 1774.4
100% Crew: 2003.2
100% Crew
Vents: 2048
Rammer: 2225.6
Both: 2275.2
Both and BiA: 2326.4
Both and Max Crew %: 2427.2

Advantageous Damage Per Minute
First-shot DPM: 2080
50% Crew: 1710.4
75% Crew: 1934.4
100% Crew: 2163.2
100% Crew
Rammer: 2385.6
Vents: 2208
Both: 2435.2
Both and BiA: 2486.4
Both and Max Crew %: 2587.2

See here, here, or here for more information.

Standard Gun

Using Shell Type 3 (280 Damage):
With wholly penetrating hits

Theoretical Damage Per Minute
Nominal DPM: 3360
50% Crew: 2713.2
75% Crew: 3105.2
100% Crew: 3505.6
100% Crew
Vents: 3584
Rammer: 3894.8
Both: 3981.6
Both and BiA: 4071.2
Both and Max Crew %: 4247.6

Advantageous Damage Per Minute
First-shot DPM: 3640
50% Crew: 2993.2
75% Crew: 3385.2
100% Crew: 3785.6
100% Crew
Rammer: 4174.8
Vents: 3864
Both: 4261.6
Both and BiA: 4351.2
Both and Max Crew %: 4527.6

See here, here, or here for more information.


|


|}}

|


|}}


1612.5

Standard Gun

Using Shell Type 1 (250 Damage):


Theoretical Damage Per Minute
Nominal DPM: 1612.5
50% Crew: 1302.5
75% Crew: 1490
100% Crew: 1682.5
100% Crew
Vents: 1720
Rammer: 1870
Both: 1912.5
Both and BiA: 1955
Both and Max Crew %: 2037.5

Advantageous Damage Per Minute
First-shot DPM: 1862.5
50% Crew: 1552.5
75% Crew: 1740
100% Crew: 1932.5
100% Crew
Rammer: 2120
Vents: 1970
Both: 2162.5
Both and BiA: 2205
Both and Max Crew %: 2287.5

See here, here, or here for more information.

Standard Gun

Using Shell Type 2 (250 Damage):


Theoretical Damage Per Minute
Nominal DPM: 1612.5
50% Crew: 1302.5
75% Crew: 1490
100% Crew: 1682.5
100% Crew
Vents: 1720
Rammer: 1870
Both: 1912.5
Both and BiA: 1955
Both and Max Crew %: 2037.5

Advantageous Damage Per Minute
First-shot DPM: 1862.5
50% Crew: 1552.5
75% Crew: 1740
100% Crew: 1932.5
100% Crew
Rammer: 2120
Vents: 1970
Both: 2162.5
Both and BiA: 2205
Both and Max Crew %: 2287.5

See here, here, or here for more information.

Standard Gun

Using Shell Type 3 (330 Damage):
With wholly penetrating hits

Theoretical Damage Per Minute
Nominal DPM: 2128.5
50% Crew: 1719.3
75% Crew: 1966.8
100% Crew: 2220.9
100% Crew
Vents: 2270.4
Rammer: 2468.4
Both: 2524.5
Both and BiA: 2580.6
Both and Max Crew %: 2689.5

Advantageous Damage Per Minute
First-shot DPM: 2458.5
50% Crew: 2049.3
75% Crew: 2296.8
100% Crew: 2550.9
100% Crew
Rammer: 2798.4
Vents: 2600.4
Both: 2854.5
Both and BiA: 2910.6
Both and Max Crew %: 3019.5

See here, here, or here for more information.
Damage Per Minute


|


|}}


0.42 m 

With 50% Crew: 0.52 m
With 75% Crew: 0.454 m
With 100% Crew: 0.403 m
With BiA: 0.394 m
With BiA and Vents: 0.385 m
Maximum possible: 0.369 m

For more details, see Crew


|


|}}


0.4 m 

With 50% Crew: 0.496 m
With 75% Crew: 0.433 m
With 100% Crew: 0.384 m
With BiA: 0.375 m
With BiA and Vents: 0.367 m
Maximum possible: 0.352 m

For more details, see Crew
Accuracy


|


|}}


2.9 s 

With 50% Crew: 3.592 s
With 75% Crew: 3.137 s
With 100% Crew: 2.781 s
With GLD: 2.528 s
With BiA: 2.719 s
With BiA and Vents: 2.66 s
With both and GLD: 2.418 s
Maximum possible: 2.318 s

For more details, see Crew or Equipment


|


|}}


2.5 s 

With 50% Crew: 3.097 s
With 75% Crew: 2.704 s
With 100% Crew: 2.397 s
With GLD: 2.179 s
With BiA: 2.344 s
With BiA and Vents: 2.293 s
With both and GLD: 2.085 s
Maximum possible: 1.998 s

For more details, see Crew or Equipment
Aim time
4644 deg/s Turret Traverse
360° Gun Arc
-5°/+22°-5°/+18° Elevation Arc
5034 rounds Ammo Capacity
General
1212 % Chance of Fire


360 m 

With 50% Crew: 282.8 m
With 75% Crew: 321.5 m
With 100% Crew: 360 m
With Recon and Situational Awareness: 378.2 m
With Coated Optics: 396 m
With Binocular Telescope: 450 m
Maximum possible: 515.4 m

For more details, see Skills or Equipment


370 m 

With 50% Crew: 290.7 m
With 75% Crew: 330.4 m
With 100% Crew: 370 m
With Recon and Situational Awareness: 388.7 m
With Coated Optics: 407 m
With Binocular Telescope: 462.5 m
Maximum possible: 529.7 m

For more details, see Skills or Equipment
View Range


|


|}}


600 m 

With 50% Crew: 484.3 m
With 75% Crew: 554.7 m
With 100% Crew: 625.8 m
With 100% Signal Boost: 720 m
When affected by 100% Relaying: 660 m
Maximum possible: 900.7 m

For more details, see Skills or Equipment


|


|}}


750 m 

With 50% Crew: 605.4 m
With 75% Crew: 693.4 m
With 100% Crew: 782.2 m
With 100% Signal Boost: 900 m
When affected by 100% Relaying: 825 m
Maximum possible: 1125.9 m

For more details, see Skills or Equipment
Signal Range
Values are Stock - click for Top

Additional Statistics
(Top Configuration)

VII

annoCh04_T34_1.png

1400000

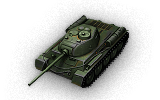
The T-34-1 is a Chinese tier 7 medium tank.

1954년, 중국 정부는 중국산 T-34-85 생산을 고려했으며, 같은 시기에 중국 전차 개발자들은 차선책으로 T-34-1을 제안하였다. T-34-1은 중국에서 독자적으로 양산할 목적으로 설계한 T-34-85의 현대식 전차이다. 변속기와 현가장치를 재배열하여 전체 중량을 줄이고 차체 높이를 낮출 계획이었다. 1954년 여러 가지 포탑과 주포를 장착한 몇 가지 설계안이 완성되었으나 시제 전차가 생산되지는 않았다.

The T-34-1 leads to the T-34-2.

Modules / Available Equipment and Consumables

Modules

주포

주포

단계 주포 평균 관통력 (mm) 연사력 100m에서의 분산도 조준 시간 일반 경험치 중량 (톤) 가격,
VI 85 mm S-53 126/167/43 160/160/280 12 0.42 2.9 0 1550 61530
VI 85 mm 56-85JT 144/172/43 160/160/280 12.5 0.36 2 6100 1750 72000
VII 100 mm 44-100JT 175/235/50 250/250/330 6.45 0.4 2.5 17500 2257 79000
엔진

엔진

단계 엔진 엔진 출력 (마력) 충돌 시 화재 발생 확률 일반 경험치 중량 (톤) 가격,
VI Type 102S 480 12 0 750 15000
VII Type 102S1 500 12 11000 750 38000
VIII 12150L 520 12 16000 750 48000
현가장치

현가장치

단계 현가장치 한계 중량 회전 속도 (도/초) 일반 경험치 중량 (톤) 가격,
VI T-34-1 32 40 0 7800 7730
VII T-34-1 model 2 35 42 8600 7800 18600
무전기

무전기

단계 무전기 통신 범위 (m) 일반 경험치 중량 (톤) 가격,
X A-220A 750 9500 40 54000
IX A-220 600 0 40 38000

Compatible Equipment

Compatible Consumables

Player Opinion

Pros and Cons

Pros:


  • Low profile
  • Excellent camouflage values
  • Great alpha damage
  • Good penetration
  • Excellent frontal turret armor


Cons:


  • Poor frontal hull armor
  • Poor gun depression
  • Long aim time and poor accuracy on the 100mm 44-100JT gun
  • Poor damage per minute value on the 100mm 44-100JT gun
  • Weaker engine power compared to other Tier 7 mediums


Performance

  • Once fully upgraded, the T-34-1's handling is very similar to that of the Type 59. It has very good maneuverability and speed on flat terrain, but its low engine power makes hill climbing a bit challenging. It possesses the second highest alpha damage of 250 among all tier 7 medium tanks, bested only by the A-44, and combined with very good penetration of 175mm, the T-34-1 has no problem penetrating most of the tanks that it can encounters. However, its low accuracy and long aim time make it ineffective at long range and against tougher high Tier tanks. Since it only holds 34 shells, it is essential to make every shot count. Unlike the Type 59, the T-34-1 cannot mount a vertical stabilizer, so the Snap Shot and Smooth Ride crew skills are important for increasing this tank's overall gun handling.
  • With the second turret, the T-34-1 is a multi-role vehicle. It does have the hp/t to flank targets, but thanks to the thick turret front, it can also go hull-down behind cover or even other tanks and prove itself a reliable roadblock, as well as act as a decent mid-long range sniper, and the long aim time doesn't matter since you'll get plenty of time to aim while the gun reloads and you're in bush cover.
  • It's effectively a highly mobile scout sniper, and despite what some might say, the Chinese mediums are not brawlers. Your real strengths lie in being able to passive scout effectively, and quickly do a lot of damage to key enemy targets early on. Aim in fully using the camouflage, and the moment that you let the shot fly, get back to avoid damage and having to contest other tanks in a DPM war, a fight that you'll lose almost every time. Even if you do win against a lower Tier tank, you won't come out unscathed. The turret can bounce some shots, but your primary defense against getting shot is to use the camouflage and speed to not get shot in the first place. Learning to play this tank well in this fashion will greatly help with the T-34-2 armed with a 122mm heavy tank cannon, as it's effectively a Tier 8 version with more accentuated strengths and weaknesses.


Early Research

  • If you have unlocked the IS-2, the top gun will be already available, but you can't mount it yet.
  • The Tier 8 12150L engine carries over from the Type 58.
  • The Tier 7 T-34-1 model 2 turret should be researched and mounted as soon as possible, as the upgraded armor and rounded slope of the turret will provide for some much needed defense.
  • The upgraded suspension will be needed to mount the tier 7 100mm 44-100JT gun.
  • Once you have the upgraded suspension get the 100mm gun as soon as possible as the significant boost in penetration as well as damage will allow this tank to show its true colors.
  • Finally, research the tier 10 A-220A radio.


Suggested Equipment


Medium-Caliber Tank Gun Rammer Enhanced Gun Laying Drive Coated Optics 


Gallery

History for this tank not found


China
Light Tanks


Vickers Mk. E Type B • Type 2597 Chi-Ha • M5A1 Stuart • 59-16 • Type 64 • Type 62 • WZ-131 • WZ-132 • M41D • WZ-132A • WZ-132-1

Medium Tanks


Type T-34 • Type 58 • T-34-1 • Type 59 • T-34-2 • T-34-3 • 59-Patton • 122 TM • Type 59 G • WZ-120 • 121 • 121B

Heavy Tanks


IS-2 • WZ-111 • WZ-111 Alpine Tiger • 110 • 112 • WZ-111 model 1-4 • WZ-114 • 113 • 113 Beijing Opera • WZ-111 model 5A • WZ-111 Qilin

Tank Destroyers


T-26G FT • M3G FT • SU-76G FT • 60G FT • WZ-131G FT • T-34-2G FT • WZ-111-1G FT • WZ-120-1G FT • WZ-111G FT • WZ-120G FT • WZ-113G FT • 114 SP2

Self-Propelled Guns


Medium Tanks
USA


T2 Medium Tank • Convert. Medium Tank T3 • M2 Medium Tank • T6 Medium • M3 Lee • M4 Improved • M4A2E4 Sherman • M4A1 Sherman • Ram II • M4A3E8 Fury • M4A3E8 Thunderbolt VII • M4A3E8 Sherman • M4A3E2 Sherman Jumbo • T26E3 Eagle 7 • T20 • T23E3 • T25 Pilot Number 1 • TL-1 LPC • T42 • ASTRON Rex 105 mm • AMBT • M46 Patton KR • M26 Pershing • T26E4 SuperPershing • T69 • T95E2 • M46 Patton • M48A5 Patton • M60 • T95E6

UK


Vickers Medium Mk. I • Vickers Medium Mk. II • Vickers Medium Mk. III • Matilda • Matilda LVT • Grant • AC 1 Sentinel • Cavalier • Valiant • Sherman III • Matilda Black Prince • Sherman Firefly • Cromwell • AC 4 Experimental • Cromwell B • Sherman VC Firefly • Comet • Centurion Mk. I • FV4202 • Chieftain/T95 • Centurion Mk. 5/1 RAAC • Chimera • Cobra • Centurion Mk. 7/1 • Centurion Action X

Germany


Großtraktor - Krupp • Pz.Kpfw. IV Ausf. A • Pz.Kpfw. S35 739 (f) • Pz.Kpfw. III Ausf. J • Pz.Kpfw. IV Ausf. D • VK 20.01 (D) • Pz.Kpfw. III Ausf. K • Turán III prototípus • Pz.Kpfw. IV Ausf. H Ankou • Pz.Kpfw. III/IV • Pz.Kpfw. IV hydrostat. • Pz.Kpfw. V/IV • Pz.Kpfw. V/IV Alpha • Pz.Kpfw. IV Ausf. H • Pz.Kpfw. T 25 • VK 30.01 (H) • Pz.Kpfw. IV Schmalturm • VK 30.01 (D) • VK 30.02 (M) • Panther/M10 • Panther • VK 30.02 (D) • Panther mit 8,8 cm L/71 • Panzer 58 • Schwarzpanzer 58 • Panzer 58 Mutz • M48A2 Räumpanzer • Kampfpanzer 07 RH • Indien-Panzer • Panther II • E 50 • T 55A • Kampfpanzer 50 t • Kunze Panzer • Leopard Prototyp A • E 50 Ausf. M • Leopard 1

France


D2 • Somua S35 • SARL 42 • Renault G1 • Bretagne Panther • M4A1 FL 10 • Bat.-Châtillon Bourrasque • AltProto AMX 30 • Lorraine 40 t • AMX Chasseur de chars • M4A1 Revalorisé • AMX 30 1er prototype • Char Futur 4 • Bat.-Châtillon 25 t AP • Bat.-Châtillon 25 t • AMX 30 B

USSR


T-29 • A-32 • T-28E with F-30 • T-34 with L-11 • T-28 • Matilda IV • T-34 shielded • M4-85 • T-34 • A-43 • T-34-85M • T-34-85 Rudy • Loza's M4-A2 Sherman • T-34-85 • A-44 • KV-13 • T-43 • T-44-122 • Object 416 • T-54 first prototype • T-44-100 Igrovoy • T-44-100 (R) • STG • STG Guard • Object 274a • T-44 • Object 430 Version II • Object 430 • T-54 • Object 140 • Object 907 • T-22 medium • K-91 • Object 430U • T-62A

China


Type T-34 • Type 58 • T-34-1 • Type 59 • T-34-2 • T-34-3 • 59-Patton • 122 TM • Type 59 G • WZ-120 • 121 • 121B

Japan


Chi-Ni • Type 89 I-Go/Chi-Ro • Type 1 Chi-He • Type 3 Chi-Nu • Type 3 Chi-Nu Kai • Type 4 Chi-To • Type 5 Chi-Ri • STA-1 • STA-2 • Type 61 • STB-1