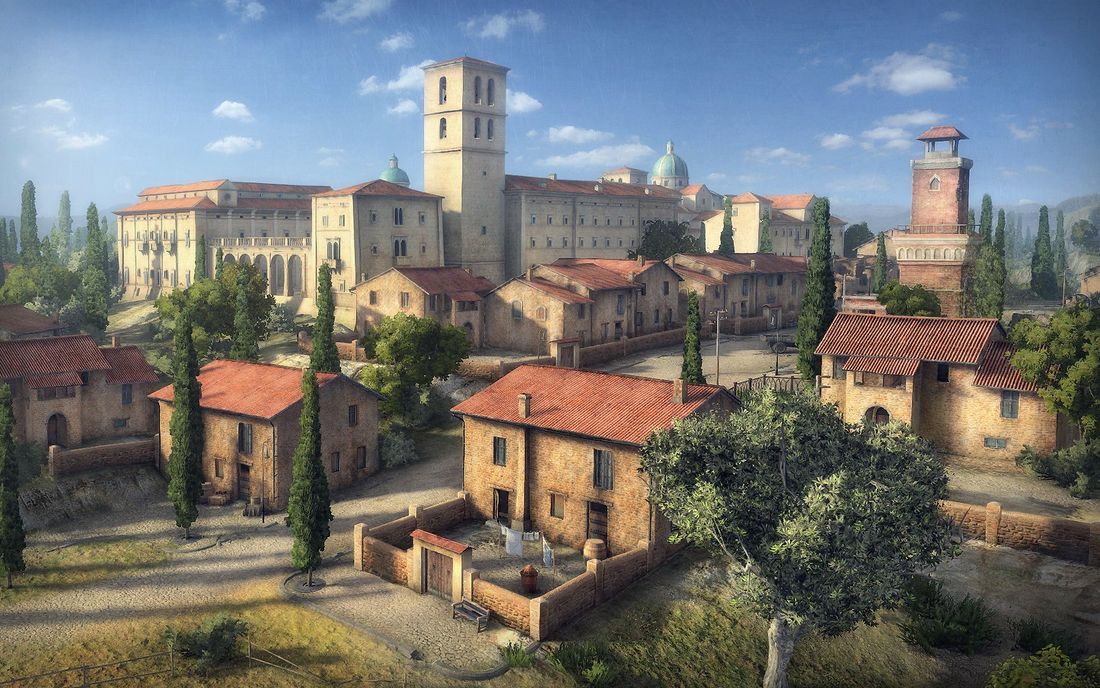
Abbey


- Map
- Standard battle

Red is soft- and green is hard terrain.
Unmarked areas are medium terrain.
A large abbey and town fill the center of the map with three roads allowing passage from the north and south, and includes an elevated firing position in the abbey's courtyard at the highest point on the hill. West of the town is an elongated hill with several positions allowing fire down into the town. Further west and past the hill, a valley offers significant protection against artillery fire. East of the town lies a curved cliff road which affords shielding from most tank and artillery fire, but forces attackers to travel in a single path.
Strategy
Many losses on this map arise because teams neglect to ensure that all flanks are adequately covered, or at least defended. There are five assault routes: The central route, through the village and abbey; the hill route, from the West side of the map; the cliff route, from the East side of the map; the road route, through the road connecting both bases; and the village route, which is straight through the village.
Each team starts on an elevated hill with their base. The first step is to ensure a good delegation of tanks going to each route, taking each route's conditions into consideration. For example, the cliff road is narrow and shielded from artillery (at least beyond the curve in the middle), so it would be ideal to send breakthrough heavies and heavily armoured tank destroyers for breakthrough and defense. On the other hand, the hill route has multiple paths and is suited for brawling and flanking, so send brawler/support heavies, flankers and mobile TDs for the firepower needed to push this side. However, do leave some tanks at base to buffer a breakthrough, snipe enemies at the abbey and the hill or to deal with scouts, which are most commonly sent through the road route.
The abbey courtyard is a tempting sniping position, but remember that the actual sniping positions there are VERY exposed. Use with caution, and be careful of SPG fire and return shots.
As the game progresses, one team should gain the upper hand and push hard into the enemy base by their preferred route. However, the battle is far from over. A group of stationed forces at the enemy base can wipe a push with good coordination, and must be dealt with carefully (unless, of course, the base is full of AFK tanks and/or SPGs). Fast tanks that can quickly return with huge firepower, such as the KV-1S, also need to be taken into account. Most importantly, the other flanks need to hold the line, especially if the battle is close or against overwhelming odds - unpinned enemy tanks could rush into the friendly base or worse, return en masse to defend theirs.
All in all, hold the routes, and push the ones which are in your favour while defending those that may fall. This is the secret to victory on this map.


| Summer Maps | Abbey • Cliff • Ensk • Fjords • Highway • Himmelsdorf • Karelia • Lakeville • Live Oaks • Malinovka • Mines • Mittengard • Murovanka • Fiery Salient • Mountain Pass • Prokhorovka • Redshire • Ruinberg • Fisherman's Bay • Siegfried Line • Steppes • Serene Coast • Swamp • Tundra • Westfield • Widepark • Paris • Berlin • Ghost Town • Pilsen |
| Winter Maps | Windstorm • Winterberg • Arctic Region • Winter Himmelsdorf • Kharkov • Erlenberg |
| Desert Maps | Airfield • Sand River • El Halluf |
| Special | Training ground • Karl • Himmelsdorf Championship • Tank Racing • 2015 New Year |
| Removed Maps | Port • Province • Komarin • Northwest • Sacred Valley • Severogorsk • Stalingrad • • Hidden Village • South Coast • Overlord • Pearl River • Dragon Ridge • Ruinberg on fire |
| |
This article is a stub. You can help the Wargaming wiki by expanding it. |