Shokaku
| <span title="Shōkaku (< 23.01.2019)" class="commentDrop" height="22">[[File:Shōkaku (< 23.01.2019)_icon_small.png|link=]]</span> | |||||||||||
| Purchase price10 080 000 |
| Hit Points50 100 |
| 127 mm/40 Type89 A16 х 2 pcs. |
| Firing Range4.5 km. |
| Rate of Fire12 shots/min. |
| Reload Time5 sec. |
| HE Shell127 mm HE Type0 |
| Maximum HE Shell Damage2100 |
| Initial HE Shell Velocity725 m./s. |
| Chance of Fire on Target Caused by HE Shel8 % |
| 127 mm/40 Type89 A1 mod. 22 х 2 pcs. |
| Firing Range4.5 km. |
| Rate of Fire10 shots/min. |
| Reload Time6 sec. |
| HE Shell127 mm HE Type0 |
| Maximum HE Shell Damage2100 |
| Initial HE Shell Velocity725 m./s. |
| Chance of Fire on Target Caused by HE Shel8 % |
| 25 mm/60 Type96 mod. 136 х 1 pcs. |
| . . . Average Damage per Second64.8 |
| . . . Firing Range3.09 km. |
| 127 mm/40 Type89 A16 х 2 pcs. |
| . . . Average Damage per Second60.6 |
| . . . Firing Range5.01 km. |
| 127 mm/40 Type89 A1 mod. 22 х 2 pcs. |
| . . . Average Damage per Second20.2 |
| . . . Firing Range5.01 km. |
| Maximum Speed34 knot |
| Turning Circle Radius1 130 m. |
| Rudder Shift Time18.3 sec. |
| Surface Detectability Range12.42 km. |
| Air Detectability Range11.97 km. |
| <span title="Shōkaku (< 23.01.2019)" class="commentDrop" height="22">[[File:Shōkaku (< 23.01.2019)_icon_small.png|link=]]</span> | |||||||||||
| Purchase price10 080 000 |
| Hit Points51 400 |
| 127 mm/40 Type89 A16 х 2 pcs. |
| Firing Range4.5 km. |
| Rate of Fire12 shots/min. |
| Reload Time5 sec. |
| HE Shell127 mm HE Type0 |
| Maximum HE Shell Damage2100 |
| Initial HE Shell Velocity725 m./s. |
| Chance of Fire on Target Caused by HE Shel8 % |
| 127 mm/40 Type89 A1 mod. 22 х 2 pcs. |
| Firing Range4.5 km. |
| Rate of Fire10 shots/min. |
| Reload Time6 sec. |
| HE Shell127 mm HE Type0 |
| Maximum HE Shell Damage2100 |
| Initial HE Shell Velocity725 m./s. |
| Chance of Fire on Target Caused by HE Shel8 % |
| 127 mm/40 Type89 A16 х 2 pcs. |
| . . . Average Damage per Second60.6 |
| . . . Firing Range5.01 km. |
| 127 mm/40 Type89 A1 mod. 22 х 2 pcs. |
| . . . Average Damage per Second20.2 |
| . . . Firing Range5.01 km. |
| 25 mm/60 Type96 mod. 132 х 1 pcs. |
| . . . Average Damage per Second57.6 |
| . . . Firing Range3.09 km. |
| 25 mm/60 Type96 Triple mod. 22 х 3 pcs. |
| . . . Average Damage per Second12.2 |
| . . . Firing Range3.09 km. |
| 25 mm/60 Type96 Triple mod. 118 х 3 pcs. |
| . . . Average Damage per Second109.8 |
| . . . Firing Range3.09 km. |
| Maximum Speed34 knot |
| Turning Circle Radius1 130 m. |
| Rudder Shift Time13.1 sec. |
| Surface Detectability Range12.42 km. |
| Air Detectability Range11.97 km. |

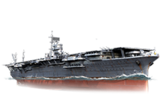
[[Ship:Shōkaku (< 23.01.2019)|Shōkaku (< 23.01.2019)]] — Japanese Tier VIII aircraft сarrier.
The Hiryu-class heavy aircraft carrier whose design stemmed from the experience gained in building ships of the same type. Compared to her predecessor, Shokaku came with reinforced anti-aircraft armament, a larger air group and somewhat improved armor. During the course of World War II, the ship's AA capabilities were significantly enhanced.
Modules
 |
Hit Points (HP) | Armor (mm) | Armor (mm) | Main Turrets (pcs.) | Secondary Gun Turrets (pcs.) | AA Mounts (pcs.) | Torpedo Tubes (pcs.) | Hangar Capacity (pcs.) |
Research price (exp) |
Purchase price ( | |
|---|---|---|---|---|---|---|---|---|---|---|---|
| Shōkaku (A) | 50 100 | 6 | 215 | 2/6 | 36/2/6 | 0 | 580 000 | ||||
| Shōkaku (B) | 51 400 | 6 | 215 | 2/6 | 36/2/6 | 18 000 | 1 100 000 | ||||
| Shōkaku (C) | 51 400 | 6 | 215 | 2/6 | 36/2/6 | 22 000 | 1 400 000 |
 |
Cruise Speed (knot) | Average Damage per Second (HP/min) | Loadout | Hit Points (HP) |
Research price (exp) |
Purchase price ( | |
|---|---|---|---|---|---|---|---|
| Mitsubishi A6M5c | 144 | 1330 | 0 | 280 000 | |||
| Kawanishi N1K5-A | 144 | 1330 | 10 500 | 620 000 |
 |
Maximum Torpedo Damage (HP) | Cruise Speed (knot) | Hit Points (HP) |
Research price (exp) |
Purchase price ( | |
|---|---|---|---|---|---|---|
| Nakajima B5N2 | 8567 | 129 | 12 | 0 | 320 000 | |
| Nakajima B6N | 8567 | 129 | 12 | 14 000 | 880 000 |
 |
Maximum Bomb Damage (HP) | Cruise Speed (knot) | Hit Points (HP) |
Research price (exp) |
Purchase price ( | |
|---|---|---|---|---|---|---|
| Aichi D3A2 | 139 | 14 | 0 | 320 000 | ||
| Yokosuka D4Y2 | 139 | 14 | 14 000 | 880 000 |
 |
Maximum Speed (knot) |
Research price (exp) |
Purchase price ( | |
|---|---|---|---|---|
| Propulsión: 160 000 CV | 34 | 0 | 540 000 |
Compatible Upgrades
Player Opinion
Performance
Pros:
- Same play style as predecessor Hiryu.
- Large hangar capacity, 72 planes in total.
- More armored than her predecessor.
- Fully-upgraded can deal huge amounts of damage to enemy ships in a single attack run.
- Excellent AA protection.
- Difficult to Citadel, the box is located well below the waterline.
- 34 knot top speed means easier relocation when necessary.
Cons:
- Expensive maintenance, especially if you are not fully upgraded.
- Poor concealment (Although purchasing the Concealment upgrade can negate the problem somewhat).
- Painful grind, expensive XP and expensive upgrades.
- Stock torpedo bomber (the Tier VI Nakajima B5N2) is highly vulnerable to the level of anti-aircraft fire she will find aboard ships in her tier.
- Loses a lot of speed during turns.
- Very vulnerable to dive bomb attacks.
Research
Get the Type8 mod.2 or mod.3 researched first depending on the play style you want. Choose mod.2 if you would still like the strike capability, but if you want to equally match with other carriers at this tier when in stock mode, you might want to get the mod.3 then.
After getting air modification, upgrade your fighters to the Kawanishi N1K5-A, followed by the Nakajima B6N.
You can then research the Type B hull of Shokaku for extra HP and AA-protection before proceeding on to the Yokosuka D4Y2 dive bombers.Optimal Configuration
Upgrades
As a carrier at Tier VIII with five upgrade slots (slots 1, 2, 4, 5, and 6), it's best to mount Air Groups Modification 1, Flight Control Modification 1 (for faster aircraft servicing time / rearming time) or Air Groups Modification 2 (for better fighter capability in fighting enemy fighters and taking down enemy bombers), Damage Control System Modification 1, Damage Control System Modification 2 (if the player chooses to use Emergency Takeoff Skill and does not have Damage Control Party ready) or Propulsion Modification 2 (if the player feels the need to relocate and avoid enemies is more important), and Concealment System Modification 1 on Shokaku.
Commander Skills
As Shokaku is a Tier VIII carrier, the player has access to the special carrier Defensive Fire consumable, which lasts for two minutes and increases the ship's AA DPS by a factor of 1.75. Coupled with Basic Firing Training and Manual Fire Control for AA Armament, the player can significantly increase the ship's AA DPS to shoot down enemy planes effectively. Or, as Shokaku has access to the Concealment System Modification, the player can opt to choose to utilize the Concealment Expert skill as an indirect form of further protection from enemy ships (with skill, camouflage, and upgrade, detection is 8.81km).
| Recommended Commander Skills | ||||||||
|---|---|---|---|---|---|---|---|---|
| Cost (points) |
Endurance | Attack | Support | Versatility | ||||
| 1 |
Priority Target ★ |
Preventative Maintenance ★ |
Expert Loader
|
Aircraft Servicing Expert ★★★ |
Direction Center for Catapult Aircraft
|
Dogfighting Expert ★★ |
Incoming Fire Alert ★ |
Evasive Maneuver ★★ |
| 2 |
High Alert ★ |
Jack of All Trades
|
Expert Marksman
|
Torpedo Acceleration ★★★ |
Smoke Screen Expert
|
Expert Rear Gunner ★★ |
Adrenaline Rush
|
Last Stand ★ |
| 3 |
Basics of Survivability ★★ |
Survivability Expert
|
Torpedo Armament Expertise ★★★ |
Emergency Takeoff ★★★ |
Basic Firing Training ★★ |
Superintendent
|
Demolition Expert ★ |
Vigilance ★ |
| 4 |
Manual Fire Control for Secondary Armament
|
Fire Prevention
|
Inertia Fuse for HE Shells
|
Air Supremacy ★★★ |
Advanced Firing Training
|
Manual Fire Control for AA Armament ★★ |
Radio Position Finding
|
Concealment Expert ★★ |
| Key: ★★★ - Extremely Useful ★★ - Frequently Useful ★ - Occasionally Useful No stars - Not Useful | ||||||||
Consumables
As a Tier VIII carrier, Shokaku has access to the following consumables:
Premium Defensive AA Fire is recommended to counter any enemy carrier's attempts to "snipe" the player (that is, by having all bombers bypass allied ships undetected and attempting to sink the player in one hit). Premium Damage Control Party II is not recommended as it is only needed in dire moments, or when the player is the last one alive.
Camouflage
Type 1, 2, or 5 camouflage can be equipped for credits; Types 1 or 5 are recommended at a minimum to reduce the chance of being detected.
Players who wish to spend doubloons can equip Shokaku with Type 18 camouflage that lowers her detection radius, reduces the accuracy of incoming shells, reduces cost of post-battle service, and increases the amount of experience she earns.
Signals
As a carrier, Shokaku can only mount at most four signals at a time and has no risk of detonating. Players should mount Equal Speed Charlie London (for faster XP grinding / increased XP gain per battle), Zulu Hotel (when coupled with Equal Speed Charlie London greatly helps increase commander (re)training), November Echo Setteseven (for better bomber self-defense against fighters and increased AA DPS), and Juliet Whiskey Unaone (to have a better chance at causing flooding and dealing damage via flooding). Players can also choose to equip the Dragon Flag for faster commander (re)training.Gallery

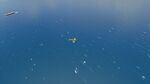
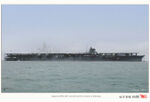
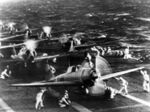
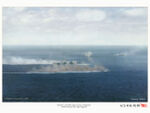
The flight deck is packed with aircraft prepared to sortie.
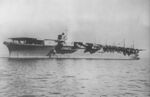
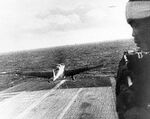
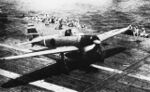
A fighter departs the Shokaku.
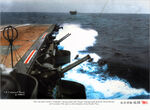
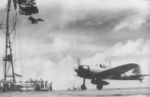
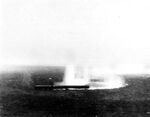
Fire alarm.


Historical Info
Construction
- Yokosuka Naval Yard; Yokosuka, Japan
- Laid down: 12 December 1937
- Launched: 1 June 1939
- Commissioned: 8 August 1941
Specifications
- 25,675 tons displacement, standard
- 257.5m length
- 26.0m beam
- 8.8m draft
Machinery
- 8 boilers, 4 turbines
Performance
- 34 knots at 160,000 shaft horsepower
- 9,700nm at 18 knots
Armor
- Main belt: 215mm
- Bulkheads: 165mm
- Flight deck: 19mm
- Conning tower: 38mm
Armament
Anti-Aircraft
- Sixteen (8x2) 127mm guns
- Thirty-six (36x1) 25 mm guns
Aircraft
Fighters
- Eighteen (18) Mitsubishi A6M2 "Zero"
Torpedo Bombers
- Twenty-seven (27) Aichi D3A1 "Val"
Dive Bombers
- Twenty-seven (27) Nakajima B5N1/2 "Kate"
History
Design
Shōkaku (Japanese: 翔鶴 "Soaring Crane") was an aircraft carrier of the Imperial Japanese Navy, the lead ship of her class. Along with her sister ship Zuikaku, she took part in several key naval battles during the Pacific War, including the attack on Pearl Harbor, the Battle of the Coral Sea and the Battle of the Santa Cruz Islands before being torpedoed and sunk by a U.S. submarine at the Battle of the Philippine Sea.
Historical Inaccuracies
- Shokaku’s actual aircraft complement consisted of 27 Mitsubishi A6M5 "Zeros", 30 Yokosuka D4Y "Suiseis" and 18 Nakajima B6N "Tenzans" prior to the Battle of the Philippine Sea. Her sister ship, Zuikaku, carried 16 Mitsubishi A6M2s, 28 Mitsubishi A6M5s, 7 Yokosuka D4Ys & 15 Nakajima B6Ns at Leyte Gulf in October 1944.
- Development of the Yokosuka D4Y2 began in October 1944; the last surviving Shokaku-class aircraft carrier, Zuikaku, was sunk that same month.
- The N1K5-A designation is fictitious. The actual N1K5 only existed as a project and was intended as a high-altitude interceptor.
- Carrier-based versions of the Kawanishi N1K only existed as prototypes of which only three were built in total.
Historical Gallery

The twenty-eight chief shipbuilders of Shōkaku pose at the ship's prow prior to launching, 30 May 1939.
The launching of Shōkaku is shrouded in rain and fog, 1 June 1939.
Shōkaku at Yokosuka on 23 August 1941, shortly after she was completed.
Zuikaku at Kobe on 25 September 1941 after launching, awaiting delivery to the Imperial Japanese Navy.
Zuikaku (foreground) and Kaga (background) on their way to rendezvous with the Japanese fleet at Hitokappu Bay, Iturup, November 1941. The fleet would leave the Kuriles on 25 November to commence Operation AI, the attack on the American naval base at Pearl Harbor, Hawaii.
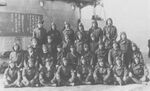
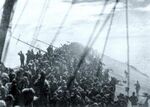
Members of Shōkaku’s air group pose on deck for a photo, 6 December 1941.
Planes from Shōkaku preparing for the attack on Pearl Harbor, 7 December 1941.
A Nakajima B5N2 "Kate" torpedo bomber departs Shōkaku’s flight deck for Pearl Harbor, 7 December 1941.
An A6M "Zero" fighter lands on the deck of Zuikaku after the attack on Pearl Harbor, 7 December 1941.
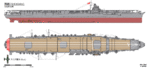
Right elevation and plan view of Shōkaku in 1942.
Shōkaku under attack by planes from USS Yorktown during the Battle of the Coral Sea, 8 May 1942.
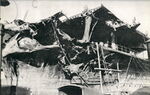
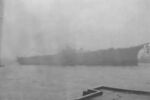
Bow damage suffered by Shōkaku during the Battle of the Coral Sea, 8 May 1942.
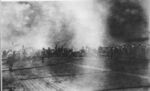
Shōkaku crew members fight fires on the flight deck during the Battle of the Santa Cruz Islands, 26 October 1942.
A6M2 Model 21 "Zero" fighter of Lieutenant Hideki Shingo preparing to take off from carrier Shokaku during the Battle of the Santa Cruz Islands, 26 October 1942.
Zuikaku under attack off of Cape Engaño, 25 October 1944.
Zuikaku’s crew salute as the Japanese flag is lowered just minutes before she sinks, 25 October 1944.


.jpg)


| Destroyers | II Tachibana |
| Cruisers | I Hashidate • II Chikuma • III Tenryū • III Katori |
| Battleships | II Mikasa |
| Aircraft Carriers | IV [[Ship:Hōshō (< 23.01.2019)|Hōshō (< 23.01.2019)]] • IV Hōshō • V [[Ship:Zuihō (< 23.01.2019)|Zuihō (< 23.01.2019)]] • VI [[Ship:Ryūjō (< 23.01.2019)|Ryūjō (< 23.01.2019)]] • VI Ryūjō • VII [[Ship:Hiryū (< 23.01.2019)|Hiryū (< 23.01.2019)]] • VII [[Ship:Kaga (< 23.01.2019)|Kaga (< 23.01.2019)]] • VIII [[Ship:Shōkaku (< 23.01.2019)|Shōkaku (< 23.01.2019)]] • VIII Shōkaku • VIII Kaga |
| N/A | |
| U.S.A. | IV [[Ship:Langley (< 23.01.2019)|Langley (< 23.01.2019)]] • IV Langley • V [[Ship:Bogue (< 23.01.2019)|Bogue (< 23.01.2019)]] • VI [[Ship:Independence (< 23.01.2019)|Independence (< 23.01.2019)]] • VI Independence • VI Ranger • VII [[Ship:Ranger (< 23.01.2019)|Ranger (< 23.01.2019)]] • VII [[Ship:Saipan (< 23.01.2019)|Saipan (< 23.01.2019)]] • VIII [[Ship:Lexington (< 23.01.2019)|Lexington (< 23.01.2019)]] • VIII Yorktown • VIII Lexington • VIII [[Ship:Enterprise (< 23.01.2019)|Enterprise (< 23.01.2019)]] • VIII Enterprise |
| Commonwealth | |
| N/A | |
| Germany | IV Rhein • VI Weser • VI Erich Loewenhardt |
| U.S.S.R. | IV Komsomolets • VI Serov • VIII Pobeda • VIII Chkalov |
| Italy | VIII Aquila |
| N/A | |
| Japan | IV [[Ship:Hōshō (< 23.01.2019)|Hōshō (< 23.01.2019)]] • IV Hōshō • V [[Ship:Zuihō (< 23.01.2019)|Zuihō (< 23.01.2019)]] • VI [[Ship:Ryūjō (< 23.01.2019)|Ryūjō (< 23.01.2019)]] • VI Ryūjō • VII [[Ship:Hiryū (< 23.01.2019)|Hiryū (< 23.01.2019)]] • VII [[Ship:Kaga (< 23.01.2019)|Kaga (< 23.01.2019)]] • VIII [[Ship:Shōkaku (< 23.01.2019)|Shōkaku (< 23.01.2019)]] • VIII Shōkaku • VIII Kaga |
| U.K. | IV Hermes • VI Furious • VI Ark Royal |
| France | VI Béarn |
| Pan-Asia | VIII Sanzang |
| N/A |
- Esta página fue modificada por última vez el 25 ago 2017, a las 14:52.
- Esta página se ha visitado 114 veces.
© 2011–2026 Wargaming.net. Todos los derechos reservados.