Kongo

| Cena výzkumu12000 exp |
| Pořizovací cena1 420 000 |
| HP (body zdraví)49 500 |
| 356 mm/45 41st Year Type ve dvouhlavňové věži4 х 2 ks. |
| Rychlost střelby1.94 ran/min. |
| Doba přebíjení31 sek |
| Rychlost otočení3 stupňů/sek |
| Čas otočení o 180 stupňů60 sek |
| Dostřel19.27 km |
| Maximální rozptyl236 m. |
| HE granát356 mm HE Type0 |
| Maximální poškození HE granátu5 700 |
| Procento zapálení HE granátem25 % |
| Úsťová rychlost HE granátu805 m/s |
| Hmotnost HE granátu625 kg |
| AP granát356 mm AP Type5 |
| Maximální poškození AP granátu10 000 |
| Úsťová rychlost AP granátu790 m/s |
| Hmotnost AP granátu635.5 kg. |
| 127 mm/40 Type 89 na palebném stanovišti Model A14 х 2 ks. |
| Dostřel4.3 km |
| Rychlost střelby12 ran/min. |
| Čas přebití5 sek |
| HE granát127 mm HE Type0 |
| Maximální poškození HE granáty2 100 |
| Úsťová rychlost HE granátu725 m/s |
| Procento zapálení HE granáty8 % |
| 152 mm/50 41st Year Type na kasematovém palebném stanovišti14 х 1 ks. |
| Dostřel4.3 km |
| Rychlost střelby6 ran/min. |
| Čas přebití10 sek |
| HE granát152 mm HE Type4 |
| Maximální poškození HE granáty2 500 |
| Úsťová rychlost HE granátu825 m/s |
| Procento zapálení HE granáty9 % |
| 127 mm/40 Type 89 na palebném stanovišti Model A14 х 2 ks. |
| . . . Průměrné poškození za vteřinu40.4 |
| . . . Dostřel5.01 km |
| 13 mm/76 Type 93 na dvouhlavňovém palebném stanovišti12 х 2 ks. |
| . . . Průměrné poškození za vteřinu24 |
| . . . Dostřel1.2 km |
| Maximální rychlost24.9 uzlů |
| Poloměr otáčení770 m. |
| Čas otočení kormidla17.2 sek |
| Odhalení z hladiny15.71 km |
| Odhalení ze vzduchu9.36 km |

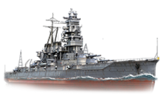
Kongō — tier V bitevní loď Japonska.
When she was commissioned, Kongo was the most advanced battlecruiser in the world. She was the first among battlecruisers and battleships to be equipped with 356 mm main battery guns. Unlike previous Japanese dreadnoughts, Kongo received a thinner armor belt while her deck armor and torpedo protection were reinforced.
Moduly
 |
Rychlost střelby (shots/min) | Čas otočení o 180° (sec) | Maximální rozptyl (m) | Maximum HE Shell Damage (HP) | Chance of Fire on Target Caused by HE Shell (%) | Maximum AP Shell Damage (HP) |
Research price (exp) |
Purchase price ( | |
|---|---|---|---|---|---|---|---|---|---|
| 356 mm/45 41st Year Type ve dvouhlavňové věži | 1,9 | 54,5 | 236 | 5 100 | 25 | 9 000 | 0 | 190 000 |
 |
Body výdrže (HP) | Armor (mm) | Armor (mm) | Hlavní věže (pcs.) | Sekundární dělové věže (pcs.) | Bodová obrana (pcs.) | Torpédomety (pcs.) | Hangar Capacity (pcs.) |
Research price (exp) |
Purchase price ( | |
|---|---|---|---|---|---|---|---|---|---|---|---|
| Kongō (A) | 49 500 | 13 | 254 | 4 | 4/14 | 12/4 | 0 | 230 000 | |||
| Kongō (B) | 54 100 | 13 | 254 | 4 | 4/14 | 4/2/6/4 | 6 500 | 480 000 |
 |
IDS_SHIP_PARAM_SUO_INCREASE_DIST (%) | Maximum Firing Range (km) |
Research price (exp) |
Purchase price ( | |
|---|---|---|---|---|---|
| Type5 mod. 1 | 0 | 0 | 76 000 | ||
| Type5 mod. 2 | 0 | 3 600 | 240 000 |
 |
Maximální rychlost (knot) |
Research price (exp) |
Purchase price ( | |
|---|---|---|---|---|
| Pohon: 75 000 hp | 24,9 | 0 | 110 000 | |
| Pohon: 136 000 hp | 30 | 2 000 | 240 000 |
Vybavení
| Slot 1 | ||||
|---|---|---|---|---|
| Slot 2 | ||||
| Slot 3 |
Názor hráče
Představení lodi
Plusy:
- Great gun range: Reaching out to 21+ kilometers, she has the second highest range in the mid tiers after Fuso.
- Impressive speed: Kongo can reach 30 knots, allowing her to keep up with cruisers and relocate if needed.
- Decent agility: She is surprisingly maneuverable and can cover her turning circle quite quickly.
- Good gun characteristics: her guns are accurate, powerful, and have decent penetration.
- Feels like a modern battleship in a world of outdated WWI era ships.
Mínusy:
- Low AA suite potency: Her AA suite will not do much against higher tier aircraft.
- High detection range: She is easily seen at 16km, but not much of a problem, as she can fire out to 21 km.
- Battlecruiser armor: Her weak armor is easily penetrated by battleship shells, though it can be partially overcome with angling.
- Sluggish rudder shift time: It takes a long time for her to start turning compared to American battleships.
- Being a mid-tier battleship, her dispersion is still somewhat high at longer range. This can be mitigated my installing Aiming System Modification 1.
Výzkum
Doporučená konfigurace
Vylepšení
The recommended upgrades for Kongō are as follows:
- Slot 1: Úprava hlavní výzbroje 1 (
 )*
)*
- Slot 2: Úprava systému řízení oprav 1 (
 )
)
- Slot 3: Úprava zaměřovacích systémů 1 (
 )*
)*
Slot 1 provides players with the first option in choosing a desired role. Typically, Úprava hlavní výzbroje 1 (![]() ) is recommended to provide additional survivability to the main battery, but players who desire to specialize in the secondary or anti-aircraft armament should choose Úprava pomocné výzbroje 1 (
) is recommended to provide additional survivability to the main battery, but players who desire to specialize in the secondary or anti-aircraft armament should choose Úprava pomocné výzbroje 1 (![]() ).
).
Slot 3 allows for further specialization. Generally, Úprava zaměřovacích systémů 1 (![]() ) is recommended because it reduces shell dispersion of the main and secondary armaments. To increase the effectiveness of the anti-aircraft armament, mount Úprava protiletadlových děl 1 (
) is recommended because it reduces shell dispersion of the main and secondary armaments. To increase the effectiveness of the anti-aircraft armament, mount Úprava protiletadlových děl 1 (![]() ). Players wishing to specialize for secondaries should mount Úprava sekundární baterie 2 (
). Players wishing to specialize for secondaries should mount Úprava sekundární baterie 2 (![]() ).
).
Kapitánské body
| Doporučené přidělení kapitánských bodů | ||||||||
|---|---|---|---|---|---|---|---|---|
| Cena (body) |
Vytrvalostní | Útočné | Podpůrné | Všestranné | ||||
| 1 |
|
|
|
|
|
|
|
|
| 2 |
|
|
|
|
|
|
|
|
| 3 |
|
|
|
|
|
|
|
|
| 4 |
|
|
|
|
|
|
|
|
| Key: ★★★ - Extrémně užitečné ★★ - Často užitečné ★ - Příležitostně účinné nic - zbytečné | ||||||||
Spotřební doplňky
Kongō can equip the following consumables:
- Slot 1: Havarijní tým (
 )
)
- Slot 2: Opravárenská četa (
 )
)
- Slot 3: Pozorovací letadlo (
 )
)
Spending credits or doubloons on Havarijní tým II (![]() ) and Opravářská četa II (
) and Opravářská četa II (![]() ) are recommended to maximize survivability.
) are recommended to maximize survivability.
Kamufláž
Type 1, 2, or 5 camouflage can be equipped for credits; Types 2 or 5 are recommended at a minimum to reduce the accuracy of incoming shells.
Signály
As with all battleships, Kongo comes with 8 signal flag slots. The three most important flags are India Delta (![]() ), Juliet Yankee Bissotwo (
), Juliet Yankee Bissotwo (![]() ) and India Yankee (
) and India Yankee (![]() ), all of which will improve your survivability. Captains wishing to improve the performance of their secondary battery should consider the addition of Mike Yankee Soxisix (
), all of which will improve your survivability. Captains wishing to improve the performance of their secondary battery should consider the addition of Mike Yankee Soxisix (![]() ).
).
Doporučené Signály 
| |||||
|---|---|---|---|---|---|
| Bojové | |||||
 |
 |
 |
 |
 |
 |
 |
 |
 |
 |
 |
 |
 |
 | ||||
Poznámka: Použití signálu Juliet Charlie plně zabraňuje detonaci.
Galerie
.jpg)
.jpg)
.jpg)
.jpg)
.jpg)
.jpg)

Historické informace
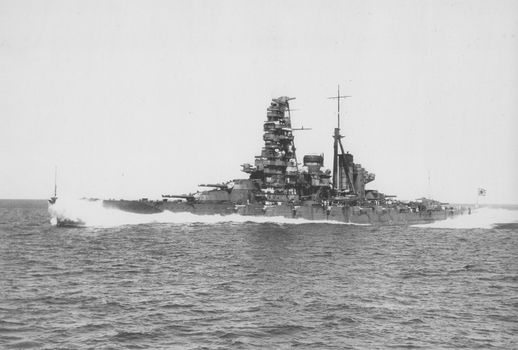
Historické snímky


| torpédoborce | II Tachibana |
| křižníky | I Hashidate • II Chikuma • III Tenryū • III Katori |
| bitevní lodě | II Mikasa |
| letadlové lodě | IV [[Ship:Hōshō (< 23.01.2019)|Hōshō (< 23.01.2019)]] • IV Hōshō • V [[Ship:Zuihō (< 23.01.2019)|Zuihō (< 23.01.2019)]] • VI [[Ship:Ryūjō (< 23.01.2019)|Ryūjō (< 23.01.2019)]] • VI Ryūjō • VII [[Ship:Hiryū (< 23.01.2019)|Hiryū (< 23.01.2019)]] • VII [[Ship:Kaga (< 23.01.2019)|Kaga (< 23.01.2019)]] • VIII [[Ship:Shōkaku (< 23.01.2019)|Shōkaku (< 23.01.2019)]] • VIII Shōkaku • VIII Kaga |