Nagato

| Cena výzkumu78500 exp |
| Pořizovací cena6 350 000 |
| HP (body zdraví)49 000 |
| 410 mm/45 3rd Year Type ve dvouhlavňové věži4 х 2 ks. |
| Rychlost střelby2.07 ran/min. |
| Doba přebíjení29 sek |
| Rychlost otočení3.8 stupňů/sek |
| Čas otočení o 180 stupňů47.37 sek |
| Dostřel20.46 km |
| Maximální rozptyl231 m. |
| HE granát410 mm HE Type0 |
| Maximální poškození HE granátu6 500 |
| Procento zapálení HE granátem30 % |
| Úsťová rychlost HE granátu805 m/s |
| Hmotnost HE granátu938.5 kg |
| AP granát410 mm AP/APC Type91 |
| Maximální poškození AP granátu12 600 |
| Úsťová rychlost AP granátu806 m/s |
| Hmotnost AP granátu1020 kg. |
| 140 mm/50 3rd Year Type na kasematovém palebném stanovišti18 х 1 ks. |
| Dostřel5.6 km |
| Rychlost střelby7.5 ran/min. |
| Čas přebití8 sek |
| HE granát140 mm HE Type0 |
| Maximální poškození HE granáty2 400 |
| Úsťová rychlost HE granátu850 m/s |
| Procento zapálení HE granáty10 % |
| 127 mm/40 Type 89 na palebném stanovišti Model A14 х 2 ks. |
| Dostřel5.6 km |
| Rychlost střelby12 ran/min. |
| Čas přebití5 sek |
| HE granát127 mm HE Type0 |
| Maximální poškození HE granáty2 100 |
| Úsťová rychlost HE granátu725 m/s |
| Procento zapálení HE granáty8 % |
| 127 mm/40 Type 89 na palebném stanovišti Model A14 х 2 ks. |
| . . . Průměrné poškození za vteřinu40.4 |
| . . . Dostřel5.01 km |
| 25 mm/60 Type 96 na dvouhlavňovém palebném stanovišti14 х 2 ks. |
| . . . Průměrné poškození za vteřinu37.8 |
| . . . Dostřel2.49 km |
| Maximální rychlost22.25 uzlů |
| Poloměr otáčení770 m. |
| Čas otočení kormidla15.2 sek |
| Odhalení z hladiny16.59 km |
| Odhalení ze vzduchu10.63 km |

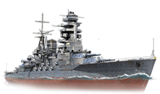
Nagato — tier VII bitevní loď Japonska.
Nagato had long remained the most powerful warship in the Imperial Japanese Navy. She had good armor and carried 410mm main battery guns. In the 1930s, the ship was modernized to receive more powerful torpedo protection.
Moduly
 |
Rychlost střelby (shots/min) | Čas otočení o 180° (sec) | Maximální rozptyl (m) | Maximum HE Shell Damage (HP) | Chance of Fire on Target Caused by HE Shell (%) | Maximum AP Shell Damage (HP) |
Research price (exp) |
Purchase price ( | |
|---|---|---|---|---|---|---|---|---|---|
| 410 mm/45 3rd Year Type ve dvouhlavňové věži | 2,1 | 47,4 | 231 | 6 500 | 30 | 12 600 | 0 | 560 000 |
 |
Body výdrže (HP) | Armor (mm) | Armor (mm) | Hlavní věže (pcs.) | Sekundární dělové věže (pcs.) | Bodová obrana (pcs.) | Torpédomety (pcs.) | Hangar Capacity (pcs.) |
Research price (exp) |
Purchase price ( | |
|---|---|---|---|---|---|---|---|---|---|---|---|
| Nagato (A) | 49 000 | 16 | 457 | 4 | 4/18 | 14/4 | 0 | 690 000 | |||
| Nagato (B) | 65 000 | 16 | 457 | 4 | 4/18 | 24/12/14/4 | 22 000 | 1 800 000 |
 |
IDS_SHIP_PARAM_SUO_INCREASE_DIST (%) | Maximum Firing Range (km) |
Research price (exp) |
Purchase price ( | |
|---|---|---|---|---|---|
| Type7 mod. 1 | 0 | 0 | 310 000 |
 |
Maximální rychlost (knot) |
Research price (exp) |
Purchase price ( | |
|---|---|---|---|---|
| Pohon: 78 000 hp | 22,3 | 0 | 220 000 | |
| Pohon: 84 000 hp | 25 | 7 500 | 550 000 |
Vybavení
| Slot 1 | ||||
|---|---|---|---|---|
| Slot 2 | ||||
| Slot 3 | ||||
| Slot 4 |
Názor hráče
Představení lodi
Nagato is the end stage for all the dreadnoughts of the Japanese battleship line. Her guns change from the 14-inch guns of Kongo and Fuso into 16.1-inch (410mm) guns she carries in four dual mount turrets, and her handling is quite impressive for a dreadnought, enabling her to be a functional firing platform and ship of the line.
The number of guns she carries is a drastic reduction from the broadside of Fuso, and their slightly longer reload time and narrower spread means that aiming them properly is critical to success. However, these guns make her a serious threat to the heavily-armored American dreadnoughts that were tough nuts to crack with only 14-inch guns. She also has a very surprising quick-firing secondary battery with a respectable firing range; with a commander equipped with the Level 4 commander skill Manual Fire Control for Secondary Armament (which requires active targeting to use) that greatly reduces their dispersion, they can be lethal to destroyers that linger around her for too long. Her health pool is generous for a Tier VII battleship, and she can soak up a lot of punishment, though her torpedo protection is not that great. Her armor, while the strongest among mid-tier Japanese battleships, is still weaker than her Tier VII counterparts of other nations, and her citadel is quite vulnerable.
Though her stock hull's anti-aircraft suite is nothing to write home about, upgrading to Hull (B) gives her a respectable AA suite and slightly enhanced armor protection. Even upgraded, though, Nagato’s AA is still weaker than many other battleships at her tier, meaning that enemy aircraft will likely focus their attentions on her. This, coupled with her sheer length (100 feet longer than Colorado) and substandard torpedo protection, makes Nagato an especially tempting target for torpedo bombers. When in a game with a higher-tier CV, Nagato captains are advised to group up with other ships with strong AA.
The key to doing well in Nagato is to make smart target selections and fire for maximum effect. Her slower rate of fire means that every shot must have maximum impact, even if it means holding fire a few extra seconds to achieve a better firing angle. Nagato can be a very rewarding battleship to have a three battleship division, with as she can provide long ranged fire support for the divisioning battleships.Plusy:
- Decent speed, impressive handling and good ergonomics for a dreadnought.
- 410mm guns have fairly good accuracy and penetration, and the highest damage in her tier.
- Superior main battery range to her American and German counterparts.
- Fast-loading secondary batteries that have a high shell volume.
- Secondary batteries become dangerous when upgraded with the right commander skills.
- Decent rudder shift time.
- Highest HP pool at her tier.
- Torpedo bulge extends to high above the waterline, providing slight protection from smaller shells at close range.
Mínusy:
- Armor is quite weak and citadel is quite vulnerable, though this can be mitigated by angling and good positioning.
- Anti-aircraft suite is subpar, with most of her AA damage being concentrated at medium range.
- Despite the guns being rather accurate, the dispersion itself is sometimes wonky at long range.
- Slow gun reload time compared to her contemporaries at Tier VII makes her reliant on getting good solid hits and citadel penetrations for damage.
- Torpedo protection is not so effective.
- Weak armor protecting her rudder.
- Fairly high detection range.
- Same dual-purpose secondaries as Kongo.
Výzkum
The recommended upgrades for Nagato are as follows:
- Slot 1: Úprava hlavní výzbroje 1 (
 )*
)*
- Slot 2: Úprava systému řízení oprav 1 (
 )
)
- Slot 3: Úprava zaměřovacích systémů 1 (
 )*
)*
- Slot 4: Úprava systému řízení oprav 2 (
 )
)
Slot 1 provides players with the first option in choosing a desired role. Typically, Úprava hlavní výzbroje 1 (![]() ) is recommended to provide additional survivability to the main battery, but players who desire to specialize in the secondary or anti-aircraft armament should choose Úprava pomocné výzbroje 1 (
) is recommended to provide additional survivability to the main battery, but players who desire to specialize in the secondary or anti-aircraft armament should choose Úprava pomocné výzbroje 1 (![]() ).
).
Doporučená konfigurace
Kapitánské body
Following the general battleship build, Nagato can go for a number of viable Level 1 skills, since none of them have a decisive advantage over the others. The Direction Center for Fighters skill sends up an additional catapult fighter when the consumable is used, and can bolster the ship's subpar defenses against carrier strikes. The catapult planes on battleships are only active for 90 seconds, though, which limits their utility. While battleships aren't in much danger of losing modules, Preventative Maintenance reduces the chance of losing a main turret, and allows captains to equip Úprava pomocné výzbroje 1 (![]() ) to increase secondary and AA batteries' resilience. The Priority Target skill isn't as crucial as it is on cruisers, but can provide useful information as to when to push ahead or retreat.
) to increase secondary and AA batteries' resilience. The Priority Target skill isn't as crucial as it is on cruisers, but can provide useful information as to when to push ahead or retreat.
For Level 2 skills, Expert Marksman is top priority for this tier, and should be acquired on all battleships. Following that, Adrenaline Rush can provide a significant boost to damage output as health evaporates in a match, to the point that Nagato can shave more than 5 seconds off her reload time in the last quarter of her health pool. Jack of All Trades provides a cooldown benefit to all consumables and Havarijní tým (![]() ).
).
The Level 3 skill Superintendent is a very valuable skill on battleships because it provides an extra Opravárenská četa (![]() ) consumable, and should be high on the list of skills to take. Otherwise, Basic Firing Training adds to the punch of Nagato’s secondaries and AA and should be taken for a secondary build. Vigilance can provide crucial seconds with which to evade torpedoes, but it does not replace careful attention to the minimap and heads-up play.
) consumable, and should be high on the list of skills to take. Otherwise, Basic Firing Training adds to the punch of Nagato’s secondaries and AA and should be taken for a secondary build. Vigilance can provide crucial seconds with which to evade torpedoes, but it does not replace careful attention to the minimap and heads-up play.
The last tier of skills offers a selection between Manual Control for Secondary Armament, Fire Prevention, Advanced Firing Training, and Concealment Expert. Manual Control for Secondary Armament and Advanced Firing Control are indispensable for secondary battery oriented builds, and provide the accuracy and range needed for them to work well. Fire Prevention increases Nagato’s survivability, but keep in mind that the small reduction in fire chance may not be worth the amount of skill points it costs. Finally, Concealment Expert afforts Nagato a small tactical boost in allowing her to withdraw when it gets too hot, though the decrease in detection radius is not so large, and this skill generally is of little benefit unless the commander in question is to be moved to higher tier battleships.
| Doporučené přidělení kapitánských bodů | ||||||||
|---|---|---|---|---|---|---|---|---|
| Cena (body) |
Vytrvalostní | Útočné | Podpůrné | Všestranné | ||||
| 1 |
|
|
|
|
|
|
|
|
| 2 |
|
|
|
|
|
|
|
|
| 3 |
|
|
|
|
|
|
|
|
| 4 |
|
|
|
|
|
|
|
|
| Key: ★★★ - Extrémně užitečné ★★ - Často užitečné ★ - Příležitostně účinné nic - zbytečné | ||||||||
Spotřební doplňky
Nagato can equip the following consumables:
- Slot 1: Havarijní tým (
 )
)
- Slot 2: Opravárenská četa (
 )
)
- Slot 3: Pozorovací letadlo (
 ) or Katapultovaný stíhač (
 )
)
Captains are urged to equip the Premium Havarijní tým II (![]() ) and Opravářská četa II (
) and Opravářská četa II (![]() ) to maximize survivability.
) to maximize survivability.
Kamufláž
Type 1, 2, or 5 camouflage can be equipped for credits; Types 2 or 5 are recommended at a minimum to reduce the accuracy of incoming shells.
Players who wish to spend doubloons can equip Nagato with Type 17 camouflage that lowers her detection radius, reduces the accuracy of incoming shells, reduces her repair costs, and increases the amount of experience she earns.
Signály
As with all battleships, Nagato comes with 8 signal flag slots. The three most important flags are India Delta (![]() ), Juliet Yankee Bissotwo (
), Juliet Yankee Bissotwo (![]() ), and India Yankee (
), and India Yankee (![]() ); all of which will improve her survivability. For captains who prefer a Secondary Build, the addition of Mike Yankee Soxisix (
); all of which will improve her survivability. For captains who prefer a Secondary Build, the addition of Mike Yankee Soxisix (![]() ) will further improve the performance of Nagato’s secondaries.
) will further improve the performance of Nagato’s secondaries.
Doporučené Signály 
| |||||
|---|---|---|---|---|---|
| Bojové | |||||
 |
 |
 |
 |
 |
 |
 |
 |
 |
 |
 |
 |
 |
 | ||||
Poznámka: Použití signálu Juliet Charlie plně zabraňuje detonaci.
Galerie
Historické informace
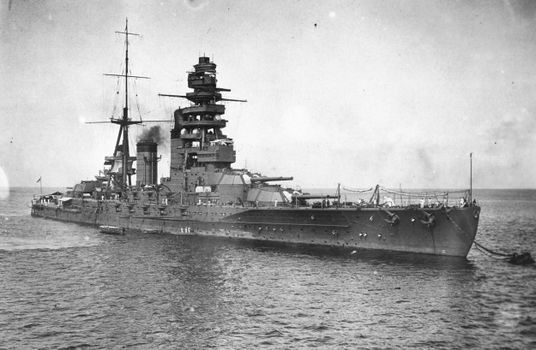
Historické snímky


| torpédoborce | II Tachibana |
| křižníky | I Hashidate • II Chikuma • III Tenryū • III Katori |
| bitevní lodě | II Mikasa |
| letadlové lodě | IV [[Ship:Hōshō (< 23.01.2019)|Hōshō (< 23.01.2019)]] • IV Hōshō • V [[Ship:Zuihō (< 23.01.2019)|Zuihō (< 23.01.2019)]] • VI [[Ship:Ryūjō (< 23.01.2019)|Ryūjō (< 23.01.2019)]] • VI Ryūjō • VII [[Ship:Hiryū (< 23.01.2019)|Hiryū (< 23.01.2019)]] • VII [[Ship:Kaga (< 23.01.2019)|Kaga (< 23.01.2019)]] • VIII [[Ship:Shōkaku (< 23.01.2019)|Shōkaku (< 23.01.2019)]] • VIII Shōkaku • VIII Kaga |