Bellerophon

| Research price2700 exp |
| Purchase price314,000 |
| Hit Points33,400 |
| 305 mm/45 Mk.X on a BVIII mount5 х 2 pcs. |
| Rate of Fire2 shots/min. |
| Reload Time30 sec. |
| Rotation Speed3 deg./sec. |
| 180 Degree Turn Time60 sec. |
| Firing Range13.68 km. |
| Maximum Dispersion210 m. |
| HE Shell305 mm HE Mk IIa |
| Maximum HE Shell Damage5,200 |
| Chance of Fire on Target Caused by HE Shell32 % |
| Initial HE Shell Velocity831 m./s. |
| HE Shell Weight386 kg. |
| AP Shell305 mm AP Mk VIa |
| Maximum AP Shell Damage8,100 |
| Initial AP Shell Velocity831 m./s. |
| AP Shell Weight389.8 kg. |
| 102 mm/50 BL Mk.VII on a PII mount14 х 1 pcs. |
| Firing Range3.2 km. |
| Rate of Fire8 shots/min. |
| Reload Time7.5 sec. |
| HE Shell102 mm HE Mk II |
| Maximum HE Shell Damage1,500 |
| Initial HE Shell Velocity873 m./s. |
| Chance of Fire on Target Caused by HE Shell6 % |
| 76.2 mm/45 QF HA Mk.I on an HA Mk.IV mount1 х 1 pcs. |
| . . . Average Damage per Second2.1 |
| . . . Firing Range3 km. |
| Maximum Speed20.36 knot |
| Turning Circle Radius560 m. |
| Rudder Shift Time16.3 sec. |
| Surface Detectability Range13.27 km. |
| Air Detectability Range6.79 km. |

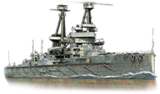
Bellerophon — British Tier III battleship.
The Bellerophon-class battleships were developed from the renowned Dreadnought class. The ship inherited turbine propulsion and a main battery consisting of ten 305 mm guns from her predecessor, but, unlike the prototype, she had armored torpedo protection.
Modules
 |
Rate of Fire (shots/min) | 180° Turn Time (sec) | Maximum Dispersion (m) | Maximum HE Shell Damage (HP) | Chance of Fire on Target Caused by HE Shell (%) | Maximum AP Shell Damage (HP) |
Research price (exp) |
Purchase price ( | |
|---|---|---|---|---|---|---|---|---|---|
| 305 mm/45 Mk.X on a BVIII mount | 2 | 60 | 210 | 5,200 | 32 | 8,100 | 0 | 32,000 |
 |
Hit Points (HP) | Armor (mm) | Armor (mm) | Main Turrets (pcs.) | Secondary Gun Turrets (pcs.) | AA Mounts (pcs.) | Torpedo Tubes (pcs.) | Hangar Capacity (pcs.) |
Research price (exp) |
Purchase price ( | |
|---|---|---|---|---|---|---|---|---|---|---|---|
| Bellerophon (A) | 33,400 | 10 | 305 | 5 | 14 | 1 | 0 | 74,000 | |||
| Bellerophon (B) | 38,100 | 10 | 305 | 5 | 14 | 4/2 | 1,600 | 160,000 |
 |
IDS_SHIP_PARAM_SUO_INCREASE_DIST (%) | Maximum Firing Range (km) |
Research price (exp) |
Purchase price ( | |
|---|---|---|---|---|---|
| Mk III mod. 1 | 0 | 0 | 24,000 | ||
| Mk III mod. 2 | 0 | 800 | 80,000 |
 |
Maximum Speed (knot) |
Research price (exp) |
Purchase price ( | |
|---|---|---|---|---|
| Propulsion: 25,000 hp | 20.4 | 0 | 17,000 | |
| Propulsion: 26,400 hp | 22.5 | 500 | 40,000 |
Compatible Upgrades
| Slot 1 |
||||
|---|---|---|---|---|
| Slot 2 |
Player Opinion
Performance
Pros:
- Large health pool like Kawachi's for Tier III battleship
- Decently armored
- Very good main battery firing range
- Decent secondaries
- Fastest Tier III battleship at 22.5 kts
- Decent rudder shift and turning radius
Cons:
- Slow turret traverse - unable to keep track on targets during evasive maneuvers
- Not very useful anti-aircraft armament like most other Tier III ships
- Terrible detectability - cannot easily hide like most other battleships of its tier
Research
Optimal Configuration
Upgrades
The recommended upgrades for Bellerophon are as follows:
- Slot 1: Main Armaments Modification 1
- Slot 4: Damage Control System Modification 1
Commander Skills
As a battleship, Bellerophon does not really need to worry much about its modules being incapacitated, but rather being set on fire and surviving enemy salvos for a considerable amount of time. Therefore, survivability skills (with the exception of Survivability Expert) are recommended. Concealment Expert may help in providing a surprise upon unsuspecting enemy cruisers or battleships. And Expert Marksman is a must-have for this ship, as she has very poor turret traverse.
| Recommended Commander Skills | ||||||||
|---|---|---|---|---|---|---|---|---|
| Cost (points) |
Endurance | Attack | Support | Versatility | ||||
| 1 |
★★ |
★ |
★★ |
|
|
|
|
|
| 2 |
★★ |
★★ |
★★★ |
|
|
|
★★★ |
★ |
| 3 |
★★★ |
|
|
|
★ |
★★ |
★ |
★★ |
| 4 |
|
★★★ |
★ |
|
★ |
|
|
★★ |
| Key: ★★★ - Extremely Useful ★★ - Frequently Useful ★ - Occasionally Useful No stars - Meh Χ - Not recommended | ||||||||
Consumables
As a Tier III battleship, Bellerophon has access to the following standard battleship consumables:
Premium consumables are not recommended at this tier as they are costly relative to the credits made by the ship per battle; this is left to the player's discretion.
Camouflage
Type 1, 2, or 5 camouflage can be equipped for credits; Types 2 or 5 are recommended at a minimum to reduce the accuracy of incoming shells.
Camouflage is not necessary for Bellerophon due to her low-tier nature. The experience "grind" does not set in until Tier V or VI, so save available +100% bonus experience camouflages for later. Players who insist on painting their ships should choose Type 2 camouflage, which decreases the accuracy of incoming enemy fire. Camos that offer -3% detectability are not helpful, as Bellerophon has very poor concealment.
Signals
Again, due to her low-tier nature, it is not necessary to mount flags on Bellerophon. Should the player insist on mounting flags, the following recommendations are available.
Recommended Signal Flags 
| |||||
|---|---|---|---|---|---|
| Combat | |||||
 ★ |

|
 ★★ |

|

|

|

|
 ★ |

|
 ★ |
 ★ |
 ★★★ |

|

| ||||
Note: Use of the Juliet Charlie signal makes detonation impossible.
Gallery
Historical Info
Historical Gallery


