Emerald

| Research price11000 exp |
| Purchase price1 560 000 |
| Hit Points24 000 |
| 152 mm/45 CPXIV7 х 1 pcs. |
| Rate of Fire8 shots/min. |
| Reload Time7.5 sec. |
| Rotation Speed10 deg./sec. |
| 180 Degree Turn Time18 sec. |
| Firing Range12.38 km. |
| Maximum Dispersion126 m. |
| Chance of Fire on Target Caused by HE Shell0 % |
| AP Shell152 mm AP 4crh SC |
| Maximum AP Shell Damage3000 |
| Initial AP Shell Velocity936 m./s. |
| AP Shell Weight45.36 kg. |
| 102 mm/45 Mk V3 х 1 pcs. |
| Firing Range4.5 km. |
| Rate of Fire15 shots/min. |
| Reload Time4 sec. |
| HE Shell102 mm HE 35 lb |
| Maximum HE Shell Damage1500 |
| Initial HE Shell Velocity811 m./s. |
| Chance of Fire on Target Caused by HE Shel6 % |
| 533 mm TR Mk IV4 х 3 pcs. |
| Rate of Fire0.85 shots/min. |
| Reload Time71 sec. |
| Rotation Speed25 deg./sec. |
| 180 Degree Turn Time7.2 sec. |
| Torpedo533 mm Mk V |
| Maximum Damage11 967 |
| Torpedo Speed59 knot |
| Torpedo Range6 km. |
| 12.7 mm Mk III6 х 4 pcs. |
| . . . Average Damage per Second12.6 |
| . . . Firing Range1.2 km. |
| 40 mm Vickers 2-pdr. QF Mk II2 х 1 pcs. |
| . . . Average Damage per Second11.2 |
| . . . Firing Range2.01 km. |
| 102 mm/45 Mk V3 х 1 pcs. |
| . . . Average Damage per Second8.4 |
| . . . Firing Range3.51 km. |
| Maximum Speed33 knot |
| Turning Circle Radius670 m. |
| Rudder Shift Time10.9 sec. |
| Surface Detectability Range11.52 km. |
| Air Detectability Range6.75 km. |

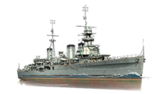
Emerald — British Tier V cruiser.
El Proyecto E, un desarrollo posterior de los cruceros ligeros británicos, ofrecía una potencia del motor mejorada para aumentar su velocidad. El crucero líder de la clase, el HMS Emerald, se puso en grada en 1918 y no entró en servicio hasta 1926. Durante el periodo de entreguerras, operó en las Indias Orientales y la base naval de China. Este barco escoltó convoyes desde Halifax entre 1939 y 1940 y se convirtió en buque insignia de la Flota Oriental en 1942. Tras las reparaciones en 1942 y 1943, participó en los desembarcos de tropas aliadas en Normandía y más adelante se recatalogó como barco objetivo.
Modules
 |
Rate of Fire (shots/min) | 180 Degree Turn Time (sec) | Maximum Dispersion (m) | Maximum HE Shell Damage (HP) | Chance of Fire on Target Caused by HE Shell (%) | Maximum AP Shell Damage (HP) |
Research price (exp) |
Purchase price ( | |
|---|---|---|---|---|---|---|---|---|---|
| 152 mm/50 BL Mk.XII en una montura CPXIV | 8 | 18 | 126 | 3000 | 0 | 100 000 |
 |
Hit Points (HP) | Armor (mm) | Armor (mm) | Main Turrets (pcs.) | Secondary Gun Turrets (pcs.) | AA Mounts (pcs.) | Torpedo Tubes (pcs.) | Hangar Capacity (pcs.) |
Research price (exp) |
Purchase price ( | |
|---|---|---|---|---|---|---|---|---|---|---|---|
| Emerald (A) | 24 000 | 10 | 76 | 7 | 3 | 6/2/3 | 4 | 0 | 140 000 | ||
| Emerald (B) | 27 100 | 10 | 76 | 7 | 3 | 6/2/3 | 4 | 6100 | 340 000 |
 |
Rate of Fire (shots/min) | Torpedo Tubes Reload Time (sec) | 180 Degree Turn Time (sec) | Maximum Damage (HP) | Torpedo Speed (knot) | Torpedo Range (km) |
Research price (exp) |
Purchase price ( | |
|---|---|---|---|---|---|---|---|---|---|
| 533 mm Mk V | 0,6 | 95 | 7,2 | 11 966 | 59 | 6 | 0 | 150 000 | |
| 533 mm Mk VII | 0,6 | 106 | 7,2 | 15 733 | 59 | 7 | 3600 | 400 000 |
 |
Firing Range Increase (%) | Maximum Firing Range (km) |
Research price (exp) |
Purchase price ( | |
|---|---|---|---|---|---|
| Mk V mod. 1 | 0 | 0 | 110 000 | ||
| Mk V mod. 2 | 0 | 4200 | 460 000 |
 |
Maximum Speed (knot) |
Research price (exp) |
Purchase price ( | |
|---|---|---|---|---|
| Propulsión: 80 000 CV | 33 | 0 | 85 000 |
Compatible Upgrades
| Slot 1 |
||||||
|---|---|---|---|---|---|---|
| Slot 2 |
||||||
| Slot 3 |
Player Opinion
Performance
Emerald is the final evolution of the Royal Navy's cruiser designs based around single, centerline mounted 152mm guns. Though she has seven total turrets, only six can be brought to bear on a single target at once; the turrets just aft of the bridge are mounted on either side of her funnels and can only fire on one side of the ship.
Unfortunately, this represents a bit of a step back for the line, putting Emerald in much the same situation that Caledon was in at Tier III: she's badly outgunned by most opponents she will face. Every other Tier V cruiser save Furutaka can get more barrels on target than Emerald can, and Furutaka’s guns are significantly larger due to the Japanese cruiser line transitioning to heavy cruiser designs. The situation gets even more unpalatable when Emerald finds herself up-tiered into Tier VII games (at least Caledon can only see opponents one tier higher).
Like Caledon and Danae, captains looking to get the most out of their Emerald will have to play incredibly smart and make maximum use of her torpedoes and consumables to see that she survives deep into games. Her stock torpedoes are equivalent to the upgraded ones on Danae, and while the torpedo module upgrade boosts their damage, they're stuck with the same 6.0 km range. Emerald is more sluggish on her rudder and has a larger turning circle than Danae, so new captains should take some time to get to know her before putting her in situations that require precise maneuvering.
Emerald is an average ship in a tough spot with unfavorable matchmaking tiers. Getting through — and past — her while working up the branch can be frustrating, but Leander makes the pain worthwhile.Pros:
- Has the lowest detection range of any Tier V cruiser.
- Gains access to the Smoke Generator consumable, while retaining access to the Repair Party consumable.
- Has a large number of torpedoes with eight per side.
- The firing arcs for her torpedoes are large which allows her to use them while presenting a sharp angle.
Cons:
- Often has difficulty damaging battleships due to a lack of high explosive shells.
- Limited firing arcs on some of her main battery guns especially against targets aft of the ship.
- The citadel is quite large and sits high above the water making it easy to hit.
- Has +2 MM, unlike her predecessors, and will frequently be matched up against Tier VIIs.
- Suffers immensely from being up-tiered due to short range torpedoes and frequently ineffective guns.
Research
Optimal Configuration
Upgrades
Main Armaments Modification 1 is the optimal choice for Upgrade Slot 1. Aiming Systems Modification 1 is recommended for Upgrade Slot 2, to decrease the ship’s maximum dispersion. Any of the three available upgrades for Upgrade Slot 4 are viable options.
Commander Skills
| Recommended Commander Skills | ||||||||
|---|---|---|---|---|---|---|---|---|
| Cost (points) |
Endurance | Attack | Support | Versatility | ||||
| 1 |
★★★ |
★ |
|
|
|
|
★ |
|
| 2 |
★★★ |
★★ |
★★ |
★★ |
★★★ |
|
★★★ |
★ |
| 3 |
★ |
★★ |
★★ |
|
|
★ |
|
★★★ |
| 4 |
|
|
|
|
|
|
★★ |
★★★ |
| Key: ★★★ - Extremely Useful ★★ - Frequently Useful ★ - Occasionally Useful No stars - Not Useful | ||||||||
Consumables
Players can equip the following consumables on this cruiser: Damage Control Party, Repair Party, Hydroacoustic Search, and a choice between Smoke Generator, Spotting Aircraft, or Catapult Fighter.
As a Royal Navy light cruiser, Emerald can be deadly to enemy destroyers, but also rather frail against them. This makes it advisable to equip premium consumable Hydroacoustic Search II, to spot the enemy ships as well as detecting the enemy torpedoes early. Additionally, her thin armor makes it highly advisable to equip premium consumable Repair Party II and Smoke Generator II (for an extra consumable charge, reduced cooldown times, and increased survivability). Catapult Fighter is not recommended due to the little protection it provides and Spotting Aircraft is not recommended due to potential difficulty in reaching out to your targets. However, some players may find Spotting Aircraft more useful than Smoke Generator due to the rather abysmal range of this cruiser. But Smoke Generator can work very well in conjunction with Hydroacoustic Search, as enemy ships may find it rather tempting to launch torpedoes at the smoke cloud.
Camouflage
Type 1, 2, or 5 camouflage can be equipped for credits; Types 2 or 5 are recommended at a minimum to reduce the accuracy of incoming shells.
Signals
India Delta and November Foxtrot are highly recommended to optimize the ship’s Repair Party consumable. Flags that speed up the research process such as Equal Speed Charlie London may also be useful.Gallery

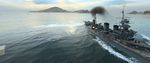
Emerald analyzes the tactical situation.
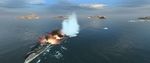
Fish in the water.
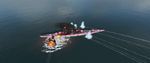
Emerald takes a big hit from an enemy battleship. Meanwhile, Emerald's torpedoes are about to return the favor.
Armor piercing shells from the Emerald impact the superstructure of an ARP Hieiclass battleship.


Historical Info

Historical Gallery


